37
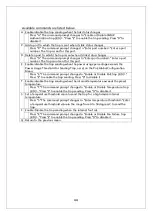
Available commands are listed below.
I Set/edit the IP address.
Press "I." The command prompt changes to "Enter IP address>." Enter an IP
address for the Switching Hub.
M Set/edit the subnet mask.
Press "M." The command prompt changes to "Enter subnet mask>." Enter a subnet
mask for the Switching Hub.
G Set/edit the IP address of the router for the default gateway.
Press "G." The command prompt changes to "Enter new gateway IP address>."
Enter the IP address of the router, set as the default gateway.
A Set the IP address, subnet mask and default gateway in succession.
Press "A." The command prompt changes to "Enter IP address>." Enter the IP
address of the Switching Hub. Then, the command prompt changes to "Enter
subnet mask>." Enter the subnet mask. Then, the command prompt changes to
"Enter new gateway IP address>." Enter the IP address of a router, used as a
default gateway.
D Disable/enable the DHCP mode. If enabled, an IP address is automatically obtained
from the DHCP server.
E Enable the DHCP mode. (A DHCP server must be operating on the network.)
D Disable the DHCP mode.
R Renew an IP address from the DHCP server.
Press "R." The command prompt changes to "Renew DHCP (Y/N)." To renew, press
"Y." Otherwise, press "N."
Q Return to the previous menu.
Note: The above items must be set in order to use the SNMP control
function and to enable a remote connection by Telnet or via WEB.
Any IP addresses on the local network must be unique and no
duplication is allowed. If you are unsure, consult the network
administrator.
Содержание Switch-M12PWR
Страница 6: ...6 malfunction When stacking Switching Hubs leave a minimum of 20 mm space between them is required ...
Страница 17: ...17 Fig 2 2 Mounting to Wall ...
Страница 20: ...20 function does not work Therefore use a cross cable to connect them ...
Страница 28: ...28 command If you enter a command or setting not available an error message is shown in the explanation field ...
Страница 30: ...30 ...
Страница 36: ...36 ...
Страница 49: ...49 ...
Страница 69: ...69 ...
Страница 78: ...78 Quit to previous menu Quits the Advanced Switch Configuration Menu and returns to the Main menu ...
Страница 81: ...81 setting and the management VLAN status of VLAN ID 1 is UP ...
Страница 96: ...96 Press S Q Return to the previous menu ...
Страница 98: ...98 ...
Страница 122: ...122 Q Return to the previous menu ...
Страница 125: ...125 ...
Страница 130: ...130 ICMP Type Displays the ICMP type ...
Страница 136: ...136 802 1p Priority Displays priority of IEEE802 1p TCP SYN Flag Displays the TCP SYN flag ICMP Type Displays ICMP type ...
Страница 156: ...156 Threshold Displays the threshold of the number of packets per second ...
Страница 173: ...173 Fig 4 7 49 Display of values accumulated after resetting the counters ...
Страница 185: ...185 Q Return to the previous menu ...
Страница 211: ...211 Q Return to the previous menu ...
Страница 232: ...232 IEEE8021 PAE MIB IEEE802 1X IEEE8023 LAG MIB IEEE 802 3ad ...
Страница 237: ...237 IEEE 802 3af standard ...
Страница 240: ...240 P0813 1084 ...


