background image

Software Tool

© Panasonic Industrial Devices SUNX Co., Ltd. 2020

35

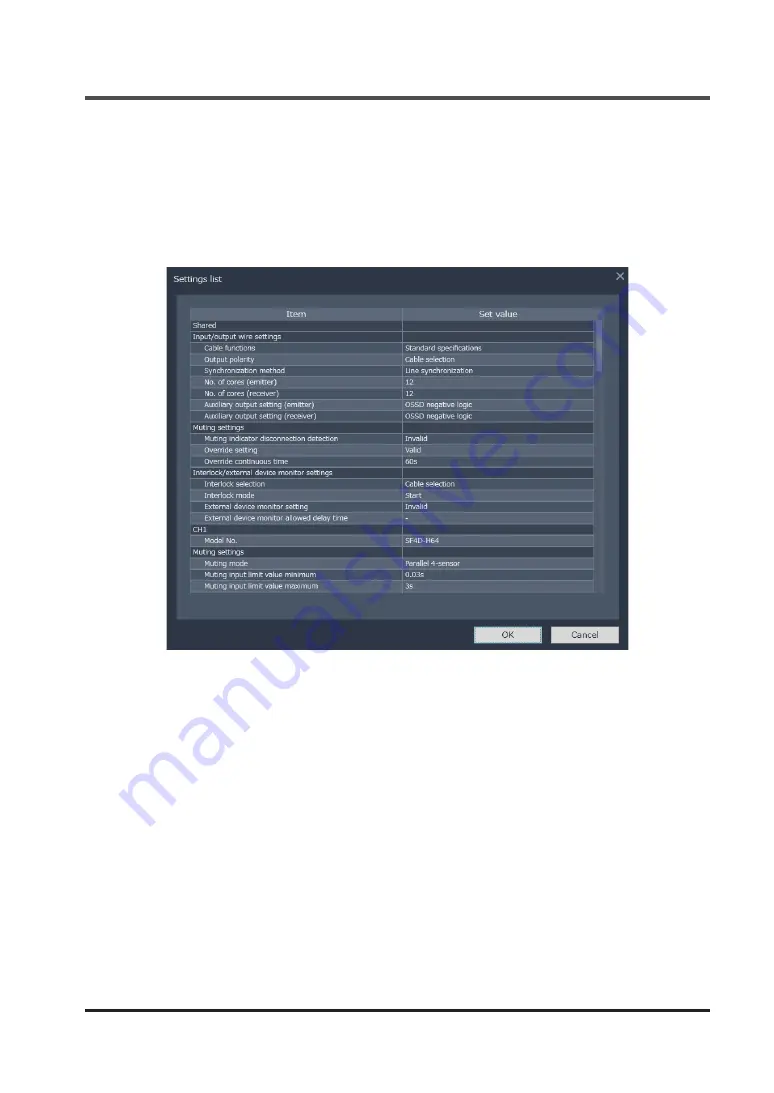
4-9  Reading data from the light curtain

When "Read data from light curtain" is clicked in the start screen, communication with the light 

curtain starts via the device and data is read from the light curtain.

To ensure safety, turn OFF the control output (OSSD 1 / 2) while data is read from the light cur-

tain.

If ON, a dialog box will appear asking for approval.

If OFF, the next screen will appear.

Check the contents.

Click "OK" to move to the function settings / configuration settings screen.

To return to the start screen, click "Cancel".

Содержание SF4D-TM1

Страница 1: ...2020 3 panasonic net id pidsx Communication Module for the SF4D Series SF4D TM1 User s Manual WUME SF4DTM1 5 ...

Страница 2: ... Panasonic Industrial Devices SUNX Co Ltd 2020 2 MEMO ...

Страница 3: ...is used Those who have the qualifications authority and responsibility to ensure safety in the phases of machinery design manufacture installation operation maintenance and disposal Read and understand Safety Standards in the Light Curtain manual Exercise sufficient caution with respect to safety and handle the product correctly Please note 1 Unauthorized reproduction of part or all of this manual...

Страница 4: ...24 3 2 3 Saved data initialization function 25 Chapter 4 Software Tool 27 4 1 System configuration 28 4 2 System requirements 29 4 2 1 Operating system 29 4 2 2 PC specifications 29 4 3 Installation 29 4 4 Uninstallation 29 4 5 Connection and disconnection procedures 30 4 6 Starting and exiting the software tool 31 4 6 1 Starting the software tool 31 4 6 2 Start screen 31 4 7 Creating a new file 3...

Страница 5: ... Optical synchronization application indicator based specification NPN output 5 core cable 74 5 3 Muting function 12 core cable 75 5 3 1 Muting input A B wire and override function 75 5 3 2 Muting mode 76 5 3 3 Muting sensor input order parallel 4 sensor invalid when rising exit only 76 5 3 4 Muting sensor output operation setting 76 5 3 5 Muting input time limit value 76 5 3 6 Muting maximum cont...

Страница 6: ... the read function 86 5 9 3 Locking the initialization function 86 5 9 4 Locking writing of settings from a PC 86 5 10 Password based prevention function of writing to light curtain 87 5 11 Initialization function 88 Chapter 6 Troubleshooting 89 Chapter 7 Specifications and Dimensions 91 7 1 Specifications 92 7 2 Dimensions 93 ...

Страница 7: ... Panasonic Industrial Devices SUNX Co Ltd 2020 7 Chapter 1 Introduction 1 1 Safety Cautions 8 1 2 Contents of Package 10 ...

Страница 8: ...rs responsible persons for installation responsible persons for use and machine users Machine designers responsible persons for installation responsible persons for use and machine users must observe applicable laws and regulations relating to installation and use of the device and follow the instructions in the manual for installation maintenance and inspection Whether this device functions as de...

Страница 9: ...and install and operate correctly Risk of serious injury to the operator if these requirements are not satisfied Operating environment Do not use a cell phone or radio equipment near the device Do not install the device in the following locations 1 A location directly exposed to sunlight 2 A location subject to condensation due to sudden temperature changes 3 A location where corrosive or flammabl...

Страница 10: ...ndustrial Devices SUNX Co Ltd 2020 10 1 2 Contents of Package Main unit 1 pc Quick Instruction Manual Japanese English Chinese 1 pc for each language General Information for Safety Compliance and Instructions 23 languages 1 pc ...

Страница 11: ... Description of parts 14 2 3 Connections 15 2 3 1 Connecting to the light curtain 15 2 3 2 Disconnecting from the light curtain 16 2 3 3 Connecting to a PC 17 2 3 4 Disconnecting from the light curtain 18 2 3 5 Connecting to the light curtain and PC 19 2 3 6 Disconnecting from the light curtain and PC 20 ...

Страница 12: ...ight curtain can be checked and changed and opera tion can be monitored Functions Input output wire settings Muting function Fixed blanking function Floating blanking function Interlock function External device monitor function Application indicator function Operation monitor Protection function Password Initialization When using the device as a standalone unit you can copy functions set in the li...

Страница 13: ...ion is used you can configure overall light curtain settings by connect ing the device to either the emitter or the receiver of the light curtain When optical synchronization is used you can configure the settings of the emitter or the re ceiver of the light curtain to which the device is connected To change the overall settings of the light curtain you must change both the settings of the emitter...

Страница 14: ...id 3 READ indicator Orange Lights up when the READ key is pressed Blinks during READ communication 4 READ key Press to read in data 5 ENTER key Press to execute 6 Strap holder Use this holder when using a strap purchase separately 7 Mini USB connector For connection to a PC 8 Version Version information of this product 9 WRITE key Press to write data 10 WRITE indicator Orange Lights up when the WR...

Страница 15: ...touch the terminals inside the light curtain while power is present Risk of malfunctioning and failure of the light curtain The case of the device is plastic Do not drop or subject to intense shock Risk of failure and damage The device can be connected to the light curtain while the light curtain power is ON To pre vent short circuiting caused by a tool or foreign matter we recommend that you perf...

Страница 16: ...icators on the device turn OFF Step 3 Disconnect the connection cable of the device from the connector inside the light cur tain Step 4 Attach the indicator cover to the light curtain Tighten to a torque of 0 3N m or less CAUTION Packing is fitted on the indicator cover If the packing is not fitted properly fit as shown below be fore attaching to the device ...

Страница 17: ...Industrial Devices SUNX Co Ltd 2020 17 2 3 3 Connecting to a PC Step 1 Connect the device to a PC using a USB 2 0 cable A mini B Purchase separately USB 2 0 cable A mini B Purchase separately Device Step 2 The device starts ...

Страница 18: ...nnections Panasonic Industrial Devices SUNX Co Ltd 2020 18 2 3 4 Disconnecting from the light curtain Step 1 Disconnect the USB cable from the device or the PC Step 2 All indicators on the device turn OFF ...

Страница 19: ...indicator cover Indicator cover Light curtain Step 2 Connect the connection cable of the device to the connector inside the light curtain Connection cable Connector Step 3 Connect the device to a PC using a USB 2 0 cable A mini B Purchase separately USB 2 0 cable A mini B Purchase separately Device Step 4 The device starts Step 5 Turn ON the light curtain power ...

Страница 20: ...evice from the connector inside the light curtain Step 3 Disconnect the USB cable from the device or the PC Step 4 All indicators on the device turn OFF Step 5 Attach the indicator cover to the light curtain Tighten to a torque of 0 3N m or less CAUTION Packing is fitted on the indicator cover If the packing is not fitted on the connector properly fit as shown below before connecting to the device...

Страница 21: ... Co Ltd 2020 21 Chapter 3 Procedures for Operation 3 1 Procedures for operating the device 22 3 2 Copy functions 23 3 2 1 Copy functions READ function 23 3 2 2 Copy functions WRITE function 24 3 2 3 Saved data initialization function 25 ...

Страница 22: ...erating the device When using the device as a standalone unit you can copy functions set in the light curtain and initialize the device Description of parts Power indicator Green Data indicator Orange ENTER key READ key READ indicator Orange ERROR indicator Yellow WRITE indicator Orange WRITE key ...

Страница 23: ...ta indicator orange re mains ON 3 Press and hold down the READ key for at least 2 seconds 4 The READ indicator orange lights up 5 Press the ENTER key within 5 seconds To cancel READ press any key other than the ENTER key 6 The READ indicator orange blinks and reading starts The control output OSSD 1 2 of the light curtain turns OFF 7 The READ indicator orange turns OFF and the data indicator or an...

Страница 24: ...east 2 seconds 4 The WRITE indicator orange lights up 5 Press the ENTER key within 5 seconds To cancel WRITE press any key other than the ENTER key 6 The WRITE indicator orange blinks and writing starts The control output OSSD 1 2 of the light curtain turns OFF 7 The WRITE indicator orange turns OFF The settings saved in the device are written to the light curtain 8 Disconnect the connection cable...

Страница 25: ...he power indicator green and data indicator orange turn OFF 3 Press the READ key and WRITE key at the same time for at least 2 seconds 4 The READ indicator orange and WRITE indicator orange light up 5 Press the ENTER key within 5 seconds To cancel initialization press any key other than the ENTER key 6 The data indicator orange turns OFF The settings and logs saved in the device are erased and ini...

Страница 26: ...Procedures for Operation Panasonic Industrial Devices SUNX Co Ltd 2020 26 MEMO ...

Страница 27: ...rtain 35 4 10 Reading data from the communication module 37 4 11 Monitoring light curtain operation 39 4 12 Opening a file from the Recently opened files list 40 4 13 Exiting the software tool 40 4 14 Function settings configuration settings 41 4 15 Muting function 42 4 15 1 Timing settings 42 4 15 2 Each beam axis setting 43 4 16 Blanking function 44 4 17 Interlock external device monitor functio...

Страница 28: ...TM1 PC Light curtain 1 Configurator Light Curtain software tool The software tool is only for use with the device The software tool can be used to configure settings for various functions of the light curtain You can download the software tool from our Website URL https industrial panasonic com ac e dl_center software index jsp Enter SF4D TM1 in Filter by part number model number type to search fo...

Страница 29: ...er 4 2 2 PC specifications Recommended hardware for Windows Hard disk 200 MB or more of free space USB port 4 3 Installation Double click the downloaded Setup exe Follow the instructions in the installation program to install the software tool Warning messages such as User Account Control and Windows can t verify the publisher of this driver software may appear during installation however there is...

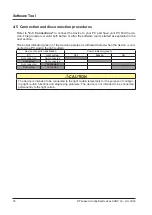
Страница 30: ...green of the device operates as indicated below when the device is con nected to a PC and to the light curtain Device connection destination Power indicator green PC Light curtain OFF Blinking ON Not connected Not connected Connected Not connected Not connected Connected Connected Connected CAUTION The device is intended to be connected to the light curtain temporarily for the purpose of configur ...

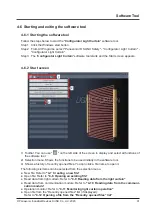
Страница 31: ...to display and select all functions of the software tool 2 Selection menu Shows the functions to be used initially in the software tool 3 Shows a history of recently opened files You can click a file name to open it The following six items can be selected from the selection menu New file Refer to 4 7 Creating a new file Open file Refer to 4 8 Opening an existing file Read data from light curtain R...

Страница 32: ...nnecting in series A maximum of 5 units 5 channels can be connected The default setting is SF4D F15 Change in 3 and 4 2 The series is SF4D only 3 Select the type 4 Select the number of beam channels 5 Copy the settings of the currently selected channel to all other channels 6 Finalize the settings The settings can be changed after you finalize them 7 Cancel the settings and return to the start scr...

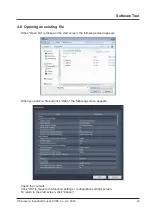
Страница 33: ...ing file When Open file is clicked in the start screen the following screen appears When you select a file and click Open the following screen appears Check the contents Click OK to move to the function settings configuration settings screen To return to the start screen click Cancel ...

Страница 34: ...Software Tool Panasonic Industrial Devices SUNX Co Ltd 2020 34 When you click OK the function settings configuration settings screen appears ...

Страница 35: ...light curtain starts via the device and data is read from the light curtain To ensure safety turn OFF the control output OSSD 1 2 while data is read from the light cur tain If ON a dialog box will appear asking for approval If OFF the next screen will appear Check the contents Click OK to move to the function settings configuration settings screen To return to the start screen click Cancel ...

Страница 36: ...Software Tool Panasonic Industrial Devices SUNX Co Ltd 2020 36 When you click OK the function settings configuration settings screen appears ...

Страница 37: ...Read data from communication module is clicked in the start screen communication with the device starts and data is read from the communication module The following screen will appear Check the contents Click OK to move to the function settings configuration settings screen To return to the start screen click Cancel ...

Страница 38: ...Software Tool Panasonic Industrial Devices SUNX Co Ltd 2020 38 When you click OK the function settings configuration settings screen appears ...

Страница 39: ...reception state of the selected channels appears 3 Enlarge the view of the light reception state of the beam axis range selected in 2 4 The input output state appears 5 When maintenance mode is turned ON the control output OSSD 1 2 of the light curtain turns OFF 6 Return to the start screen The screen color changes in response to the light reception state of the light curtain Stable light receptio...

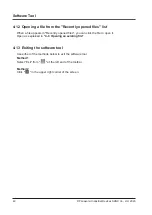
Страница 40: ... a file appears in Recently opened files you can click the file to open it Open as explained in 4 8 Opening an existing file 4 13 Exiting the software tool Use either of the methods below to exit the software tool Method 1 Select Exit from at the left end of the toolbar Method 2 Click in the upper right corner of the screen ...

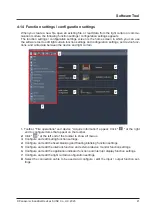
Страница 41: ... the device and light curtain 1 3 5 7 4 6 8 2 1 Toolbar File operations and device Acquire information appear Click at the right end to configure items that appear on the toolbar 2 Click at the left end of the toolbar to show all menus 3 Configure and edit muting function settings 4 Configure and edit the fixed blanking and floating blanking function settings 5 Configure and edit the interlock fun...

Страница 42: ...ually for each channel 2 This tab shows the timing settings 3 This tab shows the beam axis settings 4 Select the muting mode 5 Select the muting sensor input order 6 Select a muting sensor 7 Configure muting and override settings 8 Run a muting demonstration Click to start 9 Initialize the settings 10 Finalize the settings and return to the function settings configuration settings screen 11 Cancel...

Страница 43: ...m axis settings of the selected channels appear 3 Enlarge the view of the settings of the beam axis range selected in 2 4 Individual beam axis settings can be configured for each muting sensor input order 5 Show the fixed blanking and floating blanking settings 6 Initialize the settings 7 Finalize the settings and return to the function settings configuration settings screen 8 Cancel the settings ...

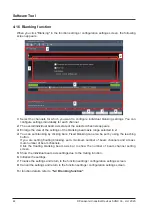
Страница 44: ...blanking beam axis range selected in 2 4 You can set blanking by clicking bars Fixed blanking can also be set by using the teaching button If you are setting floating blanking set a minimum number of beam channels and a maxi mum number of beam channels Click the floating blanking beam axis bar to show the number of beam channel setting screen 5 Show the individual beam axis settings due to the mut...

Страница 45: ...n for the reset method and interlock mode activates Select manual reset or automatic reset If you select manual reset interlock mode is also selected 3 To monitor an external device forcible guide relay magnetic conductor etc from the light curtain select the checkbox 4 To use the external device monitor set the external device delay time 5 Initialize the settings 6 Finalize the settings and retur...

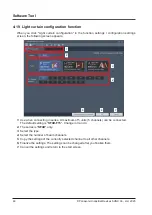
Страница 46: ...ings of the currently selected channel to all other channels 5 Initialize the settings 6 Finalize the settings and return to the function settings configuration settings screen 7 Cancel the settings and return to the function settings configuration settings screen 4 18 1 How to set the application indicator function Step 1 Click the radio buttons of the items you want to show in the application in...

Страница 47: ...f the functions that will be interrupting functions in the interrupt display function field Step 2 If the color button becomes valid click the color button and select the display color Selection is restricted in some cases Step 3 Select Lights or Blinking for muting and override For function details refer to 5 7 Application Indicator Function ...

Страница 48: ...s 1 2 3 4 5 6 7 1 Use when connecting in series A maximum of 5 units 5 channels can be connected The default setting is SF4D F15 Change in 3 and 4 2 The series is SF4D only 3 Select the type 4 Select the number of beam channels 5 Copy the settings of the currently selected channel to all other channels 6 Finalize the settings The settings can be changed after you finalize them 7 Cancel the setting...

Страница 49: ...pe automatically appears 4 Assign a function to auxiliary output 1 of the emitter Some selected cables or functions may not have function assignments 5 Assign a function to auxiliary output 2 of the receiver Some selected cables or functions may not have function assignments 6 Finalize the settings and return to the function settings configuration settings screen 7 Cancel the settings and return t...

Страница 50: ...Software Tool Panasonic Industrial Devices SUNX Co Ltd 2020 50 MEMO ...

Страница 51: ...core cable 75 5 3 1 Muting input A B wire and override function 75 5 3 2 Muting mode 76 5 3 3 Muting sensor input order parallel 4 sensor invalid when rising exit only 76 5 3 4 Muting sensor output operation setting 76 5 3 5 Muting input time limit value 76 5 3 6 Muting maximum continuous valid time 77 5 3 7 Muting indicator disconnection detection 77 5 3 8 Override setting 77 5 3 9 Each beam axis...

Страница 52: ... 5 9 Protection functions 86 5 9 1 Locking the write function 86 5 9 2 Locking the read function 86 5 9 3 Locking the initialization function 86 5 9 4 Locking writing of settings from a PC 86 5 10 Password based prevention function of writing to light curtain 87 5 11 Initialization function 88 ...

Страница 53: ...e system configuration replace a light curtain change the num ber of beam channels change the number of serial connections etc set the functions again Line synchronization or optical synchronization can be selected for the method of synchro nizing the emitter and receiver of the light curtain When line synchronization is used you can configure overall light curtain settings by connect ing the devi...

Страница 54: ...ver are connected communication between the device and the light curtain will not be possible Selecting the synchronization method for the combination of cable and input output specifications used Cable used Input output specifications cable functions Synchronization method 12 core cable Standard specification Line synchronization Parallel interference prevention specification Line synchronization...

Страница 55: ...ght reception state continues for 2 seconds or longer The ON when light reception is unstable OFF when light reception is unstable settings do not operate when the fixed blanking floating blanking or muting function is used 3 The ON when light reception is unstable OFF when light reception is unstable settings output the pres ence status of a shielding object in the sensing area regardless of the ...

Страница 56: ...ing Lockout Emitter receiv er common Auxiliary output 1 2 setting ON OFF Valid Invalid Unstable light re ception Stable light re ception Light blocked Valid Invalid Normal Operation Lockout OSSD nega tive logic OFF ON ON OFF OFF ON OFF ON OSSD positive logic ON OFF OFF ON ON OFF ON OFF OFF when test input is valid ON OFF ON ON ON ON ON ON ON ON ON when test input is valid OFF ON OFF OFF OFF OFF OF...

Страница 57: ...ale blue Output polarity setting Lockout release input Yellow Override input Pale blue Output polarity setting Lockout release input Red Auxiliary output 2 Gray NC Blue 0V Blue 0V Orange Synchronization Pale purple External device monitor input Black Control output 1 OSSD 1 Pink Muting input A White Control output 2 OSSD 2 Yellow Muting input B Orange Synchronization Orange Black Synchronization O...

Страница 58: ... 1 Pale blue Output polarity setting Lockout release input Yellow Override input Pale blue Output polarity setting Lockout release input Red Auxiliary output 2 Gray NC Blue 0V Blue 0V Orange Synchronization Pale purple External device monitor input Black Control output 1 OSSD 1 Pink Muting input A White Control output 2 OSSD 2 Yellow Muting input B Orange Synchronization Orange Black Synchronizati...

Страница 59: ...otal of three sets For details refer to the SF4D Series Instruction Manual When parallel interference prevention is used and the master light curtain settings are read written or initialized or maintenance mode is turned ON the slave light curtain control output OSSD 1 2 also turns OFF to ensure safety Master Slave Parallel interference prevention output wire Red Parallel interference prevention i...

Страница 60: ...Invalid Normal operation Lockout OSSD nega tive logic OFF ON ON OFF OFF ON OFF ON OSSD positive logic ON OFF OFF ON ON OFF ON OFF OFF when test input is valid ON OFF ON ON ON ON ON ON ON ON ON when test input is valid OFF ON OFF OFF OFF OFF OFF OFF OFF OFF OFF when light reception is unstable ON OFF ON ON ON ON when light reception is unstable OFF ON OFF OFF OFF OFF during muting ON ON OFF ON ON O...

Страница 61: ...ride input Yellow Override input Pale blue Output polarity setting Lockout release input Pale blue Output polarity setting Lockout release input Red Parallel interference prevention output Red Parallel interference prevention output Gray not used Gray not used Blue 0V Blue 0V Blue 0V Blue 0V Orange Synchronization Orange Synchronization Pale purple External device monitor input Pale purple Externa...

Страница 62: ...ase input Yellow Override input Yellow Override input Pale blue Output polarity setting Lockout release input Pale blue Output polarity setting Lockout release input Red Parallel interference prevention output Red Parallel interference prevention output Gray Not used Gray Not used Blue 0V Blue 0V Blue 0V Blue 0V Orange Synchronization Orange Synchronization Pale purple External device monitor inpu...

Страница 63: ...on Light blocked Valid Invalid Normal operation Lockout OFF when test input is valid ON OFF ON ON ON ON ON ON ON ON ON when test input is valid OFF ON OFF OFF OFF OFF OFF OFF OFF OFF OFF when locked out ON ON ON ON ON ON ON ON ON ON OFF ON when locked out OFF OFF OFF OFF OFF OFF OFF OFF OFF OFF ON The symbol indicates either ON or OFF depending on the light curtain state Example of operation of re...

Страница 64: ...ting Lockout release input Red Auxiliary output 2 Gray NC Blue 0V Blue 0V Orange NC Pale purple External device monitor input Black Control output 1 OSSD 1 Pink Test Reset input White Control output 2 OSSD 2 Yellow Interlock setting input Orange NC Orange Black NC Orange Black NC S2 S2 S1 K1 K2 S2 Emitter Receiver Symbols Switch S1 Test reset input emitter Vs to Vs 2 5V sink current 5mA or less Em...

Страница 65: ...ue Output polarity setting Lockout release input Red Auxiliary output 2 Gray NC Blue 0V Blue 0V Orange NC Pale purple External device monitor input Black Control output 1 OSSD 1 Pink Test Reset input White Control output 2 OSSD 2 Yellow Interlock setting input Orange NC Orange Black NC Orange Black NC S2 S2 S1 K1 K2 S2 Emitter Receiver Symbols Switch S1 Test reset input emitter 0 to 2 5V source cu...

Страница 66: ...n set to optical synchronization muting specification PNP output 12 core cable auxil iary output 1 of the light curtain emitter operates as indicated in the table below When set to optical synchronization muting specification PNP output 12 core cable auxil iary output 2 of the light curtain receiver is fixed at ON during muting Example of operation of emitter auxiliary output 1 in optical synchron...

Страница 67: ...V Orange NC Pale purple External device monitor input Black Control output 1 OSSD 1 Pink Muting input A White Control output 2 OSSD 2 Yellow Muting input B Orange NC Orange Black NC Orange Black NC S2 S2 S2 S2 S1 K1 K2 S3 Emitter Receiver Symbols Switch S1 Test reset input emitter Vs to Vs 2 5V sink current 5mA or less Emission halt Note Open Emission Switch S2 Test reset input receiver applicatio...

Страница 68: ...n set to optical synchronization muting specification NPN output 12 core cable auxil iary output 1 of the light curtain emitter operates as indicated in the table below When set to optical synchronization muting specification NPN output 12 core cable auxil iary output 2 of the light curtain receiver is fixed at ON during muting Example of operation of emitter auxiliary output 1 in optical synchron...

Страница 69: ...ride input Blue 0V Blue 0V Orange NC Pale purple External device monitor input Black Control output 1 OSSD 1 Pink Muting input A White Control output 2 OSSD 2 Yellow Muting input B Orange NC Orange Black NC Orange Black NC S2 S2 S2 S2 S1 K1 K2 S3 Emitter Receiver Symbols Switch S1 Test reset input emitter 0 to 2 5V source current 5mA or less Emission halt Open Emission Switch S2 Test reset input r...

Страница 70: ... in each state of light curtain OSSD Normal operation Test input Emitter Light reception status Lockout Emitter Auxiliary output setting ON OFF Valid Invalid Unstable light reception Stable light reception Light blocked Normal operation Lockout OSSD negative logic OFF ON ON OFF OFF ON ON OSSD positive logic ON OFF OFF ON ON OFF OFF OFF when test input is valid ON OFF ON ON ON ON ON ON ON when test...

Страница 71: ...nge Synchronization Orange Black Synchronization Orange Black Synchronization Emitter Receiver Symbols K1 K2 Safety relay unit etc Wiring example Standard specification 8 core cable Using NPN output K1 K2 24V DC 20 30 Gray cable Gray cable with black line Brown V Brown V Pale purple Interlock setting input Pink Test Reset input Red Auxiliary output Pale blue Output polarity setting Lockout release...

Страница 72: ... Pale blue Output polarity setting Lockout release input Pale blue Output polarity setting Lockout release input Blue 0V Blue 0V Black Control output 1 OSSD 1 White Control output 2 OSSD 2 Emitter Receiver Symbols K1 K2 Safety relay unit etc Wiring example Optical synchronization standard specification 5 core cable Using NPN output K1 K2 24V DC 20 30 24V DC 20 30 Gray cable Gray cable with black l...

Страница 73: ...ification is selected When optical synchronization appli cation indicator oriented specification PNP output 5 core cable is selected Emitter 5 Pale blue Output polarity setting lockout release input Application indicator input 1 Receiver 5 Pale blue Output polarity setting lockout release input Application indicator input 1 Wiring example Optical synchronization application indicator based specifi...

Страница 74: ...lor When Standard specification is selected When optical synchronization appli cation indicator oriented specification NPN output 5 core cable is selected Emitter 5 Pale blue Output polarity setting lockout release input Application indicator input 1 Receiver 5 Pale blue Output polarity setting lockout release input Application indicator input 1 Wiring example Optical synchronization application i...

Страница 75: ...s and regula tions in the country or region where the device is to be used and install the indicator accordingly Be sure to test operation before using the muting function Always operate the device that starts the override function manually Install the device for over ride function startup in a location that allows operation from outside the danger zone and which provides a clear view of the entir...

Страница 76: ...ng sensor connected to muting input B ON when light not received ON when approaching ON when contact made NO NC normally open normally closed Muting sensor connected to muting input A ON when light not received ON when approaching ON when contact made Muting sensor connected to muting input B ON when light received ON when away ON when contact not made 5 3 5 Muting input time limit value When outp...

Страница 77: ...he muting indicator wiring 5 3 8 Override setting You can set override to valid invalid You can change the override continuous time setting The continuous time is 1 to 600 sec increments of 1 sec 5 3 9 Each beam axis setting You can select muting function valid invalid separately for each beam axis The factory setting for muting function is valid for all beam axes When light is blocked in the muti...

Страница 78: ...tion becomes invalid Factory setting WARNING When the fixed blanking function is used the light curtain s control output OSSD 1 2 does not turn OFF when a specific beam axis is blocked Use a protective structure to prevent arrival at the machine s danger zone from the sensing area of the specific beam axis Before countermeasure Emitter Receiver Beam axes on which fixed blanking function is set Obs...

Страница 79: ...cable laws and standards of the re gion where the light curtain is to be used The minimum sensing object varies depending on the number of set beam channels When the floating blanking function is used the light curtain s digital indicator received light amount green turns OFF when there is a blocking object in the sensing area regardless of the intensity of light received The light curtain only op...

Страница 80: ...erlock setting input wire has no effect 5 5 2 Interlock setting input wire and manual reset setting The cable input output specification and synchronization method determine incorporated not incorporated and valid invalid of the light curtain s interlock setting input wire When the light curtain s interlock setting input wire is set to Incorporated Valid manual reset or automatic reset can be sele...

Страница 81: ...ify that nobody is in the danger zone before using the interlock function Risk of death or serious injury Install the reset switch in a location that allows operation from outside the danger zone and which provides a clear view of the entire danger zone When using the light curtain with automatic reset use a safety relay unit or other device to prevent automatic restart of the system after safety ...

Страница 82: ... synchronization indication by the light curtain s application indicator input 1 wire 2 wire takes place on the emitter and receiver In the case of optical synchronization indication takes place on an emitter or receiver equipped with the light curtain s application indicator input 1 wire 2 wire In the case of optical synchroni zation settings by the software tool are written to an emitter or rece...

Страница 83: ...so the set tings are written to the receiver 5 7 4 Indication linked to test function Indication takes place on the application indicator in accordance with the test function Indication linked to the test function takes place on the light curtain s emitter and receiver in the case of line synchronization and only on an emitter or receiver equipped with the test function in the case of optical sync...

Страница 84: ...ting specification NPN output 12 core cable 3 Indication is possible when using optical synchronization muting specification PNP output 12 core cable or optical synchronization muting specification NPN output 12 core cable 5 7 7 List of indication colors and ON Blinking settings Indication methods that can be set for each indication are shown in the table below Even if indicated as settable in the...

Страница 85: ...utput OSSD 1 2 Muting input A Muting input B Test Reset input Override input Application indicator input 1 Application indicator input 2 Maintenance mode When maintenance mode is set to ON you check the state of the following settings Muting beam axis A B Muting beam axis B A Fixed blanking beam axis Floating blanking beam axis The following outputs can be forced ON or OFF Auxiliary output 1 emitt...

Страница 86: ...the read function This stops the read function from the light curtain connected to the device to prevent unintended changes to data saved in the device When Lock the read function is set in the device settings can still be written to the light cur tain 5 9 3 Locking the initialization function This stops the initialization function of the device to prevent unintended loss of data saved in the devi...

Страница 87: ...n is valid or invalid When line synchronization is used the write prevention function is set canceled for both the emitter and receiver of the light curtain When optical synchronization is used the function is set canceled for the emitter or receiver of the light curtain to which the device is connected If you change the synchronization method to line synchronization after using the light curtain ...

Страница 88: ...rlock External device monitor function Interlock selection Cable selection Interlock mode Start Restart interlock External device monitor EDM Valid Allowed delay time 300ms Application indicator function Assignment selection Application indicator input State Application indicator input 1 2 Color selection Green Red Pattern selection ON ON Note When a password is set for the light curtain the passw...

Страница 89: ... Panasonic Industrial Devices SUNX Co Ltd 2020 89 Chapter 6 Troubleshooting ...

Страница 90: ... is activated If the data indicator orange is blinking the write prohibit state copy protect is activated Use the Configurator Light Curtain software tool to cancel the protect state Sensor communication error noise effects or communication circuit failure Check the noise environment around the device ERROR indicator yellow is ON Corruption of saved data The saved data is corrupted so initialize t...

Страница 91: ... Panasonic Industrial Devices SUNX Co Ltd 2020 91 Chapter 7 Specifications and Dimensions 7 1 Specifications 92 7 2 Dimensions 93 ...

Страница 92: ...ondensation or icing Storage 25 to 60 C Ambient humidity 30 to 85 RH Storage 30 to 95 RH Elevation 2 000m or less Note 1 Connection method USB Mini B male cable with connector 1 5m Weight main unit only Approx 75g Notes 1 Do not use or store in an environment pressurized to atmospheric pressure or higher at an altitude of 0m 2 If the SF4D Ver3 0 product is used with this product restrictions will ...

Страница 93: ...Dimensions Panasonic Industrial Devices SUNX Co Ltd 2020 93 7 2 Dimensions Units mm 20 4 7 37 2 96 3 46 0 6 15 4 ø3 7 cable ...

Страница 94: ...nic Industrial Devices SUNX Co Ltd 2020 94 Revision History First edition January 10 2017 Second edition March 24 2017 Third edition October 13 2017 Fourth edition September 28 2018 Fifh edition March 27 2020 ...

Страница 95: ...R ANY INDIRECT INCIDENTAL SPECIAL OR CONSEQUENTIAL DAMAGES OF ANY KIND GENERAL TERMS AND CONDITIONS 4 OR ANY DAMAGES RESULTING FROM LOSS OF USE BUSINESS INTERRUPTION LOSS OF INFORMATION LOSS OR INACCURACY OF DATA LOSS OF PROFITS LOSS OF SAVINGS THE COST OF PROCUREMENT OF SUBSTITUTED GOODS SERVICES OR TECHNOLOGIES OR FOR ANY MATTER ARISING OUT OF OR IN CONNECTION WITH THE USE OR INABILITY TO USE TH...

Страница 96: ...c Industrial Devices SUNX Co Ltd https panasonic net id pidsx global Please visit our website for inquiries and about our sales network Panasonic Industrial Devices SUNX Co Ltd 2020 March 2020 PRINTED IN JAPAN WUME SF4DTM1 5 ...

Отзывы: