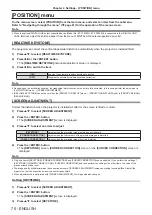
[POSITION] menu
On the menu screen, select [POSITION] from the main menu, and select an item from the submenu.
Refer to “Navigating through the menu” (
Æ
page 61) for the operation of the menu screen.
Note
f
When the optional DIGITAL LINK output supported device (Model No.: ET-YFB100G, ET-YFB200G) is connected to the <DIGITAL LINK/
LAN> terminal, adjust the shift and aspect from the menu of DIGITAL LINK output supported device frst.
[REALTIME KEYSTONE]
The projector can correct the vertical trapezoidal distortion automatically when the projector is installed tilted.
1) Press
as
to select [REALTIME KEYSTONE].
2) Press
qw
or the <ENTER> button.
f
The
[REALTIME KEYSTONE]
individual adjustment screen is displayed.
3) Press
qw
to switch the item.
[ON]
Enables the automatic realtime keystone correction.
[OFF]
Disables the automatic realtime keystone correction.
Note
f
Depending on the installation situation, the trapezoidal distortion may not be able to fully corrected. In this case, perform the adjustment in
the [POSITION] menu
→ [SCREEN ADJUSTMENT].
f
[REALTIME KEYSTONE] cannot be set when the [PROJECTOR SETUP] menu → [PROJECTION METHOD] is set to [FRONT/CEILING] or
[REAR/CEILING].
[SCREEN ADJUSTMENT]
Correct the distortion when the projector is installed as tilted or the screen is tilted or curved.
1) Press
as
to select [SCREEN ADJUSTMENT].
2) Press the <ENTER> button.
f
The
[SCREEN ADJUSTMENT]
screen is displayed.
3) Press
as
to select one item to adjust.
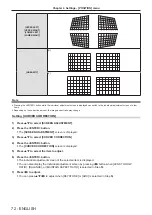
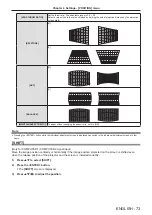
[KEYSTONE]
Adjusts when the projected image is distorted as trapezoid.
[CORNER CORRECTION]
Adjusts when the four corners of the projected image are distorted.
[CURVED CORRECTION]
Adjusts when the projected image is curved distortion.
4) Press the <ENTER> button.
f
The
[KEYSTONE]
screen,
[CORNER CORRECTION]
screen or the
[CURVED CORRECTION]
screen is
displayed.
Note
f
Only one item of [KEYSTONE], [CORNER CORRECTION] and [CURVED CORRECTION] can be enabled. If you perform the setting of
[KEYSTONE], [CORNER CORRECTION] or [CURVED CORRECTION] and then perform the setting of the other items, the value of the
previous items will be reset.
f
The image quality will deteriorate as the correction amount of [SCREEN ADJUSTMENT] increases, making focusing difficult. Install the
projector so that the correction amount is as small as possible.
f
When adjustments are performed with [SCREEN ADJUSTMENT], the image size also changes.
Setting
[KEYSTONE]
1) Press
as
to select [SCREEN ADJUSTMENT].
2) Press the <ENTER> button.
f
The
[SCREEN ADJUSTMENT]
screen is displayed.
3) Press
as
to select [KEYSTONE].
70 -
ENGLISH
Chapter 4 Settings - [POSITION] menu
Содержание PT-VZ585N
Страница 44: ...Chapter 3 Basic Operations This chapter describes basic operations to start with 44 ENGLISH...
Страница 110: ...Chapter 5 Operation of Function This chapter describes the operation methods of some functions 110 ENGLISH...
Страница 161: ...Chapter 7 Appendix This chapter describes specifications for the projector ENGLISH 161...


