background image

Chapter 5

Operations — Content Manager

ENGLISH - 147

Note


f

If the content to be deleted is registered in a schedule or slideshow, the content cannot be deleted.


f

[CIRCULAR LIGHT1] and [CIRCULAR LIGHT2] in still image content cannot be deleted.

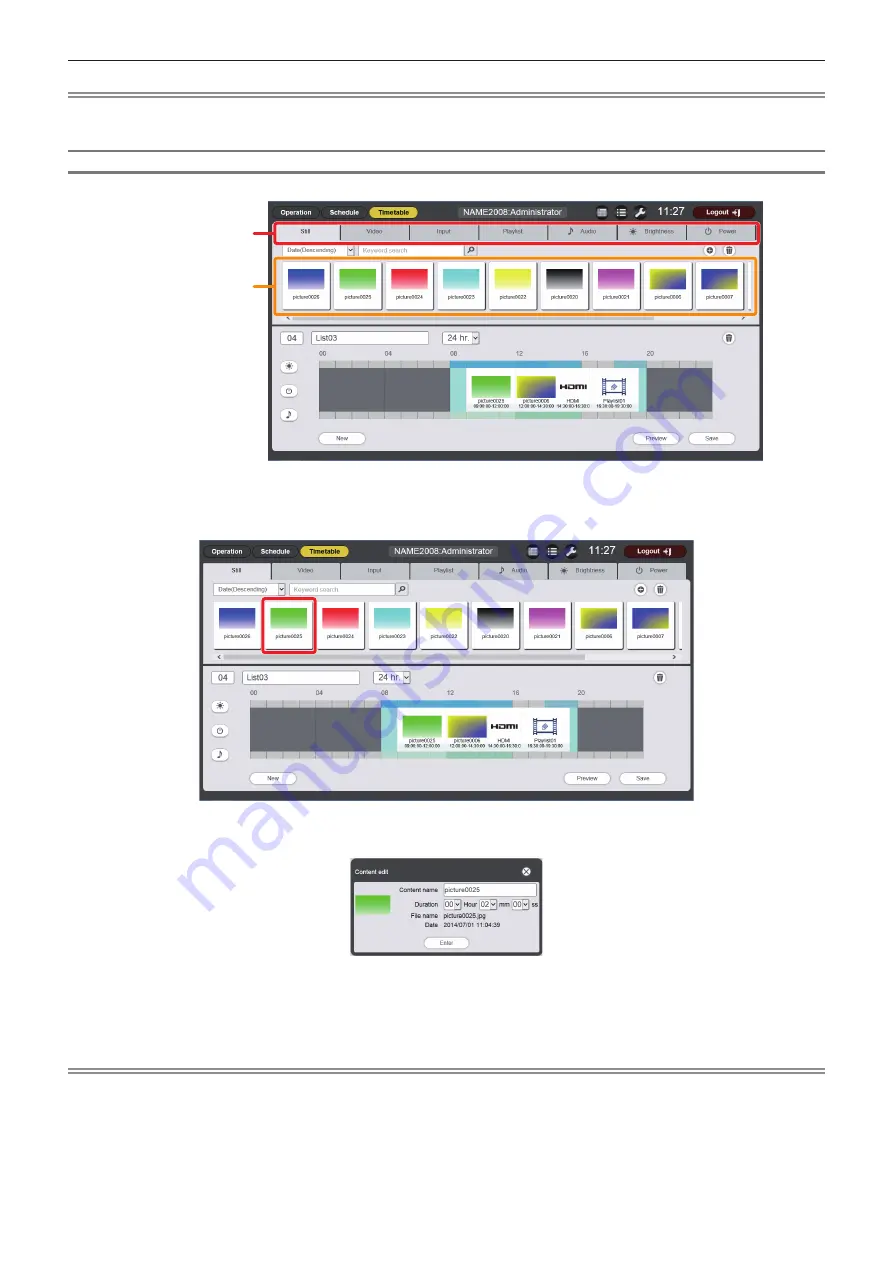
Editing registration information of content

Change the registration information of still image/movie/music contents registered in the content list.

Content selection tab

Content list

1)  In the timetable page, click the tab of the content of which registration information you want to edit 

from the “Content selection tab”.


f

Clicking the tab changes the “Content list” display.

2) 

In the “Content list”, click the content of which registration information you want to change.


f

The 

[Content edit]

 screen is displayed.

3)  Change [Content name] and/or [Duration], and click the [Enter] button.


f

You can change [Content name] and [Duration] in the case of still image content, and [Content name] in the case of movie/music 

content.


f

Changed contents are registered in the SD card.

Note


f

You cannot edit external input/brightness/power supply content because they do not have registration information.


f

To change the contents playlist, refer to “Editing a playlist” (

x

 page 150).

Содержание PT-JW130F

Страница 1: ...facturer s instructions Before installing and operating this product please read the instructions carefully and save this manual for future use Before using this product be sure to read Read this first x pages 2 to 6 DPQP1088ZA DLP Projector Commercial Use Operating Instructions Functional Manual ENGLISH Model No PT JW130GBD PT JW130GWD ...

Страница 2: ...ith arrowhead symbol within an equilateral triangle is intended to alert the user to the presence of uninsulated dangerous voltage within the product s enclosure that may be of sufficient magnitude to constitute a risk of electric shock to persons The exclamation point within an equilateral triangle is intended to alert the user to the presence of important operating and maintenance servicing inst...

Страница 3: ...07 LASER RADIATION DO NOT STARE INTO BEAM CLASS 2 LASER PRODUCT WAVE LENGTH 448 462nm MAXIMUM OUTPUT 53 0mW PULSE DURATION 1 2ms IEC EN 60825 1 2007 RAYONNEMENT LASER NE PAS REGARDER DANS LE FAISCEAU APPAREIL À LASER DE CALSSE2 LONGUEURS D ONDES 448 462nm MAXIMALE DU RAYONNEMENT 53 0mW DURÉE DE L IMPULSION 1 2ms TQFX514 TQFX513 Top of product ...

Страница 4: ...the track system which is installed in the horizontal ceiling or beam and can withstand the load Mounting the projector to the following track system will result in fire electric shocks or falling of the projector f f Track system that is installed in the wall surface or floor f f Track system that is installed in the sloping ceiling or beam f f Track system that cannot withstand the load Make sur...

Страница 5: ... of the projector cut off the power supply and consult your dealer r r ACCESSORIES Do not use or handle the batteries improperly and refer to the following Failure to observe this will cause burns batteries to leak overheat explode or catch fire f f Do not use unspecified batteries f f Do not use chargeable batteries f f Do not disassemble dry cell batteries f f Do not heat the batteries or place ...

Страница 6: ...aust port Do not place your hands or face or objects which cannot withstand heat close to this port Never plug headphones and earphones into AUDIO OUT terminal Excessive sound pressure from headphones and earphones can cause hearing loss Always disconnect the adapter from the track system before moving the projector Moving the projector with the adapter still attached can damage the adapter which ...

Страница 7: ... any kind for the problem such as the infringement of copyright caused by using this product Take caution not to infringe the right of the copyright owner and any other right holder when editing and using the contents to display f f This product is licensed under AVC Patent Portfolio License VC 1 Patent Portfolio License and MPEG 4 Visual Patent Portfolio License and following actions except for t...

Страница 8: ...s x page 00 r rTerms f f In this manual the Wireless remote control unit accessory is referred to as Remote control f f In this manual the Track Lighting System is referred to as Track System f f In this manual the SD memory card and the SDHC memory card are referred to as SD card ...

Страница 9: ... easily by the mounting method to the track system The display can be freely layout by projecting the image vertically or horizontally The projector is equipped with an electric 2 2x zoom electric focus lens A design fitting in to the space A spotlight type design is adopted to easily conform to a space requiring conformity to the design such as a store Quick Steps For details refer to the corresp...

Страница 10: ...s to the connecting terminals 42 Chapter 3 Basic Operations Turning on off the projector 44 Power indicator 44 Turning on the projector 45 When the initial setting screen is displayed 45 Making adjustments and selections 47 Turning off the projector 48 Projecting 49 Selecting the projection mode 49 Selecting the input for projector mode 49 Adjusting the projection 50 Using SD cards 51 Notes on use...

Страница 11: ...g back movies 97 Direct playback 98 Memory Viewer screen descriptions 99 Network connection 100 When connecting via wired LAN 100 When connecting via wireless LAN 102 Web control function 104 Computer that can be used for setting 104 Accessing from the web browser 104 Miracast function 125 Content Manager 126 Files compatible with signage playback 126 Computers for the signage setting 127 Procedur...

Страница 12: ...12 ENGLISH Chapter 1 Preparation This chapter describes things you need to know or check before using the projector ...

Страница 13: ...face causes damage to the DLP chip r rDo not install the projector at elevations of 2 700 m 8 858 or higher above sea level Doing so may shorten the life of the components and result in malfunctions r rMake sure to set HIGH ALTITUDE MODE to HIGH1 when using the projector at elevations between 1 000 m 3 281 and 2 000 m 6 562 above sea level and set HIGH ALTITUDE MODE to HIGH2 when using the project...

Страница 14: ...LAN cable as long as you are within range for radio transmissions On the other hand because the radio waves can travel through obstacles such as walls and are available everywhere within a given range problems of the type listed below may occur if security settings are insufficient f f Transmitted data may be intercepted A malicious third part may intentionally intercept radio waves and monitor th...

Страница 15: ...ocation where static electricity is generated The communication via wireless LAN or wired LAN may be prone to disruption when the projector is used in a location where static electricity or noise is generated There is a rare case that the LAN connection may not be established due to static electricity or noise In such case turn off the power with the power button on the remote control or the power...

Страница 16: ...cision made Note that in rare cases pixels of high precision could be missing or always lit Note that such phenomenon does not indicate malfunction f f Directing a high power laser beam onto the projection lens surface can damage the DLP chip r rLight source Laser is used as the light source of the projector and it has the following characteristics f f The luminance of the light source will decrea...

Страница 17: ... battery 2 For remote control unit CD ROM 1 1JK1JW130GD Allen wrench 1 Opposite side size 3 0 mm 1 8 TXFQB03VLP4 Adapter 1 PT JW130GBD TXFKF02WDNZ PT JW130GWD TXFKF02WDMZ The same color as the outer case will be supplied Connector secure lock 1 TTRA0185 Adapter cover 1 PT JW130GBD TKFE28702 PT JW130GWD TKFE28701 The same color as the outer case will be supplied String 1 6103430249 Attention f f Af...

Страница 18: ...only List of Compatible Device Models This is a list of projectors that are compatible with the software contained in the CD ROM and their restrictions Software license The license condition for the open source software used in the projector is contained as a PDF file Software Multi Projector Monitoring Control Software Windows This software allows you to monitor and control multiple projectors co...

Страница 19: ...OCUS button Displays the lens menu and adjusts the projection lens x page 50 11 VOL VOL buttons Adjusts the volume of audio output x page 54 12 LIGHTING PROJECTOR button Switches the projection mode of the projector to lighting mode or projector mode x page 49 13 Panasonic APP button Switches the input to Panasonic APPLICATION x page 49 When you press this button during the lighting mode the mode ...

Страница 20: ... the effective control range may be reduced f f If there are any obstacles between the remote control and the remote control signal receiver the remote control may not operate properly f f The signal from the remote control can be reflected off the projection surface to operate the projector However the operating range may be limited from light reflection loss or the shape of the projection surfac...

Страница 21: ... a audio signal is input to the HDMI IN terminal and when the movie with audio in the SD card is played back x page 41 14 DC OUT terminal This is the USB terminal only used for power supply DC 5 V maximum of 900 mA This can be used when the power supply to a Bluetooth audio transmitter etc is required 15 Connecting terminals x pages 22 41 16 Track mount part A x page 32 17 Lever A 18 Stopper for l...

Страница 22: ...AN terminal This is the terminal to connect to the network x page 41 Attention f f The LAN cable connecting to the projector directly should be wired indoors only f f Store small parts such as SD card in an appropriate manner and keep them away from small children Note f f The product number serial number and rating of the projector is indicated in the product plate in the position shown in follow...

Страница 23: ...4 3 1 3 r r Illustration of the adapter attached to the track system 6 1 7 6 7 5 2 3 3 1 Lever 2 Power phase indicator Indicates the current power phase 3 Phase selector switch Switches the power phase 4 Power connector 5 Ground contact 6 Power contacts 7 Locking fingers ...

Страница 24: ...ique ID number is assigned to each projector When using the projectors by setting the ID numbers set the ID number of the projector body after initial settings have been completed Then set the ID number of the remote control For initial settings refer to When the initial setting screen is displayed x page 45 The factory default ID number of the projector projector body and remote control is set to...

Страница 25: ...ENGLISH 25 Chapter 2 Getting Started This chapter describes things you need to do before using the projector such as the setup and connections ...

Страница 26: ...rojector in the projector mode Set the SETUP menu PROJECTION METHOD x page 68 and VERTICAL FLIP x page 69 depending on the installation form To project forward To project from rear Using the translucent screen ABC ABC Menu item Method Menu item Method PROJECTION METHOD FRONT PROJECTION METHOD REAR VERTICAL FLIP OFF VERTICAL FLIP OFF To project forward To project from rear Using the translucent scr...

Страница 27: ...f the main unit as described in Adjusting the projection position x page 37 and the settings of the SETUP menu PROJECTION METHOD x page 68 and the VERTICAL FLIP x page 69 The direction of irradiation can be adjusted freely in similar manner when using the projector in the lighting mode Following illustrations are examples when PROJECTION METHOD is set to FRONT and VERTICAL FLIP is set to OFF ABC A...

Страница 28: ...ttention f f Before setting up read Precautions for use x page 13 f f Do not use the projector and the high power laser equipment in the same room The DLP chip can be damaged if a laser beam hits the lens surface Projection distance The dimension in the following table contains a slight error Also it is corrected to become smaller than the specified image size when KEYSTONE is used r r When the im...

Страница 29: ...of the formula is all m Value obtained by the following calculation formula contains a slight error When calculating a projection distance using image size designation value in inches multiply the value in inches by 0 0254 and substitute it into SD in the formula for calculating the projection distance r r When the image aspect ratio is 16 10 Minimum projection distance LW L 1 2976 x SD 0 0385 Max...

Страница 30: ... Track system that is installed in the wall surface or floor g g Track system that is installed in the sloping ceiling g g Track system that cannot withstand the load f f If it is hard to operate the lever on the track mount parts A B when mounting the projector remove the projector from the track system without turning the lever forcibly displace the projector slightly and mount it again Note f f...

Страница 31: ...connector Phase selector switch Lever Phase selector switch r r Illustration of the adapter attached to the track system Power contacts Lever Locking fingers Locking fingers Power contacts Ground contact Power phase indicator Phase selector switch Phase selector switch Note f f The setting of the phase selector switch can be changed even when the adapter is attached to the track system f f When th...

Страница 32: ...ngitudinal direction of the power supply unit Lever A Lever plate A Track mount part A Hook clasp A Power supply unit 3 Completely turn the lever B to the same direction as the lever A against the power supply unit f f Turn the lever on the track mount part B in the direction of the arrow shown in the figure so that the hook clasp B is parallel to the longitudinal direction of the power supply uni...

Страница 33: ... f Put the string already attached to the supplied adapter cover on the connector secure lock as shown in the figure Adapter cover String 7 Fix the connector secure lock f f Push the connector secure lock in until the tab of the connector secure lock clicks with the string put on Be careful not to get the string caught in the tab f f The string is used to prevent the adapter cover from falling off...

Страница 34: ...same side i Turn the lever A in the direction of the arrow shown in the figure to align it parallel to the track system ii Completely turn the lever B in the direction of the allow shown in the figure f f Be sure to operate the lever A first f f Confirm that both hook clasps A B are securely housed inside the track system i ii Lever A Lever B WARNING When mounting to the track system turn both lev...

Страница 35: ... the track system f f Insert the adapter into the opening of the track system f f The adapter of the projector cannot be mounted to the position of the tapping screw fixing the track system to the ceiling or beam f f Allowing for attaching the adapter cover to be performed in Step 17 mount the adapter to the track system using the rough dimension shown in the figure 30 mm 1 3 16 50 mm 1 31 32 14 T...

Страница 36: ...ver ISO No 2 6 mm 1 4 diameter and fix to the lever plate B Lever B Lever B Cross section Lever B locking screw Lever B locking screw Lever plate B Lever plate B 17 Attach the adapter cover f f While aligning the protrusion at the lower center of the adapter cover to the depression on the power supply unit i push both tabs at the upper side of the adapter cover into the notches of the power supply...

Страница 37: ...lt the main unit and adjust the orientation of the main unit 360 360 Ball joint fixing screws Shaft holder Ball joint movable part The shaft holder will rotate 360 when the rotating fixing screw is loosened Move the ball joint movable part to the direction to tilt the main unit The ball joint will become free when the ball joint fixing screws 2 locations are loosened The main unit can be rotated 3...

Страница 38: ...nt fixing screws are hexagonal socket head fixing screws M6 Note that they will come off the projector if they are loosened too much Removing the projector from the track system 1 Turn off the power of the track system WARNING When removing the projector from the track system be sure to turn off the power of the track system Electric shocks can result 2 Remove the adapter cover f f While pushing b...

Страница 39: ...stem f f Completely turn the adapter lever in the direction of the arrow shown in the figure i and pull out from the track system while tilting the adapter ii i ii Lever Adapter 5 Turn the lever B 90 and turn the lever A to the same side to direct them 90 against the track system WARNING Hold the projector with your hand when removing it from the track system Release the lever B first when removin...

Страница 40: ...main unit last i ii Lever A Lever B Note f f The projector will fall off from the track system when this lever operation is performed without holding the projector Hold the projector with your hand when removing it from the track system 6 Remove the projector from the track system f f Confirm that both hook clasps of the track mount parts A B are removed from the track system and then remove the p...

Страница 41: ... f Some computer models or graphics cards are not compatible with the projector f f Use a cable compensator when you connect devices to the projector using long cables Otherwise the image may not display properly f f Only HDMI signals can be input to the projector Refer to List of compatible signals x page 215 for the types of video signals that can be used with the projector Connecting example Ex...

Страница 42: ...to attach LAN terminal cap HDMI terminal cap Card slot cap Note f f The card slot cap can be attached even when an SD card is inserted The direction of attaching the card slot cap will differ as shown below depending on the existence of the SD card Check the condition of the SD card slot and the direction of the card slot cap before attaching SD card Card slot cap f f Do not insert with excessive ...

Страница 43: ...ENGLISH 43 Chapter 3 Basic Operations This chapter describes basic operations to start with ...

Страница 44: ...TWORK Projection will start when the power v b button is pressed f f The projector may not operate when the temperature indicator TEMP is blinking x page 199 Blinking 2 The power is switched off in standby mode STANDBY MODE in the SETUP menu ECO MANAGEMENT is set to NORMAL Projection will start when the power v b button is pressed f f The projector may not operate when the temperature indicator TE...

Страница 45: ... f f It may take longer for the projection to start when the SETUP menu ECO MANAGEMENT STANDBY MODE is set to ECO or NETWORK when compared set to NORMAL f f When the power is turned on or an input signal is switched you may hear a high frequency driving sound This is not a malfunction f f When the SETUP menu INITIAL STARTUP is set to LAST MEMORY and the projection was ended by turning off the powe...

Страница 46: ...he remote control to select an item 2 Press qw on the remote control to switch the setting 2 4 INITIAL SETTING PROJECTION METHOD OFF FRONT VERTICAL FLIP MENU SELECT CHANGE SET OFF HIGH ALTITUDE MODE Change PROJECTION METHOD or VERTICAL FLIP if the screen display is upside down or inverted SWITCH TO HIGH ALTITUDE MODE HIGH1 IF BETWEEN 1000m 2000m 3281Ft 6562Ft SWITCH TO HIGH ALTITUDE MODE HIGH2 IF ...

Страница 47: ...ime Change the time zone according to the region where you use the projector Making adjustments and selections It is recommended to adjust the focus after 30 minutes have elapsed projecting 3 1 7 6 4 2 1 Press the FOCUS button on the remote control to roughly adjust the focus of the projection light x page 50 2 Set the SETUP menu PROJECTION METHOD x page 68 and VERTICAL FLIP x page 69 according to...

Страница 48: ... power v b button the projector consumes power if the power of the track system is turned on The power consumption during standby can be conserved when the SETUP menu STANDBY MODE is set to ECO f f The projector can be turned off by turning off the power of the track system during the projection but the settings and adjustments performed right before turning off the power may not be reflected f f ...

Страница 49: ...cted Remote control button Input Usage HDMI HDMI Displays the image input to the HDMI IN terminal from the external device MEMORY VIEWER Memory Viewer Displays the still image or movie recorded in the SD card using the Memory Viewer function x page 93 Miracast Miracast Displays the image transmitted wirelessly from the Miracast compatible terminal x page 125 Panasonic APP Panasonic APPLICATION Dis...

Страница 50: ...When a projection position is required to be adjusted adjust according to the steps described in Adjusting the projection position x page 37 f f The operation can be sped up by pressing asqw for at least one second f f It is recommended to adjust the focus after 30 minutes have elapsed projecting f f Only FOCUS is shown in yellow so that the displayed menu item can be recognized by color even when...

Страница 51: ...r the data may be destroyed f f Manage the contents in the SD card under your responsibility It is recommended to take a backup of important data on other disc etc f f Panasonic assumes no responsibility for loss of data recorded by yourself or any other direct or indirect damage f f It is recommended to physically destroy the card with a hammer etc when discarding Cards that can be used with the ...

Страница 52: ...is not blinking 2 Lightly press center of the SD card 3 Hold onto the slightly ejected SD card and pull it out f f Note that pulling out the card forcibly while it is inserted will cause a malfunction Attention f f Do not perform following when the projector is accessing the SD card while the SD card indicator SD is blinking g g Ejecting the SD card g g Turning off the power of the track system g ...

Страница 53: ...n the projection screen when the switching takes time Switching the input The input for projection can be switched button 1 Press the HDMI MEMORY VIEWER Miracast Panasonic APP or SIGNAGE button HDMI Switches the input to HDMI MEMORY VIEWER Switches the input to Memory Viewer x page 66 Miracast Switches the input to Miracast x page 125 Panasonic APP Switches the input to Panasonic APPLICATION SIGNA...

Страница 54: ...each projector individually using single remote control if a unique ID number is assigned to each projector After setting the ID number of the projector set same ID number on the remote control The factory default ID number of the projector is set to ALL When using a single projector press the ID ALL button on the remote control Also you can control a projector by pressing the ID ALL button on the...

Страница 55: ...ENGLISH 55 Chapter 4 Settings This chapter describes the settings and adjustments you can make using the on screen menu ...

Страница 56: ...SETUP SECURITY NETWORK MENU SELECT SUB MENU DISPLAY LANGUAGE DISPLAY OPTION TEST PATTERN ENTER 2 Press as on the remote control to select a main menu item f f The selected item is highlighted by yellow cursor MAIN MENU PROJECTOR PICTURE MEMORY VIEWER SETUP SECURITY NETWORK MENU SELECT SUB MENU DISPLAY LANGUAGE DISPLAY OPTION TEST PATTERN ENTER 3 Press the ENTER button on the remote control f f The...

Страница 57: ...red to the factory default settings button 1 Press the DEFAULT button on the remote control 0 CONTRAST ADJUST Note f f You cannot reset all the settings to the factory default at a time f f To reset all the adjusted sub menu items to the factory defaults at a time perform the SETUP menu INITIALIZE x page 76 f f Some items cannot be reset to the factory default settings even when the DEFAULT button...

Страница 58: ... mode Sub menu item Factory default Page PATTERN CIRCULAR LIGHT1 60 COLOR SETTING SUPER WHITE 60 DIMMER 100 62 PICTURE Only in the projector mode Sub menu item Factory default Page PICTURE MODE DYNAMIC 63 CONTRAST 0 63 BRIGHTNESS 0 64 COLOR 0 64 TINT 0 64 COLOR TEMPERATURE MIDDLE 64 DIMMER 100 65 MEMORY VIEWER Only in the projector mode Sub menu item Factory default Page VIEW THUMBNAIL 66 SORT NAM...

Страница 59: ...ETWORK Sub menu item Factory default Page PROJECTOR NAME NAME1234 1 77 WIRED LAN 77 WIRELESS LAN M DIRECT 78 NETWORK CONTROL 81 Panasonic APPLICATION 2 81 NETWORK STATUS 83 Art Net OFF 83 1 Differs depending on the product 2 Only in the projector mode DISPLAY OPTION Only in the projector mode Sub menu item Factory default Page HDMI IN 87 ON SCREEN DISPLAY 87 AV MUTE 88 DISPLAY LANGUAGE Details x p...

Страница 60: ... refer to Registering a lighting pattern x page 192 f f Even when either of SD1 to SD10 is set as PATTERN the pattern will be the same as that for CIRCULAR LIGHT1 if corresponding still image contents are not registered to the SD card or if an SD card is not inserted into the SD card slot COLOR SETTING Set the color for lighting 1 Press as to select COLOR SETTING 2 Press qw or the ENTER button f f...

Страница 61: ... WHITE Sets the base color to warm white LIGHT Sets the base color to light bulb color RED Sets the base color to red GREEN Sets the base color to green BLUE Sets the base color to blue YELLOW Sets the base color to yellow CYAN Sets the base color to cyan MAGENTA Sets the base color to magenta 8 Press the RETURN or MENU button 9 Press as to select RED GREEN or BLUE 10 Press qw to adjust the level ...

Страница 62: ...DIMMER individual adjustment screen is displayed 3 Press qw to adjust the level Operation Adjustment Range of adjustment Press w Makes brighter 0 100 Factory default is 100 Press q Makes darker Note f f Lighting color may appear reddish depending on the set value f f The set value for DIMMER is also reflected in DIMMER x page 65 in PICTURE ...

Страница 63: ...ment screen is displayed 3 Press qw to switch the item f f The items will switch each time you press the button DYNAMIC The light output is maximized for use in bright areas NORMAL The image becomes suitable for movie type video contents in general Note f f The PICTURE MODE setting is also reflected in the menu screen CONTRAST Adjust the contrast of the colors 1 Press as to select CONTRAST 2 Press...

Страница 64: ... select TINT 2 Press qw or the ENTER button f f The TINT individual adjustment screen is displayed 3 Press qw to adjust the level Operation Adjustment Range of adjustment Press w Adjusts skin tone toward greenish color 31 31 Press q Adjusts skin tone toward reddish purple COLOR TEMPERATURE Switch the color temperature if the white areas of the projected image are bluish or reddish Adjusting with c...

Страница 65: ...l colors will not be displayed properly unless adequate adjustment is made If the adjustment does not look suitable you can press the DEFAULT button on the remote control to return the setting for the selected item only to the factory default setting f f The setting of COLOR TEMPERATURE is not reflected in internal test patterns x page 91 Make sure to set COLOR TEMPERATURE while the input signal i...

Страница 66: ...he display order of files in the Memory Viewer screen 1 Press as to select SORT 2 Press qw to switch the item f f The items will switch each time you press the button NAME Displays the files in the ascending order by the file name TYPE Displays the files by the types of files TIME Displays the files in order from the file whose update time is the oldest AUTOPLAY Enable disable automatic playback 1...

Страница 67: ...rtical blind CHECKER WIPE Displays the image gradually from the left to right in checkerboard patterns SLIDE IN Displays the next screen as if it slides in from the right to left SLIDE OUT Displays the next screen by removing the current screen as if it slides out from the right to left Note f f If you change the EFFECT setting during playback on the Memory Viewer the change will not be reflected ...

Страница 68: ...ify an ID number for individual control the ID number of a remote control must match the ID number of the projector f f When the ID number is set to ALL the projector will operate regardless of the ID number specified during remote control or computer control If multiple projectors are set up side by side with IDs set to ALL they cannot be controlled separately from the projectors with other ID nu...

Страница 69: ...the input signal converted to the aspect ratio of the screen Note f f If an aspect ratio which is different from the aspect ratio for the input signals is selected the images will appear differently from the originals Be careful of this when selecting the aspect ratio f f If using the projector in places such as cafes or hotels to display programs for a commercial purpose or for public presentatio...

Страница 70: ...mall as possible f f Image size will also change when adjustments are performed with KEYSTONE f f The menu may run off the screen when adjustments are performed with KEYSTONE f f Aspect ratio of the image size may shift depending on the amount of correction or lens zoom value f f The KEYSTONE setting is not reflected in internal test patterns x page 91 SIGNAGE Set the playback method of contents u...

Страница 71: ...e playback In addition pressing each of the HDMI MEMORY VIEWER Miracast Panasonic APP or LIGHTING PROJECTOR button while in signage playback stops signage playback and switches the input or projection mode to a corresponding one HIGH ALTITUDE MODE Set this item to other than OFF when using the projector at high altitudes between 1 000 m 3 281 and 2 700 m 8 858 above sea level 1 Press as to select ...

Страница 72: ...l switch each time you press the button ECO Select this item to reduce power consumption during standby NETWORK Select this item to reduce power consumption during standby and to operate the projector via wired LAN using the Wake on LAN function NORMAL Select this item to use the network function during standby Or select this item to synchronize with the NTP server and adjust the date and time of ...

Страница 73: ...IGNAGE Sets the input to signage LIGHTING Starts projecting in the lighting mode Note f f If POWER of the restart option is enabled in Setting the restart option x page 71 which explains the SETUP menu SIGNAGE the input switches to signage regardless of the STARTUP INPUT SELECT setting as the signage playback schedule restarts at the same time when the power is turned on AUDIO SETTING Set detailed...

Страница 74: ...r of the projector MAIN VERSION Displays the main version of the firmware of the projector SUB VERSION Displays the sub version of the firmware of the projector NETWORK VERSION Displays the network version of the projector Note f f The content of status can be sent via E mail to E mail addresses up to two set in E mail set up page x page 115 by pressing the ENTER button while the STATUS screen is ...

Страница 75: ...TP server function By using this projector as an NTP server you can synchronize the time of other projectors in the same network For example it is effective when you use multiple projectors of this model and play back the schedule of the Content Manager simultaneously under the environment where access to an external NTP server is not possible For the steps to play back a schedule simultaneously r...

Страница 76: ...SIGNAGE NETWORK and E mail set up to the factory default settings The projector enters the standby mode to reflect the setting values NETWORK E MAIL Returns SIGNAGE NETWORK and E mail set up to the factory default settings 5 Press the ENTER button 6 When the confirmation screen is displayed press qw to select OK and press the ENTER button f f PROGRESS is displayed while initialization is being per...

Страница 77: ...IRED LAN 2 Press the ENTER button f f The WIRED LAN screen is displayed 3 Press as to select an item and change the settings according to the operation instructions of the menu DHCP Set to ON when obtaining an IP address automatically using a DHCP server Set to OFF when not using a DHCP server IP ADDRESS Enter the IP address when not using a DHCP server SUBNET MASK Enter the subnet mask when not u...

Страница 78: ...ricted to indoor use when operated in the following frequency range 5 15 to 5 35 GHz Channels 36 to 64 5 725 to 5 85 GHz Channels 149 to 165 Note f f If S DIRECT or M DIRECT is set up to 10 devices can be connected to the projector via wireless LAN f f Even when S DIRECT or M DIRECT is selected in WIRELESS LAN the setting will be disabled if the input is Miracast f f When WIRELESS LAN is selected ...

Страница 79: ...DHCP server DEFAULT GATEWAY Enter the default gateway address when not using a DHCP server DNS1 Enter the primary DNS server address when not using a DHCP server DNS2 Enter the secondary DNS server address when not using a DHCP server Note f f When you use a DHCP server confirm that the DHCP server is running f f Consult your network administrator regarding the IP address subnet mask default gatew...

Страница 80: ... EAP TTLS MD5 EAP TTLS MS CHAPv2 EAP FAST MS CHAPv2 EAP FAST GTC USER NAME Enter the user name to be used for authentication in single byte alphanumeric characters space not included 64 characters at the maximum It can be selected when AUTHENTICATION is set to WPA EAP WPA2 EAP WPA EAP or WPA2 EAP PASSWORD Enter the password to be used for authentication in single byte alphanumeric characters 64 ch...

Страница 81: ...ONTROL screen is displayed 3 Press as to select an item and press qw to change the setting WEB CONTROL Set to ON to control with the web browser PJLink CONTROL Set to ON to control with the PJLink protocol COMMAND CONTROL Set to ON when you control the projector using control commands Refer to Control commands via LAN x page 206 COMMAND PORT Set the port number used for command control Crestron Co...

Страница 82: ...ayed 3 Press as to select MULTI LIVE and press the ENTER button f f The projector is switched to multi live mode f f The items will switch each time you select MULTI LIVE f f The style switches to 4 screen multi 4 screen index and 16 screen index in order Setting PASSWORD By setting the projector to require password entry when a device is connected you can prevent image cut in due to wrong externa...

Страница 83: ...mary DNS server DNS2 Displays the address of the secondary DNS server MAC ADDRESS Displays the MAC address of wired LAN WIRELESS LAN Displays the network information of the wireless LAN set on the projector ANTENNA LEVEL Displays the signal status of wireless LAN NETWORK Displays the connection method of wireless LAN CHANNEL Displays the channel used for wireless LAN SSID Displays the string of SS...

Страница 84: ...o be connected to the projector UNIVERSE Enter the universe setting of the control console to be connected to the projector START ADDRESS Enter a start address where the projector processes Art Net f f When 2 x x x or 10 x x x is selected in Step 5 proceed to Step 8 7 Press as to select each item and change the settings according to the operation instructions of the menu DHCP Set to ON when obtain...

Страница 85: ...N screen 2 2 is displayed 9 Press as to select each item and change the settings according to the operation instructions of the menu SSID Enter the same string as the SSID registered to the access point AUTHENTICATION Select the user authentication method used in the network to which the projector is connected OPEN Select this item when the authentication method of the access point is Open System ...

Страница 86: ...P FAST MS CHAPv2 EAP FAST GTC USER NAME Enter the user name to be used for authentication in single byte alphanumeric characters space not included 64 characters at the maximum It can be selected when AUTHENTICATION is set to WPA EAP WPA2 EAP WPA EAP or WPA2 EAP PASSWORD Enter the password to be used for authentication in single byte alphanumeric characters 64 characters at the maximum It can be s...

Страница 87: ...n the DVI terminal output of an external device such as a computer is connected to the HDMI IN terminal via a conversion cable or similar cable Select it also when the HDMI terminal output of a computer or other device is connected to the HDMI IN terminal Note f f The optimal setting varies depending on the output setting of the connected external device Refer to the operating instructions of the ...

Страница 88: ...of the warning message 1 Press as to select ON SCREEN DISPLAY 2 Press the ENTER button f f The ON SCREEN DISPLAY screen is displayed 3 Press as to select WARNING MESSAGE 4 Press qw to switch the item f f The items will switch each time you press the button ON Displays the warning message OFF Hides the warning message AV MUTE Turn off lighting or projection and audio output temporarily when the pro...

Страница 89: ...he language of the on screen display DISPLAY LANGUAGE DISPLAY LANGUAGE f f Various menus settings adjustment screens control button names etc are displayed in the selected language f f The language can be changed to English German French Italian Spanish Portuguese Dutch Swedish Finnish Norwegian Danish Polish Hungarian Romanian Czech Russian Turkish Arabic Kazakh Vietnamese Chinese Korean Japanese...

Страница 90: ...tions other than the power v b button and the AV MUTE button become disabled 1 Press as to select SECURITY PASSWORD 2 Press qw to switch the item f f The items will switch each time you press the button OFF Disables the security password entry ON Enables the security password entry Note f f SECURITY PASSWORD is set to OFF at the time of purchase or when ALL USER DATA in INITIALIZE x page 76 has be...

Страница 91: ... items will switch each time you press the button Menu screen All white Displays test patterns with the menu screen Select a test pattern so that it is easy to make various adjustments Menu screen All black Menu screen Color bar vertical Menu screen Cross hatch Menu screen Entry screen Displays the menu screen and input signal Built in test patterns are not displayed Note f f Pressing the MENU or ...

Страница 92: ...92 ENGLISH Chapter 5 Operations This chapter describes how to use each function ...

Страница 93: ...odec of WMV7 WMV8 DivX or Xvid f f Uncompressed video f f Multi angle video f f Files with the profile of Advanced Simple Profile Level 0 or Advanced Simple Profile Level 1 Note f f Some information for still image movie files can be viewed with a computer where relevant files are accessible Operation example g g For Windows computer 1 Right click a file and click Properties 2 Click the Details ta...

Страница 94: ...the thumbnail view area on the right Background color yellow 3 Press asqw to select a file f f The information on the still image or movie file is displayed in the information area on the lower left of the screen 4 Press the ENTER button f f Playback starts in the full screen display f f Refer to Playing back still images x page 96 or Playing back movies x page 97 for detailed playback procedure 5...

Страница 95: ... Press the ENTER button f f Playback starts in the full screen display f f Refer to Playing back still images x page 96 or Playing back movies x page 97 for detailed playback procedure 5 Press the RETURN button to end playback f f Full screen display ends and the Memory Viewer screen list view is displayed f f To subsequently play back another file perform Steps 1 to 4 Note f f While the Memory Vi...

Страница 96: ...playback rotates the image 90 clockwise with the aspect ratio maintained f f Pressing s during playback rotates the image 90 counterclockwise with the aspect ratio maintained 2 Press the RETURN button f f Automatic playback ends and the Memory Viewer screen thumbnail view returns When automatic playback is disabled This section describes the operations when the MEMORY VIEWER menu AUTOPLAY x page 6...

Страница 97: ...playback ends and the Memory Viewer screen thumbnail view returns When automatic playback is disabled This section describes the operations when the MEMORY VIEWER menu AUTOPLAY x page 66 is set to OFF In this case files to be projected are selected and played back one by one 1 Press asqw to select a file from the thumbnails and press the ENTER button f f Playback starts in the full screen display ...

Страница 98: ...itions are met playback of still images movies starts automatically when the projector is turned on f f Automatic playback is enabled g g The MEMORY VIEWER menu AUTOPLAY x page 66 is set to ON f f The input is set to Memory Viewer when the power is turned on to start projection g g The SETUP menu STARTUP INPUT SELECT x page 73 is set to MEMORY VIEWER g g The SETUP menu STARTUP INPUT SELECT x page ...

Страница 99: ...rol are pressed the operation is disabled if the folder corresponding to the pressed number button does not exist or if the files that can be played back with the Memory Viewer are not saved f f For the operations during playback refer to Playing back still images x page 96 and Playing back movies x page 97 Memory Viewer screen descriptions The icons on the Memory Viewer screen indicate the follow...

Страница 100: ...ger ME6 2 and Multi Projector Monitoring Control Software refer to the Operating Instructions of them included in the supplied CD ROM Refer to the following URL for image transfer application software that supports iPad iPhone iPod touch and Android terminals http panasonic net avc projector f f Signage playback You can configure the settings for Signage playback function which allows you to proje...

Страница 101: ...n the projector 3 Press the MENU button to open the NETWORK menu and configure settings for WIRED LAN f f Refer to WIRED LAN x page 77 for details Note f f Consult your network administrator before connecting to an existing network f f The following settings are configured as the factory defaults DHCP OFF IP ADDRESS 192 168 10 100 SUBNET MASK 255 255 255 0 DEFAULT GATEWAY 192 168 10 1 DNS1 DNS2 No...

Страница 102: ...d terminal and computer on which Panasonic s image transfer application software has been installed Input Miracast Panasonic APPLICATION Communication method IEEE802 11a n IEEE802 11b g n Connection method WPS Wi Fi Direct Panasonic exclusive method connection by user Image transmission method Miracast Panasonic exclusive method Setting for projector 1 Turn on the projector 2 Press the MENU button...

Страница 103: ...DIRECT is set on the projector side set Obtain an IP address automatically in the network setting on the computer side f f If USER1 through USER3 are set on the projector side follow the instructions of your network administrator and configure each network setting item of your computer and the projector 3 Connect the computer to the network set for the projector f f For Windows computers click in ...

Страница 104: ...For details of Crestron ConnectedTM refer to the website of Crestron Electronics Inc English only URL http www crestron com To download RoomView Express go to the website of Crestron Electronics Inc English only URL http www crestron com getroomview Computer that can be used for setting A web browser is required to use the web control function Confirm that your web browser can be used beforehand O...

Страница 105: ...are given in assumption that Windows 8 OS and the web browser Internet Explorer 10 are used The actual size or indications of the screens may differ from that of this manual depending on the OS or web browser you use Available functions per account With the administrator rights all functions can be used With the user rights available functions are restricted Select an account according to the purp...

Страница 106: ...ector 2 PROJECTOR NAME Displays the projector name set for the projector 3 MAIN VERSION Display the firmware version of the projector 4 POWER Displays the status of the power 5 LIGHT POWER Displays the setting status of LIGHT POWER x page 71 6 SERIAL NUMBER Displays the serial number of the projector 7 NETWORK VERSION Displays the version of the firmware of the network 8 AV MUTE Displays the AV mu...

Страница 107: ...iance LD MODULE TEMPERATURE The temperature of the light source is high The projector is possibly used in an environment where the temperature is high such as near a heating appliance LOW TEMPERATURE The internal temperature of the projector or ambient temperature is low Projection cannot be started until the internal temperature of the projector or ambient temperature becomes warm LD STATUS The l...

Страница 108: ...tings of wireless LAN 2 WIRED LAN Displays the settings of wired LAN Access error log page Click Status Access error log The error log on the web server is displayed such as access to the pages that do not exist or access with unauthorized user names or passwords E mail error log page Click Status E mail error log E mail error information is displayed if periodic E mail sending fails ...

Страница 109: ...he picture mode 6 AV MUTE Switches AV mute on off 7 POWER Switches on off the power Attention f f When you turn on the projector be careful so that the eyes of people around the projector are not exposed to the sudden light from the light source Or operate the projector only if the eyes of people around the projector are not exposed to the light from the light source even when projection starts su...

Страница 110: ...o other than Miracast beforehand Advanced control page Click Projector control Advanced control If the projection mode is set to lighting mode switch to the projector mode in the Basic control page and click Projector control Advanced control 1 2 3 4 1 KEYSTONE Corrects horizontal vertical keystone distortion 2 PICTURE Switches the input 3 DIMMER Adjusts the brightness 4 LENS Adjusts the projectio...

Страница 111: ...G 3 Back button Returns to the previous screen Note f f For details of settings refer to Setting a desired color x page 61 which explains the LIGHTING menu COLOR SETTING of the projector Network config page Click Detailed set up Network config 1 Click Network config f f The CAUTION screen is displayed 2 Select an item for which you want to change the setting and click the Next button f f The curre...

Страница 112: ...e settings Click the Submit button to update the settings Note f f When you use the Forward or Back functions of your browser a warning message Page has Expired may appear In that case click Network config again as the subsequent operations will not be guaranteed f f Changing LAN settings while connected to the LAN may cause the connection to cut out Connecting with wireless LAN M DIRECT 6 5 4 3 1...

Страница 113: ...d in the network to which the projector is connected 9 EAP Select the EAP set for RADIUS server 10 ENCRYPTION Select the encryption method used for the communication between the projector and the network Note f f The contents in the setting screen differ depending on the authentication method of the connected wireless LAN Adjust clock page Click Detailed set up Adjust clock 1 2 3 4 5 6 7 1 Time Zo...

Страница 114: ...nection has succeeded 4 Example of display when the connection has failed ECO management set up page Settings related to the ECO management function of the projector can be made Click Detailed set up ECO management set up 1 2 3 1 LIGHT POWER Select the light source power setting 2 NO SIGNAL SHUT OFF When NO SIGNAL SHUT OFF is used select the time until the projector goes into the standby status 3 ...

Страница 115: ...r the temperature warning E mail The default value is 60 minutes In this case another E mail will not be sent for 60 minutes after sending the temperature warning E mail even if it reaches the warning temperature 6 INTAKE AIR TEMPERATURE Change the temperature setting for the temperature warning mail A temperature warning E mail is sent when the temperature exceeds this value 8 7 7 E MAIL ADDRESS ...

Страница 116: ...s to send E mails to the second E mail address MAIL CONTENTS Select either NORMAL or SIMPLE ERROR Sends an E mail when an error occurred in the self diagnosis INTAKE AIR TEMPERATURE Sends an E mail when the air intake temperature has reached the value set at the above field PERIODIC REPORT Place a check mark on this to send an E mail periodically to the second E mail address E mails will be sent a...

Страница 117: ...Z a z 0 9 Minus sign and period 4 User name Enter the user name for the POP server or the SMTP server 5 Password Enter the password for the POP server or the SMTP server 6 SMTP server port Enter the port number of the SMTP server Normally 25 7 POP server port Enter the port number of the POP server Normally 110 8 Submit button Update the settings Port set up page Set the port number used for comma...

Страница 118: ...17 00 ON 18 00 ON 19 00 ON 20 00 ON 21 00 ON 22 00 ON 23 00 ON check system MAIN CPU BUS OK FAN OK INTAKE AIR TEMPERATURE OK OPTICS MODULE TEMPERATURE OK LD MODULE TEMPERATURE OK LOW TEMPERATURE OK LD STATUS OK INTAKE AIR TEMP SENSOR OK OPTICS MODULE TEMP SENSOR OK LD MODULE TEMP SENSOR OK BATTERY OK PHOSPHOR WHEEL OK COLOR WHEEL OK COVER OPEN OK Error code 00 00 00 00 00 00 00 00 00 00 00 00 01 0...

Страница 119: ... SENSOR OK LD MODULE TEMP SENSOR OK BATTERY OK PHOSPHOR WHEEL OK COLOR WHEEL OK COVER OPEN OK Error code 00 00 00 00 00 00 00 00 00 00 00 00 01 00 00 89 Intake air temperature 158 degC 316 degF Optics module temperature 28 degC 82 degF PROJECTOR RUNTIME 30 H Current status MAIN VERSION 1 00 NETWORK VERSION 1 00 SUB VERSION 1 00 POWER STATUS POWER ON INPUT HDMI SIGNAL NAME SIGNAL FREQUENCY kHz H Wi...

Страница 120: ...e password Administrator account 1 2 3 4 5 6 7 1 Account Displays the account to change 2 Current User name Enter the user name before the change 3 Current Password Enter the current password 4 New User name Enter the desired new user name Up to 16 characters in single byte 5 New Password Enter the desired new password Up to 16 characters in single byte 6 New Password Retype Enter the desired new ...

Страница 121: ... Enter the desired new password again 5 OK button Determines the change of password Change password For user rights Only the change of password is enabled under the user rights 1 2 4 3 1 Old Password Enter the current password 2 New Password Enter the desired new password Up to 16 characters in single byte 3 Retype Enter the desired new password again 4 OK button Determines the change of password ...

Страница 122: ...3 4 5 6 7 1 Tools Info Help tab Tabs for switching the setting information or help page of the projector 2 POWER button Switches off on the power 3 VOL DOWN AV MUTE VOL UP button Operates the volume AV mute These operations are not available when the projector is turned off 4 Input Select button Controls input selection The operation is not available when the projector is turned off 5 Menu screen ...

Страница 123: ...Displays the current setting value IpAddress Displays the current setting value SubnetMask Displays the current setting value DefaultGateway Displays the current setting value DNSServer Displays the current setting value 5 Exit button Returns to the operation page Info page Click the Info tab on the operation page 4 5 6 7 1 2 3 8 1 Projector Name Displays the projector name 2 Mac Address Displays ...

Страница 124: ...tions Web control function 124 ENGLISH Help page Click the Help tab on the operation page The Help Desk window is displayed 1 1 Help Desk Sends receives messages to from an administrator who uses Crestron ConnectedTM ...

Страница 125: ...e operation of Miracast application refer to the operating instructions of your terminal f f The default projector name is NAMExxxx and the network ID is Projxxxx xxxx is a four digit number and differs depending on the product You can check the projector name network ID MAC address of wireless LAN from the NETWORK menu NETWORK STATUS x page 83 Terminating connection with the Miracast compatible t...

Страница 126: ...playback The signage playback function schedule slideshow can use the following still image movie music files Still image Extension Format Restriction jpg jpeg JPEG Number of pixels Maximum 8 000 x 8 000 For progressive JPEG maximum 4 096 x 4 096 YUV format Only YUV444 YUV422 and YUV411 supported Color mode Only RGB supported bmp Windows Bitmap Number of pixels Maximum 2 000 x 2 000 1 bit 4 bit 8 ...

Страница 127: ... it may take time to display a still image Speed class Class 10 recommended f f For SD cards compatible with the projector refer to Cards that can be used with the projector x page 51 Computers for the signage setting The signage setting is performed by connecting a client computer including iPad iPhone iPod touch or Android terminal to the projector A web browser is required for the setting Prepa...

Страница 128: ... f f When the PRIVATE folder in the SD card is deleted on the computer data such as slideshow settings and contents registered using the Content Manager will be lost f f If the SETUP menu ECO MANAGEMENT STANDBY MODE x page 72 is set to ECO or NETWORK and the projector is in standby state you cannot log in to the Content Manager of the projector from the client computer f f To switch to the Schedul...

Страница 129: ... can use all Content Manager functions If you log in with the user rights you can check registered schedules or timetables and the content of preset slideshow but cannot register edit or play them f f When no SD card is inserted in the SD card slot or the projector cannot recognize the SD card the person will be logged out forcibly f f If the Content Manager screen is not displayed consult your ne...

Страница 130: ...e slideshow and log out from the Content Manager 1 Click the Logout button on the top right of the screen f f Logout from the Content Manager is complete and the login screen is displayed 2 Click the close button of the web browser to exit f f To use the Content Manager again access the projector from the web browser Logging in to the Content Manager x page 128 Note f f Other than the start screen...

Страница 131: ... schedule x page 157 3 Timetable button Click this to display the timetable page Register the contents to be played in one day Creating a timetable x page 132 4 Projector name Displays the name of the connected projector 5 Login rights information Displays the logged in account rights 6 Calendar icon Click this to display the schedule confirmation screen Check the registered schedule Checking a sc...

Страница 132: ... when selected and displays the registered brightness content in a timetable Click the icon again to cancel the selection then the icon color changes to white 8 Power supply content display icon This icon becomes yellow when selected and displays the registered power supply content in a timetable Click the icon again to cancel the selection then the icon color changes to white 9 Music content disp...

Страница 133: ...ils on registration procedure refer to Registering content in a timetable x page 134 5 Check the timetable content f f Preview the timetable where the contents are registered Note f f After the timetable content played back in a day to be used by the specified date or by the day of the week set the schedule Refer to Setting a schedule x page 157 for details f f For operations of the timetable or c...

Страница 134: ...2 3 4 6 9 8 1 2 3 4 8 2 3 4 7 8 2 3 4 8 When registering still image content When registering movie external input content When registering playlist When registering music content When registering brightness content When registering power supply content 1 Content name Displays the selected content name 2 Start Set the time to start playback of the content 3 End Select the radio button and set the ...

Страница 135: ...g a playlist x page 150 r r Procedure 1 Click the tab of the content to register in the timetable from the Content selection tab f f Clicking the tab changes the Content list display 2 Register the content in the timetable f f Drag the content to be registered in the timetable from the Content list into the Timetable Content list Timetable f f To add and register new contents still image movie mus...

Страница 136: ... light source will not enter the eyes of people around the projector even if it starts projection suddenly Note f f Up to 99 timetables can be registered f f Up to 100 contents can be registered in one timetable f f During playback of movie external input content music content is not played f f If you click the Save button without entering the timetable name the timetable name entry screen is disp...

Страница 137: ...the confirmation screen is displayed click the OK button f f The selected image content is deleted from the timetable f f Deleting content from the timetable will not delete the content from the SD card Deleting music content registered in a timetable Delete music content registered in a timetable 1 2 3 1 Music content display 2 Content in timetable deletion 3 Timetable 1 Click to select it f f Wh...

Страница 138: ...s displayed click the OK button f f The selected music content is deleted from the timetable Deleting brightness content registered in a timetable Delete brightness content registered in a timetable 1 2 3 1 Brightness content display 2 Content in timetable deletion 3 Timetable 1 Click to select it f f When selected the icon color changes to yellow f f When the icon is displayed in white it is not ...

Страница 139: ...isplayed click the OK button f f The selected brightness content is deleted from the timetable Deleting power supply content registered in a timetable Delete power supply content registered in a timetable 1 2 3 1 Power supply content display 2 Content in timetable deletion 3 Timetable 1 Click to select it f f When selected the icon color changes to yellow f f When the icon is displayed in white it...

Страница 140: ... f f You can select multiple contents 4 Click the Delete button 5 When the confirmation screen is displayed click the OK button f f The selected power supply content is deleted from the timetable Changing the settings of content registered in a timetable Change the settings of content registered in a timetable r r Timetable page Timetable ...

Страница 141: ...ent For details of the setting items refer to Effect x page 196 6 Color Select the color setting to be reflected when playing image content For details of the setting items refer to Color x page 196 7 Brightness Select the brightness to be reflected when playing image content 8 Enter button Click this to confirm the settings 9 Display button Click this to display the Playlist edit screen Editing a...

Страница 142: ... selection screen is displayed 2 Select a preview mode and click the Start button f f When WEB browser is selected the image is displayed on the web browser f f When Projector is selected the image is displayed on the projection screen Note f f In the following cases the projector mode Projector is not available g g During signage playback schedule slideshow g g When the input is other than signag...

Страница 143: ...on screen f f An operation screen is displayed on the web browser as follows Operation icon Performance Stops playback Starts or pauses playback The icon display changes depending on the playback state Note f f When there is a blank period between contents the period is handled as one content and displayed in preview f f Regardless of the content setting still image content is played for 10 second...

Страница 144: ...Editing registration information of content x page 147 f f Creating a playlist x page 148 Registering content in a content list Register still image movie music files in the SD card as contents from the client computer Content selection tab Content list 1 In the timetable page click the tab of the content to register among the Content selection tab f f Clicking the tab changes the Content list dis...

Страница 145: ...r to delete content from the Add content screen go to Step 6 and to end adding content proceed to Step 10 f f Up to 10 contents can be registered in the Add content screen 6 To cancel addition of content click on the Add content screen f f The mode changes to deletion mode 7 Select the content for which you want to cancel addition f f You can select multiple contents 8 Click the Delete button 9 Wh...

Страница 146: ... tab of the content to delete among the Content selection tab f f Clicking the tab changes the Content list display Content deletion 2 Click in the Content list f f The mode changes to deletion mode 3 Select the content to delete f f You can select multiple contents 4 Click the Delete button 5 When the confirmation screen is displayed click the OK button f f The selected content is deleted from th...

Страница 147: ...on information you want to edit from the Content selection tab f f Clicking the tab changes the Content list display 2 In the Content list click the content of which registration information you want to change f f The Content edit screen is displayed 3 Change Content name and or Duration and click the Enter button f f You can change Content name and Duration in the case of still image content and ...

Страница 148: ...x page 152 f f Changing the settings of content registered in a playlist x page 152 f f Duplicating a playlist x page 153 f f Displaying preview of playlist contents x page 154 Registering playlist Bundle multiple still image movie external input contents and register them as one content called playlist Content selection tab 1 In the timetable page click the Playlist tab among the Content selectio...

Страница 149: ...ntent list into the playlist Content list Playlist f f The Content registration screen is displayed 5 Input Duration and Effect and click the Enter button f f The content is registered in the playlist Total time f f You can set Effect only for still image content f f To continue to register content go back to Step 3 f f The total playback time of the contents registered in the playlist is displaye...

Страница 150: ...ge movie external input can be registered in a playlist f f Up to 100 contents can be registered in one playlist f f Up to 500 playlists can be registered However it may not be possible to register 500 files depending on the capacity of the SD card f f If you click the Save button without entering the playlist name the playlist name entry screen is displayed Enter the playlist name and click the E...

Страница 151: ... a playlist you want to edit and click the Execute button f f The Playlist edit screen is displayed Playlist 4 Editing a playlist f f To add content perform the procedure same as Registering playlist x page 148 f f To delete content refer to Deleting content registered in a playlist x page 152 f f To change content settings refer to Changing the settings of content registered in a playlist x page ...

Страница 152: ...de 2 Select the content to delete f f You can select multiple contents 3 Click the Delete button 4 When the confirmation screen is displayed click the OK button f f The selected content is deleted from the playlist f f Return to the Playlist edit screen and click the Save button to register the edited playlist in the SD card Changing the settings of content registered in a playlist Change the sett...

Страница 153: ...tings f f The settings of the content on the playlist will change f f You can set Effect only for still image content f f Return to the Playlist edit screen and click the Save button to register the edited playlist in the SD card Duplicating a playlist Duplicate a registered playlist Content selection tab 1 In the timetable page click the Playlist tab among the Content selection tab f f The Conten...

Страница 154: ...ylist name entry screen is displayed 4 Enter any Playlist name and click the Enter button f f For Playlist name up to 24 characters in single byte can be input f f The duplicated playlist is displayed in the Content list and registered in the SD card Displaying preview of playlist contents Display the preview image of a playlist on the web browser of on the projection screen Content selection tab ...

Страница 155: ... f The Content list shows the list of playlists Content list Playlist edit 2 Click in the Content list f f The mode changes to selection mode 3 Select a playlist you want to preview and click the Execute button f f The Playlist edit screen is displayed 4 Click the Preview button f f The preview mode selection screen is displayed ...

Страница 156: ...y changes depending on the playback state Switches to the next content Note f f When there is a blank period between contents the period is handled as one content and displayed in preview f f Regardless of the content setting each content including blank periods is played for 10 seconds f f In the case of movie external input content only an icon is displayed on the preview screen instead of the a...

Страница 157: ...e ID Content name Ascending Content name Descending Displays timetables in the order of timetable name 3 Timetable ID Displays the timetable ID 4 Timetable name Displays the timetable name 5 Display scale Sets the display scale for Timetable 6 Period setting Sets the period week to be displayed in a schedule When selected the calendar is displayed 7 Schedule Displays the schedule of the specified ...

Страница 158: ...gister it in a schedule Refer to Registering a schedule x page 159 for details 5 Register the schedule f f Click the Save button to set the schedule Note f f Schedules can be set from the current week up to 12 weeks ahead as the different timetable on a daily basis The same content can also set on a weekly basis f f For operations for setting the schedule refer to the descriptions of the following...

Страница 159: ...ar of the previous month 2 Move to the next month Displays the calendar of the next month 3 Calendar Click a date to display the schedule of the week 4 Every week button Click this to register a timetable for a certain day of the week r r Procedure 1 Click for the Period setting f f The calendar is displayed 2 On the calendar click the day in which you want to register a timetable f f The Period s...

Страница 160: ...of the week on the Schedule Timetable ID Schedule f f When you finish registering the timetable in the schedule currently displayed proceed to Step 4 4 After the registration of the timetable is complete click the Save button f f The schedule is registered in the SD card Note f f When you use Internet Explorer as the web browser and drag the Timetable ID with the mouse pointer the ID sometimes doe...

Страница 161: ... 2 Select a day or day of week to delete f f You can select multiple days or days of week 3 Click the Delete button 4 When the confirmation screen is displayed click the OK button f f The timetable assigned to the selected day or day of week is deleted from the schedule Note f f Deleting a timetable from the schedule will not delete the timetable from the SD card ...

Страница 162: ...k sequence and playback time registered in a timetable Timetable edit 1 Click of the timetable to edit f f The timetable page is displayed 2 Edit the timetable f f Edit the timetable according to the procedure described in Creating a timetable x page 132 Duplicating a timetable Duplicate a registered timetable Timetable duplication ...

Страница 163: ...g a timetable Delete a registered timetable Timetable deletion 1 Click f f The mode changes to deletion mode 2 Select the timetable to delete f f You can select multiple timetables 3 Click the Delete button 4 When the confirmation screen is displayed click the OK button f f The selected timetable is deleted from the SD card Note f f If the timetable to be deleted is registered in a schedule then t...

Страница 164: ...timetable being displayed Duplicating a timetable x page 162 5 Timetable edit icon Edits the timetable being displayed Editing a timetable x page 162 r r Procedure 1 Click the day or day of week of which timetable you want to confirm the details f f The Assigned timetable screen is displayed Checking the operational information of a schedule Check the information of the content currently played or...

Страница 165: ...f still image movie external input music content being played 10 Display scale Sets the display scale for Timetable 11 Interrupt button Click this to display the Interrupt list screen Setting interruption playback x page 166 12 Play Stop button Click this to start playing a schedule or to stop playing the schedule Starting playback of a schedule x page 165 13 Timetable Displays the timetable curre...

Страница 166: ...utton Click this to stop interruption playback Canceling the currently played interruption schedule x page 172 7 Interruption schedule registration icon Register a new interruption schedule Registering interruption playback x page 167 8 Registered interruption schedule deletion icon Deletes a registered interruption schedule Deleting a registered interruption schedule x page 170 9 Registered inter...

Страница 167: ... a schedule x page 175 set in the System setting page has passed it is deleted from the interruption schedule f f For operations for interruption playback refer to the descriptions of the following items g g Registering interruption playback x page 167 g g Editing the information of registered interruption schedule x page 169 g g Duplicating a registered interruption schedule x page 170 g g Deleti...

Страница 168: ...e time to start the interruption playback 5 Interrupted still image content being selected Displays the selected still image content 6 Return button Click this to return to the Interrupt list screen 7 Projector time Displays the time of the connected projector 8 Save button Click this to confirm the settings and register the interruption schedule in the SD card r r Procedure 1 Click f f The Interr...

Страница 169: ...back time of a registered interruption schedule r r Interrupt list screen Registered interruption schedule edit r r Interrupt edit screen 7 8 1 6 2 3 4 5 1 Interrupted still image content name Displays the selected interrupted still image content name 2 Start Sets the time to start interruption playback 3 End Select the radio button and set the time to end the interruption playback 4 Duration Sele...

Страница 170: ...red interruption schedule Registered interruption schedule duplication 1 Click of the registered interruption schedule to be duplicated f f The Interrupt edit screen is displayed 2 Edit Start and End or Duration 3 Click the Save button f f The interruption schedule is duplicated and registered in the SD card Note f f Interrupted still image content name cannot be edited f f If the playback time ov...

Страница 171: ...click the OK button f f The selected interruption schedule is deleted Note f f Deleting the interruption schedule will not delete the still image content from the SD card Editing the information of currently played interruption schedule Edit the playback time of the currently played interruption schedule Currently played interruption schedule edit 1 Click f f The Interrupt edit screen is displayed...

Страница 172: ... of the interruption playback 1 Click the Stop button f f Interrupt the currently played interruption schedule and terminate the interruption playback Checking a schedule Check the currently registered schedule r r Schedule confirmation screen 3 2 1 1 Calendar Displays the ID of the assigned timetable for each date Click an ID to display the timetable of the day 2 Move to the previous month Displa...

Страница 173: ...etable r r Procedure 1 On the start screen click Schedule f f The schedule screen is displayed 2 Click f f The schedule confirmation screen is displayed 3 Click the day of which schedule you want to check on the calendar f f The Timetable display is updated Check the timetable set for the day Checking the playback history Display the history of played contents for approximately one week 1 On the s...

Страница 174: ... history screen is displayed Check the content already played back r r Display contents of the history Icon Details Played Playback failed Playback stopped Interruption occurred Interruption playback Interruption playback failed Brightness changed Power on Power off ...

Страница 175: ...The setting screen is displayed Setting selection tabs 3 Select one of the setting selection tabs System setting Data management Login f f The page of the selected tab is displayed Change the setting as necessary For details refer to the descriptions of the following items g g Performing system settings x page 176 g g Obtaining a backup of a schedule x page 177 g g Uploading a schedule x page 179 ...

Страница 176: ...ent is registered in the timetable 8 Restart option As a condition to resume the paused signage playback sets enable disable of Power Image content 9 Fixed loading time Select whether to fix the loading time after starting the scheduled movie content till displaying the image on the projection screen Enable Fixes the loading time after starting playback till displaying the image to three seconds D...

Страница 177: ...rt option in the System setting page the setting is reflected in the menu setting of the projector Refer to Setting the restart option x page 71 which explains the SETUP menu SIGNAGE Obtaining a backup of a schedule Download a registered schedule into the client computer only Windows computer Mac are supported r r Data management page 1 3 2 5 4 1 Backup All schedule Sets the backup target to be al...

Страница 178: ...displayed 4 Select the date or day of the week in which the target schedule is registered and click the Setting button f f In the Data management page the timetable ID and the timetable name are displayed 5 Click the Backup button f f The Backup file list screen is displayed f f If the size of the backup target data is large several backup files are created 6 Click the link to the backup file and ...

Страница 179: ...y comparing the number of saved data items when backup was obtained with the number of added upload target data items 6 Upload button Writes upload target data in the SD card of the projector 7 Undo button Clears upload target data r r Procedure 1 Click the Data management tab f f The Data management page is displayed 2 Click the upload file Add button f f The file selection screen is displayed 3 ...

Страница 180: ...the desired new user name Up to 8 alphanumeric characters in single byte 4 New Password Enter the desired new password Up to 16 alphanumeric characters in single byte 5 New Password Retype Enter the desired new password again 6 Undo button Click this to clear the entered information 7 Setting button Click this to confirm the settings r r Procedure 1 Click the Login tab f f The Login page is displa...

Страница 181: ...with the NTP server once after you have turned on the power or the power has been turned on g g Depending on the network environment such as unstable communication condition access to the NTP server may become unavailable In such a case the image may disappear temporarily when you synchronize with the server again after the synchronization was interrupted Setting schedules for simultaneous playbac...

Страница 182: ...oad the schedules downloaded in Step 2 to the duplication destination projector f f For the upload procedure refer to Uploading a schedule x page 179 f f Upload the backed up schedules to all projectors for simultaneous playback Acquiring and delivering schedules using Multi Projector Monitoring Control Software Using Multi Projector Monitoring Control Software you can deliver and register the sam...

Страница 183: ...t clock page of the web control screen f f For details on a computer that can be used for setting the web control screen refer to Computer that can be used for setting x page 104 f f If you use the projector as the NTP server approximately 15 minutes are required after configuring the synchronization setting of other projectors till completing synchronization After configuring the synchronization ...

Страница 184: ...d 6 Total time Displays the total time of the contents registered in a slideshow 7 Slideshow Displays the contents registered in a slideshow 8 Clear button only for administrator rights Click this to delete all contents registered in a slideshow 9 Settings icon only for administrator rights Click this to display the slideshow setting screen Make various settings of a slideshow Setting a slideshow ...

Страница 185: ...he content to be registered in the slideshow from the Content list into the Slideshow Content list Slideshow f f You cannot register multiple contents in a batch To continue to register another content go back to Step 1 and perform the procedure f f When registering contents in a slideshow you cannot specify the position to insert the contents After registering the contents in the Slideshow perfor...

Страница 186: ...186 f f Deleting content x page 188 Registering content Register still image movie files in the SD card as contents from the client computer Content selection tab Content list 1 Click the tab of the content to register from the Content selection tab Still or Video f f Clicking the tab changes the Content list display Content addition 2 Click f f The Add content screen is displayed Content addition...

Страница 187: ...d content screen go to Step 6 and to end adding content proceed to Step 10 f f Up to 10 contents can be registered in the Add content screen 6 To cancel addition of content click on the Add content screen f f The mode changes to deletion mode 7 Select the content for which you want to cancel addition f f You can select multiple contents 8 Click the Delete button 9 When the confirmation screen is d...

Страница 188: ... deleted from the Content selection tab Still or Video f f Clicking the tab changes the Content list display Content deletion 2 Click f f The mode changes to deletion mode 3 Select the content to delete f f You can select multiple contents 4 Click the Delete button 5 When the confirmation screen is displayed click the OK button f f The selected content is deleted from the SD card ...

Страница 189: ...or setting to be reflected when playing a slideshow For details of the setting items refer to Color x page 196 3 Brightness Select the brightness to be reflected when playing a slideshow 4 Interval Sets the default playback time which is set when still image content is registered in a slideshow 5 Undo button Click this to undo the entered setting to the state before the setting screen was displaye...

Страница 190: ...a slideshow Slideshow 1 Move the content of which order you want to change using a drag and drop operation in the Slideshow 2 Click the Save button f f The edited slideshow setting is registered in the SD card Deleting content from a slideshow Delete contents registered in a slideshow Slideshow Content registered in slideshow deletion ...

Страница 191: ...ave button f f The edited slideshow setting is registered in the SD card Changing the still image content setting Change the setting of still image contents registered in a slideshow Slideshow 1 Click the still image content registered in the Slideshow f f The setting screen is displayed 2 Change Effect and Duration and click the Enter button f f Change the image effect and playback time settings ...

Страница 192: ...m the beginning In the case of movie content the playback resumes from the paused part Registering a lighting pattern Register lighting patterns to be used in the settings SD1 to SD10 of the LIGHTING menu PATTERN x page 60 of the projector in the SD card as still image contents f f Refer to Cards that can be used with the projector x page 51 for SD cards that can be used with the projector 1 Save ...

Страница 193: ...ager with administrator rights f f The start screen is displayed 3 Click Slideshow f f The slideshow screen is displayed Content selection tab 4 Click the Still tab among the Content selection tab Content addition 5 Click f f The Add content screen is displayed Content addition ...

Страница 194: ...tep 6 or to delete content from the Add content screen go to Step 9 and to end adding content proceed to Step 13 9 To cancel addition of content click on the Add content screen f f The mode changes to deletion mode 10 Select the content for which you want to cancel addition f f You can select multiple contents 11 Click the Delete button 12 When the confirmation screen is displayed click the OK but...

Страница 195: ...etion 1 Click f f The mode changes to deletion mode 2 Select the content you want to delete or replace f f You can select multiple contents 3 Click the Delete button 4 When the confirmation screen is displayed click the OK button f f The selected content is deleted from the SD card f f To replace it with another pattern proceed to Step 5 or to just delete the pattern proceed to Step 9 Content addi...

Страница 196: ...l effects Effect which can be set to still image contents and used when changing the playback screen Off Does not apply image effects Random Applies image effects randomly Wipe left Displays the image gradually from the left like wiping Wipe right Displays the image gradually from the right like wiping Wipe down Displays the image gradually from the top like wiping Split Displays the image gradual...

Страница 197: ...justed in the LIGHTING menu COLOR SETTING User L4 Reflects the USER4 setting 2 adjusted in the LIGHTING menu COLOR SETTING User L5 Reflects the USER5 setting 2 adjusted in the LIGHTING menu COLOR SETTING 1 For the setting method refer to Adjusting desired white balance x page 65 which explains the PICTURE menu COLOR TEMPERATURE The setting adjusted after changing the input to Memory Viewer is refl...

Страница 198: ...198 ENGLISH Chapter 6 Maintenance This chapter describes troubleshooting and maintenance methods ...

Страница 199: ... projector x page 48 when switching off the projector f f Check the status of the power supply with the power indicator ON G STANDBY R x page 44 ON G STANDBY R LIGHT TEMP SD Power indicator ON G STANDBY R Light source indicator LIGHT Temperature indicator TEMP Light source indicator LIGHT Indicator status Lighting in red projecting Blinking in red 2 times Blinking in red 3 times Status The light s...

Страница 200: ...E MODE x page 71 to HIGH2 when using the projector at altitude between 2 000 m 6 562 and 2 700 m 8 858 f f Do not use the projector at high altitudes of 2 700 m 8 858 or higher above sea level f f Turn off the power of the track system and consult your dealer 1 The operating environment temperature should be between 0 C 32 F and 35 C 95 F when using the projector at elevations between 1 000 m 3 28...

Страница 201: ...front surface of the lens with a soft clean cloth f f Do not use a cloth that is fluffy dusty or soaked with oil water f f Since the lens is fragile do not use excessive force when wiping the lens Attention f f The lens is made of glass Hitting with a hard object or excessive force when wiping may scratch its surface Handle with care Cleaning inside the projector In certain environments such as in...

Страница 202: ...lor is pale or grayish f f Are COLOR and TINT adjusted correctly 64 f f Is the external device connected to the projector adjusted correctly 41 Remote control does not respond f f Are the batteries depleted f f Is the battery polarity correct 24 f f Is there any obstruction between the remote control and the remote control signal receiver of the projector power supply unit 19 f f Is the remote con...

Страница 203: ...played normal sound not being output or not being able to connect perform the following to restore g g Set STANDBY MODE in the SETUP menu ECO MANAGEMENT x page 72 to ECO and turn off on the projector If it is already set to ECO the changing operation of STANDBY MODE is not necessary g g Turn off the power of the track system and then turn it on again g g Turn the Miracast compatible device and the...

Страница 204: ...204 ENGLISH Chapter 7 Appendix This chapter describes specifications and after sales service for the projector ...

Страница 205: ...y 51 Panasonic APPLICATION 52 Miracast 53 LIGHTING AVMT AV mute control 30 AV mute function off AVMT AV mute function query 31 AV mute function on ERST Error status query xxxxxx 1st byte Indicates fan errors and returns 0 2 f f 0 No error is detected f f 1 Warning f f 2 Error 2nd byte Indicates light source errors and returns 0 2 3rd byte Indicates temperature errors and returns 0 2 4th byte Indic...

Страница 206: ...223 Focus adjustment fast 224 255 7 Lens zoom Zoom adjustment fast 0 31 Zoom adjustment moderate 32 63 Zoom adjustment slow 64 95 No operation 96 159 Zoom adjustment slow 160 191 Zoom adjust moderate 192 223 Zoom adjustment fast 224 255 8 Power supply control Power standby 0 63 No operation 64 191 Power on 192 255 11 Lock Operation not available 0 127 When Operation not available is set operations...

Страница 207: ...er Data section Termination symbol Command example Hash value Refer to Connecting above 0 0x30 0 0x30 Control command ASCII string CR 0x0d Data length 32 bytes 1 byte 1 byte Undefined length 1 byte r r Received data Header Data section Termination symbol Command example 0 0x30 0 0x30 Control command ASCII string CR 0x0d Data length 1 byte 1 byte Undefined length 1 byte r r Error response String De...

Страница 208: ...ination symbol Command example 0 0x30 0 0x30 Control command ASCII string CR 0x0d Data length 1 byte 1 byte Undefined length 1 byte r r Received data Header Data section Termination symbol Command example 0 0x30 0 0x30 Control command ASCII string CR 0x0d Data length 1 byte 1 byte Undefined length 1 byte r r Error response String Details Termination symbol Message ERR1 Undefined control command CR...

Страница 209: ...he power is on use the Power supply status query command POF Power standby QPW Power supply status query 000 001 STANDBY status Power on condition IIS Input mode selection HD1 HDMI MV1 MEMORY VIEWER MC1 Miracast PA1 Panasonic APPLICATION SI1 SIGNAGE LI1 LIGHTING OLP Light source power setting 0 NORMAL QLP Light source power setting query 1 ECO QST Runtime query 00000 99999 In hours OSH AV mute 0 A...

Страница 210: ...ely small range such as inside a company MAC address An ID number unique to each network adapter A unique number is assigned to network adapters throughout the world and data is sent and received between the adapters based on this This ID number is a combination of the unique number for the manufacturer managed and assigned by IEEE and the number assigned by each manufacturer to their adapter MD5 ...

Страница 211: ...and encryption is performed using an external server WPA PSK WPA2 PSK A standard of encryption method for wireless LAN This is advanced security than the WEP and it has functions such as user authentication function and TKIP encryption protocol that will automatically change the encryption key every specified time Also this authentication method does not need an authentication server ...

Страница 212: ...DC 3 V AAA R03 or AAA LR03 battery x 2 Operating range Within approx 7 m 22 11 when operated directly in front of signal receiver Weight 63 2 2 ozs including batteries Dimensions Width 44 mm 1 23 32 Height 105 mm 4 1 8 Depth 20 5 mm 13 16 1 When the SETUP menu ECO MANAGEMENT STANDBY MODE is set to ECO the network function both wireless LAN and wired LAN cannot be used in standby mode 2 When the SE...

Страница 213: ...al 1 set M3 stereo mini jack monitor output stereo compatible 0 V rms to 2 0 V rms variable output impedance 2 2 kΩ or less LAN terminal 1 set RJ 45 for network connection PJLink compatible 10Base T 100Base TX DC OUT terminal USB connector type A x 1 for power supply DC 5 V maximum 900 mA Wireless LAN Compliance standards IEEE802 11b g n IEEE802 11a n wireless LAN standard protocol Used wireless c...

Страница 214: ...0 3 5 16 20 9 13 16 57 4 2 1 4 183 1 7 7 32 26 0 1 1 32 φ150 0 5 29 32 165 6 6 17 32 372 4 14 21 32 290 0 11 13 32 142 0 5 19 32 220 2 8 21 32 56 0 2 7 32 84 0 3 5 16 20 9 13 16 57 4 2 1 4 183 1 7 7 32 φ150 0 5 29 32 165 6 6 17 32 Including the adapter Excluding the adapter 76 0 3 30 0 1 3 16 50 0 1 31 32 19 0 3 4 Actual dimensions may differ depending on the product ...

Страница 215: ...68 48 4 60 0 65 0 l SXGA 1 280 x 1 024 64 0 60 0 108 0 l 1280 x 720 1 280 x 720 37 1 49 8 60 5 1 280 x 720 44 8 59 9 74 5 1280 x 768 1 280 x 768 39 6 49 9 65 3 1 280 x 768 47 8 59 9 79 5 1280 x 800 1 280 x 800 41 3 50 0 68 0 1 280 x 800 49 7 59 8 83 5 l 1600 x 900 1 600 x 900 46 4 49 9 96 5 1 600 x 900 56 0 59 9 118 3 1 Signals with a l in the Plug and play columns are signals described in EDID ex...

Страница 216: ...e signals 215 LIVE MODE CUT IN 81 LOAD ALL USER DATA 75 M Main menu 57 Maintenance 201 M DIRECT 78 MEMORY VIEWER 58 66 MEMORY VIEWER button 19 53 Memory Viewer function 93 MENU button 19 Menu item 58 Miracast button 19 53 Miracast function 125 MULTI LIVE 82 N Navigating through the menu 56 NETWORK 59 77 Network config 111 NETWORK CONTROL 81 NETWORK ID 83 Network status 108 NETWORK STATUS 83 Number...

Страница 217: ...symbols are only valid in the European Union If you wish to discard this product please contact your local authorities or dealer and ask for the correct method of disposal M0615NN1076 YI Panasonic Corporation Web Site http panasonic net avc projector Panasonic Corporation 2015 ...

Отзывы: