Chapter 5
Operations — Content Manager
132 - ENGLISH
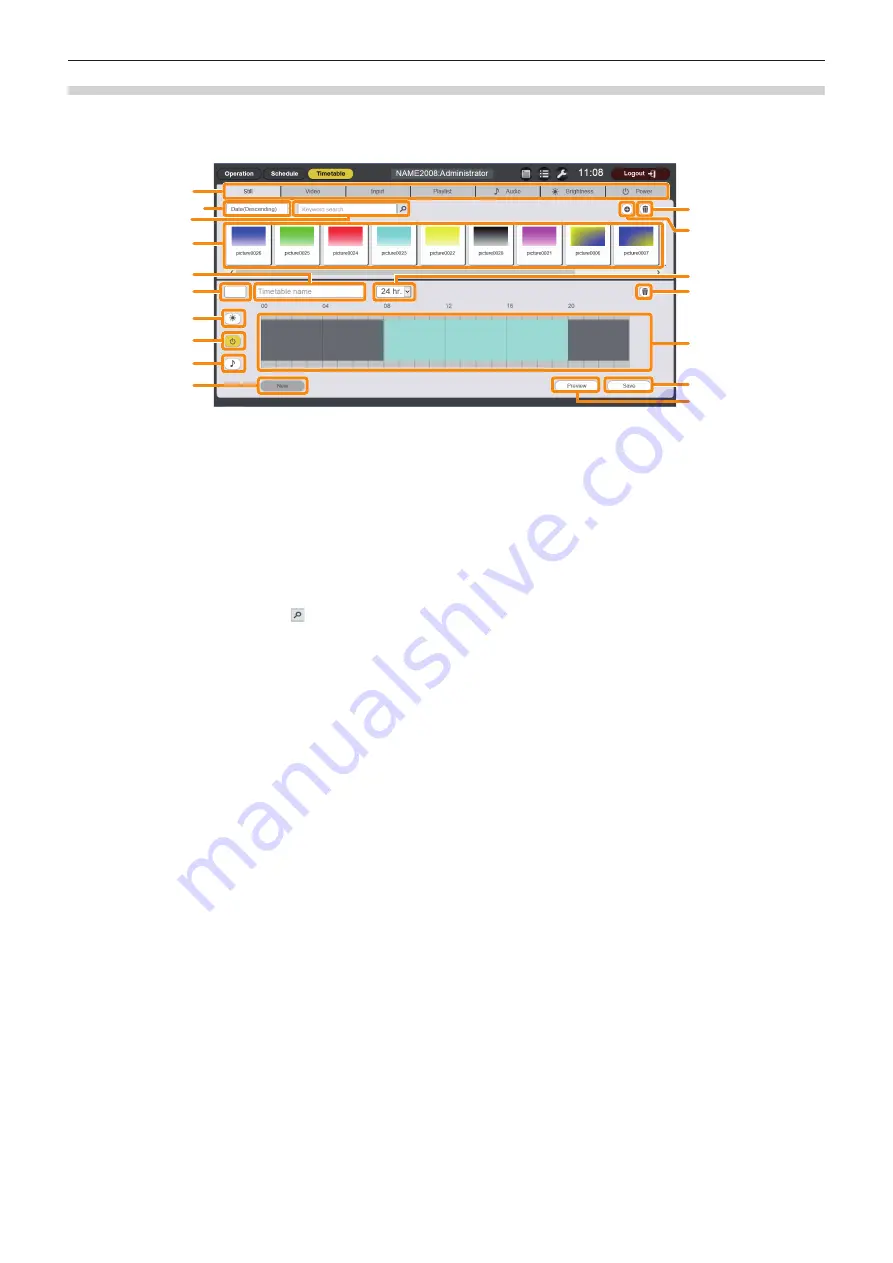
Creating a timetable
Set the content details to be played in one day, playback time, and playback sequence as a timetable.
r
Timetable page
16
15
17
12
14
11
1
2
3
6
5
13
7
8
9
10
4
1 Content selection tab
Select the type of content to register in a timetable.
Clicking the tab changes the “Content list” display.
2 Sort content
Select the display order of the “Content list”.
[Date(Ascending)]/[Date(Descending)]:
Displays contents in the order of registration date.
[Content name(Ascending)]/[Content name(Descending)]:
Displays contents in the name order.
[File name(Ascending)]/[File name(Descending)]:
Displays contents in the file name order.
3 [Keyword search]
Enter string to be searched and click to search contents
in the “PRIVATE” folder in the SD card. Search target varies
depending on the content.
Still image/movie/music content:
Content name and file name
Playlist:
Playlist name
Brightness content:
Brightness
Search result is displayed in the “Content list”.
4 Content list
Displays the content registered in the SD card.
5 [Timetable name]
Enter a timetable name.
Or, the timetable name being edited is displayed. Click it to edit
the timetable name.
6 Timetable ID
Displays the ID of the timetable being edited.
It is assigned automatically when a timetable is registered.
7 Brightness content display icon
This icon becomes yellow when selected, and displays the
registered brightness content in a timetable. Click the icon again
to cancel the selection, then the icon color changes to white.
8 Power supply content display icon
This icon becomes yellow when selected, and displays the
registered power supply content in a timetable. Click the icon
again to cancel the selection, then the icon color changes to
white.
9 Music content display icon
This icon becomes yellow when selected, and displays the
registered music content in a timetable. Click the icon again to
cancel the selection, then the icon color changes to white.
10 [New] button (only for administrator rights)
Click this to discard the timetable being edited and create a new
timetable.
11 Content addition icon (only for administrator rights)
Adds and registers contents in the SD card. (“Registering
content in a content list” (
x
page 144))
12 Content deletion icon (only for administrator rights)
Deletes contents registered in the SD card. (“Deleting content
registered in a content list” (
x
page 146))
13 Display scale
Sets the display scale for “Timetable”.
14 Content in timetable deletion icon (only for administrator
rights)
Deletes the content registered in a timetable.
15 Timetable
Displays the content registered in a timetable.
16 [Save] button (only for administrator rights)
Click this to register the timetable setting being edited in the SD
card.
17 [Preview] button
Click this to display the timetable being edited on the web
browser, or to display the preview of it on the projection screen.
(“Displaying preview of timetable details” (
x
page 142))
Содержание PT-JW130F
Страница 43: ...ENGLISH 43 Chapter 3 Basic Operations This chapter describes basic operations to start with ...
Страница 92: ...92 ENGLISH Chapter 5 Operations This chapter describes how to use each function ...
Страница 198: ...198 ENGLISH Chapter 6 Maintenance This chapter describes troubleshooting and maintenance methods ...
Страница 204: ...204 ENGLISH Chapter 7 Appendix This chapter describes specifications and after sales service for the projector ...


