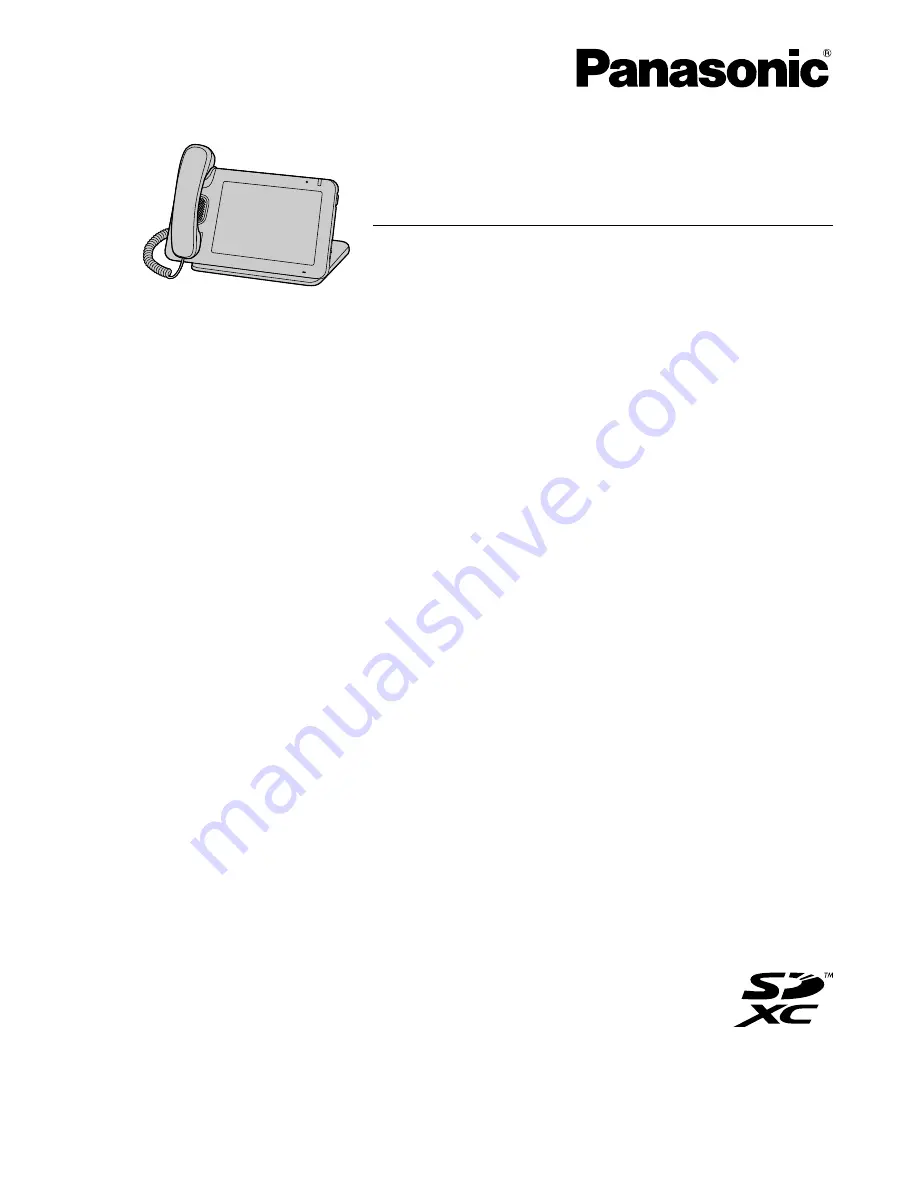
background image

Model No.        

KX-UT670

Smart Desk Phone

Thank you for purchasing this Panasonic product.
Please read this manual carefully before using this product and save this manual for future use.

KX-UT670: Software File Version 02.000 or later

In this manual, the suffix of each model number is omitted unless necessary.

Operating Instructions

Document Version: 2011-09

Содержание KX-UT670

Страница 1: ...product Please read this manual carefully before using this product and save this manual for future use KX UT670 Software File Version 02 000 or later In this manual the suffix of each model number i...

Страница 2: ...arty or tap an entry in the call log to call that person back Contacts Network Camera Viewer Phone Call Logs Support for High quality Audio The wide band 7 kHz audio provides high voice quality in con...

Страница 3: ...ith that contact Network Camera Viewer starts automatically and you can view the camera s video feed during the conversation Page 55 For the most recent information about network cameras that have bee...

Страница 4: ...c support sipphone for users in Canada Note The contents and design of the software are subject to change without notice Conventions Used in This Manual SD memory cards that can be used with this unit...

Страница 5: ...om this product To view this information press when the Home screen is displayed and then tap Settings About phone Legal information At least three 3 years from delivery of products Panasonic System N...

Страница 6: ...ck do not expose this unit to rain or moisture Do not splash water on the AC adaptor or the power cord nor get them wet Doing so can result in fire electric shock or injury If they do get wet immediat...

Страница 7: ...ecessary for the wall to be reinforced Only use the optional wall mount kit with the unit The wall mount kit includes the necessary screws washers and wall mounting adaptor When driving the screws int...

Страница 8: ...log in to the Web user interface Call logs Preventing Data Loss Use a personal computer to make periodic backups of recordings stored on the SD card Keep a copy of all important data such as contact...

Страница 9: ...he unlock pattern PIN or password for the unit are not seen by a third party while being input or otherwise become known by an unauthorized party Privacy and Right of Publicity By installing and using...

Страница 10: ...s authority to operate this device FCC Declaration of Conformity Trade Name Panasonic Model Number KX UT670 Responsible Party Panasonic Corporation of North America One Panasonic Way Secaucus NJ 07094...

Страница 11: ...ure such as immediately after turning on an air conditioner or heater condensation may form on the inside of the touch screen and cause the screen to function incorrectly In this case cease operation...

Страница 12: ...onfirming a Number Before Dialing Pre dialing 48 Redialing 48 Calling from the Contacts Screen 48 Calling from the Call Log 49 Calling Using a Flexible Button Set as a One touch Dialing Button 49 Call...

Страница 13: ...Clock 66 Setting an Alarm 66 Deleting an Alarm 66 Stopping an Alarm 66 Activating and Canceling Snooze 67 Using Alarm Clock s Menu 67 Browser 68 Displaying a Web Page in Browser 68 Using Bookmarks 68...

Страница 14: ...dgets and Folders 90 Displaying Your Schedule on the Phone Screen 91 Setting a Ringtone 91 Using Music on an SD Card as the Ringtone 92 Web User Interface Programming 93 Accessibility 94 Keyboard Oper...

Страница 15: ...368 For users in the United States only Note The illustrations may differ from the appearance of the actual product Optional Accessories The following optional accessories are available for purchase O...

Страница 16: ...the unit s status as follows Color state Unit Status Green flashing rapidly Receiving a call Red steady on New voice message Or new voice message and missed calls Green flashing slowly Cleaning mode G...

Страница 17: ...ion and the playback volume of the music application Navigation Key Select items on the screen such as when searching for a contact or configuring settings Enter Confirms and accepts entered text or a...

Страница 18: ...ing information stored on the unit such as your contacts list and for loading information onto the unit Page 118 Cable Cover If the distance from the Ethernet cable connector to where the cable bends...

Страница 19: ...Left Side View B C A Modular Handset Jack EHS Jack Used to connect an EHS headset Page 99 Headset Jack Page 99 Document Version 2011 09 Operating Instructions 19 Unit Overview...

Страница 20: ...mp Page 16 Ventilation Opening 4 locations RESET Button Reinitializes the unit s settings Page 120 DC Jack LAN Port PC Port Wire Openings For attaching an anti theft cable or wire 20 Operating Instruc...

Страница 21: ...de your finger across the display vertically or horizontally and then lift your finger off the display Drag To move an object like an icon touch and hold it with your finger and then move it across th...

Страница 22: ...ll but you remain off hook i e you will hear a dial tone Hands free Mode The following actions enable hands free mode where you can talk to and hear the other party without using the handset In stand...

Страница 23: ...o use the on screen keyboard to enter text Two keyboards are available on this unit the iWnn IME keyboard and the Android keyboard The iWnn IME keyboard provides additional features such as Japanese i...

Страница 24: ...cter to the left Moves the cursor one character to the right Displays the Symbol Emoticon input screen Inserts a line break accepts the currently entered text etc Accepts the entered text and moves to...

Страница 25: ...xt text box Switches to numeric and symbol input Inserts a single space If multiple keyboard languages are enabled Page 115 touching and holding this key and then swiping left or right changes the key...

Страница 26: ...Note For details about Android keyboard settings see Page 115 26 Operating Instructions Document Version 2011 09 Before Operating the Telephone...

Страница 27: ...the key sheet Home key Functions the same as on the key sheet Tab key Moves the cursor a fixed number of characters to the right Shift key Used in combination with other keys or to switch between uppe...

Страница 28: ...reen press 2 On the Menu screen tap Emergency number setting 3 Enter values in Label and Phone Number 4 When you have finished entering the values tap OK Note For details about dialing emergency numbe...

Страница 29: ...is comprised of three screens and you can freely position shortcuts etc on each screen Tap here to display the Application screen Page 32 Tap here to hide or show the application dock Application dock...

Страница 30: ...etc Displays the user s name and the unit s phone number If multiple lines are configured on your unit the phone number of the default line is displayed Displays the status of phone features Displays...

Страница 31: ...tions Displays settings and status information for the unit You can tap each item to display additional information change settings etc Displays current notifications Tap each item to launch the relat...

Страница 32: ...cations installed on the unit This screen is displayed when you tap on the Home screen A B Displays the applications installed on the unit Page 66 Tap here to close the Application screen 32 Operating...

Страница 33: ...en is displayed the Phone screen is displayed automatically You can also press or tap on the Home screen to display the Phone screen Dial Key display A B D F E G H C Schedule display I Document Versio...

Страница 34: ...26 If multiple lines are configured on your unit the total number of new messages on all lines is displayed Redials the last dialed phone number Page 48 Temporarily changes the screen between the Dia...

Страница 35: ...cts that person s information will be displayed Incoming tab Displays information about incoming calls Displays information about the line being used number name etc Displays the duration of the call...

Страница 36: ...tablished with the transfer destination second party switches back to the first party Page 52 Performs a blind transfer Page 52 Adds a 3rd party to a 2 party call Page 52 Begins a 3 party conference c...

Страница 37: ...s If there is no registered contact information only the phone number is displayed Displays the date and time of the call The icon indicates the type of call Page 46 Tap to call the phone number assoc...

Страница 38: ...act Page 54 Displays the number of contacts in the currently displayed list Photo Tapping a photo displays the quick contact popup Page 48 Images stored on the SD card can be used for pictures Page 54...

Страница 39: ...n activates the feature assigned to the flexible button Switches between single row display and full screen display Displays the next column Note For details about assigning features to flexible butto...

Страница 40: ...twork camera Displays the camera name as registered in the Camera Registration screen Page 60 Returns to the camera s set home position Page 62 Tap to zoom in and to zoom out Page 61 Calls the phone n...

Страница 41: ...en someone taps the display while the screen lock is activate the following screen is displayed When using a pattern A B When using a PIN A B Document Version 2011 09 Operating Instructions 41 The Dis...

Страница 42: ...y number Page 49 Trace the unlock pattern enter the PIN or enter the password to unlock the screen Page 88 Note For details about activating the screen lock see page 88 42 Operating Instructions Docum...

Страница 43: ...setting status Enable Disable Displays the status of the calling service and the network If multiple lines are configured on your unit the connection error icon is displayed if there is a connection e...

Страница 44: ...too high Displays the number of icons not being displayed on the status bar Displayed when the alarm snooze feature is active Displayed when an alarm is set Page 66 Displays the status of the current...

Страница 45: ...Displays the dial keys Switches between the single row display and the full screen display or flexible buttons Displays the next column of flexible buttons in single row display mode The column with a...

Страница 46: ...38 Icon Description Enter a name to search for a contact Page 56 Adds a new contact Page 54 Calls the contact s default phone number Sends an e mail to the contact s default e mail address Displays t...

Страница 47: ...camera side defaults Page 62 Zoom in zoom out the network camera s video feed Page 61 Brighten darken the network camera s video feed Page 64 Dials the phone number paging number associated with the...

Страница 48: ...dialed 1 Go off hook 2 Tap Redial 3 To end the call go on hook Note In step 1 tapping Redial without going off hook enables hands free mode Calling from the Contacts Screen Calling Using Quick Contac...

Страница 49: ...ld the record you want to delete 4 Tap Remove from call log To delete all records from the call logs 1 On the Phone screen tap Call Log 2 Press 3 Tap Clear all call log 4 On the Clear screen tap OK No...

Страница 50: ...hen you hear the call waiting tone go on hook 2 Go off hook Holding the Current Call and Answering the Second Call 1 On the Incoming Call window tap Close 2 On the Current tab tap Hold 3 Tap the DN bu...

Страница 51: ...enter the phone number tap OK Deleting a stored phone number 1 On the Phone screen press 2 Tap Call Block setting 3 Select the phone number you want to delete and then clear number 4 Tap OK Holding a...

Страница 52: ...tion s phone number and then press 3 Go on hook Note For details about making a call see page 48 In step 2 tapping Transfer Cancel before pressing returns you to the original call Three party Conferen...

Страница 53: ...screen Also the Message Ringer lamp lights red 1 On the Phone screen tap Message 2 Follow the voice guidance Note To use this feature the voice mail access number must be enabled through configuration...

Страница 54: ...r e mail addresses have been added to a contact a frequently used phone number or e mail address can be designated for use with the quick contact feature to quickly contact another party 1 On the Phon...

Страница 55: ...a Contact A network camera that has been configured to connect to this unit can be added to a contact s information The video feed of a registered network camera can be viewed during a conversation 1...

Страница 56: ...Searching for a Contact You can search for a contact within your registered contacts 1 On the Phone screen tap Contacts 2 Tap and enter the name of the contact you are searching for 3 Tap one of the...

Страница 57: ...e contacts into a single contact and you can separate joined contacts Joining Contacts 1 On the Phone screen tap Contacts 2 Tap the name of one of the contacts you want to join 3 Press 4 Tap Edit cont...

Страница 58: ...When editing vCard files on your computer using a text editor be sure to save the file using the UTF 8 character encoding Saving to an SD Card 1 On the Phone screen tap Contacts 2 On the Contacts scr...

Страница 59: ...details about entering text see page 23 Assigning Ringtones to Specific Contacts You can assign different ringtones to specific contacts 1 On the Phone screen tap Contacts 2 On the Contacts screen tap...

Страница 60: ...ctory default value is 80 User ID Enter the user name to use when connecting to the network camera max 32 alpha numeric characters Password Enter the password to use when connecting to the network cam...

Страница 61: ...me you start Network Camera Viewer the video feed of the camera that was selected the previous time is displayed Controlling a Network Camera Changing the View Area 1 On the Home screen tap 2 Swipe ac...

Страница 62: ...with a Camera You can call a phone number that is associated with a network camera called a paging number The number is dialed from Network Camera Viewer while the camera s video feed is being displa...

Страница 63: ...Tap Camera Select 4 Press 5 Tap Sequential Interval 6 Tap the desired length of time Note The factory default value is 10 seconds Using Network Camera Presets You can select a viewing position that h...

Страница 64: ...f the network camera and set up automatic mode Adjusting the Brightness of the Picture 1 On the Home screen tap 2 In Network Camera Viewer press 3 Tap Camera Settings 4 Tap Brightness 5 Tap brighter o...

Страница 65: ...ancel returns you to the Camera Settings screen Canceling Automatic Mode 1 On the Home screen tap 2 In Network Camera Viewer press 3 Tap Camera Settings 4 Tap Auto Mode 5 On the Auto Mode screen tap O...

Страница 66: ...up to 12 alarms Setting an Alarm 1 On the Application screen tap 2 Select the alarm you want to set 3 Tap Time and then specify the time for the alarm 4 Specify the alarm tone or other items as necess...

Страница 67: ...u can configure the following settings Set alarm Add and set a new alarm Hide the clock Hide the clock To display the clock again tap Show clock Settings Alarm volume Set the alarm s volume Snooze int...

Страница 68: ...ering text see page 23 Using Bookmarks Adding a Bookmark 1 On the Application screen tap 2 Display the web page that you want to bookmark 3 Press 4 Tap Bookmark 5 Tap Add 6 Change the title of the boo...

Страница 69: ...Press 3 Tap Other 4 Tap Settings 5 Tap Home Page 6 Enter the URL of the web page you want to set as the home page 7 Tap OK Going Back to the Previous Page You can return to the web page you were viewi...

Страница 70: ...page in the web browser press The following actions are available New window Display a new window Bookmark The bookmark screen is displayed where you can add new bookmarks and display bookmarked page...

Страница 71: ...ont of the cursor Touching and holding CLEAR deletes the entire calculation Using Calculator s Menu 1 On the Application screen tap 2 Press The following actions are available Clear history Delete the...

Страница 72: ...n tapping Today allows you to quickly change the view to display today In Month view tapping a day that contains events displays either event details or a list of events for the selected day Adding an...

Страница 73: ...to change the view 4 Tap the event you want to edit 5 Press 6 Tap Edit Event 7 Enter the new information as necessary and then tap Done Note For details about entering text see page 23 Deleting an Ev...

Страница 74: ...ap 2 Press 3 Tap Settings 4 Configure the settings as necessary Set alerts notifications Select the notification method Alert At the specified date and time is displayed in the status bar and the Noti...

Страница 75: ...mail address using the contact search box Page 56 Entering the first few characters of an e mail address in the recipient field displays e mail addresses registered in your contacts that match the ent...

Страница 76: ...rent e mail message Reply Reply to the current e mail message Reply to All Reply to the sender and all recipients of the current e mail message other than yourself Mark as unread Mark the current e ma...

Страница 77: ...aching a file to an e mail message see page 75 Displaying a Mailbox You can display and view the contents of mailboxes such as your inbox sent messages drafts etc 1 On the Application screen tap 2 Pre...

Страница 78: ...lly check for new messages Also if you enable automatic checking specify the frequency at which to check Set as preferred account Set this account as the preferred account New mail notification Select...

Страница 79: ...ng an image Send the current image as an attachment to an e mail message Delete the current image Display the previous image in the image folder Display the next image in the image folder Zoom in on a...

Страница 80: ...w Select multiple Select multiple images which you can then delete or share via e mail Settings Configure various settings such as image size Single Image View Share Send the current image as an attac...

Страница 81: ...ying Music You can perform the following operations by using the icons that are displayed while you are playing music Display the songs in the current playback list Shuffle the songs in the current pl...

Страница 82: ...ilable Play Begin playing the selected playlist Delete Delete the selected playlist Change name Change the name of the selected playlist Edit Set the period for which items are displayed in Recently a...

Страница 83: ...Shuffle all Play through all the songs on the SD card in a random order Library Display the screen that was displayed before you started playing music Add to playlist Add the selected song to a playl...

Страница 84: ...the number to forward calls to No Answer Forward calls after you do not answer for a specified length of time If you enable this setting you must also specify the number to forward calls to and the n...

Страница 85: ...le button Pressing the flexible button will start the specified application Bookmark Assign a web page s URL to the flexible button Pressing the flexible button will start Browser and then load the pa...

Страница 86: ...hat button etc Color State Line Status Off Idle Green steady on Dialing On a call Color State Line Status Green flashing rapidly Incoming call Green flashing slowly Call on hold Parameter Ringtone Sel...

Страница 87: ...headset button to switch Headset mode For details about configuring flexible buttons see page 85 For details about connecting a headset see page 97 Disabling Headset Mode 1 Tap the status bar 2 Tap He...

Страница 88: ...will start Note To dial an emergency number see page 49 Unlocking the Screen Lock 1 Touch the display or key sheet or press an alphanumeric or symbol key on an attached USB keyboard Or lift the handse...

Страница 89: ...and then resize it to 640 480 pixels using an image editor If you try to use the image without resizing it it may not be displayed correctly The following file formats can be used for the Home screen...

Страница 90: ...then tap Add Or touch and hold on the Home screen a spot with no icons 2 Select Shortcuts Widget or Folder 3 Tap the item you want to add Moving a Shortcut Widget or Folder 1 On the Home screen touch...

Страница 91: ...figured on your unit you can set a different ringtone for each line If you select the Automatic check box the ringtone assigned to the DN button flexible button at which a call arrives will be used Ri...

Страница 92: ...nt to add as the ringtone 12 Tap OK 13 On the Melody for Phone ringtone screen tap Cancel Note Ringtones you add are stored in ringtones 10 to 32 overwriting the factory default ringtone The following...

Страница 93: ...strator or dealer Basic network settings 1 Page 108 User password for access to Web user interface HTTP authentication settings Default outgoing line Call rejection phone numbers 1 Page 50 Block calle...

Страница 94: ...ction equivalent to tapping the highlighted item Esc On the Phone screen During pre dialing Equivalent to tapping Cancel After dialing Equivalent to tapping Disconnect Ignored otherwise On other scree...

Страница 95: ...o change the angle of the unit Depending on the angle you want to use the unit at the holes to which you attach the stand differ so determine your preferred angle before attaching the stand If you wan...

Страница 96: ...h under the display Failure to do so may result in damage to the display Removing the Stand 1 Gently lift up the tab on the back A with your finger slide the stand to the right and then remove it A No...

Страница 97: ...ing Hub 2 Optional AC adaptor 1 To a PC AC adaptor LAN PC EHS jack Headset jack 1 If power is supplied over Ethernet PoE an AC adaptor is unnecessary 2 To use PoE use a PoE switching hub that is PoE C...

Страница 98: ...16 in or less 30 mm 13 16 in or less Ethernet cable If the distance from the end of the connector to the bend in the cable is more than 30 mm 1 3 16 in Remove the cable cover A from the back of the st...

Страница 99: ...dsets Panasonic KX TCA400 or KX TCA430 EHS headsets Plantronics Savi Talk Voyager or CS series When selecting Ethernet cables Use a straight category 5e cable sold separately that is 6 5 mm 1 4 in in...

Страница 100: ...a USB keyboard Ensure that the USB cable has slack Pulling the cord too tightly can result in damage to the connectors Note Devices other than USB keyboards cannot be connected You may connect a USB h...

Страница 101: ...isplay before attaching the adaptor Failure to do so may result in damage to the display 1 Insert the 4 tabs of the wall mounting adaptor into the designated openings in the base A and then slide the...

Страница 102: ...bles see page 97 4 Screw the 2 screws for wall attachment with their washers into the wall as shown in the following figure and then mount the unit on the wall Washer Insert the screw to this point 83...

Страница 103: ...ck into its slot until it clicks The handset will be safely hooked when it is in the cradle Hooking the Handset During a Conversation 1 Hook the handset over the top edge of the unit Document Version...

Страница 104: ...een lock now Page 108 Network MAC Address Page 108 Basic Network Settings Connection mode Page 108 DHCP Settings Page 108 Static Settings Page 108 Proxy Server Settings Use Proxy server Page 109 Embed...

Страница 105: ...s Page 111 Use secure credentials Page 112 Install from SD card Page 112 Set password Page 112 Clear storage Page 112 Applications Running services Page 112 SD card phone storage Total space Page 112...

Страница 106: ...n Page 114 Wildcard Prediction Page 114 Lines of Candidate Area Page 115 Mushroom Page 115 User Dictionary Page 115 Clear Learning Dictionary Page 115 Android keyboard Sound on keypress Page 115 Auto...

Страница 107: ...information Open source licenses Page 116 Model number Page 117 OS version Page 117 Kernel version Page 117 Firmware version Page 117 Administration 2 1 This setting is available only if an unlock pat...

Страница 108: ...settings Receive DNS Server Address Automatica lly DNS1 When manual entry is selected for the DNS server enter the address for DNS server 1 here xxx xxx xxx xxx DNS2 When manual entry is selected for...

Страница 109: ...ings apply to browsing the web with the Browser application 2 Depending on the unit s settings you may not be able to change these settings For details consult your administrator Sound General Setting...

Страница 110: ...1 Feedback Setting Description Value Range Default Audible touch tones Sets whether sounds are heard each time a dial key is tapped On Off On Audible selection Sets whether sounds are heard when menu...

Страница 111: ...een lock Connect 4 to 9 points PIN Register a numeric PIN for the screen lock 4 to 16 digits Password Register a password for the screen lock 4 to 16 alpha numeric characters Use visible pattern Sets...

Страница 112: ...ons that are currently running in the background Applications can be stopped or settings can be configured SD card phone storage SD card Setting Description Value Range Default Total space Displays th...

Страница 113: ...ist names album names and track names stored in the Music application On Off Off Clear shortcuts Clears the search history Language keyboard Setting Description Value Range Default Automatic Sets whet...

Страница 114: ...tering Latin characters On Off On Keyboard Type Sets the type of keyboard to use for input 10 key Keyboard QWERTY Keyboard Last Used Keyboard Setting for Each Input Mode Last Used Keyboard Input Word...

Страница 115: ...languages Sets which languages are available for the Android keyboard For each language you can set whether it is displayed Deutsch Deutschland English United Kingdom English United States Espa ol Esp...

Страница 116: ...hen an NTP server is not used Use 24 hour format Specifies whether the time is displayed in a 24 hour format when off the time is displayed in a 12 hour format On Off On Select date format Selects the...

Страница 117: ...lays the software version of the phone s interface 2 2 Kernel version Displays the kernel version 2 6 32 9 Firmware version Displays the firmware version For details about updating the firmware contac...

Страница 118: ...ensure correct operation of the unit observe the following precautions Do not remove the SD card or unplug the AC adaptor during the following operations Music playback Backup Reformatting Reading da...

Страница 119: ...tatic electricity Be sure to back up important data to a computer or other external source Inserting and Removing an SD Card Notice Before removing an SD card first unmount the card Page 112 With the...

Страница 120: ...ipe the unit When finished dry the unit with a soft and dry cloth Do not clean the unit with cleaners that contain petroleum scouring powder paint thinner benzene wax hot water or powdered soap When u...

Страница 121: ...d you can answer the call Exiting Cleaning Mode You can exit cleaning mode by lifting the handset off its cradle Note If a USB keyboard is connected you can also exit cleaning mode by pressing an alph...

Страница 122: ...isplay s brightness Page 110 The ambient light sensor is covered by something Check that the ambient light sensor is not covered or blocked If it is remove whatever is blocking it The previous screen...

Страница 123: ...lication quits unexpectedly when I try to open a file The file may be an unsupported type or the data may be corrupt Try playing back the file stored on the SD card on a computer or other device The G...

Страница 124: ...again Page 52 I cannot assign anything to a flexible button You are on a call or the screen lock is active When the call ends try the operation again Unlock the screen lock and then try the operation...

Страница 125: ...ovens air conditioners or other devices that emit electrical noise If using the unit in a room with windows close the curtains or blinds to prevent echoes Use the unit in a quiet environment The unit...

Страница 126: ...mera Some or all of the controls are unavailable The network camera you are connected to does not support these functions Refer to the documentation of the network camera or consult your administrator...

Страница 127: ...n screen You have not registered the file to the ringtone list in the Music application In the Music application register the music you want to use as a ringtone to the ringtone list and then add it a...

Страница 128: ...re on a call When you finish the call try configuring the settings again You moved to another screen while configuring settings If you move to another screen while making changes those changes may not...

Страница 129: ...only Ambient Light Sensor 1 Dimensions Width Depth Height Approx 270 mm 180 mm 220 mm 11 in 7 1 in 8 7 in When the angle is set to 65 and including the handset and stand Weight Approx 1 300 g 2 9 lb I...

Страница 130: ...e mail attachment 59 Splitting 57 Controls locations of 16 Current tab 35 D DC jack 20 Dial key display 33 Do Not Disturb 84 E EHS jack 19 Emergency number Calling 49 Registration 28 Enter Key Sheet b...

Страница 131: ...Button screen 39 Home screen 29 Lock screen 41 Network Camera Viewer 40 Notification screen 31 Phone screen 33 Status bar 30 SD card 118 Formatting 119 Locking Unlocking 119 SD card slot 18 Shortcuts...

Страница 132: ...crews into the wall as indicated 2 Hook the unit onto the screw heads Note Make sure to set the print size to correspond with the size of this page If the dimensions of the paper output still deviate...

Страница 133: ...Document Version 2011 09 Operating Instructions 133 Notes...

Страница 134: ...Ontario L4W 2T3 http www panasonic com sip http www panasonic ca This material is copyrighted by Panasonic System Networks Co Ltd and may be reproduced for internal use only All other reproduction in...

Отзывы: