


7.3 Specifying Operation Times
You can specify the days and times during which general users and guest users can view camera images (the
administrator can always view camera images). When the camera is accessed outside of the operation time,
the camera image on the single camera page, multi camera page, and buffered image page is displayed as a
gray or black screen. Additionally, [The operation time has ended.] is displayed on the single camera page.
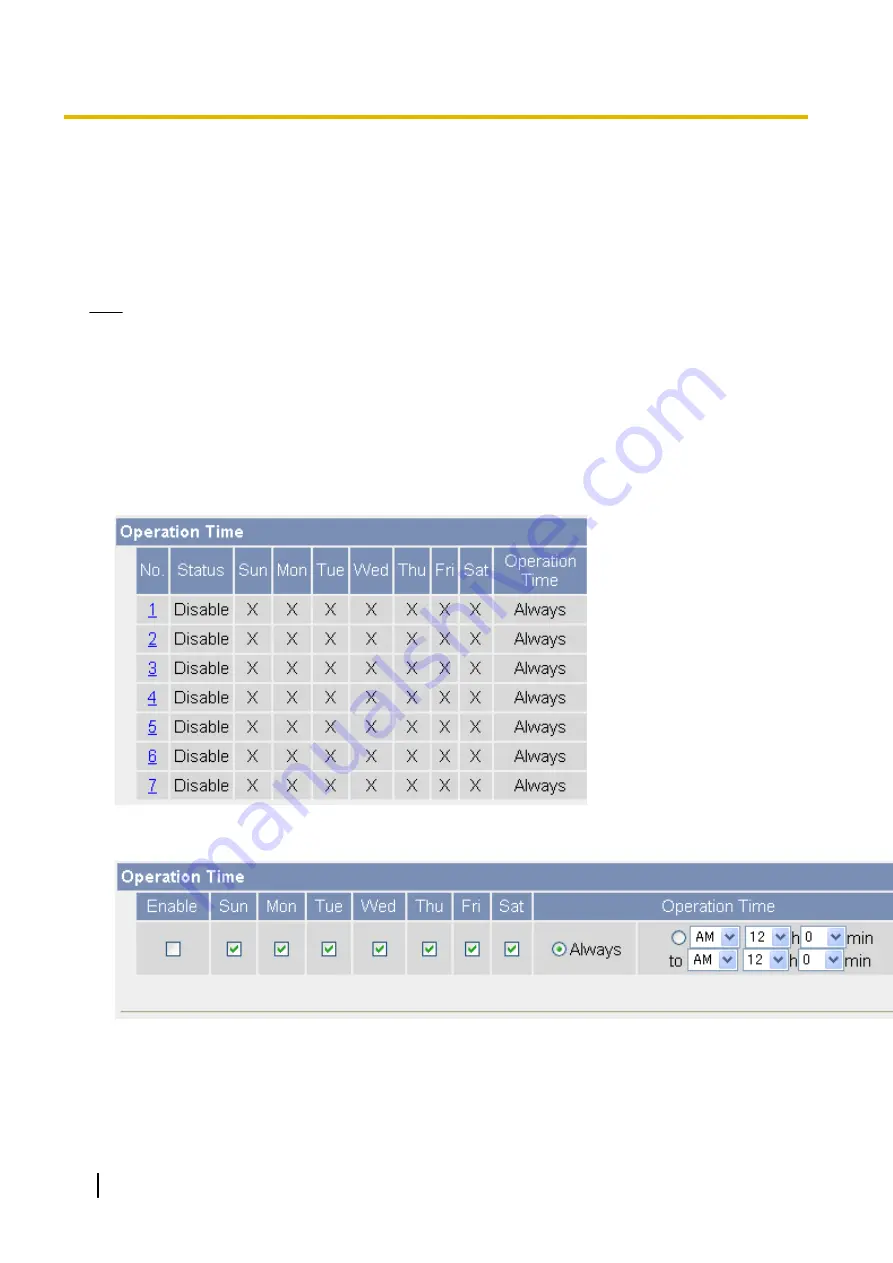
Up to 7 different operation times can be set.
Note
•
Your privacy may be compromised if you set this feature incorrectly. To confirm that you have made
the correct settings, access the camera as a general user or guest user during a time the camera is
outside of the operational time to confirm that camera images cannot be seen.
•
Make sure the camera’s date and time setting is correct in order for this feature to function as desired.
•
If H.264 or MPEG-4 images are being viewed when the camera’s operation time ends, the last image
will be displayed for about 20 seconds, followed by a black screen when viewing H.264 images and a
gray screen when viewing MPEG-4 images. If MJPEG are being viewed when the camera’s operation
time ends, the last image is displayed continuously as a still image.
1.
Click the [Setup] tab.
2.
On the left side of the screen under [Advanced], click [Operation Time].
3.
Select the desired operation time setting number.
•
If No. 1–7 are disabled, camera images can always be seen.
4.
Check [Enable] to enable this operating time setting number, then set the desired operation days and times.
•
Click [Always] to allow camera images to be seen at any time of day on the days which have a check
mark under them.
5.
Click [Save].
166
Operating Instructions
7.3 Specifying Operation Times
Содержание BL-C210 Series
Страница 122: ...4 Click Certificate Error in the address bar then click View certificates 122 Operating Instructions 5 2 HTTPS Settings ...
Страница 124: ...6 After the wizard is displayed click Next 124 Operating Instructions 5 2 HTTPS Settings ...
Страница 126: ...9 Click Next 126 Operating Instructions 5 2 HTTPS Settings ...
Страница 127: ...10 Click Finish Operating Instructions 127 5 2 HTTPS Settings ...
Страница 131: ...6 Click Finish 7 Click Yes Operating Instructions 131 5 2 HTTPS Settings ...
Страница 196: ...3 Click the Connections tab then click LAN Settings 196 Operating Instructions 11 1 Proxy Server Settings ...


