background image

Page 9

Page 8

900-0125-

12

-

02 Rev A 

©2017 OutBack Power Technologies.  All Rights Reserved.

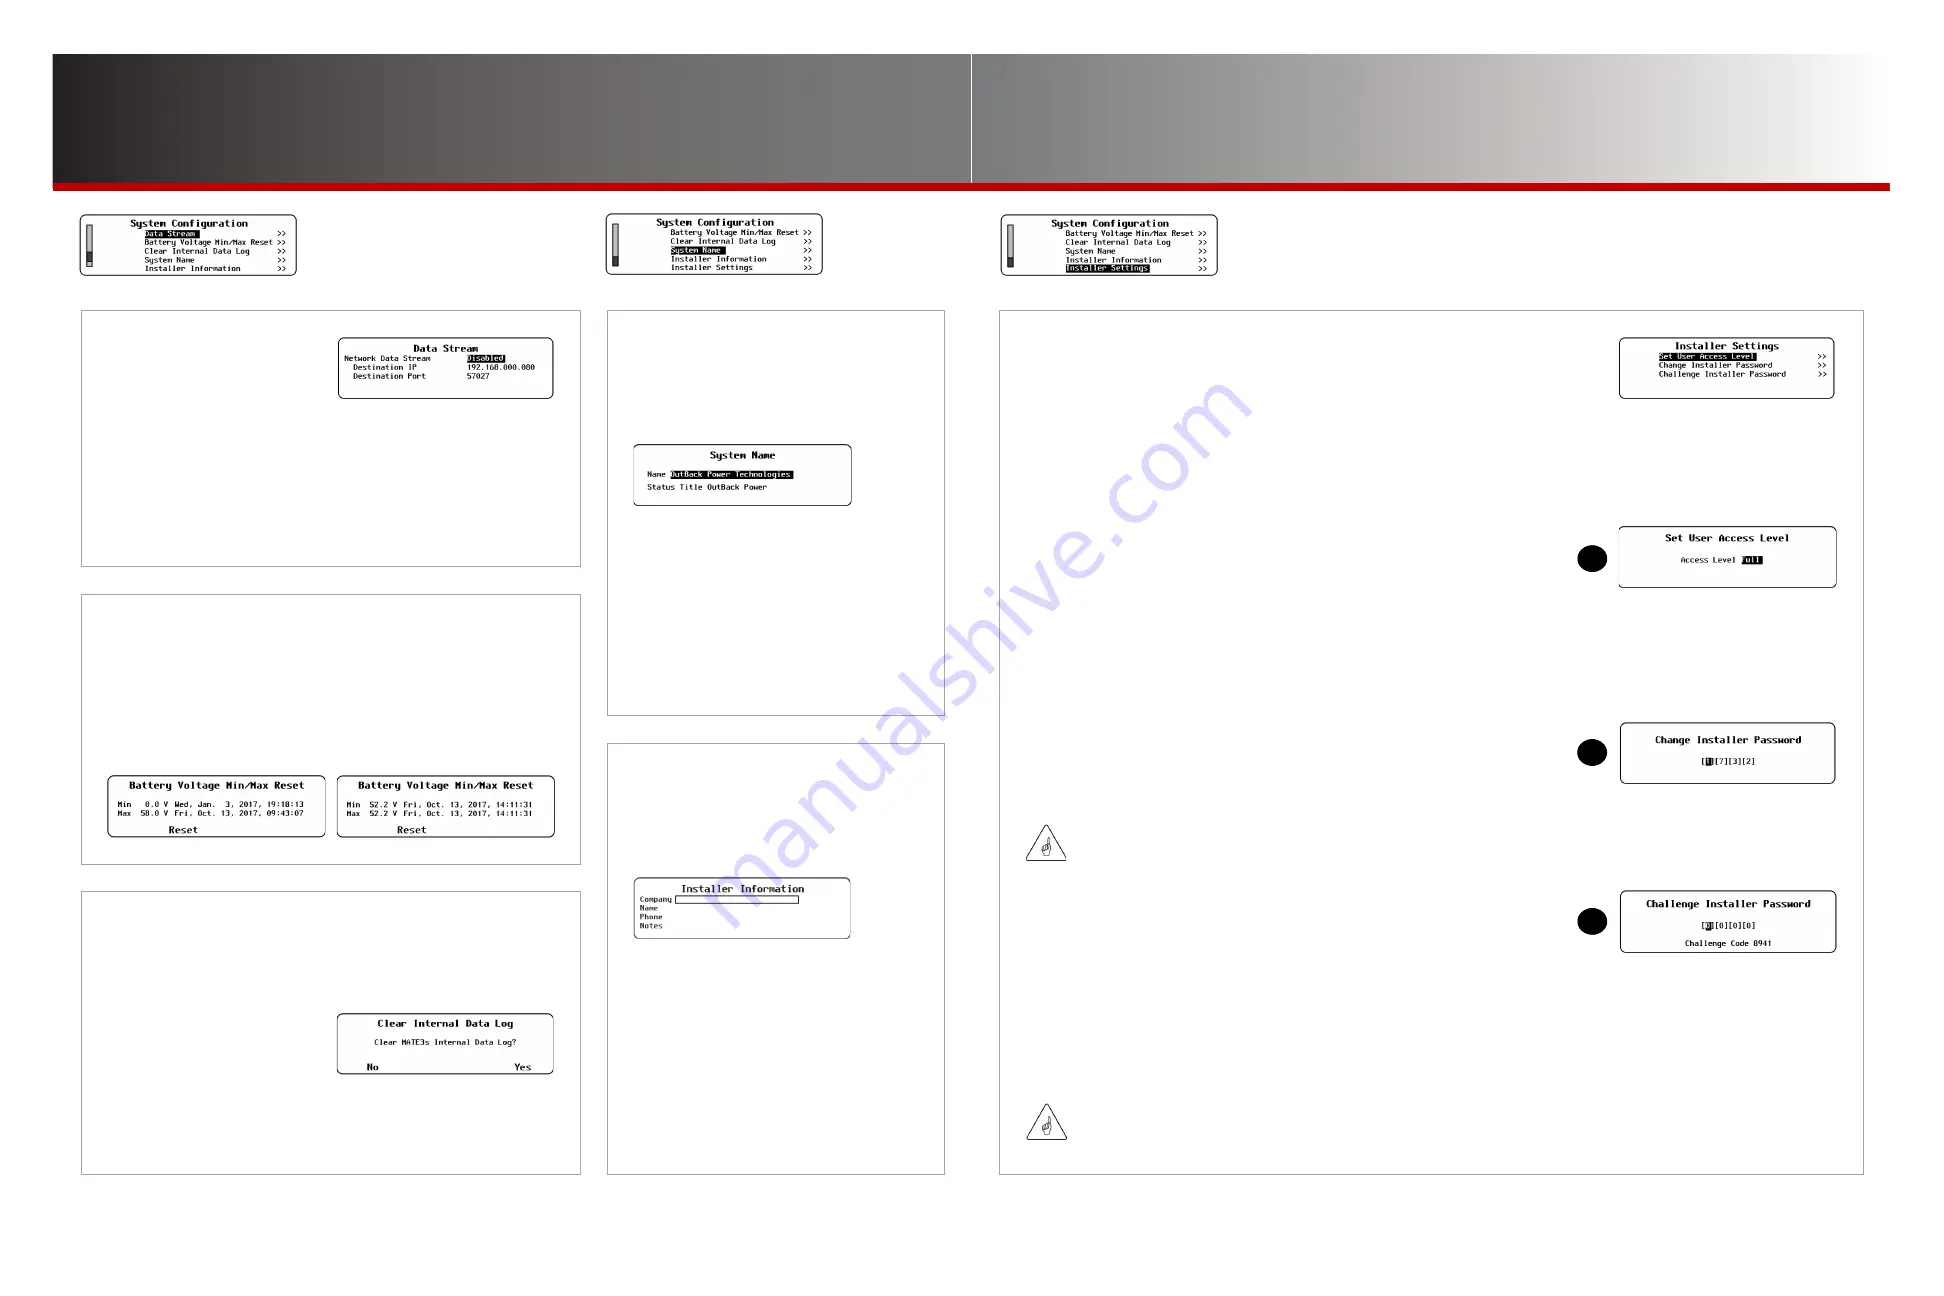
S-11. Data Stream

The 

Network Data Stream


option can be enabled if   

the data is destined for a  

network server.  

Network Data Stream

 — 

Enabled

 or 

Disabled

Destination IP

 — The IP address of the host computer or server.

Destination Port 

— The port number assigned to the MATE3s on the

host computer or server.

System Settings

Installer Password

S-12. Battery Voltage Min/Max Reset

This screen shows the time and date of the highest and 

lowest battery voltages that have been recorded.  The  

Reset

 key resets these items to the values present at  

that moment.

S-13. Clear Internal Data Log

This screen allows the option to clear the internal history of 

the MATE3s.  The Yes key clears all graph data, Event logs, 

and similar items.

S-14. System Name

This screen allows the installer 

to give the installation a unique 

name and status title.

Name

 — Any combination of

characters up to 30 characters

maximum.  This information is

displayed by the web site

interface (if used).

Status Title

 — (Optional) Any

combination of characters up to 15

characters maximum.  This name

is displayed on the Home screen

.

S-15. Installer

Information

This screen allows a location to 

enter basic installer information.

Company

 — Any combination of

characters up to 28 characters maximum.

Name

 — Any combination of characters

up to 19 characters maximum.

Phone

 — Any combination of characters

up to 15 characters maximum.

Notes

 — Any combination of characters

up to 31 characters maximum.

S-16. Installer Settings

This screen is a menu with options to set user 

access levels and the installer password.

Set User Access Level

 (

A

) — This prevents unauthorized access to certain levels of menus when using the standard password 

141

.

Change Installer Password

 (

B

) — This sets an alternate password which allows access to the full menus.  Often this is used by an

installer if the user’s access has been limited by 

A

.

Challenge Installer Password

 (

C

) — (Optional) Any combination of characters up to 15 characters maximum.  This name is displayed

on the Home screen.

Set User Access Level (

A

)

This menu allows one of four different user access 

levels (UAL) to set points for programming.

Full

 — Access Level 1 (UAL1).  This allows full access to all available menus.

This is the same access permitted by the installer password.  It is the default setting.

Advanced

 — Access Level 2 (UAL2).  This allows access to many user menus.  It also accesses the menus of UAL3 and UAL4.

Basic

 — Access Level 3 (UAL3).  This allows access to the designated basic user menus.  It also accesses the menus of UAL4.

Minimum

 — Access Level 4 (UAL4).  This allows access to only a few designated user menus.  The ability to program is minimal.

Change Installer Password (

B

)

This menu allows changes to the installer password.  In conjunction 

with the UAL settings, this password will restrict full menu access to 

those who know the new password (OEM or installers).

IMPORTANT:  

Changes to system settings should only be made by qualified personnel.

The installer password consists of

four settable numerical digits from

0

 to 

9

.

The default password is 

1732

.

Challenge Installer Password (

C

)

If the installer password is lost or forgotten, this process is used to   

reset access to the device.  The screen will generate a challenge code  

as shown in the image.  Once the installer has the c

hallenge code, it is  

necessary to contact OutBack Technical Support to obtain a temporary 

“challenge password” that corresponds with the MA

TE3s-generated 

challenge code.  After entering a valid challenge password, the MATE3s 

will immediately display the 

Change Installer Password

 screen 

B

.   

The installer should change the password according to preference.   

Make certain to record the new password.  

The challenge password

consists of four settable numerical

digits from 

0

 to 

9

.

IMPORTANT:  

After changing the installer password, cycle the power to the MATE3s.  Unplug the cable, 

wait 5 seconds, then plug it back in.  This will ensure the new installer password is saved.

Before

After

B

A

C

Содержание MATE3s

Страница 1: ...ks may be registered in the United States and other countries Date and Revision August 2017 Revision B Part Number 900 0125 12 02 Rev B A B C D F B A B MATE3s System Display and Controller Programming...

Страница 2: ...such as when to start or stop a generator The MATE3s allows a user to view monitor and establish all the settings and values that occur while the system is running Occasionally components may be adde...

Страница 3: ...Wizard See the Profile Wizard on page 42 for more information Settings Menus This menu accesses additional menus with settings for the system and for individual devices System Settings S apply to over...

Страница 4: ...eyesight vary with each installation The contrast color brightness and backlighting of the LCD can be adjusted to provide the best visibility for a given location Contrast Range is from 1 to 100 from...

Страница 5: ...access has been limited by A Challenge Installer Password C Optional Any combination of characters up to 15 characters maximum This name is displayed on the Home screen Set User Access Level A This m...

Страница 6: ...nly A and B Turns off the charger for an individual inverter and prevents it from responding to global charger commands Input Support FX class only C Enables the Input Support function if present Not...

Страница 7: ...vation The AUX deactivates three minutes after the Enable condition clears and Auxiliary Relay Radian inverters have an additional Auxiliary Relay This is a switched contact with no 12 Vdc output It h...

Страница 8: ...L1 inverter for single phase parallel or split phase multiple inverter systems OB Slave L2 A secondary L2 inverter for split phase multiple inverter systems L2 Phase Master The subphase master inverte...

Страница 9: ...rtain items such as Voltage Limit which are adjustable in other modes Upload Grid Protection These menus can implement any of several GIP files which can be downloaded from the OutBack website The GIP...

Страница 10: ...vated when the GridZero or Grid Tied input modes are selected See page 11 All items described on this page are enabled according to regulatory specifications Grid Support Functions indicates whether t...

Страница 11: ...al features this as an option under RTS Compensation Limited Lower and Upper Battery Voltage Adjust the lowest and highest allowed compensated voltage The Owner s Manual features these as an option un...

Страница 12: ...g Disconnect Disconnect Delay The time after reaching Disconnect before the output is activated Threshold The low voltage setting that activates the output following the Hysteresis Time ON Time The le...

Страница 13: ...er to turn on or off any of three shunts current sensors used by the battery monitor These are designated as shunts A B and C For more information on the use of each shunt see the Owner s Manual for t...

Страница 14: ...f it had previously been manually disabled CAUTION Equipment Damage This function can damage the generator or the batteries if either are not properly maintained Be sure to follow all maintenance requ...

Страница 15: ...of Load Start the inverter will charge the batteries However it is not programmed to perform a complete charge cycle If the generator reaches its Stop point the charge might not be completed State of...

Страница 16: ...ing the exercise period This is mostly applicable to DC generators IMPORTANT Regularly running a generator keeps engine components lubricated expels excess moisture charges the starting battery and he...

Страница 17: ...two columns in the table below are a list of start reasons The remaining columns display the possible reasons for the generator to stop The possible stop reasons are connected to the start reasons Fo...

Страница 18: ...X class inverters use Device Type 2 while FLEXmax charge controllers are Type 3 The FLEXnet DC Battery Monitor is Device Type 4 Device Types not depicted here include FXR class inverters Type 5 and Ra...

Страница 19: ...stem to reconnect to the utility grid Grid Connect Delay 0 to 240 minutes The delay period after reaching Grid Connect before the system reconnects to the utility grid Grid Disconnect xx x VDC inverte...

Страница 20: ...iod is ignored If the battery voltage falls below the inverter s Low Battery Cut Out voltage the inverter will automatically connect to the AC input source regardless of the time of day setting EXAMPL...

Страница 21: ...for more information on this function If the battery voltage exceeds the target the 12V AUX output will open the ROCB This removes the AC source from the grid tied inverter shutting it down This will...

Страница 22: ...ce programming and saving is complete press Exit to return to the Main Menu W 2 Using Existing Profiles If the most recent profile was lost or changed it can be retrieved from an SD card and applied t...

Страница 23: ...battery Capacity in B above See I 6 on page 12 for more information on battery charging Wizard Date Time A Hour Minute Day Month Year Weekday NOTE See S 6 on page 6 for more information on clock setti...

Страница 24: ...y pressing Save will automatically default to Option 2 below 1 Select a name on the list with the control wheel Press the Save soft key N to save the new settings over the selected profile Saving to S...

Страница 25: ...1 0 01 99 4 12 17 81 2 17 9 0 11 72 2 06 98 4 11 17 83 1 67 9 0 12 54 1 55 98 NOTE This header line is included in the download Device Data Logs D Users can create Device Data Logs for the FLEXmax FM...

Страница 26: ...Log is downloaded to an SD card an elg file is created This file can be opened in Notepad or MS Word as a text file Event logs can be used to identify repeated symptoms and other patterns A partial E...

Страница 27: ...these steps to help determine the nature of the fault This may also help resolve the problem See the MATE3s Overview Guide for more information on the EVENTS indicator To investigate event messages 1...

Страница 28: ...g the equipment off and on the user is encouraged to try to correct the interference by one or more of the following measures Reorient or relocate the receiving antenna Increase the separation between...

Отзывы: