background image

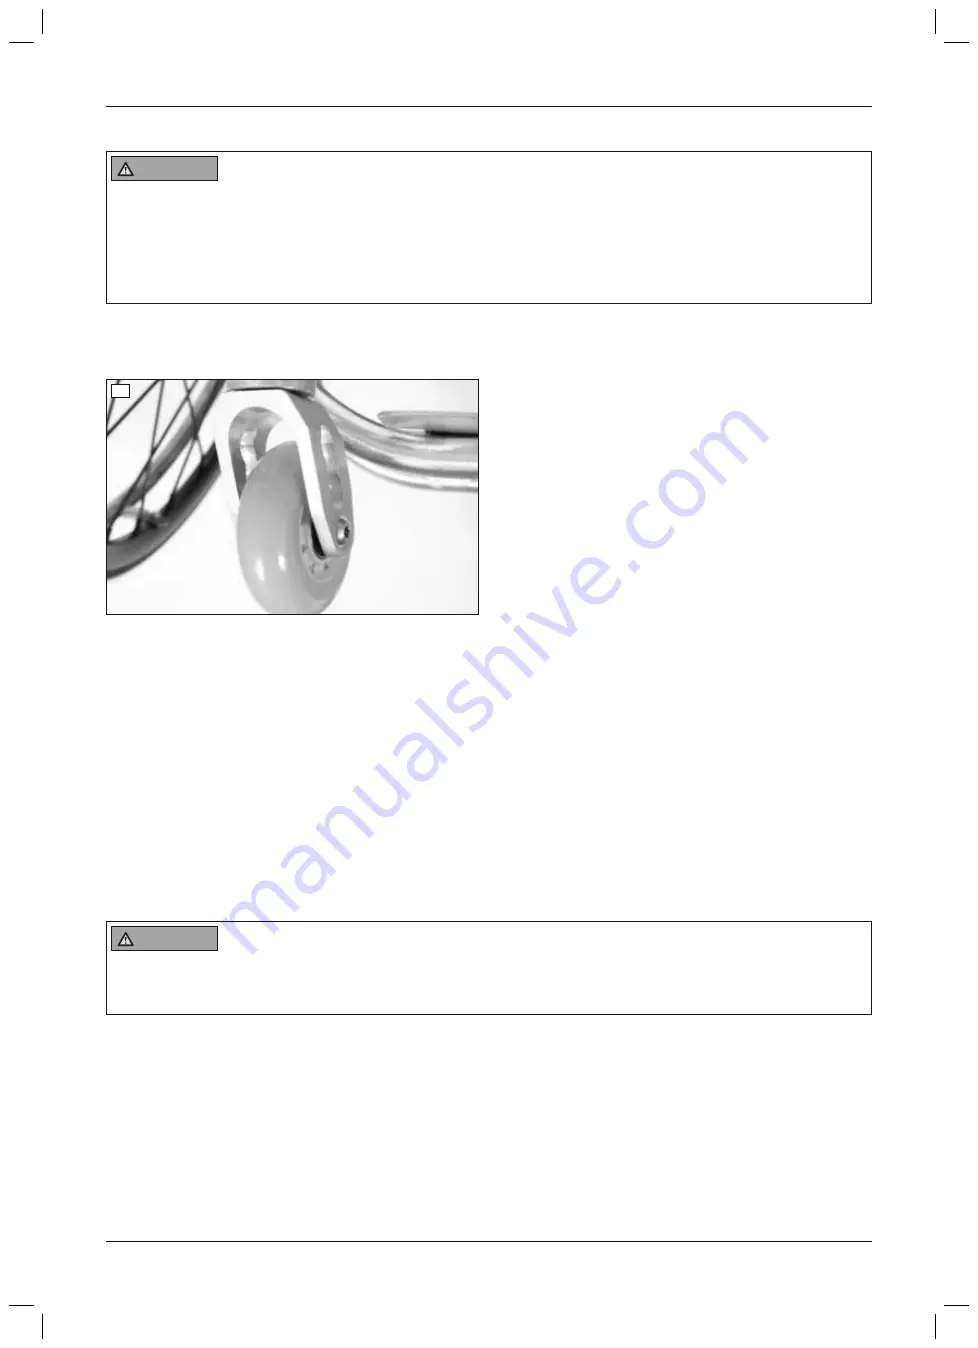
9.7 Caster wheels and caster forks

WARNING

Failure of caster wheels or caster forks

Falling, severe injury due to the wheelchair tipping over

Regularly inspect the caster wheels and caster forks for damage.

Regularly clean and oil the caster wheel axles and the threaded axles on the caster forks, especially in case of
stiffness.

Inform the responsible qualified personnel in case of permanent changes to the driving characteristics.

The  combination  of  caster  wheels  and  caster  forks  ensures  the  ability  to  hold  a  straight  line  and  navigate  bends
securely.
The caster wheels and caster forks have been assembled by the qualified personnel according to the order.

37

9.7.1 Approach in case of stiffness

In case of stiffness, the caster forks or caster wheel axles should be cleaned and oiled.

Oiling the caster forks

1)  Use a screwdriver to pry the cap off the caster fork housing (see fig. 11, item 1).
2)  Remove dirt from the caster fork around the hexagon nut (see fig. 11, item 2).
3)  Add a few drops of thin, resin-free oil to the housing (sewing machine oil).
4)  Close the housing.

Oiling the caster axle

1)  Remove dirt from the caster axle (e.g. hairs).
2)  Lubricate the caster axle between the caster wheel and caster fork with a few drops of thin, resin-free oil (sew­

ing machine oil) (see fig. 12, item 2).

9.8 Anti-tipper

WARNING

Incorrectly adjusted anti-tipper

Risk of falling as a result of incorrectly adjusted anti-tipper.

The anti-tipper may only be adjusted by qualified personnel.

One or two anti-tipper wheels may be installed depending on the wheelchair version (see fig. 38, item 1). 
In the Basketball version, an anti-tipper pad protects the respective anti-tipper housing (see fig. 38, item 2).

25

Invader 480S26=20000_K

Use

Содержание 480S26 20000 K

Страница 1: ...Instructions for use 3 Invader 480S26 20000_K...

Страница 2: ...2 Invader 480S26 20000_K...

Страница 3: ...5 2 2 13 Preparing the product for use 6 13 Assembly 6 1 13 Settings and assembly instructions 7 14 Prerequisites 7 1 14 Safety Instructions for Assembly 7 2 14 Adjusting the drive wheels 7 3 15 Adju...

Страница 4: ...sport 9 13 29 Use in vehicles for transporting persons with reduced mobility 9 14 29 Care 9 15 30 Cleaning 9 15 1 30 Cleaning by hand 9 15 1 1 30 Cleaning the seat cushion 9 15 1 2 30 Cleaning belts s...

Страница 5: ...user The product was adapted to the needs of the user Subsequent changes may be made only by qualified per sonnel We recommend checking the product settings once per year to ensure optimal treatment o...

Страница 6: ...t 1 Back support with back support upholstery 8 Caster wheel 2 Leather corner protective pad 9 Anti tipper wheel 3 Side panel 10 Anti tipper pad 4 Seat upholstery seat cushion 11 Drive wheel 5 Frame 1...

Страница 7: ...support upholstery 8 Bumper steel 2 Leather corner protective pad 9 Wing 3 Side panel 10 Caster wheel 4 Seat upholstery 11 Anti tipper wheel 5 Frame pads 12 Drive wheel 6 Frame 13 Handrim 7 Foot plat...

Страница 8: ...t with back support upholstery 7 Pickbar steel 2 Leather corner protective pad 8 Caster wheel 3 Side panel 9 Anti tipper wheel 4 Seat upholstery 10 Drive wheel 5 Frame 11 Handrim 6 Foot plate 12 Back...

Страница 9: ...bsolute Contraindications None known 3 3 2 Relative Contraindications Failure to meet physical or mental requirements The product has a permanently welded frame Therefore the product is not suitable f...

Страница 10: ...me parts CAUTION Heat development when braking with handrims Burns due to insufficient hand protection Wear wheelchair gloves when travelling at high speeds Hazards while driving CAUTION Lack of drivi...

Страница 11: ...meplate and section Technical data Please note that certain accessories and add on components will reduce the remaining load capacity WARNING Exceeding the service life Serious injuries due to failure...

Страница 12: ...uctions for use before using the product Observe important safety related information e g warnings precautions I The product has not been approved by the manufacturer for use as a seat in vehicles for...

Страница 13: ...o incorrect adjustment or installation Before you start using the wheelchair for the first time check the chosen wheelchair settings with the support of authorised personnel After every assembly check...

Страница 14: ...d screw connection with medium strength thread locker e g Loctite 241 Always replace self locking screws and nuts with new self locking screws and nuts after disassembly Fine tuning and adjustments sh...

Страница 15: ...end of the quick release axle see fig 6 item 1 in or out 6 7 3 2 Adjusting the handrims INFORMATION This section does not apply to standard wheels All handrims are designed for a spacing from the dri...

Страница 16: ...d pressure zones Do not create too much pressure INFORMATION Ensure that the user s pelvis is positioned as far back in the wheelchair as possible i e between the backrest tubes The back upholstery is...

Страница 17: ...g 16 INFORMATION The two ends of the hook and loop strap have to overlap by at least 100 mm in each case INFORMATION Keep the respective front hook and loop straps tight INFORMATION Deviating adjustme...

Страница 18: ...seat belts Strangulation suffocation due to failure to observe specifications Observe the information in the instructions for use included with the seat belt for installation The correct positioning o...

Страница 19: ...belts Following the preliminary adjustment of the belt lengths final adjustments have to be made in the presence of the user If a medically correct positioning cannot be achieved by means of the stra...

Страница 20: ...1 Instructions for use Attaching loads e g backpacks can adversely affect stability Therefore suspending additional loads on the wheelchair is not permitted The recommended overall width for manual wh...

Страница 21: ...e is handled improperly or negligently Keep away from all ignition sources especially lit cigarettes CAUTION Wear of the seat and back upholstery Loss of functionality due to prohibited continued use...

Страница 22: ...back padding back onto the back upholstery Position the seam of the backrest padding exactly over the upper upholstery strap see fig 29 item 1 5 Pull the backrest padding down and attach it to the hoo...

Страница 23: ...ocked in the wheel attachment device The clamp axles have to be fully countersunk and the clamp brackets must be closed to the stop CAUTION Defective tyres Accidents falling due to poor traction reduc...

Страница 24: ...fied personnel promptly Drive wheels with quick release axle 1 Release the wheel lock 2 Grip the area between the spokes near the hub with your fingers 3 Use your thumb to press in the push button on...

Страница 25: ...el axles should be cleaned and oiled Oiling the caster forks 1 Use a screwdriver to pry the cap off the caster fork housing see fig 11 item 1 2 Remove dirt from the caster fork around the hexagon nut...

Страница 26: ...sult the qualified personnel if you notice signs of discomfort or fear when using a belt sys tem Have the basic settings of the belt system checked regularly Adjustments may be required due to the gro...

Страница 27: ...the attachment points and brackets must be correspondingly moved The usage information that follows provides a brief overview of using the seatbelts Detailed information on adjust ment and use is pro...

Страница 28: ...g the protective pads The protective pads can be removed for cleaning 1 Open the hook and loop closures and remove the protective pads illustration see previous section 2 After cleaning see page 30 Se...

Страница 29: ...ansport in a passenger vehicle 1 Remove the drive wheels see page 24 2 Place the disassembled wheelchair and components safely in the vehicle 3 Securely reattach the drive wheels during reassembly 9 1...

Страница 30: ...e attached care label Seat cushion with foam core 1 Open the zipper and remove the foam core see fig 54 2 Clean the cover according to the attached care label 3 Wash all foam parts by hand at 40 C usi...

Страница 31: ...vice performed at least once per year For users with a changing anatomy for example body dimensions weight or users with a changing clinical picture have the product inspected adjusted and serviced at...

Страница 32: ...ick release axle system as standard equipment To keep this system operational ensure that no dirt adheres to the quick release axle or receiver bushing Periodically lubricate the quick release axle li...

Страница 33: ...fied personnel 10 3 1 Inner tube rim tape and tyre replacement CAUTION Improper tyre replacement Injuries to the user due to incorrect installation product damage No person is permitted to sit in the...

Страница 34: ...from the position across the valve Ensure that the tube is not pinched between the tyre and rim during this process 57 58 Inflating the tube 1 Ensure that the valve is positioned perpendicularly for p...

Страница 35: ...gly 12 1 Liability The manufacturer will only assume liability if the product is used in accordance with the descriptions and instruc tions provided in this document The manufacturer will not assume l...

Страница 36: ...according to tyre option see the print on the tyre wall Ambient conditions Temperatures and relative humidity Temperature during use C F 10 to 40 14 to 104 Transport and storage temperature C F 10 to...

Страница 37: ...37 Invader 480S26 20000_K...

Страница 38: ...Invader 480S26 20000_K 38...

Страница 39: ...Meri Sitesi B Blok No 30 B 34387 Mecidiyek y stanbul Turkey T 90 212 3565040 F 90 212 3566688 info ottobock com tr www ottobock com tr Africa Otto Bock Alg rie E U R L 32 rue Ahc ne Outaleb Coop rati...

Страница 40: ...late Version SB_2016 10 21 FM483 SB_210x297 Ihr Fachh ndler Your specialist dealer Otto Bock Mobility Solutions GmbH Lindenstra e 13 07426 K nigsee Germany www ottobock com Ottobock 647H576 en_INT 06...

Отзывы: