background image

NOTE:

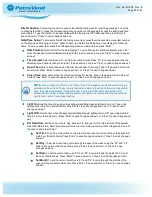
A Keypad Tone Duration set to a value greater than 90 milliseconds is not

recommended. This will cause keypad de-synchronization (pressing keys in succession will
result in a delayed tone playback).

7.1.5 System Network Number Menu

The

System Network Number Menu

allows the user to set a number to identify your network.

NOTE:

The default system network ID is 0000; the magnetic or proximity test card provided

with your system is also default network ID 0000. Once the system has been tested, the
installer should set the network ID to match the network ID coded on the cards that will be used
with the system.

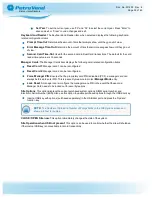
Press ‘5’ “ENTER” to access the

System Network Number Menu

. There is one option within the

Network ID Menu

:

1. Network ID

Network ID

: The Network ID is a security feature, and is also programmed on to each of the proprietary

magnetic or proximity cards associated with the system. If the

Network ID

on the card does not match the

Network ID

in the system, fueling will not be allowed.

To set a

Network ID

number, type in the four-digit number that corresponds with the numbers encoded on

the cards, then press “Enter.”

NOTE:

If your Network ID is unknown, use the Test Reader option (see 7.2.3 Reader Menu)

to determine the first four digits encoded on your cards.

The network ID for proximity cards is restricted to a range of 0000-0255.

7.1.6 Petro-Net

Setup Menu

Petro-Net

setup is not available for the PV100

®

. Choosing this menu item will display the message “Petro-

Net Setup is not available for the PV100

®

."

7.1.7 Miscellaneous Menu

The

Miscellaneous Men

u consists of miscellaneous tests and various restore options for the PV100

®

.

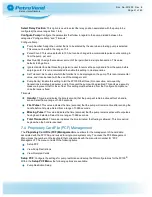
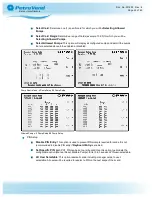
Select the keyboard number that corresponds with the desired menu item number.

1. Lights Test

2. DIP Switch Test

3. RAM Test

4. USB Test

5. PCM Loopback Test

Doc. No.: M1900 Rev.: 8

Page 34 of 65

Содержание M1900

Страница 1: ...Part Number M1900 Rev 8 Issue Date 12 4 2018 Supersedes 5 3 2017 M1900 Petro Vend 100 Fuel Control System Installation Operation and Maintenance Guide 3 01 03f 2 01m...

Страница 2: ...n Inc All Rights Reserved DOVER the DOVER logo are registered trademarks of Delaware Capital Formation Inc a wholly owned subsidiary of Dover Corporation Contact OPW Fuel Management Systems Visit us a...

Страница 3: ...3 System Technical Specifications 14 2 3 1 Fuel Control System 14 2 4 Pump Control 15 2 4 1 Mechanical Pump Control 15 Section 3 Pre Installation Information 16 3 1 Conduit Wiring Requirements 16 3 1...

Страница 4: ...uration 26 5 5 1 Configuration DIP Switches 26 5 5 2 PCM Testing 28 Section 6 Complete the Installation 30 Section 7 System Configuration 31 7 1 Terminal Setup Test Menu 31 7 1 1 Display Menu 32 7 1 2...

Страница 5: ...t 41 7 4 1 Clearing Totals 43 7 4 2 Reporting 44 7 5 Dual Card Security Feature 49 Section 8 System Maintenance 55 Appendix A PV100 Primary Board 56 Appendix B Termination Codes 57 Appendix C Menu of...

Страница 6: ...rial grade USB key that is used to store data for Totals and Transactions NOTICE Use the metal industrial grade USB Flash Drive that was provided with your unit to store Totals and Transactions Use th...

Страница 7: ...that follow contain important safety and compliance information related to the installation and operation of this unit Read these instructions carefully before you continue with the installation Doc N...

Страница 8: ...pecified DANGER Indicates an immediately hazardous condition that if not prevented will result in death or serious injury WARNING Indicates a possibly hazardous condition that if not prevented could r...

Страница 9: ...and might also cause simultaneous failure of electric equipment 2 Class I Division 2 A Class I Division 2 location is a location a In which volatile flammable liquids or flammable gases are handled pr...

Страница 10: ...nstallation is subject to approval by the local authority that has jurisdiction at the site 1 3 2 Installation Requirement OPW Terminals are designed to be installed above the hazardous area when usin...

Страница 11: ...ve equipment PPE This includes safety glasses hardhat safety shoes and reflective vest Barricade the work area before installation Be sure to obey all applicable Lockout Tagout LOTO procedures before...

Страница 12: ...ications Commission FCC Rules Regulations Operation is applicable to these conditions l This device must not cause harmful interference l This device must accept interference received including interf...

Страница 13: ...l Island Terminal FIT and Pump Control Module PCM and another controls the operation of the Fuel Site Controller FSC The FIT PCM piece supplies the user interface that controls the card reader or HID...

Страница 14: ...of the FSC will occur A reconfiguration of pump and system control settings will be necessary 2 3 System Technical Specifications This section details the technical specifications i e dimensions oper...

Страница 15: ...ve Module or PCM Slave OPW Part 20 4405 is mounted on the back wall of the PV100 enclosure providing control for up to two 2 hoses A second PCM Slave board can be added to control a total of four 4 ho...

Страница 16: ...l wiring and conduit runs must conform to the National Electric Code NFPA No 70 Code for Motor Fuel Dispensing Facilities and Repair Garages NFPA No 30A and all national state and local codes All wiri...

Страница 17: ...sealed in order to meet NEC code 3 1 3 Grounding ThePV100 incorporates internal noise suppression circuitry To ensure safety and proper operation of the equipment all devices of the OPW system must be...

Страница 18: ...t is acceptable to share the conduit with dispenser wiring 3 1 5 Pulser Wire For mechanical pump installations pulser wires must meet the pulser manufacturer s wire requirements if installed in separa...

Страница 19: ...nser PV100 Installation 1 Unpack your new PV100 and inspect the contents for shipping damage Make sure that all of the following are in the box n A package of cards if this will be a carded system n I...

Страница 20: ...Use the provided mounting hardware to mount the PV100 enclosure to the pedestal Align the provided gasket with the mounting holes of the pedestal top plate Carefully position the enclosure in place s...

Страница 21: ...ut of the enclosure Place the heater assembly aside in a safe place 6 Remove the two 2 hex nuts that hold the Lexan shield in place and remove the Lexan shield NOTICE Place the Lexan shield in a safe...

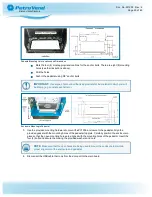
Страница 22: ...conduit will contain the contain the Line Neutral and Ground wires for the PV100 This conduit can also contain pump power wires The power conduits must be stubbed from the seal off to the bottom of t...

Страница 23: ...to including the pulser wiring in the pump control conduit a separate conduit for the pulser wire can be run This conduit is dedicated to bringing the pump pulser wires from the pump junction box to...

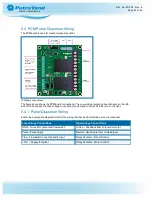
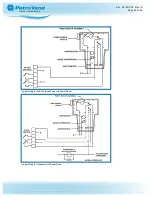
Страница 24: ...re on the right 5 4 1 Pump Dispenser Wiring Follow the appropriate diagram below for the wiring of either a self contained pump or a dispenser Low voltage Connections High voltage Connections GND Grou...

Страница 25: ...TypicalWiring for Self Contained Pump with Power Reset TypicalWiring for Dispenser with Power Reset Doc No M1900 Rev 8 Page 25 of 65...

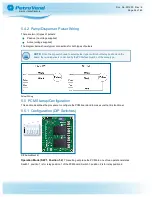
Страница 26: ...ispensers controlled by the PCM slave must be of the same type Pulser Wiring 5 5 PCM Startup Configuration This section describes the procedure to configure the PCM board and to make sure that it is f...

Страница 27: ...es and will generate more electrical noise Setting the Pulser Filter to Mechanical will filter the input signal l Electronic Pulsers typically have shutter wheels and optical detectors l Mechanical Pu...

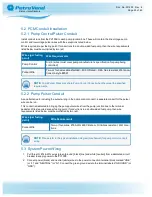
Страница 28: ...ake sure that the PCM is correctly wired to the pumps by using the Manual Override feature 1 Apply power to the system 2 Activate the bypass switch for the first relay on the PCM You will hear the rel...

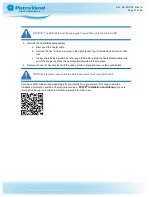
Страница 29: ...e installation If you have a QR code scanner reader app for your smartphone you can scan this code to view the DIP switch configuration and testing segment of the instructional video PV100 Installatio...

Страница 30: ...the wiring has been installed and the system has been tested the installation can be completed as follows 1 Put the Lexan shield back in place and secure it with the two 2 hex nuts 2 Reconnect the US...

Страница 31: ...pump processing conditions 7 1 Terminal Setup Test Menu To access the Terminal Setup Test Menu open the door of the PV100 and flip DIP switch bank 2 switch 1 located on the main board as shown in Mai...

Страница 32: ...ess Enter Normal Screen Test Choose this option to test the PV100 display screen in Normal mode To begin press the menu item number that corresponds with Normal Screen Test Various characters will run...

Страница 33: ...s This will test the functionality of the card key reader When prompted at the test screen insert or present the card or key If the card key reader is functioning properly the status will be displayed...

Страница 34: ...ach of the proprietary magnetic or proximity cards associated with the system If the Network ID on the card does not match the Network ID in the system fueling will not be allowed To set a Network ID...

Страница 35: ...rd is connected This can cause damage to the relay board Restore Factory Defaults This will clear all configured parameters within the terminal side of thePV100 configuration and restore the default p...

Страница 36: ...l update the PV100 circuit board firmware from the USB key Once choosing this option follow the instructions on the screen to proceed with the update Program USB Driver This menu option updates the PV...

Страница 37: ...e as follows 1 Site Management 2 Pump Management 3 PCF Management 4 Clear Totals 5 Reporting 7 2 1 Site Management Site Management Menu To access the Site Management menu press the corresponding item...

Страница 38: ...the system If a user enters their card number either by a card swipe or keyboard entry the system will display System Closed and return to the Insert Card screen If a manager card number is presented...

Страница 39: ...PIN Ensures that if a proprietary card PIN is disabled PCF a manager card can always be forced to enter PIN This is a security measure to protect Manager Mode entry l Lock Reset A manager can re conf...

Страница 40: ...the reader types magnetic proximity or ChipKey is enabled NOTE If a Driver card is entered with the keyboard when Reader is specified and the Vehicle card is set up for Keyboard the error message bel...

Страница 41: ...s as a security measure to prevent theft or loss of fuel This setting must be cleared from the Configure Pump Menu once the issue is fixed Timeouts l Handle This value indicates the time seconds that...

Страница 42: ...owed Pumps 4 Pump Setup 2 Pump Setup l PIN Setup n Disable PIN Entry This option is used to prevent PIN prompts required for cards It is not recommended to disable PIN entry if Keyboard Entry is enabl...

Страница 43: ...f all programmed pump restrictions which can be scrolled by using the F1 F2 F3 and F4 buttons l View Prompted Cards The View Prompted Cards menu item displays a list of all allowed cards and shows whe...

Страница 44: ...ermits a user to view reports for the various functions of the PV100 divided as follows l View Pump Totals l View Card Totals l View Bypass Totals l Pump Totals to USB l Card Totals to USB l Transacti...

Страница 45: ...the keypad and then Enter View Card Totals 4 Pump Support and 2 Pump Support NOTE The 4 Pump site configuration will show five 5 cards with the card totals for Pump 1 and 2 showing on the top lines a...

Страница 46: ...h a file name of P_YYMMDD CSV where YYMMDD represents the date at which the file was created If this option is selected a second time on the same day any existing file with that date will be over writ...

Страница 47: ...ndix B for transaction termination codes Example of Transactions For further programming information on both non card keyboard only and carded systems from the instructional video PV100 Installation a...

Страница 48: ...Program a Carded System Doc No M1900 Rev 8 Page 48 of 65...

Страница 49: ...s see Site Management on page 37 Media Type menu option for information on input restrictions Configuration Driver ID Input Vehicle ID Input 1 Card Key Reader Card Key Reader 2 Card Key Reader Keyed i...

Страница 50: ...ype Setup The Card Type Setup screen is where the Card Type is specified for a range of cards and an individual card number The available types are Driver Vehicle and Single 1 Select a card number Doc...

Страница 51: ...range that is entered overlaps the range of another Card Type 3 Push the F3 function key to show the types Push F3 again and again to scroll through and select the applicable types Driver Vehicle and...

Страница 52: ...et a range that contains a Manager card the error message below will come into view Range contains Manager card and its type cannot be vehicle Set Specific PIN Screen Set Specific PIN Before a PIN can...

Страница 53: ...een in Proprietary Card File PCF Management will show the Card Type next to each card number listed View Card Totals View Card Totals 4 Pump When the Dual Card security feature is enabled the View Car...

Страница 54: ...ons Report for DualCard When the Dual Card security feature is enabled the Transactions to USB report will show Card Type information The report will also include the manager card transaction NOTE The...

Страница 55: ...abrasive cloth as needed If Keypad becomes damaged replace Door Locks Lubricate door locks every six 6 months or as needed Use graphite or molybdenum disulfide Moly B dry lubricant DO NOT apply too m...

Страница 56: ...Appendix A PV100 Primary Board PV100 Primary Board Doc No M1900 Rev 8 Page 56 of 65...

Страница 57: ...card is in the card file verify card number is correct i Card invalidated Proprietary Card or Network Card Type invalidated Proprietary Cards Change card validation to valid in card file Network Cards...

Страница 58: ...y active Pump nozzle is engaged Stop fueling and hang up the nozzle I Normal Transaction terminated normally J Quantity limit exceeded One of the quantity limits for the transaction has been reached V...

Страница 59: ...c Function Keypad Test 3 Reader Menu on page 33 a Select Reader b Reader Status 4 Tones Menu on page 33 a Tone Sequence Test b Keypad Prompt Reader i Tone Value ii Tone Duration 5 System Network Numbe...

Страница 60: ...Management on page 37 a Site ID Number b Date Time Setup i Date Format ii Time Format iii Open Time iv Close Time v Light On vi Light Off vii Set Date Time n Set Time n Set Day n Set Date n Set Month...

Страница 61: ...i Handle ii First Pulse iii Missing Pulse iv Total Transaction 3 Proprietary Card File PCF Management on page 41 a Setup PCF i Pump Restriction Setup n Select Card n Select Card Range n Select Allowed...

Страница 62: ...ngle Pump e Bypass Totals 5 Reporting on page 44 a View Pump Totals b View Card Totals c View Bypass Totals d Pump Totals to USB e Card Totals to USB f Transactions to USB Doc No M1900 Rev 8 Page 62 o...

Страница 63: ...ny particular purpose and of all other obligations or liabilities on OPW Fuel Management Systems part Further OPW Fuel Management Systems neither assumes nor authorizes any other person to assume for...

Страница 64: ...ion 6 3 3 Proprietetary card file Man agement added bullet point config prompt 1 Replaced in Section 6 3 5 Reporting replaced Figure 6 3 6 4 to reflect additions in Section 6 3 3 4 893 6 1 2016 2 01h...

Страница 65: ......
Отзывы: