108 / 181
Manual-ZintoA_final_ger_engl_it_20081017.doc
05.11.2008, Dipl.-Ing. S. Spitzley
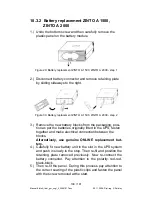
Figure 28: Battery replacement ZINTO A 800, ZINTO A 1000 - step 2
3.) Remove the new battery blocks from the packaging, posi-
tion as per the batteries originally fitted in the UPS, fasten
together and make electrical connection between the
blocks.
Alternatively,
use
genuine ONLINE replacement bat-
tery.
4.) Carefully fit new battery unit in the slot in the UPS system
and push in slowly to the stop. Then re-fit and position the
retaining plate removed previously. Now re-connect the
battery connector. Pay attention to the polarity: red-red,
black-black.
5.) Then re-fit the panel. During this process pay attention to
the correct seating of the plastic clips and fasten the panel
with the screws removed at the start.
Содержание ZINTO A 1000
Страница 1: ...www online ups com Manual ZINTO A Series A 800 A 1000 A 1500 A 2000 A 3000 ...
Страница 3: ...2 181 Manual ZintoA_final_ger_engl_it_20081017 doc 05 11 2008 Dipl Ing S Spitzley ...
Страница 63: ...62 181 Manual ZintoA_final_ger_engl_it_20081017 doc 05 11 2008 Dipl Ing S Spitzley ...
Страница 65: ...64 181 Manual ZintoA_final_ger_engl_it_20081017 doc 05 11 2008 Dipl Ing S Spitzley ...
Страница 123: ...122 181 Manual ZintoA_final_ger_engl_it_20081017 doc 05 11 2008 Dipl Ing S Spitzley ...


