In
s
trument
Nomen
c
la
tu
re and
Fun
c
tio
n
s
1
1.2
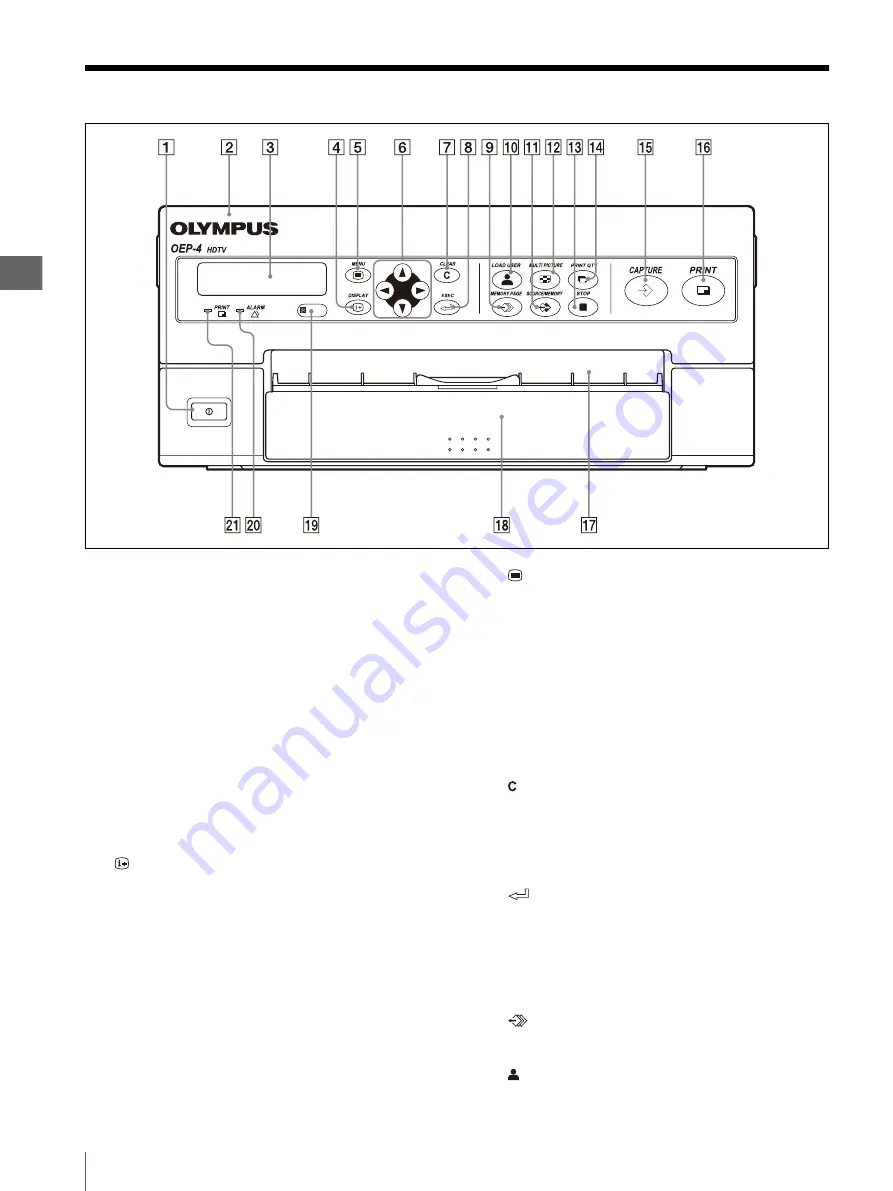
Front Panel
10
1.2
Front Panel
A
Power switch
Press to turn this instrument ON, and press again to
turn it OFF.
B
Front door
To open the front door, place a finger on its top edge
and flip it toward the front.
The ink ribbon holder is located inside the front
door.
C
LCD panel
The information of the current settings displayed
here. During menu operation, this displays the
menu item in which the cursor is present. When an
error occurs, this displays the error message.
D
DISPLAY button
E
MENU button
Press to display the menu. This button is also used
to exit from the menu and return to the normal
image.
F
Cursor (
v
/
V
/
b
/
B
) keys
G
CLEAR button
Press to clear an image from the memory. The type
of image that can be cleared with this button
depends on the setting of the CLEAR item in the
FUNCTION SETUP menu.
H
EXEC button
When “EXEC” is displayed in menu, press this
button to execute the setup item.
Press this button to input characters or execute the
selected function in the CAPTION menu and
USER NAME menu.
I
MEMORY PAGE button
Press to select the memory page to be used.
J
LOAD USER button
Press to load a previously registered user setup.
When a normal image is displayed :
Press to
display or hide the on-screen display (Print
quantity, Memory page, Operation mode, Source/
Memory). Pressing the button displays the current
setup for a few seconds, and each further press
switches the display ON and OFF alternately.
When a menu is displayed :
Press and hold to
hide the on-screen display on the monitor
temporarily. The on-screen display is hidden only
while the button is held depressed.
When the normal image is displayed :
Move
the pointer in the direction of an arrow.
When the menu is displayed :
Move the cursor
in the direction of an arrow.
Содержание oep-4
Страница 2: ...2 ...
Страница 76: ...Index 76 Appendix ...
Страница 77: ...Index 77 Appendix ...
Страница 78: ...Index 78 Appendix ...
Страница 80: ...2 667 561 13 2 Printed in Japan GT2251 04 ...


