


8
- LINEA FLESSIBILE
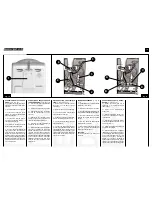
Il tubo di collegamento tra le due
unità dovrà essere fatto passare
tra i due battenti della finestra, i
quali, durante il funzionamento del
climatizzatore dovranno essere chiu-
si il più possibile (Fig. 6).
Nel caso si voglia operare una in-
stallazione “semifissa” che consenta
la chiusura completa dei battenti
della finestra occorrerà praticare
un foro rettangolare di dimensioni
40 mm di larghezza e 25 mm di
altezza nello stipite. Questo foro
può essere eseguito: nella parte
fissa, nella parte mobile, o nella
parte fissa e mobile del serramen-
to (Fig. 7).
Per procedere ad un altro tipo di in-
stallazione (sfruttando la possibilità
di scollegare la linea di collegamen-
to tra le due unità per poi inserirla
nel foro praticato nella parete) con-
sultate il paragrafo “ISTRUZIONI
PER L’INSTALLAZIONE CON FO-
RATURA DELLA PARETE”
- LIGNE FLEXIBLE
Le tuyau de raccordement entre les
deux unités devra passer entre les
deux battants de la fenêtre qui, pen-
dant le fonctionnement du climatiseur,
devront être fermés le plus possible
(Fig. 6).
Si vous voulez realiser une installation
“demifixe” permeffant la fermeture to-
tale des battants de la fenêtre, il faudra
percer, dans le montant, un trou
rectangulaire de 40 mm de large de
haut 25 mm. Ce trou pourra être percé:
seulement sur le bâti dormant ou seu-
lement sur le châssis mobile, ou bien
dans la partie fixe et mobile du cadre
(Fig. 7).
Pour procéder à un autre type de pose
(en exploitant la possibilité de
déconnecter la ligne de branchement
entre les deux unités pour les monter
ensuite dans un trou percé au mur),
reportez-vous au paragraphe “POSE
PAR PERCAGE DU MUR”.
- FLEXIBLE LINE
The hose connecting the two units goes
under the two partially closed wings of
the window. When the unit is running,
the wings should be kept closed as
much as possible (Fig. 6).
If you want a "semi-permanent" instal-
lation to allow you to close the window
completely, cut a 40x25 mm rectangu-
lar hole in the window sill or frame. Drill
this hole either in the fixed part or in the
moving part, or in the fixed and moving
part of the window frame (Fig. 7).
If you wish to proceed with a different
kind of installation (taking advantage
of being able to disconnect the line
between the two units and passing it
through the hole in the wall) consult the
paragraph: “INSTALLATION
INSTRUCTIONS, DRILLING A HOLE
IN THE WALL”.
- BIGSAME LEITUNG
Der Verbindungsschlauch der beiden
Geräte wird zwischen den beiden
offenen Fensterflügeln nach außen
geführt. Das Fenster soll soweit wie
möglich geschlossen bleiben (Abb. 6).
Sollten Sie eine “halbfeste” Aufstellung
wählen, bei der das Fenster ganz zu
ist, müssen Sie eine 40 mm breite und
25 mm hohe Öffnung in den
Fensterrahmen bohren. Für die Öffnung
kann man folgende Positionen (Abb. 7)
wähien:
a) am festen Rahmen
b) am Flügel
c) am Fensterrahmen und am Fügel.
Eine weitere Installationsmöglichkeit
besteht darin, die Verbindungsleitung
der beiden Geräte abzutrennen und in
das Bohrloch einzuführen, das in der
Wand ausgeführt wurde. Diese Art von
Installation ist im Kapitel “ANLEITUNG
ZUR MONTAGE UNTER
DURCHBORHUNG DER WAND”
beschrieben.
- LíNEA FLEXIBLE
El tubo de conexión entre las dos
unidades deberá pasar entre las dos
hojas de la ventana, las que, durante la
marcha del acondicionador, deberán
permanecer cerradas lo más posible
(Fig. 6).
Si se desea realizar una instalación
“semifija” que permita el cierre total de
las hojas de la ventana, será necesario
efectuar un orificio rectangular en el
marco de 40 mm de anchura por 25
mm de altura. Dicho orificio puede ser
realizado sólo en la parte fija, sólo en la
parte móvil o bien sobre ambas partes
(fija y móvil) del cerramiento (Fig. 7).
Para proceder a otro tipo de instalación
(aprovechando la posibilidad de
desconectar la línea de conexión entre
las dos unidades para después
introducirlas en el orificio realizado en
la pared) lean el párrafo
“INSTRUCCIONES PARA LA
INSTALACIÓN CON ORIFICIO EN LA
PARED”.
- FLEXIBELE LEIDING
De verbindingsslang via het raam
naar buiten leiden. Zorg dat het
r a a m z o v e r m o g e l i j k g e s l o t e n
blijft (Fig. 6).
Vo o r e e n “ s e m i - p e r m a n e n t e ”
i n s t a l l a t i e : m a a k e e n g a t v a n
40x25 mm in het kozijn zodat het
raam gesloten kan blijven (Fig.
7).
Om het apparaat op een andere
manier te installeren (en daarbij de
mogelijkheid te benutten om de
verbindingsleiding tussen de beide
units los te koppelen en deze
vervolgens in het in de muur
geboorde gat te doen) moet u de
paragraaf “AANWIJZINGEN VOOR
DE INSTALLATIE MET IN DE MUUR
GEBOORDE GATEN”.
Fig. 6
Fig. 7
Содержание NovEcos Split 11
Страница 27: ...27...
Страница 28: ...COD 273107B Edizione 1G...