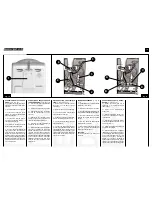
Olimpia splendid NovEcos Split 11 Скачать руководство пользователя страница 26

26

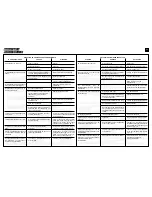
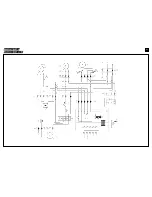
A1) Scheda elettronica

(potenza);

A2) Scheda elettronica

(comando);

B1) Sonda termostato;

F1) Protettore termico compres-

sore;

K1) Relais per ventilatore;
K2) Relais per ventilatore;
K3) Relais per compressore;
K4) Relais per ventilatore U.E.;

M1) Motocompressore;
M2) Ventilatore unità interna
M3) Ventilatore unità esterna
M4) Pompa smaltimento

condensa;

R1) Resistenza per velocità U.E.;

S1) Microinterruttore timer;
S2) Microinterruttore di sicurezza;
S3) Microinterruttore pompa;

T1) Trasformatore;
T2) Timer;

X1) Morsettiera alimentazione

generale;

X2) Connettore 4 poli;
X3) Connettore 4 poli;
X4) Connettore 5 poli;
X5) Connettore 9 poli;
X6) Connettore 6 poli;
X7) Connettore a 4 poli;

Z1) Condensatore compressore;
Z2) Condensatore ventilatore

U.I.;

Z3) Condensatore ventilatore

U.E.

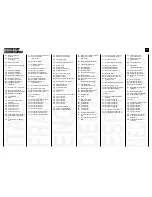
A1) Electronic card (power);
A2) Electronic card (control);

B1) Thermostat probe;

F1) Compressor thermal cut-out;

K1) Relays for fan;
K2) Relays for fan;
K3) Relays for compressor;
K4) Relays for fan O.U;

M1) Motor-driven compressor;
M2) Indoor unit fan;
M3) Outdoor unit fan;
M4) Condensation discharge pump;

R1) Resistance for O.U. speed;

S1) Timer microswitch;
S2) Safety microswitch;
S3) Pump microswitch;

T1) Transformer;
T2) Timer;

X1) Terminal board for main power;
X2) 4-pin connector;
X3) 4-pin connector;
X4) 5-pin connector;
X5) 9-pin connector;
X6) 6-pin connector;
X7) 4-pin connector;

Z1) Compressor capacitor;
Z2) Indoor unit fan capacitor;
Z3) Outdoor unit fan capacitor.

A1) Carte électronique (puissance);
A2) Carte électronique

(commande);

B1) Sonde thermostat;

F1) Protecteur thermique

compresseur;

K1) Relais pour ventilateur;
K2) Relais pour ventilateur;
K3) Relais pour compresseur;
K4) Relais pour ventilateur U.E.;

M1) Motocompresseur;
M2) Ventilateur unité interne;
M3) Ventilateur unité externe;
M4) Pompe évacuation

condensation;

R1) Résistance pour vitesse U.E.;

S1) Micro-interrupteur timer;
S2) Micro interrupteur de sécurité;
S3) Micro interrupteur pompe;

T1) Transformateur
T2) Timer;

X1) Bornier alimentation général;
X2) Connecteur 4 pôles;
X3) Connecteur 4 pôles;
X4) Connecteur 5 pôles;
X5) Connecteur 9 pôles;
X6) Connecteur 6 pôles;
X7) Connecteur 4 pôles;

Z1) Condensateur compresseur;
Z2) Condenseur ventilateur U.I.;
Z3) Condenseur ventilateur U.E.

A1) Elektronische Platte (Leistung);
A2) Elektronische Platte

(Steuerung);

B1) Fühler Temperaturwächter;

F1) Hitzeschutz Kompressor;

K1) Ventilatorrelais;
K2) Ventilatorrelais;
K3) Verdichterrelais;
K4) Ventilatorrelais ext. Einh.;

M1) Motorverdichter;
M2) Ventilator interne Einheit;
M3) Ventilator externe Einheit;
M4) Pumpe

Kondenswasserableitung;

R1) Widerstand für 2.

Geschwindigkeit ext. Einh.;

S1) Mikroschalter Timer;
S2) Sicherheits-Mikroschalter;
S3) Mikroschalter Pumpe;

T1) Transformator;
T2) Timer;

X1) Klemmbrett allgem.

Stromversorgung;

X2) 4-Pol-Stecker;
X3) 4-Pol-Stecker;
X4) 5-Pol-Stecker;
X5) 9-Pol-Stecker;
X6) 6-Pol-Stecker;
X7) 4-Pol-Stecker;

Z1) Verdichter-Kondensator;
Z2) Ventilator-Kondensator int.

Einh.;

Z3) Ventilator-Kondensator ext.

Einh.

A1) Ficha electrónica (potencia);
A1) Ficha electrónica (mando);

B1) Sonda termostato;

F1) Protector térmico compresor;

K1) Relé para ventilador;
K2) Relé para ventilador;
K3) Relé para compresor;
K1) Relé para ventilador U.E.;

M1) Motocompresor;
M2) Ventilador unidad interior;
M3) Ventilador unidad exterior;
M4) Bomba eliminación

condensación;

R1) Resistencia para velocidad U.E.;

S1) Microinterruptor  timer;
S2) Microinterruptor de seguridad;
S3) Microinterruptor bomba;

T1) Transformador;
T2) Timer;

X1) Caja de bornes alimentación

general;

X2) Conector de 4 polos;
X3) Conector de 4 polos;
X4) Conector de 5 polos;
X5) Conector de 9 polos;
X6) Conector de 6 polos;
X7) Conector de 4 polos;

Z1) Condensador compresor;
Z2) Condensador ventilador U.I.;
Z3) Condensador ventilador U.E.

A1) Elektronische plaat

(vermogensstroom);

A2) Elektronische plaat

(stuurstroom);

B1) Thermostaatvoeler;

F1) Thermische

compressorbeveiliging;

K1) Relais voor ventilator;
K2) Relais voor ventilator;
K3) Relais voor compressor;
K4) Relais voor ventilator ext.

Einh.;

M1) Motorcompressor;
M2) Ventilator binnenunit;
M3) Ventilator buitenunit;
M4) Condensafvoerpomp;

R1) Weerstand voor snelheid

buitenunit;

S1) Microschakelaar timer;
S2) Veiligheidsmicroschakelaar;
S3) Microschakelaar pomp;

T1) Transformator;
T2) Timer;

X1) Hoofdvoedingsklemmenbord;
X2) 4-polige connector;
X3) 4-polige connector;
X4) 5-polige connector;
X5) 9-polige connector;
X6) 6-polige connector;
X7) 4-polige connector;

Z1) Condensator compressor;
Z2) Condensator ventilator

binnenunit;

Z3) Condensator ventilator

buitenunit.

Содержание NovEcos Split 11

Страница 1: ...ch und Wartung Climatiseur Minisplit Instructions pour l installation l emploi et l entretien Minisplit air conditioner Instructions for installation use and maintenance Climatizzatore Minisplit Istru...

Страница 2: ...sant d autrui L environnement et la sant sont mis en danger par une limination incorrecte du produit Pour toutes informations compl mentaires concernant le recyclage de ce produit adressez vous votre...

Страница 3: ...grille 7 Cover for quick connections Novecos Split 12 QC 8 Handle for moving 9 Connecting hose 10 Outside unit IDENTIFIKATION DER BAUTEILE 1 Schaltblende 2 Programmierer 3 Luftabla gitter 4 Luftfilte...

Страница 4: ...k your local waste collection centre for information WICHTIGER HINWEIS Sicherstellen da sich der Ansaugfilter nicht zu nahe bei Vorh ngen oder anderen behindernden Gegenst nden befindet Abb 1 4 Abb 1...

Страница 5: ...hould be positioned so that its back is at least 20 cm from any obstacle curtain wall etc that could prevent good air flow through the rear intake grille and its filter Nothing should obstruct the coo...

Страница 6: ...l with the indoor unit is 1 8 m To prevent a lot of water coming out it is essential for the outdoor unit to be absolutely level Fig 3 NOTICES THE OUTDOOR UNIT MUST NEVER BEHUNGJUSTBYITSCONNECTION HOS...

Страница 7: ...and hook on the structure We recommend using square plugs as they make it easy to dismantle the outdoor unit support d Insert the outdoor unit onto the support Fig 5 INSTALLIERUNG MIT SERIENM SSIGEM...

Страница 8: ...lation taking advantage of being able to disconnect the line between the two units and passing it through the hole in the wall consult the paragraph INSTALLATION INSTRUCTIONS DRILLING A HOLE IN THE WA...

Страница 9: ...ld bij het stroomverbruik van andere elektrische apparatuur de stroom niet uitvalt CONNECTION TO THE MAINS Before connecting the air conditioner make sure that The power supply is 220 240V 50Hz The po...

Страница 10: ...ilation 3 Ventilation speed selection key 4 Temperature selection key 5 Automatic night time key 6 Display STEUERTAFEL 1 Stand By Taste 2 Funktionsw hltaste K hlung Entfeuchtung Ventilator 3 Taste zum...

Страница 11: ...set at minimum speed The air conditioner works intermittently in the Dehumidification mode ANWAHL DER FUNKTIONEN ERSTMALIGES EINSCHALTEN Den Stecker in die dazugeh rige Buchse stecken Den Wahlschalter...

Страница 12: ...OR Taste 2 Diese Funktion erzeugt einen konstanten Luftstrom ohne die Raumtemperatur zu beeinflussen VENTILATORGESCHWINDIGKEIT Taste 3 Es sind zwei Geschwindigkeiten m glich Die H chstgeschwindigkeit...

Страница 13: ...move the air conditioner VORGABE DER GENAUEN UHRZEIT Den Programmierer Abb 9 1 im Uhrzeigersinn drehen so da der mittlere Zeiger auf die aktuelle Uhrzeit gerichtet ist VORGABE DER BETRIEBSZEIT Die bla...

Страница 14: ...uier operaci n de mantenimiento desenchufar siempre el aparato LIMPIEZA DE LOS FILTROS DE AIRE El filtro retiene las impurezas del aire polvo polen etc por eso es necesario limpiarlo cada semana Filtr...

Страница 15: ...ain all the condensation fig 1 5 Filtro Posterior Extraigan el filtro tirando del mismo hacia el lado izquierdo fig 11 Limpien el filtro con un chorro de agua Antes de colocarlo de nuevo esperen a que...

Страница 16: ...te per evitare di lesionare strutture portanti o impianti della Vostra abitazione travi pilastri tubazioni idrauliche cavi elettrici ecc AVVERTENZE Prima di procedere ad effet tuare l operazione di sc...

Страница 17: ...CONNECTING THE FLEXIBLE LINE CONNECTION AND DISCON NECTION OF THE FLEXIBLE LINES MUST ONLY BE CARRIED OUT BY SPECIALISED PERSONNEL THE TWO QUICK COUPLINGS OF THE FLEXIBLE LINE MUST BE KEPT PERFECTLY C...

Страница 18: ...screw that secures the guard 1 to the back of the air conditioner Remove the door from its housing Take the moisture transfer hose out of the hose holder 2 Pressing on the two outside tabs remove the...

Страница 19: ...two screw connections are not interchangeable The coolant hoses should always be attached in the vertical position and never tilted At the moment of startup never put pressure on the screw attachments...

Страница 20: ...ing the metal clamp IMPORTANT NOTE AFTER CONNECTING THE QUICK COUPLINGS CHECK TO MAKE SURE THAT THERE ARE NO LEAKS OF COOLANT Insert the electrical connector making sure that the side tabs fit into th...

Страница 21: ...Assistenza SYMPTOMES CAUSES REMEDES Attendre Mettre la fiche dans la prise D brancher le timer Abaisser la temp rature programm e Oter les obstacles Appeler le S A V L teindre et appeler le S A V Fer...

Страница 22: ...tand By und die Klimaanlage funktioniert nur in der Betriebsweise Ventilator Stromversorgung unterbrochen Netzstecker gezogen Timer in Betrieb Die eingestellte Temperatur liegt zu nahe an der Raumtemp...

Страница 23: ...emasiado frecuente llamen al Centro de Asistencia Llamen al Centro de Asistencia STORING De airconditioner doet het niet De airconditioner doet het alleen gedurende korte tijd De airconditioner laat d...

Страница 24: ...le d nergie en mode refroidissement 1 I P R Indice de perform nerg tique 1 Tension d alimentation Fr quence Tension d alimentation min max Classe de performance nerg tique en refroidissement 2 Capacit...

Страница 25: ...le d nergie en mode refroidissement 1 I P R Indice de perform nerg tique 1 Tension d alimentation Fr quence Tension d alimentation min max Classe de performance nerg tique en refroidissement 2 Capacit...

Страница 26: ...resseur Z2 Condenseur ventilateur U I Z3 Condenseur ventilateur U E A1 Elektronische Platte Leistung A2 Elektronische Platte Steuerung B1 F hler Temperaturw chter F1 Hitzeschutz Kompressor K1 Ventilat...

Страница 27: ...27...

Страница 28: ...COD 273107B Edizione 1G...

Отзывы: