


22
Control Panel and Configuration Menu
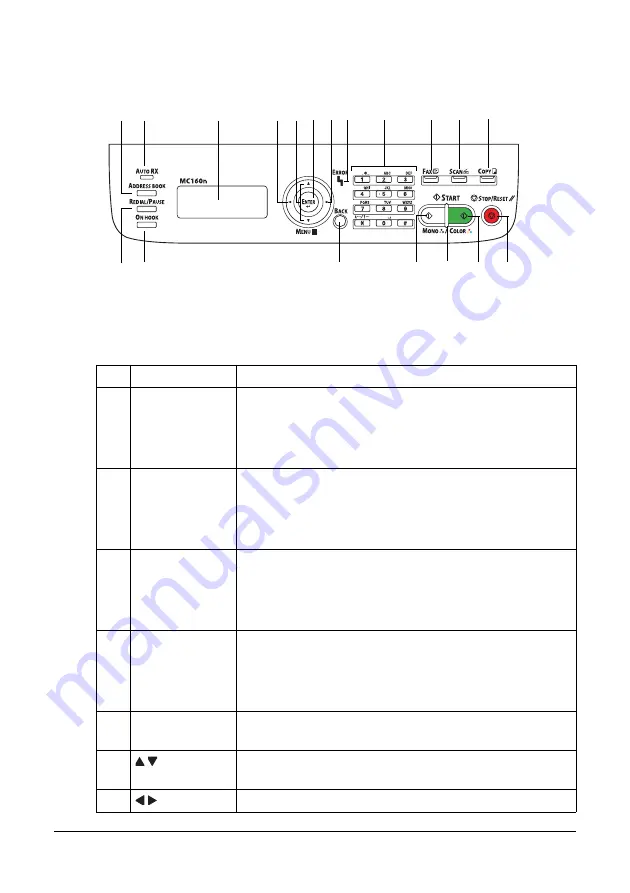
About the Control Panel
Control Panel Indicators and Keys
No. Name
Function
1
Address book
key
Displays the information registered in the favorite list,
speed dial destinations and group dial destinations.
For details, refer to the Facsimile User’s Guide on the
CD.
2
Auto RX indica-
tor
Lights up when the automatic receiving function is
selected.
For details, refer to the Facsimile User’s Guide on the
CD.
3
Redial/Pause
key
Recalls the last number dialed. Inserts a pause when a
number is dialed.
For details, refer to the Facsimile User’s Guide on the
CD.
4
On hook key
Sends and receives transmissions with the receiver on
the hook.
For details, refer to the Facsimile User’s Guide on the
CD.
5
Message
window
Displays settings, menus, and messages.
6
/ keys
Moves up and down through menus, options, or
choices.
7
/ keys
Moves left and right through menus, options, or choices.
2
1
5
7
6 8 7
12
9
13
11
14
18
4
17
3
10
15
16
Содержание MC160N
Страница 1: ...User Guide Print Copy Scan Modes 59320401 my okidata com MC160n MFP...
Страница 9: ...1Introduction...
Страница 17: ...17 Introduction when the attachment and duplex option are installed 1 Duplex option 2 Attachment 1 2...
Страница 21: ...1Control Panel and Configuration Menu...
Страница 40: ...40 Control Panel and Configuration Menu FAX RX OPERATION REPORTING SCAN SETTING...
Страница 76: ...2Media Handling...
Страница 91: ...91 Media Handling 6 Reattach the lid to Tray 2 7 Reinsert Tray 2 into the machine...
Страница 101: ...2Using the Printer Driver...
Страница 108: ...3Using the Copier...
Страница 121: ...4Using the Scanner...
Страница 150: ...150 Using the Scanner...
Страница 151: ...5Replacing Consumables...
Страница 155: ...155 Replacing Consumables 6 Open the front cover Before opening the front cover open Tray 1 if it is not already open...
Страница 174: ...174 Replacing Consumables...
Страница 175: ...6Maintenance...
Страница 199: ...7Troubleshooting...
Страница 213: ...213 Troubleshooting Note Do not touch the wires and flat cable shown in the illustration...
Страница 217: ...217 Troubleshooting 7 Load the media in Tray 2 and attach the lid 8 Reinsert Tray 2...
Страница 218: ...218 Troubleshooting 9 Open and close the scanner unit to clear the missfeed message...
Страница 222: ...222 Troubleshooting 3 Close the duplex cover...
Страница 247: ...3Installing Accessories...
Страница 260: ...Appendix...


