


Oki Data CONFIDENTIAL
44158801TH Rev.2
307 /
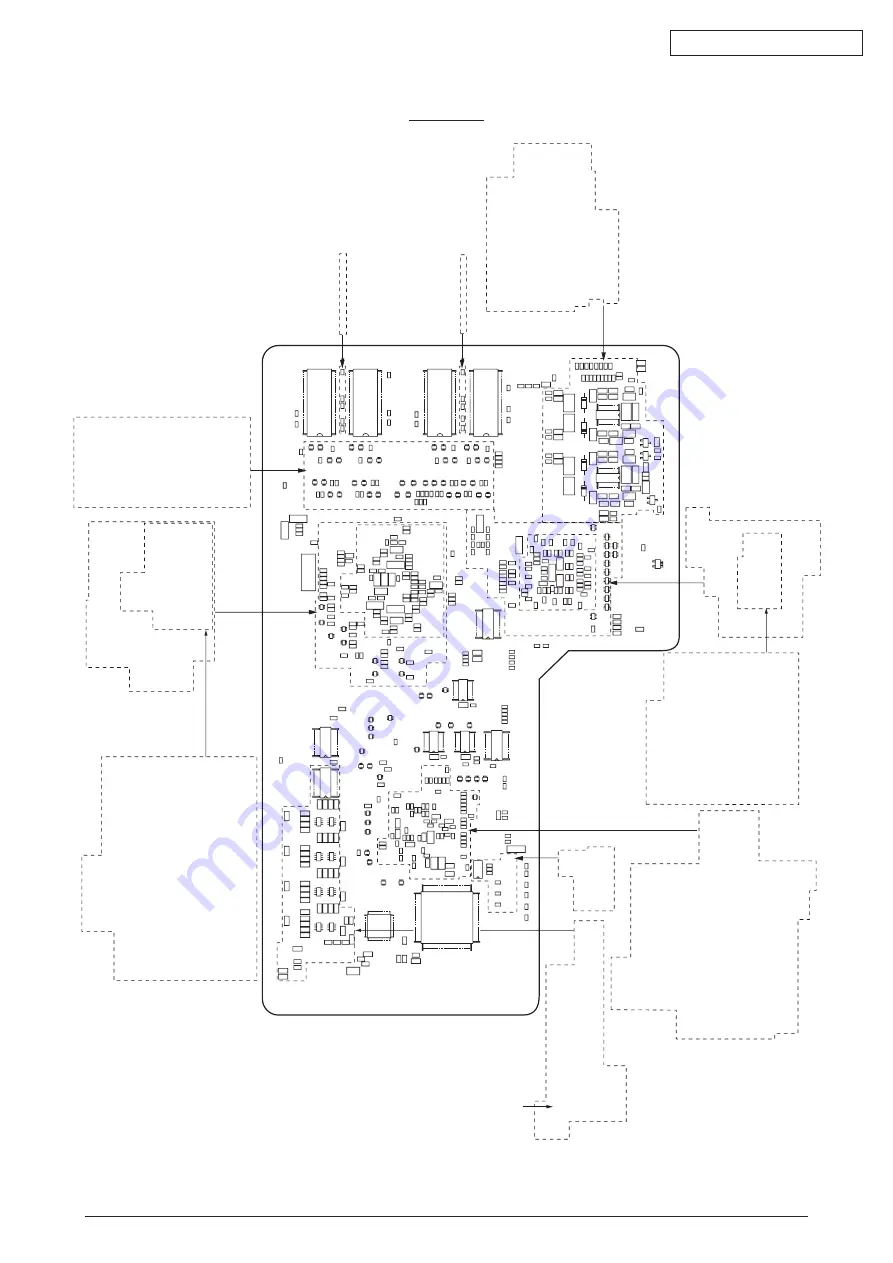
Solder side
C536 C530 C527
C525
C774
C765
C708
C713
C667
C697
C687
C764
C763
C762
C773
C743
C735
C734
C725
C717
C712
C711
C704
C694
RM573
C718
C753
C752
C744
C736
C701
C690
C686
C684
R661
R771
RR504
RRM504
RRM508
RR508
RR507
RR506
RR505
R769
IC506
DBF516
RRM507
RRM503
RRM506
R711
R709
R745
R744
R710
RM570
RM566
RM560
RM571
RM567
RM552
RM576
RM574
RM684
RM580
RM561
RM553
RM550
RM547
RM545
RM542
RM540
RM528
RM524
RM537
RM534
RM539
RM536
RM521
RM525
RM530
RM519
RM516
R666 R663
R660
R667 R659
R658
R655 R650
R645
R612
R608
R631
R649
R630
R597
R611
R629
R600
R598
RM546
RM532
RM531
RM520
RM517
R707
R706
R743
R726
R702
R703
R700
R727
R725
RM577
RM575
RM583
RM579
C779
C757
C802
C816
C813
C812
C811
C809
C797
C789
C790
C748
C747
C728
C729
C730
C731
C714
C715
C716
C732
C733
C709
C710
C721
C722
C741
C756
C769
C742
C784
C785
C770
C771R683
C723
C724
C698
C651
C689
C688
C699
C749
C750
C727
C798
C794
C783
C778
C780
R677
C791
C800
C801
C795
C796
C793
C792
C782
C781
C767
C768
C761
C737
C738
C739
C740
C755
C754
C746
C745
C766
C808
C815
C823
R718
R717
R715
R713
R712
R708
RM578
RM582
RM581
R742
R741
R740
R739
C831
C830
R729
R722
R721
R720
R719
C814
C702
R736
R734
R692
R675
R671
R691
R689
C786
R732
R731
C827
C822
C829
RM573
RM572
RM549
RM548
RM555
RM556
RRM502
RRM505
RRM501
DBF515
DBF514
DBF513
DBF512
DBF511
DBF510
DBF509
DBF508
DBF507
DBF506
DBF505
DBF504
DBF503
DBF502
DBF501
C858
C703
R656
R693
R652
R647
R643
R642
R697
DBF532
DBF531
DBF530
DBF529
DBF528
DBF527
DBF526
DBF525
DBF524
DBF523
DBF522
DBF521
DBF520
DBF519
DBF518
DBF517
F505
R752
R751
R639
R638
R628
R627
R626
R625
R624
R623
R622
R621
R619
R610
R648
R636
R653
R679
R644
C685
C707
C838
C857
C856
R772
F504
C839
C700
C706
C696
C695
R618
R617
R616
R615
R614
R696
R667
R668
R654
R665
R664
R637
C705
BF504
C821
C820
C819
C818
C817
C672
C671
C670
C669
C668
C574
C573
C572
C571
D505
D504
D503
D502
C542C542C542
C541
C540
C539
C555 C552 C547 C544
C537 C531 C528
C526 R530
C553 C548 C545 C538
R532R529
R531R535
R534
C518
C524
C535
C516
R522
IC502
R515R521
C515
R514
C514
R520
C523
C534
C522
R537
C513C521
C533
R519C517
R533
R513R518
IC501
C505
C501
D501
BF501
C512
R512
R504
C506
C588
R542R547
R541R546
C586R544
R540R543
C587R545
R548
C510R525
R524
C511
C520C532
C519R536
R517
C504
C503
TR502
TR501
C502
R505
C653
C652
C651
C657
C656
R596
OSCUSB1
R591
R590
R589
R588
R587
R586
R585
R584
R563
R561
C635
R560
C636
RM513
RM511
RM510
RM509
RM508
RM507
RM506
RM505
RM504
RM502
RM501
RM503
RM512
C543
C634
C666
C665
R603 R601
C664
C663
C662
C661
C660
C659
C658
C613
C603
C594
C581
C579
C609
C602
C597
C590
C585
C584
C577
C569
C583
C576
C568
C575
C567
C589
C582
C598
C596
C612
C614
C595
C605
C580
C566
C592
C578
C570
C593
C556
C565
C622
R555
R554
R553
C620
BF502
C619
C621
C601
C600
C549
C599
C608
C607
C606
C554
C564
C563
C562
C561
C560
C559
C558
C557
R539
R538
C551
C550
C549
C546
R508
R507
C508
R529
R528
R527
R526
RST501
R511
C591
C642
C643
SDRAM1
SDRAM2
SDRAM3
SDRAM4
C775
C776
C777
C720
C719
C644
F501
C615
C611C633
R594
R593
R592
C650
C836
C835
C836
C833
C840
C841
C760
C604
C610
IG501
C832
C837
C834
R747
R746
OSC1
C681
C682
C683
R633
R634
R632
C508
C646
R578
R579
C647
C645
C640
C639
C638
C637R604
R605
C673
C676
C675
C674
R609
C677
RM526
RM533
RM541
RM522
C655
R606
R646
C692
C678
C679
R607
RM527
RM586
RM588
RM587
RM565
RM562
R698
R705
C787
RM569
RM563
RM564
IGTD501
C842
RR501
RR502
RR503
C807
RM585
R699
RM554
RM568
C772
RM559
RM558
RM557
RM543
IC503
IC502
IC504
IC505
RM535
RM538
RM551
RM544
RM529
RM518
BE503
C648
C649
C828
C824
C825
C641
R567
R566
R580
R581
C627
C628
C626
C623
C624
C625
37
36
72
R767
C758
C759
1
144
73
109
108
L
A
N
IC
C726
BF505
R768
R701
R704
FUSE
C861
IC509
C767