background image

OB   12

Z-Domain Synthesizer

 9.1 EDIT PART SETTINGS

193

The main feature of a Program is that it can be subdivided into four Parts, to which one Timbre
each is assigned. This allows you to play a multi-timbre Program and also assign the Parts to
different zones of the keyboard, in order to obtain different sounds (for example, you can play
Parts 1 and 3 in a given zone of the keyboard and Parts 2 and 4 in another position) by simply
using the same Program.

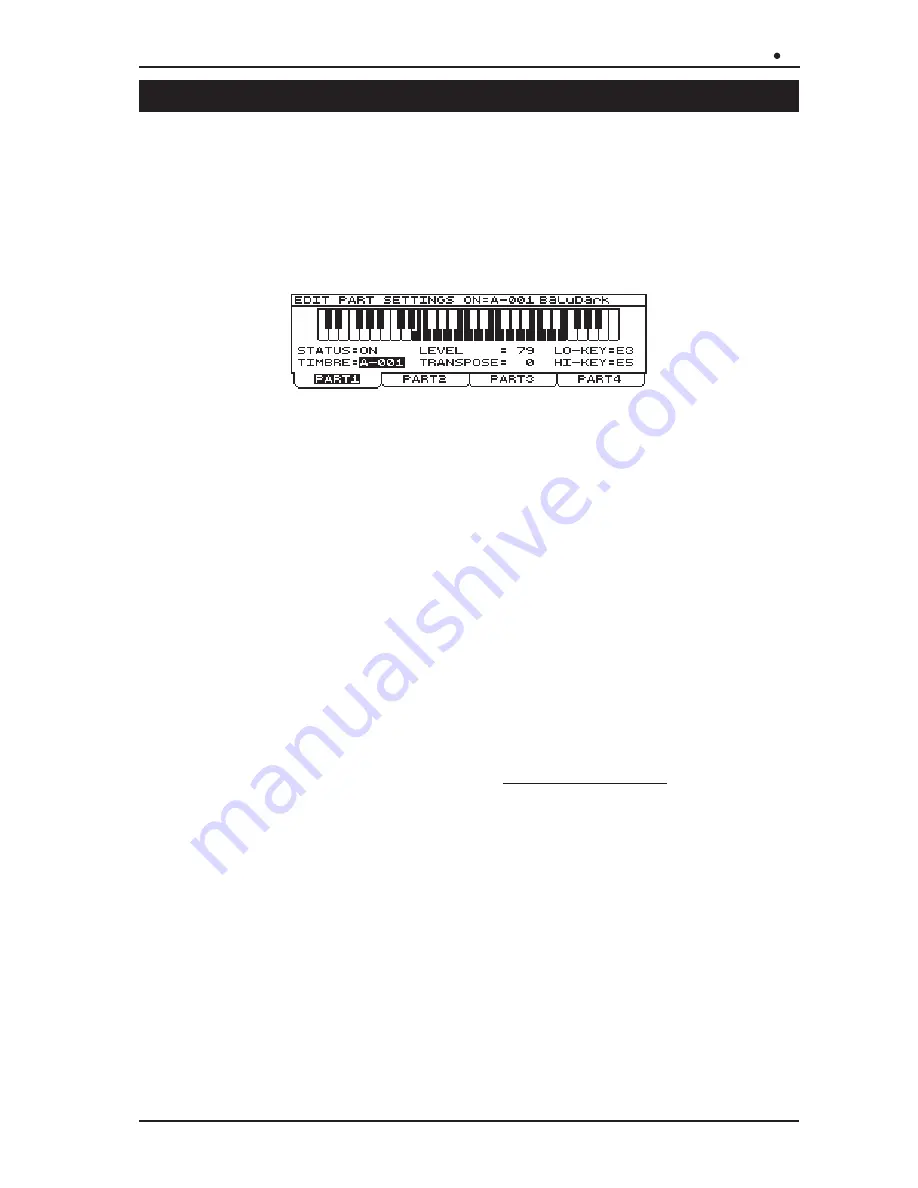
From the EDIT PROGRAM MENU select field 1-PART SETTING; the display will show:

As you can see, buttons [F1]-[F2]-[F3]-[F4] can be used to select the four video pages relating to
definition of the Parts.  Here we will describe the first page, which is identical to the later pages and
can therefore be taken as reference for them all.

First of all, under the heading (i.e. where the name of the video page and of the Program of
reference appear) there is a drawing of the OB-12 keyboard which shows the range (the keys
displayed in reverse) of the Part currently selected.
The following parameters are then present:

STATUS: activates (ON) and/or deactivates (OFF) the Part in question. If it is disabled, it will
not be possible to play the Timbre it contains. If no other Part is present in the keyboard zone
to which the Part in question is associated, that portion of the keyboard will not produce any
sound.

TIMBRE: assigns a given Timbre (displaying its memory location) to the Part.

LEVEL: regulates the level of the Part. If LEVEL=0 is set, the part in question will not produce
any sound.

TRANSPOSE: sets the transposition of the Part (and not of the keyboard) in a range of ± 12
semitones.

LO-KEY: sets the lowest note of the portion of the keyboard associated to the Part. As well as
using the usual data input tools, you can also select the desired value by pressing the keyboard
key itself.

HI-KEY: sets the highest note of the portion of the keyboard associated to the Part. As well as
using the usual data input tools, you can also select the desired value by pressing the keyboard
key itself.

N.B.: In order to have a better MIDI compatibility with any eventual connected instrument, LO-KEY
and HI-KEY parameters are setted beyong the real keyboard range. When a given Part is
transposed, the MIDI Note On messages (since the Note Off is sent like Note On with Velocity=0)
relating to the Part concerned will be sent to the MIDI [OUT] port on the basis of the transposition.
Conversely, the Note On messages received by the MIDI [IN] port will not be affected by the
transposition. However, refer to point 10.1 with regard to the settings of the MIDI channels assigned
to the Parts.

Содержание OB 12

Страница 1: ...OB 12 MANUALE OPERATIVO OPERATING MANUAL VISCOUNT J O I N T V E N T U R E Oberheim Synthesizer Z Domain...

Страница 2: ......

Страница 3: ...1 146 7 2 SETTING THE SECOND WAVEFORM OSC 2 148 7 3 MODIFYING THE PARAMETERS COMMON TO OSC 1 AND OSC 2 OSC COMMON 150 7 4 MODIFIYNG THE TIMBRE FILTERS 152 7 5 VOLUME CONTROL AMPLIFIER 155 7 6 MODULAT...

Страница 4: ...NGS 204 9 8 PHRASE RECORDER 207 9 9 AUTO MANUAL MORPH 213 9 10 KEYBOARD TRANSPOSE 214 9 11 MOTION RECORDER 215 9 12 WRITE PROGRAM 221 10 EDIT SYSTEM 222 10 1 MIDI COMMON 222 10 2 MIDI CONTROLS 225 10...

Страница 5: ...rce to it CONNECTING TO THE ELECTRICAL MAINS To avoid the risk of electric shock do not make the connections with wet hands Make sure that the mains voltage is as indicated on the lower panel CONNECTI...

Страница 6: ...processing technologies The front panel is subdivided into various sections containing the controls dedicated to the various blocks of the generation chain TOTAL MEMORISATION The OB 12 offers the use...

Страница 7: ...o set the characteristics of the first oscillator for generation of the first basic waveform which however will already be complex of the sound you are about to create 4 OSC 1 PARAM Oscillator 1 Param...

Страница 8: ...of a keyboard key 13 CONTROL CENTER section This section contains all the commands for display operations for assignment of parts to the keyboard and for the MOTION and MORPH functions See point 3 2...

Страница 9: ...s group of buttons includes an ESC key for exiting from the video page or the function currently shown on the display Four buttons F1 F2 F3 F4 are provided for selecting pages in addition to the one d...

Страница 10: ...g from one Program or Timbre to another in a programmable period of time or using the MODULATION wheel while the second relates to the Motion or two memory locations in which all the movements carried...

Страница 11: ...nt at the MAIN and AUX outputs The output signal at the MAIN OUT L MONO and R AUX OUT 1 and 2 connectors is not amplified In order to listen to the sound produced by the OB 12 you will have to connect...

Страница 12: ...different channels so that the signals on the outputs can be processed differently This solution is especially useful when for example you wish to process the individual Parts of a Program differently...

Страница 13: ...section will take priority while the first ones will be gradually deactivated as subsequent notes are received Remember this during your performances EFFECTS SECTION You can use this section to add f...

Страница 14: ...how the pitch will change over time one envelope dedicated to the filter to determine how the brightness will change over time and one envelope dedicated to the amplifier to regulate the volume over...

Страница 15: ...for all necessary information about the Programs In addition section 7 describes the panel controls of the sections associated to the Programs Effects Arpeggio Phrase Recorder and Equalizer You can ac...

Страница 16: ...Section 8 contains all the display settings relating to the Timbre operating environment To access this operating environment press the TIMBRE key in the MODE SET UP section of the central panel Once...

Страница 17: ...bre editing page immediately by just moving a control on the panel without having to carry out the entire display procedure to obtain display of the video page concerned The DISPLAY SWAPPING function...

Страница 18: ...alise it both using the display and by means of the panel controls The AUTOMATION section is subdivided into two large categories the NOTE automation functions the GENERATION automation functions The...

Страница 19: ...f the function in accordance with the following rule LED on function active LED off function disabled With the function active if another note or another chord is played after the one on which the ins...

Страница 20: ...MIDI OUT port except for any filters enabled for the note messages Point 9 7 describes all the display procedures relating to this function N B The ARPEGGIO and PHRASE RECORDER automation functions a...

Страница 21: ...one THE MOTION RECORDER The MOTION RECORDER function allows the user to record and repeat movements of trimmers or sliders on the OB 12 front panel This enables you to vary the sound continuously wit...

Страница 22: ...res for programming this function To Morph Programs or Timbres simply select the operating environment associated to them by pressing the PROGRAM and TIMBRE buttons in the front panel MODE SET UP sect...

Страница 23: ...me and memory location of the Program the keyboard transposition KT Keyboard Transpose field the Parts enabled and the Timbre contained in the Part currently selected shown in reverse in the display f...

Страница 24: ...n on the display Refer to them for all the video pages described in the manual Now select the INFOS folder the display will show This video page contains the main information about the Program i e P P...

Страница 25: ...ree folders called SELECTION INFOS and SCOPE plus the EDIT function field Now select the INFOS folder the display will show This video page shows the status of the main system controllers with the fol...

Страница 26: ...waveform or ramp a triangular waveform a square waveform or pulse using the panel controls on the display you can mix or delete the three waveforms to allow you to obtain the solution you require We w...

Страница 27: ...overtones are added to the sound generated by the signal WIDTH sets the pulse width of the waveform The trimmer can be turned to the minimum or maximum setting to enrich the harmonic spectrum of the s...

Страница 28: ...g as source of the modulating signal LFO1 the first low frequency oscillator LFO2 the second low frequency oscillator EG the envelope generator The selection will be confirmed by illumination of the c...

Страница 29: ...generating vibrato effects With the knob turned completely to the right Osc 2 will be affected by the maximum depth of LFO1 modulation With the knob in central position the oscillator will be unaffect...

Страница 30: ...of the two oscillators i e how the tuning will change over time The Ring Modulator multiplies the two waveforms emitted by Osc 1 and Osc 2 to produce a signal formed by a large number of harmonic and...

Страница 31: ...he oscillator envelope meaning the duration of the initial modification decay in the pitch ENV DEPTH Envelope Depth you can use this trimmer to regulate the depth of the envelope applied to Osc 1 and...

Страница 32: ...with regard to operation of the filters in relation to the cut off frequency KBD TRACK Keyboard Tracking you can use this trimmer to vary the behaviour of the filter in relation to which key is press...

Страница 33: ...g a darker softer sound HP High Pass Filter you can use this filter to attenuate all the frequencies below the cut off frequency giving a sharper brighter sound BP Band Pass Filter you can use this fi...

Страница 34: ...tain Release envelope applied to the filter which therefore specifies how the character of the sound changes over time ENV DEPTH Envelope Depth you can use this filter to regulate the depth of the env...

Страница 35: ...EDIT FILTERS ADV ENV display page see point 8 5 RELEASE Release Time regulates the release time meaning the time from when the key is released to when the sound is no longer present See next the examp...

Страница 36: ...fect will not be audible As we have already seen LFO1 Low Frequency Oscillator generates a waveform which when required will modulate the signal present in the sections we have described so far This a...

Страница 37: ...as LFO1 with the sole difference that the amount of modulation can be adjusted using the MODULATION wheel The panel section comprises RATE regulates the frequency of the modulating signal Turn the tri...

Страница 38: ...ctive LED off function disabled UNISON The UNISON function allows you to play three voices simultaneously by pressing one key on the keyboard enriching the sound and giving it more body When this func...

Страница 39: ...led OSC SHIFT In this subsection of the KEYBOARD you can regulate the transposition of the oscillators thus varying the pitch of the signal which they generate by octaves This allows you to make use o...

Страница 40: ...the echo effect REVERB simulates the diffusion of the sound in enclosed environments bearing in mind the reflection and absorption of the walls the controls on the panel are OVERDRIVE adds bypasses th...

Страница 41: ...ttenuates the signal in the frequency region centred on 200 Hz 600 enhances attenuates the signal in the frequency region centred on 600 Hz 2K enhances attenuates the signal in the frequency region ce...

Страница 42: ...by the LFO2 on the sections specified in the section of the same name control the Manual Morphing effect control the parameters associated to the Aftertouch As well as the two wheels the WHEEL MODE se...

Страница 43: ...e CONTROLLERS section of the EDIT TIMBRE display menu point 8 9 The Ribbon Controller allows the user to modify two generation parameters simultaneously by simply placing a finger on and or moving it...

Страница 44: ...e display will change to This video page shows the menu for editing a Timbre It consists of the following sections 1 LFO1 regulation of the parameters relating to the first low frequency oscillator 2...

Страница 45: ...rated by the oscillators Oscillators may be analog VCO Voltage Controlled Oscillator or digital DCO Digitally Controlled Oscillator as in the case of the OB 12 Oscillators normally generate three fund...

Страница 46: ...s of the following parameters SAW STATUS WAVE SELECT relating to the waveform concerned enables SAW STATUS ON disables SAW STATUS OFF generation of the waveform concerned SAW LEVEL WAVE MIX relating t...

Страница 47: ...ON deactivates PULSE STATUS OFF the waveform concerned PULSE LEVEL WAVE MIX associated to the square waveform regulates the level of the square waveform in a range between 0 signal level zero and 100...

Страница 48: ...frequency oscillators LFO1 and LFO2 In the first case the frequencies of the modulant signal received from Osc 2 and the carrier the Osc 1 signal assume almost the same value This means that the spect...

Страница 49: ...rom LFO1 0 no modulation 50 maximum modulation PWM DEPTH FROM LFO1 Pulse Width Modulation Depth From LFO1 PWM DEPTH of OSCILLATOR 2 section assigned to LFO1 regulates the depth of modulation of the pu...

Страница 50: ...the signal generated by Osc 2 will no longer depend on the key pressed but on the FIXED PITCH CRS and FIXED PITCH FINE parameters which specify its pitch PITCH SHIFT RNG Pitch Shift Range RANGE this o...

Страница 51: ...in mind noises present in the original sounds or unharmonic elements This is done using white noise generators White noise is a wide band non periodic signal containing all the frequencies in the aud...

Страница 52: ...ME DECAY in the OSCILLATOR COMMON section sets the first portion of the envelope decay time or the time from when the oscillator reaches the maximum degree of pitch modification to when the minimum le...

Страница 53: ...with a high harmonic content in our case the sum of the signal produced by the two oscillators the Ring Modulator white noise and the modulations of the various signals which is then filtered to elim...

Страница 54: ...elow the cut off frequency Therefore all the harmonics below those which coincide with the cut off frequency are attenuated the resulting sound will be sharper and brighter BAND PASS BP band pass filt...

Страница 55: ...sets the type of the first filter by means of the values LOW PASS BAND PASS HIGH PASS and FLAT already described F 1 FREQ Filter 1 Frequency FREQUENCY regulates the cut off frequency of the first fil...

Страница 56: ...the lower notes with fewer partials When the parameter is set with values close to 50 there will be an increase in the harmonics in the higher notes so that they will be brighter while the lower notes...

Страница 57: ...LTER 2 IN selects the source section from which the signal to be sent to FILTER 2 is to be obtained The values which can be assigned to the FILTER 1 IN and FILTER 2 IN are as follows OSC MIX signal ob...

Страница 58: ...a parameters graph with dotted line If the ADV ENV folder is now selected the user can display the second page relating to the envelope to be applied to the filters This video page comprises the param...

Страница 59: ...llowing controls ATTACK ATTACK of the AMPLIFIER section sets the time the signal takes to reach its maximum level once a note has been played The values available range from 0 no ATTACK time to 100 ma...

Страница 60: ...us remains unchanged until the key is released When the LEVEL folder is selected the third amplifier programming page will be displayed containing the following parameters AMOUNT AMOUNT regulates the...

Страница 61: ...tting of its waveform and regulation of its envelope and the parameters of a low pass filter associated to the LFO Discussing the parameters relating to the OB 12 sections we have already discussed th...

Страница 62: ...s from 0 maximum width reached immediately to 100 maximum period of time to reach the width specified with the LFO1 DEPTH parameters If the LPF folder is now selected the video will display the parame...

Страница 63: ...signal leaving LFO2 in a range of values from 0 minimum frequency to 100 maximum frequency If the DEPTH folder is now selected the display will show the parameters for regulating the quantity of modul...

Страница 64: ...E section is to set the modes of the keyboard and its transposition This allows use of the Portamento and Unison function set the keyboard in monophonic mode with addition of Legato or polyphonic mode...

Страница 65: ...e one associated to the key pressed last with HIKEY set the note taking priority over the others will be the highest while if LOWKEY is set the lowest note takes priority VOICE RESERVE sets the minimu...

Страница 66: ...be played on the basis of the transposition carried out Conversely the Note On messages since the Note Off is sent like Note On with Velocity 0 sent to the MIDI OUT port will not be affected by the tr...

Страница 67: ...OSCC ATCKT attack time of the OSC 1 and OSC 2 envelope ATTACK of OSC COMON AMP ATCK T attack time of the AMPLIFIER envelope ATTACK of AMPLIFIER OSCC DEC T decay time of the OSC 1 and OSC 2 DECAY of OS...

Страница 68: ...sures on the keyboard When the level of force applied to the key is increased to the maximum the dynamic generated will fall sharply The AFTER T folder can now be selected to display the video page re...

Страница 69: ...the second function to the Ribbon Controller MIN and MAX referred to FUNCTION1 and 2 set the minimum and maximum values of the parameters to which they refer SELECTIONS CONTROLLED PARAMETERS CONTROLS...

Страница 70: ...envelope ATTACK of OSC COMON OSC2 PUL LV square wave level generated by OSC 2 WAVE MIX of the square wave of OSCILLATOR2 AMPL REL release time of the AMPLIFIER envelope RELEASE of AMPLIFIER OSC COM DE...

Страница 71: ...confirm the memorisation procedure and the display will show everything with the Pop Up Conversely if the F4 button is pressed from the video page shown previously you can assign a new name to the Tim...

Страница 72: ...definition of the Parts and their assignment to the keyboard zones 2 BUS SETTINGS assignments of the outputs present on the rear panel to the Parts 3 EFFECTS activation and regulation of the effects...

Страница 73: ...her Part is present in the keyboard zone to which the Part in question is associated that portion of the keyboard will not produce any sound TIMBRE assigns a given Timbre displaying its memory locatio...

Страница 74: ...AUX OUT 1 connector AUX MONO 2 the Part is sent to the AUX OUT 2 connector To display the video page relating to the part for which you wish to make these settings use the function keys N B Equalizer...

Страница 75: ...scribed select field 1 ROUTING CONFIGURATION The display will show in which we can see a graph on the left of the screen showing the configuration and position of the algorithms and then the parameter...

Страница 76: ...set to allow control of the signal timbre LEVEL LEVEL with the LED of the LEVEL PARAMETER button off regulates the level of the signal leaving the effect PARAMETER KNOB ASSIGNED TO defines which of t...

Страница 77: ...can also be obtained by means of the MOD DEPTH and MOD RATE parameters The programming parameters are the following STATUS CHORUS inserts the Delay effect in the effects chain INSERTED or bypasses it...

Страница 78: ...he sound is propagated and reflected inside a room in a range of values from 0 2 sec to 24 sec TYPE sets the type of environment in which the reverb occurs The possible options are the following HALL...

Страница 79: ...r enhancement attenuation and the band width A graphic equalizer on the other hand allows control of given preset frequency bands and attenuation enhancement of these bands are the only operations pos...

Страница 80: ...e MID FREQ parameter If the LOW MID B C and HIGH parameters are set at 12 you will obtain attenuation of the signal of 12 dB conversely setting them at 12 will give an enhancement of 12 dB If the para...

Страница 81: ...by means of control of the MIDI Clock of the transmitter device Selecting the EFFECTS folder now allows you to set the Links assigned to the RATE parameter of the CHORUS effect and the DELAY TIME The...

Страница 82: ...EYBOARD OSC1 SAW in activates and disactivated the saw wave generated by OSC 1 WAVE SELECT of SAW of OSC 1 UNISON it activates and disactivates the Unison function UNISON of KEYBOARD OSC1 TRIANG in ac...

Страница 83: ...width modulation depth of EG on OSC 1 PWM DEPTH assigned to EG of OSCILLATOR1 OSC COM ATT attack time of the OSC 1 and OSC 2 envelope ATTACK of OSC COMON OSC2 SAW LV saw wave level generated by OSC 2...

Страница 84: ...s function SELECTIONS CONTROLLED PARAMETERS CONTROLS ON PANEL SELECTIONS CONTROLLED PARAMETERS CONTROLS ON PANEL FILT RES resonance of FILTERS RESONANCE of FILTERS AMPL REL release time of the AMPLIFI...

Страница 85: ...ANGE RANGE sets the range of the arpeggio in octaves The possible settings are 0 oct arpeggio range one octave 1 oct arpeggio range one octave above the one played 2 oct arpeggio range two octaves abo...

Страница 86: ...imbre is to perform the arpeggio If the PATTERN folder is now selected the display will show the video page for setting the type of arpeggio TYPE if this parameter is set as REGULAR you will be able t...

Страница 87: ...Each Set can be viewed as a memory bank in which the recorded phrases can be saved Therefore a key can be configured as the pilot key of four phrases each saved in one Set If the phrases are then pla...

Страница 88: ...ell as the usual data input devices encoder number keypad this parameter can also be set using the keyboard key which acts as split for the section PART1 2 3 4 these options allow you to set which Par...

Страница 89: ...recorded in a range of 25 250 BPM MEASURE sets the number of bars measures of which the phrase to be recorded consists If the preset number of bars is exceeded the data which follow the notes played...

Страница 90: ...ated by the TRIGGER NOTE parameter and present in the set defined by the PHRASE SET field The display will then request confirmation to proceed by means of the following video page As the display indi...

Страница 91: ...the following video page Select field 2 PHRASE EVENT EDITOR the display will show The SET indicates the Set of phrases containing the one to be monitored while TRIGGER NOTE identifies its pilot key A...

Страница 92: ...Phrase After using the CURSOR keys to locate the cursor in the second column you can change the identity of the note in the third column you can change its dynamic and in the fourth column the duratio...

Страница 93: ...rogrammable time or number of bars a manual Morph with which you can control the passage from one Program Timbre to another by means of the MODULATION wheel The minimum position of the MODULATION whee...

Страница 94: ...bove select field 8 AUTO MORPH SET the display will show in which you can set TYPE setting this parameter as TIME allows you to set the period of time taken to pass from one location to another with a...

Страница 95: ...difying a Motion The LED on the buttons themselves indicates the status of the function When on the LEDs of the buttons LOC1 and LOC2 show that the Motion is being played back whenever the playback lo...

Страница 96: ...the new value of the trimmer slider in use will have priority over the Motion recording When manual control of the trimmer slider finishes the variation in sound will again depend on the event record...

Страница 97: ...f bars measures of which the Motion to be recorded consists If the preset number of bars is exceeded during recording the data which follow the events generated after the last bar will be recorded in...

Страница 98: ...ay will ask confirmation before proceeding As the display indicates pressing the ENTER key deletes the Motion while the ESC button can be pressed to abort the deletion procedure If the contents of the...

Страница 99: ...en signal that saving is in progress MOTION EVENT EDITOR The MOTION EVENT EDITOR allows the contents of a Motion to be shown on the display in the form of events generated by the panel controls This f...

Страница 100: ...event If the cursor is located in the first column default when the function is accessed you can vary the position of the event within the Motion After using the CURSOR keys to locate the cursor in t...

Страница 101: ...n procedure and the display will show everything with the Pop Up menu From the video page shown previously pressing the F5 allows a new name to be assigned to the Program in this case the display will...

Страница 102: ...The display will show the System main menu from which the following functions can be recalled 1 MIDI COMMON setup of the MIDI channels reception and transmission filters and MIDI Program Map 2 MIDI CO...

Страница 103: ...ing used to play as well as recording the channelled messages on a sequencer During reception on the other hand the main feature of this setting is that it allows the Part split settings to be ignored...

Страница 104: ...e Bank Select messages Thanks to the MIDI Program Map you can assign Program A 023 to Program Change 1 for example if this is done when the instrument receives this PG it will activate Program A 023 a...

Страница 105: ...OSC COMMON DECAY1 LEVEL 0 38 0 127 FILTERS SUSTAIN TIME 0 58 0 127 OSC COMMON DECAY2 TIME 0 39 0 127 FILTERS FILTER 1 TYPE 0 59 0 2 OSC COMMON OSC1 ENV DEPTH 0 12 0 127 FILTERS F 1 FREQUENCY 0 60 0 1...

Страница 106: ...31 0 127 VELOCITY OSC1 FM INFL 0 106 0 127 EFFECTS DELAY MOD RATE 1 32 0 127 VELOCITY OSC2 DTUNE INFL 0 107 0 127 EFFECTS REVERB STATUS 1 33 0 64 AFTERTOUCH STATUS 0 108 0 64 EFFECTS REVERB LEVEL 1 34...

Страница 107: ...DE AND F0 31 30 00 04 00 78 01 21 F7 PULSE ON OFF OSCILLATOR 1 F0 31 30 00 04 00 4F 01 4A F7 SPLIT KEYBOARD MODE AND F0 31 30 00 04 00 79 01 20 F7 PWM LFO1 LFO2 EG OSCILLATOR 1 F0 31 30 00 04 00 4C 01...

Страница 108: ...essages on the basis of the commands used on the Arpeggio the Phrase Recorder the Motion Recorder and the Auto Morph This means that you can send these MIDI messages to start and stop a MIDI sequence...

Страница 109: ...send the START STOP or CONTINUE messages MOTION REC1 when Motion 1 is activated the START message will be sent When it is interrupted the STOP message will be sent Depending on the setting of the STO...

Страница 110: ...message being received The video page displayed is the following in which the following parameters can be seen ARPEGGIO sets the multiplication factor from 0 1X to 8X of the incoming MIDI Clock assig...

Страница 111: ...se of connection with machines no longer at the state of the art NORMAL transmission suitable for standard modern machines FAST high speed transmission for machines with especially short memorisation...

Страница 112: ...nments on the basis of the Parts which the Program comprises In this case the functions assigned to the pedals depend on the Program selected On the other hand if functions are assigned to the pedals...

Страница 113: ...the Ribbon Controller HOLD of Ribbon Controller ARP MODE UP Arpeggio mode change with the sequency UP DOWN UP DOWN RANDOM MODE of ARPEGGIO RIB CTL REL it cyclically activates and disactivates the Rel...

Страница 114: ...b LEVEL PARAMETER of EFFECTS associates to PRE DELAY of REVERB CHOR PRDLY delay to activate Chorus LEVEL PARAMETER of EFFECTS associates to PRE DELAY of CHORUS LOW LEVEL controls LOW parametric eq or...

Страница 115: ...ss the video page for setting up the display The video page comprises in which you can adjust the following parameters LCD MODE sets the display operating modes as follows NORMAL standard display whit...

Страница 116: ...omprises in which the following fields can be modified MODE sets the switch on procedure with a choice of normal with NORMAL selected or slow with SLOW selected in which case all the instrument s pres...

Страница 117: ...ed The memory locations in the interval between the one specified in FROM TIMBRE and the one indicated for TO TIMBRE will undergo initialisation When the WRITE key is pressed the instrument will show...

Страница 118: ...ease version of the CPU software currently installed in the instrument DATE displays the date of creation of the CPU software release DSP REL displays the release version of the DSP software currently...

Страница 119: ...omputer or a sequencer as shown in the diagram When sending the MIDI datas OB 12 will automatically abilitate the updating procedure and show on the display As can be seen the video page indicates the...

Страница 120: ...m DATA LOSS DETECTED TIMBRE There is a loss Timbre datas by switching the instrument off during the memorization The screen displays the unusable Timbre datas compared to the maximun number and one in...

Страница 121: ...mation transfer is used for recording MIDI sequences A PC or a sequencer can be used to record the MIDI data transmitted by the OB 12 or by any other instrument When these recorded data are sent to th...

Страница 122: ...een regulated and the Data Entry LSB message specifying the value it has assumed The system messages are subdivided into three categories System Common Messages System Real Time Messages and System Ex...

Страница 123: ...OB 12 Z Domain Synthesizer 11 4 BLOCK DIAGRAM 243...

Страница 124: ......

Страница 125: ...TY Note ON Note OFF O X O X AFTER Key s TOUCH Ch s X O X O PITCH BENDER O O CONTROL CHANGE 0 127 0 127 See chapt 10 2 for more informations PROGRAM CHANGE True 0 127 0 127 Use Bank Select messages to...

Страница 126: ...a particular installation If this equipment does cause harmful interference to radio or television reception which can be determinated by turning the equipment off and on the user is encuraged to try...

Страница 127: ......

Отзывы: