background image

nVent.com 

|

 45

Raychem-AR-H

58686

-NGC

40

DemoUnit-EN-

1805

Step 

3

:

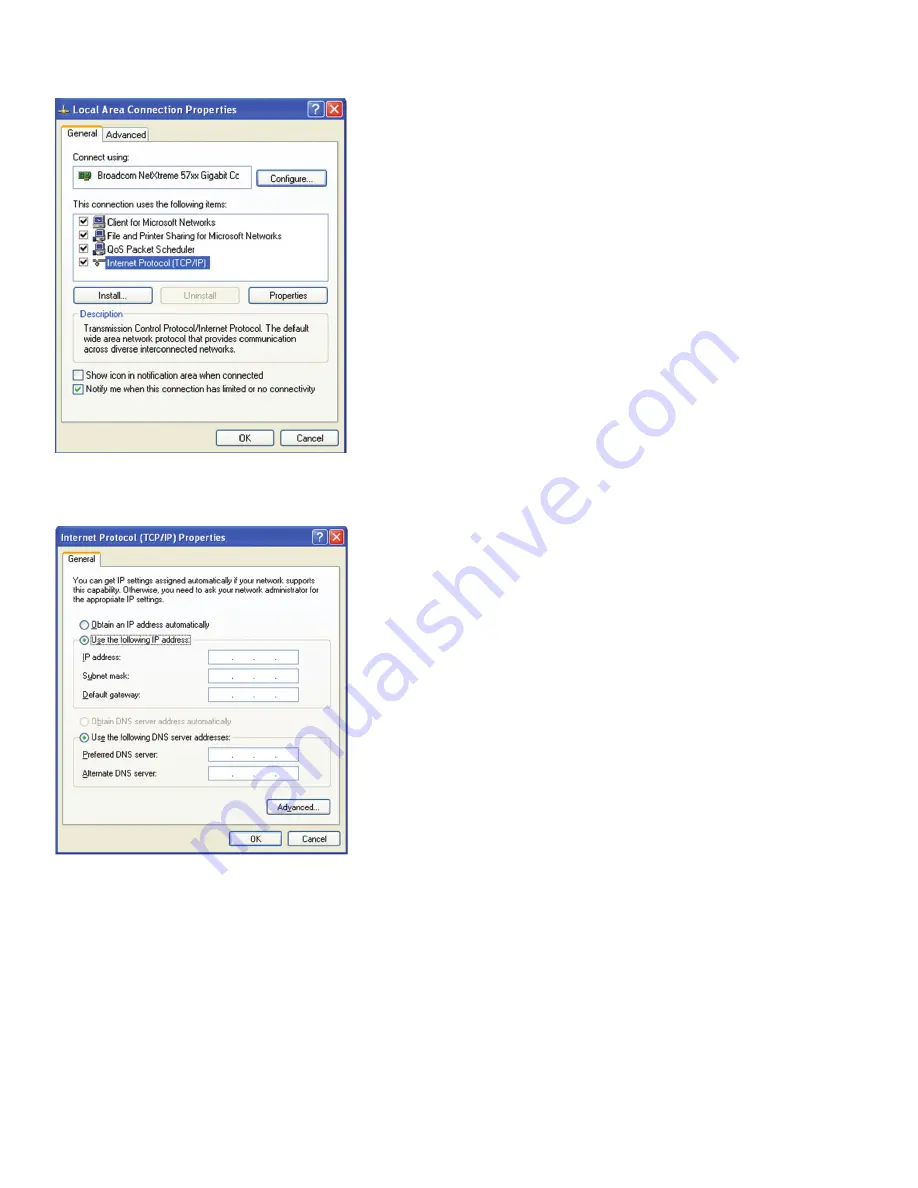
 Double Click on the Local Area Connection or Local Area Connection 

2

 depending on which Ethernet port is connected to the 

NGC-

40

 BRIDGE. You should see the below screen:

Step 

4

:

 Double click on Internet Protocol (TCP/IP)

Step 

5

:

 Click on “Use the following IP address” You should see the below screen:

Step 

6

:

 Enter the first 

3

 blocks of the NGC-

40-BRIDGE’s IP address. The default IP address for the NGC-40

-BRIDGE is 

192

.

168

.

1

.

100

. For 

the last block, choose a number between 

1

 and 

255

, but it cannot be the same address being used by the NGC-

40

-BRIDGE. IMPORTANT: 

Once the IP address is entered, the Subnet Mask will automatically be entered. No change is required. Press OK.

Содержание NGC-40 DEMO UNIT

Страница 1: ...Raychem AR H58686 NGC40DemoUnit EN 1805 NGC 40 DEMO UNIT USER MANUAL nVent com 1...

Страница 2: ...HTC HTC3 Module Configuring and Monitoring 15 5 1 Introduction 15 5 2 Basic Configuration 16 5 3 Monitoring the NGC 40 HTC HTC3 Module 20 Section 6 NGC 40 IO Module Configuring and Monitoring 25 6 1...

Страница 3: ...uses the RS 232 port from the NGC 40 BRIDGE module to communicate with TOUCH 1500 software The NGC 40 demo ships from the factory with one RJ 11 to 9 pin D Sub female cable and one USB to RS 232 seria...

Страница 4: ...the necessary drivers to your computer Included in the packaging of the USB cable is a disk with the drivers Follow the directions on the disk to load the USB drivers May need admin rights from IT The...

Страница 5: ...switch for the proper voltage 120 Vac Demo Unit 230 Vac Demo Unit The illustration below shows the 230 Vac demo Typically the demos that are configured for 230 Vac input will be used in countries othe...

Страница 6: ...3 2 Selecting and Configuring the TOUCH 1500 COMM Port The following steps will help you determine which COMM port has been assign to the USB to RS 232 converter Step 1 Insert the USB end of the USB t...

Страница 7: ...nVent com 7 Raychem AR H58686 NGC40DemoUnit EN 1805 Step 4 The following screen will appear Click on the Hardware tab Step 5 Click on the Device Manager tab...

Страница 8: ...Ports COM LPT You will now see the COMM port that your PC has selected for the USB cable In this example COM 3 has been selected Step 7 You will need to enter this com port into the TOUCH 1500 softwa...

Страница 9: ...The screen below is the Circuit List This list will only show the NGC 40 HTC and NGC 40 HTC3 modules and some circuit status information 2 2 Navigation Buttons The RAYCHEM TOUCH 1500 software Main scr...

Страница 10: ...Desktop System Device Manager Allows the User to load or remove the modules HTC HTC3 and I O modules from the database configure each module and set the modules online or offline User Level Allows the...

Страница 11: ...nVent com 11 Raychem AR H58686 NGC40DemoUnit EN 1805 2 3 Menu Maps The following menu structure shows you menus used whether you select Circuit List or Device Manager...

Страница 12: ...TOUCH 1500 software You should see the following screen Step 2 Go to the System Communication Field Port window The below screen will appear Step 3 Click on the DOWN ARROW for the COM Port field to ex...

Страница 13: ...0 BRIDGE module has been set to Modbus address 1 at the factory Change the To Modbus Address from 247 to 2 by clicking on the box with 247 shown A numeric keypad will appear that will allow you to ent...

Страница 14: ...s and the modules that have been installed Information regarding the NGC 40 BRIDGE is shown on the left hand side Step 6 Click on the Device List tab The screen below will appear This screen shows all...

Страница 15: ...e is used Device Reset Alarm the default for this parameter is enabled When enabled the NGC 40 Bridge will send an alarm when it has been reset from a power cycle or it s reset button has been pressed...

Страница 16: ...5 Saving your changes Now that you have made several changes to the Bridge you need to click on the Apply button before exiting this screen If you do not click on the Apply button and you exit this sc...

Страница 17: ...module as a stand alone device for controlling and monitoring temperatures How to setup for HI and LO temperature alarm conditions How to setup the electrical measurements used to monitor the line cu...

Страница 18: ...it List IMPORTANT The NGC 40 DEMO has two NGC 40 HTC s and one NGC 40 HTC3 module This Section will focus on the NGC 40 HTC module for both configuring and monitoring Step 2 Selecting a module from th...

Страница 19: ...the tag name is shown This will open the keyboard for entering the new tag name Enter a new tag name Step 6 Temperature Basic Settings Control Temperature Click on the Control Setpoint field A numeri...

Страница 20: ...allow you to change setup parameters Change the deadband from 3 to 2 For this exercise use the default settings for the Output Switch Type and Switch Control Mode Click on the BACK button to return t...

Страница 21: ...button to save the new setup parameters IMPORTANT the filters are set to 5 seconds The system default is 0 Due to the simulation of the line current for the demo all line current filters are set to 5...

Страница 22: ...nitor Device shown first is the Monitor data for Control Temperature A similar screen is also provided for ground fault current and line current Move the cursor over the gauge to obtain the actual con...

Страница 23: ...ntrol of the heater all modules connected to the BRIDGE will stop activating their front panel LEDs for a brief period of time except the module being identified IMPORTANT This feature can be access f...

Страница 24: ...the control knobs press the ALARM RESET button located on the HTC Step 6 Creating a High Temperature Alarm Rotate the TS1 switch on the NGC 40 Demo to create an HIGH temperature alarm Notice after a...

Страница 25: ...erview screen Step 9 High Current Alarm Rotate the Line Current knob clockwise very slowly on the NGC 40 DEMO while observing the Line Current section within the Overview screen The line current measu...

Страница 26: ...te the ground fault knob fully counterclockwise Use the alarm list to reset the alarm Click on the Monitor Device Tab Review What you accomplished How to setup a circuit using the basic mode for an NG...

Страница 27: ...for the NGC 40 HTC and NGC 40 HTC3 modules This section will instruct you how to Configure the NGC 40 IO module as a standalone device for monitoring temperatures How to setup for Hi and LO temperatur...

Страница 28: ...e NGC 40 IO module will alarm when the external switch is in the OPEN position Step 6 Temperature Sensor Settings Click on the Temperature Sensor menu item located on the left hand side of the screen...

Страница 29: ...atus of the alarm output and Digital Input Step 2 Change to setting TS1 TS4 Temperatures on NGC 40 IO module Set TS1 rotary switch to 79 C Set TS2 TS4 toggle switches to 79 C Step 3 Setting Digital In...

Страница 30: ...Resetting the Alarms using the Reset buttons Click anywhere on the alarm message The below screen will appear showing the reset options Click on the Reset All button to clear both alarms IMPORTANT Th...

Страница 31: ...the factory Your factory representative may ask for this information Step 9 Module Identification Click on the Module Identification button while observing the modules in the demo unit A message will...

Страница 32: ...Process The NGC 40 SLIM modules use temperature data to control an external contactor providing protection against over temperature of heating cables If the measured temperature exceeds the user defi...

Страница 33: ...TS1 of the NGC 40 SLIM is configured at the HTC HTC3 module TS2 and TS3 must be enabled at the NGC 40 SLIM screen If a NGC 40 SLIM is detected on the CANbus then a setup button Safety Temperature Limi...

Страница 34: ...st The NGC 40 HTC3 can also be selected from the Circuit List IF the NGC 40 HTC3 is picked from the Circuit List then the Overview screen will appear From the Overview screen select CONFIG Step 2 Clic...

Страница 35: ...lick on the Safety Limiter Temperature button The screen below will appear Click on the Safety Temperature Limiter CAN ID down arrow The list will show all the NGC 40 SLIM modules connected on the CAN...

Страница 36: ...and hold the Set Config button until the message below is gone The Limiter Trip and Communication alarm have also been enabled by default Step 6 Configuring the NGC 40 SLIM TS2 TS3 and Alarms To conf...

Страница 37: ...e screen below will appear To configure TS2 and TS3 click on the Temperature Sensors button The screen below will appear Temperature Sensor 1 Setup is grayed out since this sensor was configured at th...

Страница 38: ...below Step 3 If the NGC 40 SLIM and NGC 40 HTC3 are already in alarm then follow these instructions to clear the alarm otherwise go to step 4 If the NGC 40 SLIM module was already tripped then reset t...

Страница 39: ...0 SLIM output relays should turn ON Step 6 Clearing the SLIM alarm using the Safety Limiter button Create another trip but this time clear the alarm by pressing the Safety Limiter Reset button on the...

Страница 40: ...ation ports RS 232 RS 485 and Ethernet The NGC 40 BRIDGE also is the module that gathers all of the information from the NGC 40 HTC NGC 40 HTC3 and NGC 40 IO The method of communication between the NG...

Страница 41: ...combination with other NGC 40 modules to provide flexible measurement control and alarming configurations NGC 40 PTM Module The NGC 40 PTM module is used to interface the DC power supply 24 Vdc to th...

Страница 42: ...below shows the NGC 40 demo without the NGC 40 SLIM module The simulation control panel is divided into indvidual groups for setting the temperature ground fault current line current and digital inpu...

Страница 43: ...nt applied to the HTCs or HTC3 from 0 to 60 amps This simulated current allows you to illustrate a HIGH and LOW line current alarms The NGC 40 demo line current simulation is created by amplifying mil...

Страница 44: ...rd is not available a virtual keyboard can be accessed Go to Start All Programs Accessories Accessibility On Screen Keyboard Example 1 Connection Directly from the NGC 40 BRIDGE to the TOUCH 1500R usi...

Страница 45: ...Protocol TCP IP Step 5 Click on Use the following IP address You should see the below screen Step 6 Enter the first 3 blocks of the NGC 40 BRIDGE s IP address The default IP address for the NGC 40 BR...

Страница 46: ...nVent com 46 Raychem AR H58686 NGC40DemoUnit EN 1805 Step 7 Start the TOUCH 1500 program and go to the System Device Manager Scan for Devices Scan EtherNet Network You should see the below screen...

Страница 47: ...m 47 Raychem AR H58686 NGC40DemoUnit EN 1805 Step 8 Enter in the IP address of the Bridge default IP 192 168 1 100 and change the To Modbus Address to 1 Step 9 Press the Start Scan button to load the...

Страница 48: ...ll Programs Accessories Accessibility On Screen Keyboard The following only addresses local networks with DHCP If your network does not have DHCP you may need to manually setup an IP address in the TO...

Страница 49: ...w you to edit the NGC 40 BRIDGE settings Step 6 Enter the first 3 blocks of the TOUCH 1500R s IP address and Subnet Mask that was assigned by the DHCP server in step 3 For the last block of the IP add...

Страница 50: ...OUCH 1500R program and go to the System Device Manager Scan for Devices Scan EtherNet Network You should see the below screen Step 9 Enter in the IP address of the BRIDGE step 6 and change the To Modb...

Страница 51: ...Europe Middle East Africa Tel 32 16 213 511 Fax 32 16 213 604 thermal info nvent com Asia Pacific Tel 86 21 2412 1688 Fax 86 21 5426 3167 cn thermal info nvent com 2018 nVent All nVent marks and logo...

Отзывы: