


302
Displaying, Editing and Organizing Files
・
You cannot transfer the received mail folder and
sent mail folder of the mail-connected i-
α
ppli. All
the mails in the folder are saved to the Inbox or
Outbox.
・
The setting of “color coding” set in the received mail
list screen or sent mail list screen cannot be
transferred.
Session number
●
Transferring all requires the session number to
authenticate the sender and recipient. Before
sending or receiving, the sender and recipient should
agree on a 4-digit number as the session number and
then both enter the same number.
<Infrared data exchange>
When You Forward Data by
Infrared Data Exchange
When transferring data using the Infrared
data exchange
●
Set the receiving device ready to receive and start
sending within 30 seconds.
●
Place the devices so that the Infrared data ports are
aligned on the same level and facing each other.
●
Do not move the devices until the confirmation
message about completing the exchange appears.
Also, do not place anything between the devices or
cover the Infrared data ports.
●
The devices may not communicate successfully if
they are placed in direct sunlight, directly under a
fluorescent light, or close to other infrared equipment.
Transferring one data at a time using the
Infrared data exchange
You can exchange one data at a time with other
devices using the Infrared data exchange function.
●
Sending one data
Select “Send Ir data” from the function menu of Data
list screen or detail screen.
<Example: Send one phonebook data>
1
Phonebook detail screen (P.97)
p
(FUNC) “Send Ir data”
2
Set the receiving device ready to
receive
3
Direct the Infrared data port toward
the other party’s device “YES”
The data transmission starts.
When the data is sent, a notification message about
completing the exchange appears.
■
To cancel sending
“NO”
■
To exit during sending
o
(Quit)
●
Receiving one data
1
i79
The “Receive Ir data screen” appears.
2
“Receive” Direct the Infrared data
port toward the other party’s device
Receive data from the other party’s
device
The data reception starts.
3
“YES”
When the received data is saved, a notification
message about completing the save appears.
The received data will be erased if you do not operate
your FOMA terminal at all for about 30 seconds after
you receive the data.
■
Not to save the received data
“NO”
Receive Ir data screen
1
Receive Ir data screen (P.302)
p
(FUNC) Select any item:
Add desktop icon
……
“Using Desktop Icons”
→
P.128
Transferring all data at a time using the
Infrared data exchange
You can exchange all data at a time with other
devices using the Infrared data exchange function.
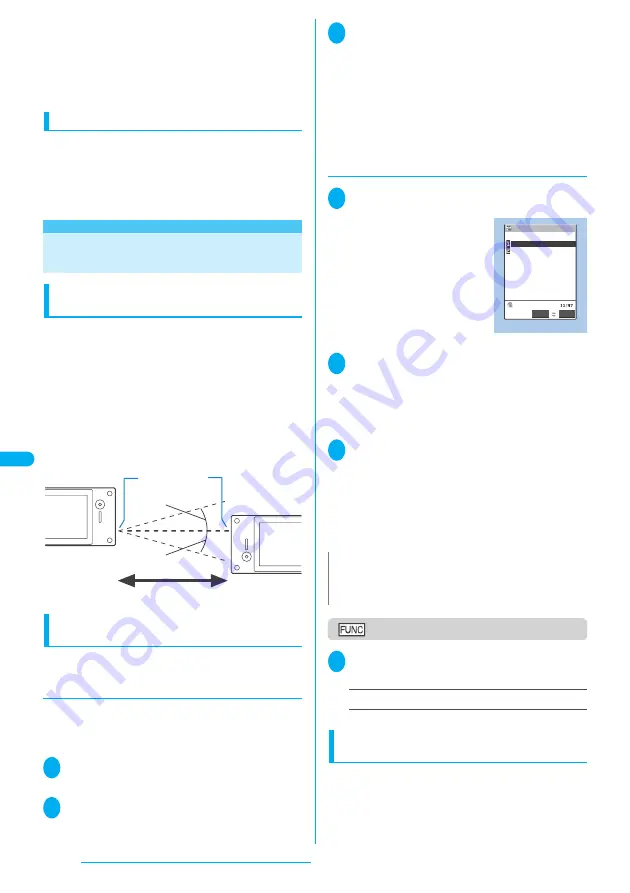
Within about 20 cm
Sender
Receiver
Within the range
of ±15°
Within the
range of ±15°
Infrared data port
N
z
When the other party’s device sends all the data, the FOMA
terminal enters Receive all status and you can receive all the
data by following the procedure.
Function menu P.302
Receive Ir data
Receive Ir data
Receive all
Receive
Select
FUNC
Содержание FOMA N703iD
Страница 110: ......
Страница 136: ......
Страница 162: ......
Страница 180: ......
Страница 206: ......
Страница 246: ......
Страница 260: ......
Страница 268: ......
Страница 308: ......
Страница 354: ......
Страница 372: ......
Страница 415: ...413 Appendix Using the FOMA Terminal with External Devices Troubleshooting Memo...
Страница 416: ...414 Appendix Using the FOMA Terminal with External Devices Troubleshooting Memo...
Страница 417: ...415 Appendix Using the FOMA Terminal with External Devices Troubleshooting Memo...
Страница 418: ...416 Appendix Using the FOMA Terminal with External Devices Troubleshooting Memo...
Страница 419: ...417 Index Quick Manual Index 418 Quick Manual 428...
Страница 496: ...Kuten Code List...


