background image

  - 


  ,-. 

  %

'

5

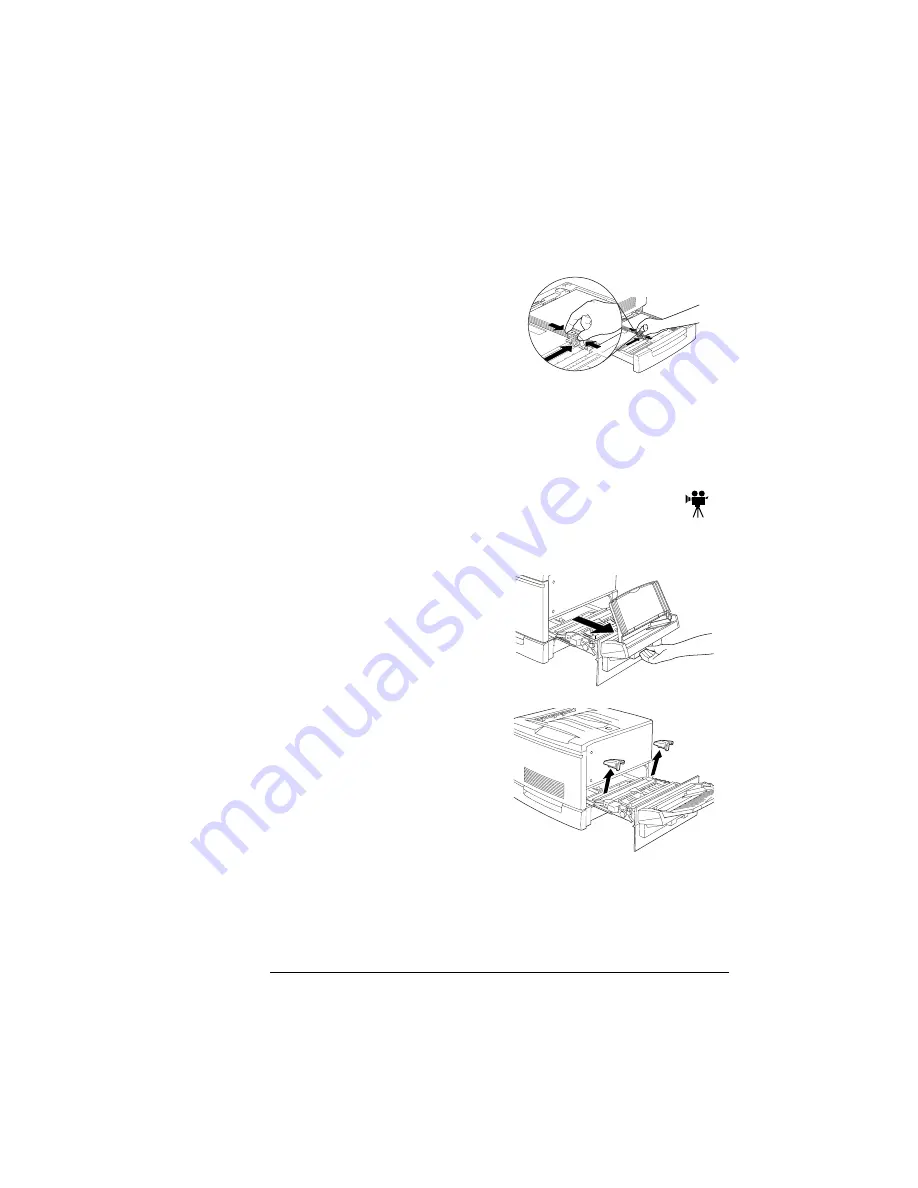
Align the left guide clip with 
the appropriate media size 
mark.

»

Note: 

Automatic media size detection cannot be assured if the 

vertical guide clip is even slightly out of position. If this occurs, 
slide the vertical guide clip momentarily to the left edge, then 
reposition it according to the proper hole in the scale.

6

Push the media cassette firmly back into the printer.

1

Pull the multipurpose tray 
unit out as far as it will go.

2

Remove the protective 
pads.

EDNord - Istedgade 37A - 9000 Aalborg - telefon 96333500

Содержание QMS magicolor 330

Страница 1: ...EDNord Istedgade 37A 9000 Aalborg telefon 96333500...

Страница 2: ...honeNET Farallon Computing Inc HP PCL HP GL LaserJet Hewlett Packard Co IBM OS 2 Token Ring International Business Machines Corporation Intel Intel Corporation Iomega Jaz Zip Iomega FreeHand Macromedi...

Страница 3: ...ard Product Documentation 1 2 Related Documentation 1 4 Manuals on the CD ROMs 1 5 About This Manual 1 7 Conventions 1 8 What s Next 1 8 Introduction 2 2 Finding a Good Location 2 2 Power Requirements...

Страница 4: ...the Fuser Oil Roller 2 15 Install the Toner 2 16 Install the OPC Drum Cartridge 2 19 Remove the Media Cassette Spacers 2 21 Remove the Multipurpose Tray Protective Pads and Tie Wrap 2 23 Installing Op...

Страница 5: ...figuration 4 4 OS 2 LAN Manager LAN Server and Microsoft Windows Network Interface Configuration 4 4 NetWare 3 x Interface Configuration 4 5 NetWare 4 x Interface Configuration 4 7 TCP IP Interface Co...

Страница 6: ...Trouble 5 8 What s Next 5 8 Introduction 6 2 Configuration Message Window 6 3 Setting the Configuration Message Window Language 6 3 Control Panel Indicators 6 4 Control Panel Buttons 6 4 What s Next...

Страница 7: ...About the Printer on page 1 2 About the Documentation on page 1 2 What s Next on page 1 8 EDNord Istedgade 37A 9000 Aalborg telefon 96333500...

Страница 8: ...ystem software An optional large capacity input feeder is available for either model QMS magicolor 330 CX Print System QMS magicolor 330 EX Print System 64 MB RAM upgradable to 384 MB 600x600 dpi reso...

Страница 9: ...ROM magicolor 330 CD ROM QMS magicolor 330 Print System Options Adobe Acrobat PDF format Refer to this manual for information on installing and using printer options emula tions security key memory up...

Страница 10: ...ng the printer s QMS CrownNet Ethernet or optional QMS CrownNet Token Ring interface and when using the QMS CrownAdmin software Software Utilities CD ROM QMS Crown Document Option Commands Adobe Acrob...

Страница 11: ...nt formats side by side or two up one page at a time scrolling two up article flow and zooming capability up to 800 You can conduct full text searches through all of the manuals You can watch QuickTim...

Страница 12: ...wing with bookmarks will enable you to use a quick table of contents to move around the document The toolbar also gives you quick access to page navigation fea tures For example you may click a button...

Страница 13: ...llustrated instructions to guide you as you unpack and set up your printer and connect it to a host computer or network In addition it introduces you to the printer s control panel Introduction Presen...

Страница 14: ...ch beschriebene Vorgehensweise da sonst Verletzungsgefahr bestehen k nnte Chapter 2 Setting Up Your Printer explains how to find a good loca tion for the printer unpack the printer install consumables...

Страница 15: ...Moving the Printer on page 2 10 Getting Acquainted with Your Printer on page 2 11 Setting up the Printer on page 2 13 Installing Options on page 2 24 Connecting the Interface and Power Cables on page...

Страница 16: ...an air conditioner Note If the printer is located in a cold room that is rapidly heated or if the printer is moved from a cold place to a warm humid place condensation may occur within the printer deg...

Страница 17: ...o an easily accessible power supply On an exclusively dedicated power outlet If the printer is con nected to the same circuit used by other high current machines such as a copier or air conditioner or...

Страница 18: ...1 7 inches 55 1 cm 4 32 9 inches 83 5 cm 2dv 1 20 inches 50 3 cm 2 28 7 inches 72 9 cm 3 21 7 inches 55 1 cm 4 22 inches 59 9 cm 1 5 9 inches 15 0 cm 2 27 2 inches 69 1 cm 3 32 9 inches 83 5 cm EDNord...

Страница 19: ...ere f r 240 V Schlie en Sie keine anderen Ger te an diesen Ausgang an da sonst als Folge von berhitzung Feuergefahr oder Gefahr eines Stromschalgs herrscht Der Drucker zieht 11 A bei 120 V oder 6 A be...

Страница 20: ...Required during operation is 11 amps for a 120 V system and 6 amps for a 220 240 V system Noise generating Equipment Should not be connected to the same electrical outlet as the printer Recommended Fr...

Страница 21: ...p Guide and Quick Setup Guide Options QMS magicolor 330 Print System Getting Started QMS magicolor 330 Print System Operation QMS magicolor 330 Print System Options QMS magicolor 330 Print System Refe...

Страница 22: ...Never touch the surface the blue part of the drum or hit or rub the drum surface if the drum is scratched or contaminated with oil from your hand printing will be degraded c Fuser oil roller This uni...

Страница 23: ...ister your printer through our World Wide Web site http www qms com support prodreg To register by mail fill out and send in your warranty card To register by telephone in the US call QMS at 334 633 4...

Страница 24: ...en oder zu tragen Greifen Sie in die vorgesehenen Geh use Aussparungen vorne hinten und links wenn Sie den Drucker anheben Heben sie den Drucker niemals an der Mehrzweckzufuhr an da das Ger t fallen u...

Страница 25: ...rinter you should become familiar with certain physical items as shown below Note If you re using the Acrobat PDF version of this manual the parts of the printer shown on the next page are hotlinked b...

Страница 26: ...EDNord Istedgade 37A 9000 Aalborg telefon 96333500...

Страница 27: ...OPC drum cartridge Remove the media cassette spacer and load the media cassette Remove the spacers from the multipurpose tray Remove the shipping tie wrap Connect the interface and power cables Config...

Страница 28: ...ends downward from the tray and does not enter the hole in the printer 2 Fit the face up tray s left coupling arm into the hole in the printer 3 Holding the multipurpose tray with both hands fit the c...

Страница 29: ...as far as it will go 2 Remove the tape and the two metal fuser roller separators 3 Remove the spacer labeled A 4 Remove the fuser oil roller from its package 5 Remove its tape protective cover and tw...

Страница 30: ...roller as shown in the diagram 7 Align two colored tabs one on the fuser unit and one on the fuser oil roller 8 Carefully lower the fuser oil roller until it clicks into place 9 Slide the fuser unit...

Страница 31: ...a color coded end that corre sponds to the colored cartridge slots It doesn t matter which color you start with or in what order the colors are installed Each cartridge is physically as well as visual...

Страница 32: ...he toner cartridge clockwise until the mark on the cartridge is aligned with Lock on the printer Caution Be sure to rotate the cartridge all the way to the Lock mark Otherwise toner may spill Locate t...

Страница 33: ...ar as it will go to move the cartridge into position Note The knob will not turn unless the toner cartridge is set properly If the knob will not turn recheck for proper toner cartridge installation 7...

Страница 34: ...ned with the top of the rail the cartridge may be damaged 5 Push the OPC drum cartridge slowly all the way into the printer until it clicks Note Unless the drum cartridge is inserted all the way the l...

Страница 35: ...edia that are suitable for printing 1 Take a stack of about 250 sheets ream Note Don t unpack paper above the printer as this might cause paper particles to fall into the printer 2 Holding the stack w...

Страница 36: ...print side facing down A fill limit mark is on the inside of the cassette Note Make sure the top sheet is under the fluke Do not load more sheets than the maximum specified 4 Squeeze the media guide...

Страница 37: ...slightly out of position If this occurs slide the vertical guide clip momentarily to the left edge then reposition it according to the proper hole in the scale 6 Push the media cassette firmly back i...

Страница 38: ...about startup pages is included in the Reference manual If installation instructions are included with the option follow them If not instructions are included in the Options manual 4 Note In complianc...

Страница 39: ...the main disconnect device 4 Turn the printer on After a brief warmup less than five minutes the printer pro duces a startup page If a startup page doesn t print see chapter 8 Troubleshooting Printer...

Страница 40: ...perly installed Make sure the box sits loosely in its compartment and that the top of the box is not wedged under the top of the compartment Printouts seem faded on one side of the page The printer is...

Страница 41: ...age 3 2 Making a Serial Connection on page 3 4 Computer Printing Software on page 3 6 Printing from the Computer on page 3 21 If You Have Trouble on page 3 21 What s Next on page 3 22 EDNord Istedgade...

Страница 42: ...Connection on page 3 2 If you re connecting to the PC through a serial interface con nect the printer to the PC as described in Making a Serial Connection on page 3 4 Note If the printer is more than...

Страница 43: ...an IEEE 1284 bidirectional parallel cable IEEE 1284 is indicated on the cable This cable must be 6 5 feet 2 meters or less in length If your computer supports only Centronics parallel unidirectional...

Страница 44: ...ending on the type of null modem assembly you have you may also need a 9 to 25 pin adapter See your cable vendor for more specific cable assembly information b Attach the 36 pin end of the cable to th...

Страница 45: ...other end of the cable to the printer s serial port and tighten the screws 3 Turn on both the printer and the PC A startup page should print and Serial RS 232C should be listed as an interface If it...

Страница 46: ...ption files if you use QuarkXPress PageMaker or Photoshop If you re using Windows we recommend that you install one of the QMS developed Level 2 Windows drivers on the QMS Software Utili ties CD ROM w...

Страница 47: ...her processor A hard disk with at least 1 MB of free space At least 4 MB of RAM Windows 95 98 Installation Caution Windows limits the total number of installed printers to 16 Problems may occur if you...

Страница 48: ...ndow choose Browse 10 Change to the x PLATFORM WINDOWS DRIVERS ADVPS2 directory where x is the drive in which you installed the CD ROM in step 1 QMS INF displays in the File Name list 11 Choose OK to...

Страница 49: ...drivers or choose Cancel to exit from the setup program 15 Remove the CD ROM and store it in a safe place 16 Access the default driver settings through the Start Settings Printers menu Use the online...

Страница 50: ...indows 95 98 Skip to step 3 because the CD ROM auto matically boots and starts the QMS Printer Utilities Setup Windows 3 1 Windows for Workgroups 3 11 In Explorer change to the directory in which you...

Страница 51: ...d files into the WINDOWS SYSTEM directory and updates the Registry Win dows 95 98 and WIN INI Windows 3 1 or Windows for Work groups 3 11 accordingly Consequently the specified printers do not need to...

Страница 52: ...Compress Output This feature decreases the time the file stays out on the network because the data is compressed at the host transferred to the printer and then decompressed However for users who are...

Страница 53: ...s CD ROM in the CD ROM drive on your workstation The CD ROM automatically boots 2 In the Welcome dialog box select Install Printer Utilities and Drivers 3 Read the installation note and then choose Ne...

Страница 54: ...has been previously installed you must use the following procedure to delete the files before installing a new printer driver 1 Open Windows NT Explorer from the Start Programs menu choose Windows NT...

Страница 55: ...her 9 Select LPR Port 10 Check with your system administrator the correct IP address of the printer and type it without leading zeros in both the Name Or Address Of Host Providing LPD and Name Of Prin...

Страница 56: ...mple c spool qmsmc330 where c spool is the spool directory and qmsmc330 is the port name 11 Choose OK and close the Print Manager EtherTalk Note The AppleTalk Protocol must be Installed and running on...

Страница 57: ...ons that require them Applications may require special files drivers and or configurations to produce correct output on your QMS magicolor 330 Print System Check your application s documentation to de...

Страница 58: ...ows Printer Description WPD file instead of the QMS Level 2 Windows driver with PageMaker 5 0 because PageMaker requires a Microsoft 3 56 or higher Windows driver Use the following procedure to instal...

Страница 59: ...s are also to be used with PageMaker 5 0 They were copied into the PPD subdirectory of the QMS Level 2 Windows driver direc tory during the installation process They should be stored in the ALDUS USEN...

Страница 60: ...e a backup copy of the Photoshp ini Photoshop 2 5x or Photos30 ini Photoshop 3 0 and later initialization file 2 Using a text editor open the original initialization file 3 In the Photoshop section of...

Страница 61: ...the center of the page 4 You re now ready to print from your computer From this point you ll probably perform most printing tasks from your application For specific information check the printing sect...

Страница 62: ...ted your printer to a computer continue with chapter 6 Using the Control Panel in this manual to learn about the printer s control panel keys indicators and message window EDNord Istedgade 37A 9000 Aa...

Страница 63: ...onfiguring the Network on page 4 10 Installing the QMS CrownNet Print Monitor IPX or the QMS Network Print Monitor TCP IP on page 4 11 Where To Go From Here on page 4 12 If You Have Trouble on page 4...

Страница 64: ...interface and using the CrownNet soft ware CrownAdmin CrownNet Manager and the CrownNet Print Monitor for Windows refer to the QMS CrownNet System Adminis trator s Guide 1 Connecting the printer to t...

Страница 65: ...s Guide You can make these configuration changes through any of the follow ing means Printer control panel For information on using the printer con trol panel to change configuration menu settings ref...

Страница 66: ...er installation and configu ration see chapter 5 Connecting to a Macintosh 1 One unique printer name is broadcast to the network Use the Administration Communications Resident NIC Crown Net LAN Manage...

Страница 67: ...x menus allow you to identify 1 file server with a name up to 47 characters long Up to 16 characters can be entered in each of the 3 menus You cannot use these 3 menus to identify 3 file servers Up to...

Страница 68: ...of the print server name to end the name For example the print server name FIRSTGROUP_GROUPS_BLUE_TEAM_TEAMS_CRC_QMS is 42 characters long and must be entered as follows PSERVER NAME 1 FIRST_GROUP_GR...

Страница 69: ...m this point you ll probably perform most printing tasks from your application For specific information check the printing sec tion in your application documentation For information on print media typ...

Страница 70: ...QMS you would enter QMS 4 PRINTSERV2 SALES QMS Note Make sure to put a space between the file server name QMS 4 and the print server name PRINTSERV2 Up to 16 characters can be entered in the Pserver C...

Страница 71: ...n Communications Resi dent NIC CrownNet TCPIP Default Router menu enter the Internet address of the default router The factory default router address is 000 000 000 000 3 If necessary in the Administr...

Страница 72: ...ame is the name of the host 3 If necessary set the hardware address Caution We strongly recommend that you do not change the hardware address If you re working on a system other than a UNIX system set...

Страница 73: ...stem Administrator s Guide Provides detailed configuration and utility information CrownAdmin online help Contains detailed information on using CrownAdmin Choose Contents from the Help menu in the ma...

Страница 74: ...Network Print Monitor for Windows 95 QMS Network Print Monitor for Windows 95 online help Con tains detailed information on using the QMS Network Print Moni tor for Windows 95 4 5 1 If you have troubl...

Страница 75: ...page 5 2 Making the Ethernet Connection on page 5 3 Macintosh Printing Software on page 5 3 Printing from the Macintosh on page 5 7 If You Have Trouble on page 5 8 What s Next on page 5 8 EDNord Isted...

Страница 76: ...Zone Part 2 menus to enter the name of the zone to which the printer is attached Note The two Zone Part x menus allow you to identify 1 zone with a name up to 32 characters long Up to 16 characters c...

Страница 77: ...th the printing software already in place Refer to your application documentation for instructions on sending documents to the printer However if you want to be able to use all your printer s special...

Страница 78: ...nstall location To change the Install Location you can either use the drop down list box to display and select the appropriate disk or you can choose the Switch Disk button to scroll through the avail...

Страница 79: ...edia FreeHand Adobe PrePrint Adobe Separator or QuarkXPress See Other Printer Files on page 5 6 for information A PPD PostScript Printer Description file is used by a software printer driver to provid...

Страница 80: ...the Printer Descriptions folder on your Macintosh hard disk 6 From the Apple menu select Chooser 7 In the Chooser window select the LaserWriter 8 x icon and then select the QMS magicolor 330 8 Choose...

Страница 81: ...Color profile option If you use Adobe Separator install the PPD file The Adobe Separator documentation explains where to put it 4 You re now ready to print from your Macintosh From this point you ll p...

Страница 82: ...ecting and configuring your Macintosh interface refer to chapter 8 Troubleshooting Printer Problems in the Operation manual for troubleshooting tips Now that you ve set up your magicolor 330 and are p...

Страница 83: ...Configuration Message Window on page 6 3 Control Panel Indicators on page 6 4 Control Panel Buttons on page 6 4 What s Next on page 6 6 EDNord Istedgade 37A 9000 Aalborg telefon 96333500...

Страница 84: ...he printer s operation In addition it displays the current status of the printer including any condition that needs your attention 0 0 0 0 1 1 2 2 2 2 3 2 3 4 5 1 6 2 7 8 2 2 2 5 2 1 2 5 9 2 2 2 Paper...

Страница 85: ...Menu Administration Miscellaneous Keypad Language Purpose Change the message window language Choices English French German Spanish Default English Notes The printer must be restarted for changes to th...

Страница 86: ...y Saver mode When the printer experiences a condition that will not allow the printer to operate or the printer is not ready to print The printer is receiving data through one or more of its simultane...

Страница 87: ...is offline press the Select button to access a menu scroll through the menu or to choose a displayed menu option The selected item is denoted with an asterisk Note You must take the printer off line b...

Страница 88: ...u giving the option to cancel either the current job or all jobs or to end the current job See chapter 3 Advanced Printing Features in the Operation manual for complete information You can use this bu...

Страница 89: ...Sources of Support on page A 2 QMS World wide Offices on page A 5 EDNord Istedgade 37A 9000 Aalborg telefon 96333500...

Страница 90: ...ervice provides application notes technical support notes on common printing problems and information about printer specifications options accessories con sumables and prices In the United States and...

Страница 91: ...oduct announcements a trade show schedule and other general informa tion about QMS If you have access to the World Wide Web you can view the QMS home page at http www qms com The QMS ftp resource is f...

Страница 92: ...perating system you re using The interface you re using and if serial the protocol for example XON XOFF The application and version you re using The emulation of the file you re trying to print listed...

Страница 93: ...9 3347 National Service Service Information Installation and Maintenance Pricing 1 800 762 8894 On Site Service and Depot Repair Information 1 800 858 1597 7 00 am 7 00 pm Central Time Spare Parts Ord...

Страница 94: ...ed coun tries Planetenbaan 60 Corner Plaza 3606 AK Maarssen The Netherlands 31 346 551333 Fax 31 346 550170 Internet http www qms com nl V lizy Plus 1 Bis Rue du Petit Clamart 78142 V lizy Cedex Franc...

Страница 95: ...Saskay House Unit 24 Sunninghill Business Park Peltier Road Sunninghill Johannesburg Republic of South Africa 27 11 807 6957 Fax 27 11 807 6960 4 United Kingdom and Ireland Old Bridge House The Hythe...

Страница 96: ...EDNord Istedgade 37A 9000 Aalborg telefon 96333500...

Страница 97: ...Serial interface 3 5 Cancel button 6 6 Cassette Loading 2 22 CD ROMs 1 5 Config PServer 4 5 4 6 Consumables Gas gauges 6 2 Control panel 6 2 Buttons 6 2 6 4 Data indicator 6 4 Gas gauges 6 2 Indicato...

Страница 98: ...alling 2 15 Gas gauges 6 2 Indicators Control panel 6 4 Data 6 4 Media jam 6 4 Message 6 4 Online 6 4 Ready 6 4 Installation CrownNet Print Monitor 4 11 Face up tray 2 13 Fuser oil roller 2 15 Laser P...

Страница 99: ...6 3 Microsoft Windows Network Configuration 4 4 Multipurpose tray Installing 2 13 Naming File servers 4 5 Print servers 4 5 NetWare 3 x Interface configuration 4 5 NetWare 4 x Interface configuration...

Страница 100: ...bat 1 5 Ready indicator 6 4 Registration printer 2 9 RJ45 4 3 Select button 6 5 Serial interface Connecting via 3 4 Service United States A 4 Setup Printer 2 2 Shipment Contents 2 6 Soft Reset NetWare...

Отзывы: