background image

User Manual

Nighthawk AX12
12-Stream AX6000 WiFi Router

Model RAX120

NETGEAR, Inc.
350 E. Plumeria Drive

November 2018

San Jose, CA 95134, USA

202-11873-01

Содержание NIGHTHAWK RAX120

Страница 1: ...User Manual Nighthawk AX12 12 Stream AX6000 WiFi Router Model RAX120 NETGEAR Inc 350 E Plumeria Drive November 2018 San Jose CA 95134 USA 202 11873 01...

Страница 2: ...ial NETGEAR support resources Contact your Internet service provider for technical support Trademarks NETGEAR Inc NETGEAR and the NETGEAR Logo are trademarks of NETGEAR Inc Any non NETGEAR trademarks...

Страница 3: ...all or Manage Your Router With the Nighthawk App 23 Change the Language 24 Manage Your Router With the Nighthawk App 24 Chapter 3 Specify Your Internet Settings Use the Internet Setup Wizard 27 Manual...

Страница 4: ...a QoS Rule 57 Delete a QoS Rule 58 Delete All QoS Rules 59 Improve Network Connections With Universal Plug N Play 60 Manage Wi Fi Multimedia Quality of Service 61 Enable or Disable Smart Connect 62 E...

Страница 5: ...View or Change the Router Ethernet Port Aggregation Mode 97 Chapter 7 Manage Your Router Update the Router Firmware 99 Check for New Firmware and Update the Router 99 Manually Upload Firmware to the R...

Страница 6: ...se Time Machine to Back Up Onto a USB Hard Disk 124 Enable FTP Access Within Your Network 125 View or Change Network Folders on a Storage Device 126 Add a Network Folder on a USB Storage Device 127 Ed...

Страница 7: ...ding Service 155 Delete a Port Forwarding Entry 156 Application Example Make a Local Web Server Public 156 How the Router Implements the Port Forwarding Rule 157 Port Triggering 157 Add a Port Trigger...

Страница 8: ...to Your Router 168 Test the Path From a Windows Based Computer to a Remote Device 169 Chapter 13 Supplemental Information Factory Settings 172 Technical Specifications 173 8 Nighthawk AX12 12 Steam A...

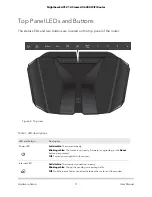
Страница 9: ...llowing sections Unpack Your Router Top Panel LEDs and Buttons Rear Panel Extend the Antennas Router Label Position Your Router Cable Your Router Turn the LEDs On or Off Using the LED On Off Switch Fo...

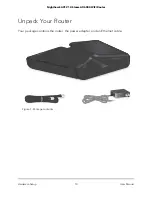
Страница 10: ...Unpack Your Router Your package contains the router the power adapter and an Ethernet cable Figure 1 Package contents User Manual 10 Hardware Setup Nighthawk AX12 12 Steam AX6000 WiFi Router...

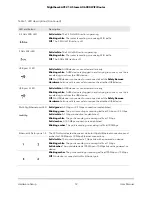
Страница 11: ...dy Blinking white The router is not ready firmware is upgrading or the Reset button was pressed Off Power is not supplied to the router Power LED Solid white The Internet connection is ready Blinking...

Страница 12: ...cted or someone clicked the Safely Remove Hardware button and it is now safe to remove the attached USB device USB port 2 LED Solid green A 5 Gbps or 2 5 Gbps connection is established Blinking green...

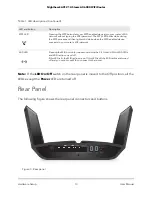
Страница 13: ...he WiFi button for two seconds turns the 2 4 Ghz and 5 GHz WiFi LEDs and WiFi radios on and off If this LED is lit the WiFi radios are on If this LED is off the WiFi radios are turned off and you cann...

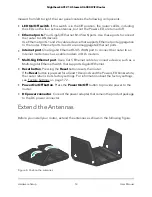
Страница 14: ...r DLS modem Multi Gig Ethernet port Use a Cat 5 Ethernet cable to connect a device such as a Multi Gigabit Ethernet Switch that supports Gigabit Ethernet Reset button Pressing the Reset button resets...

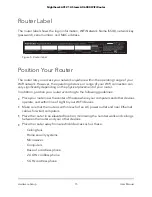
Страница 15: ...to the following guidelines Place your router near the center of the area where your computers and other devices operate and within line of sight to your WiFi devices Make sure that the router is wit...

Страница 16: ...thickness and number of walls the WiFi signal passes through Other WiFi access points in and around your home might affect your router s signal WiFi access points are routers repeaters WiFi range ext...

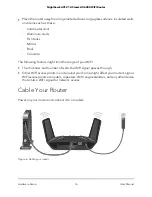
Страница 17: ...power adapter into an outlet 4 Press the Power On Off button on the rear panel of the router The router s Power LED lights solid white when the router is ready Turn the LEDs On or Off Using the LED O...

Страница 18: ...To turn the LEDs on or off using the LED On Off switch Move the LED On Off switch on the rear panel to the On or Off position User Manual 18 Hardware Setup Nighthawk AX12 12 Steam AX6000 WiFi Router...

Страница 19: ...This chapter explains the ways you can connect and how to access the router and log in The chapter contains the following sections Connect to the Network Types of Logins Use a Web Browser to Access t...

Страница 20: ...local area network LAN WiFi Connection To find and select the WiFi network 1 Make sure that the router is receiving power its Power LED is lit 2 On your computer or WiFi device find and select the Wi...

Страница 21: ...ss the Router When you connect to the network either with WiFi or with an Ethernet cable you can use a web browser to access the router to view or change its settings When you access the router the so...

Страница 22: ...rowser goes to http www routerlogin net and the Configuring the Internet Connection page displays If you already set up the Internet connection enter http www routerlogin net in the address field for...

Страница 23: ...he procedures in this manual use http www routerlogin net A login window opens 3 Enter the router admin user name and password The user name is admin The password is the one that you specified the fir...

Страница 24: ...user name and password are case sensitive The BASIC Home page displays 4 In the upper right corner select a language from the menu 5 When prompted click the OK button to confirm this change The page...

Страница 25: ...The dashboard displays User Manual 25 Connect to the Network and Access the Router Nighthawk AX12 12 Steam AX6000 WiFi Router...

Страница 26: ...ur router to detect the Internet connection when you first access the router with a web browser You can also customize or specify your Internet settings This chapter contains the following sections Us...

Страница 27: ...C Home page displays 4 Select ADVANCED Setup Wizard The Setup Wizard page displays 5 Select the Yes radio button If you select the No radio button you are taken to the Internet Setup page see Manually...

Страница 28: ...omatically assigns these addresses Use Static IP Address Enter the IP address IP subnet mask and the gateway IP address that your ISP assigned The gateway is the ISP router to which your router connec...

Страница 29: ...gin section select the Yes radio button 6 From the Internet Service Provider menu select the encapsulation method PPPoE L2TP or PPTP 7 In the Login field enter the login name that your ISP gave you Th...

Страница 30: ...ses the MAC address of the computer that you are now using You must use the one computer that the ISP allows Use This MAC Address Enter the MAC address that you want to use 15 Click the Apply button Y...

Страница 31: ...t it The following errors invalidate an IPv6 address More than eight groups of hexadecimal quartets More than four hexadecimal characters in a quartet More than two colons in a row Use Auto Detect for...

Страница 32: ...rmation to LAN devices but some IPv6 systems might not support the DHCv6 client function Auto Config This is the default setting This setting specifies how the router assigns IPv6 addresses to the dev...

Страница 33: ...r the IPv6 address If no address is acquired the field displays Not Available 6 Select a Remote 6to4 Relay Router radio button Auto Your router uses any remote relay router that is available on the In...

Страница 34: ...ogin net A login window opens 3 Enter the router admin user name and password The user name is admin The password is the one that you specified the first time that you logged in The user name and pass...

Страница 35: ...rver that resolves IPv6 domain name records for the router Note If you do not specify the DNS servers the router uses the DNS servers that are configured for the IPv4 Internet connection on the Intern...

Страница 36: ...n Type menu select DHCP The page adjusts The router automatically detects the information in the following fields Router s IPv6 Address on WAN This field shows the IPv6 address that is acquired for th...

Страница 37: ...ce ID check box and specify the interface ID to be used for the IPv6 address of the router s LAN interface If you do not specify an ID here the router generates one automatically from its MAC address...

Страница 38: ...account is JerAB ISP com you would type JerAB in this field Some ISPs like Mindspring Earthlink and T DSL require that you use your full email address when you log in If your ISP requires your full e...

Страница 39: ...3 Enter the router admin user name and password The user name is admin The default password is password The user name and password are case sensitive The BASIC Home page displays 4 Select ADVANCED Ad...

Страница 40: ...ction Auto Config This is the default setting This setting specifies how the router assigns IPv6 addresses to the devices on your home network the LAN 9 Optional Select the Use This Interface ID check...

Страница 41: ...n window opens 3 Enter the router admin user name and password The user name is admin The password is the one that you specified the first time that you logged in The user name and password are case s...

Страница 42: ...you want to be used for the IPv6 address of the router s LAN interface If you do not specify an ID here the router generates one automatically from its MAC address 9 Select an IPv6 Filtering radio bu...

Страница 43: ...ithin websites secure login pages or FTP or POP servers If you suspect an MTU problem a common solution is to change the MTU to 1400 If you are willing to experiment you can gradually reduce the MTU f...

Страница 44: ...that you logged in The user name and password are case sensitive The BASIC Home page displays 4 Select ADVANCED Setup WAN Setup The WAN Setup page displays 5 In the MTU Size field enter a value from...

Страница 45: ...network from unwanted intrusions from the Internet This chapter includes the following sections Allow or Block Access to Your Network Use Keywords to Block Internet Sites Manage Network Access Contro...

Страница 46: ...if a device is in the blocked list 6 Select an access rule Allow all new devices to connect With this setting if you add a new device it can access your network You don t need to enter its MAC address...

Страница 47: ...is admin The password is the one that you specified the first time that you logged in The user name and password are case sensitive The BASIC Home page displays 4 Select ADVANCED Security Block Sites...

Страница 48: ...Click the Add Keyword button The keyword is added to the keyword list The keyword list supports up to 32 entries 8 Click the Apply button Keyword blocking takes effect User Manual 48 Control Access to...

Страница 49: ...schedule select the Per Schedule radio button For information about how to specify the schedule see Schedule When to Block Internet Sites and Services on page 52 6 Click the Add button The Block Servi...

Страница 50: ...password is admin The user name and password are case sensitive The BASIC Home page displays 4 Select ADVANCED Security Block Sites The Block Sites page displays 5 Do one of the following To delete a...

Страница 51: ...eld enter the IP address of the trusted computer 7 Click the Apply button Your settings are saved Manage Network Access Control Lists You can use access control to block or allow access to your networ...

Страница 52: ...pens 3 Enter the router admin user name and password The user name is admin The password is the one that you specified the first time that you logged in The user name and password are case sensitive T...

Страница 53: ...he email address to which logs and alerts are to be sent This email address is also used for the From address If this field is blank log and alert messages are not sent 7 In the Your Outgoing Mail Ser...

Страница 54: ...e b From the Day menu select the day c From the Time menu select the time and select the am or pm radio button 12 Click the Apply button Your settings are saved Logs are sent automatically according t...

Страница 55: ...communications such as instant messaging By default the router uses Wi Fi Multimedia Quality of Service WMM QoS This chapter contains the following sections Optimize Internet Streaming With QoS Impro...

Страница 56: ...he first time that you logged in The user name and password are case sensitive The BASIC Home page displays 4 Select Quality of Service The QoS Setup page displays 5 Select the Enable Upstream QoS che...

Страница 57: ...s 5 Select the Enable Upstream QoS check box 6 Click the Set Up QoS Rule button The QoS priority list displays 7 Scroll down to the bottom of the page 8 Click the Add Priority Rule button The QoS Prio...

Страница 58: ...e page 9 Click the Edit button The page adjusts 10 Change the settings 11 Click the Apply button Your settings are saved Delete a QoS Rule You can delete a specific QoS rule To delete a QoS rule 1 Lau...

Страница 59: ...www routerlogin net A login window opens 3 Enter the router admin user name and password The user name is admin The password is the one that you specified the first time that you logged in The user n...

Страница 60: ...urn UPnP On check box By default this check box is selected UPnP for automatic device configuration can be enabled or disabled If the Turn UPnP On check box is cleared the router does not allow any de...

Страница 61: ...fort and background For an application to receive the benefits of WMM QoS WMM must be enabled for both it and the client running that application Legacy applications that do not support WMM and applic...

Страница 62: ...s the WiFi settings for 5 GHz band To enable or disable Smart Connect 1 Launch a web browser from a computer or mobile device that is connected to the network 2 Enter http www routerlogin net A login...

Страница 63: ...ce that is connected to the router network 2 Enter http www routerlogin net A login window opens 3 Enter the router admin user name and password The user name is admin The password is the one that you...

Страница 64: ...e IP Addresses That the Router Assigns Disable the DHCP Server Feature in the Router Manage Reserved LAN IP Addresses Use the WPS Wizard for WiFi Connections Specify Basic WiFi Settings Change the WiF...

Страница 65: ...ult DMZ Server This feature is sometimes helpful when you are playing online games or videoconferencing but it makes the firewall security less effective Respond to Ping on Internet Port This feature...

Страница 66: ...tion of the firewall and is exposed to exploits from the Internet If compromised the DMZ server computer can be used to attack other computers on your network The router usually detects and discards i...

Страница 67: ...er admin user name and password The user name is admin The password is the one that you specified the first time that you logged in The user name and password are case sensitive The BASIC Home page di...

Страница 68: ...me page displays 4 Select ADVANCED Setup LAN Setup The LAN Setup page displays 5 In the IP Address field type the IP address 6 In the IP Subnet Mask field type the subnet mask of the router The IP add...

Страница 69: ...dresses must be part of the same IP address subnet as the router s LAN IP address Using the default addressing scheme define a range between 192 168 1 2 and 192 168 1 254 although you can save part of...

Страница 70: ...default the router acts as a DHCP server The router assigns IP DNS server and default gateway addresses to all computers connected to the LAN The assigned default gateway address is the LAN address o...

Страница 71: ...or mobile device that is connected to the router network 2 Enter http www routerlogin net A login window opens 3 Enter the router admin user name and password The user name is admin The password is th...

Страница 72: ...the one that you specified the first time that you logged in The user name and password are case sensitive The BASIC Home page displays 4 Select ADVANCED Setup LAN Setup The LAN Setup page displays 5...

Страница 73: ...ile device that is connected to the router network 2 Enter http www routerlogin net A login window opens 3 Enter the router admin user name and password The user name is admin The password is the one...

Страница 74: ...r WiFi security settings you are disconnected when you click the Apply button To avoid this problem use a computer with a wired connection to access the router To specify basic WiFi settings 1 Launch...

Страница 75: ...nnels for example use Channels 1 and 5 or 6 and 10 9 Click the Apply button Your settings are saved If you connected wirelessly to the network and you changed the SSID you are disconnected from the ne...

Страница 76: ...tions radio button None An open WiFi network that does not provide any security Any WiFi device can join the WiFi network We recommend that you do not use an open WiFi network WPA2 Personal AES This o...

Страница 77: ...e The BASIC Home page displays 4 Select Wireless The Wireless Settings page displays 5 In the Wireless Network 2 4 GHz b g n section select a WiFi mode from the Mode menu Up to 54 Mbps This mode allow...

Страница 78: ...lick the Apply button Your settings are saved Change the Transmission Power Control By default you router s transmission power is set to 100 This allows your router to give you whole home WiFi coverag...

Страница 79: ...n the Up to 54 Mbps mode in the 2 4 GHz band The channel also depends on the channel selection of the main WiFi network The router provides two default guest networks with the following names SSIDs 2...

Страница 80: ...ensitive name in this field 6 Select a WiFi security option for the 2 4 GHz or 5 GHz guest WiFi network None An open WiFi network that does not provide any security Any WiFi device can join the WiFi n...

Страница 81: ...os are off you can still use an Ethernet cable for a LAN connection to the router You can turn the WiFi radios on and off with the WiFi On Off button on the router or you can log in to the router and...

Страница 82: ...n the WiFi radio Select the Enable Wireless Router Radio check box 6 Click the Apply button Your settings are saved Set Up a WiFi Schedule You can turn off the WiFi signal from your router at times wh...

Страница 83: ...in net A login window opens 3 Enter the router admin user name and password The user name is admin The password is the one that you specified the first time that you logged in The user name and passwo...

Страница 84: ...P 1 Use an Ethernet cable to connect the Internet port of this router to an Ethernet port in the other router 2 Launch a web browser from a computer or mobile device that is connected to the network 3...

Страница 85: ...benefits Take advantage of gigabit WiFi speeds on current devices Use Gigabit WiFi for applications like video and gaming Connect multiple devices like NAS Smart TV Blu ray player and game consoles at...

Страница 86: ...reless Networks 5Ghz a n ac ax For 802 11ac or 802 11ax mode select 5 GHz b In the Name SSID file enter the wireless network name SSID c In the Security Options section select a radio button d If the...

Страница 87: ...evices such as an IPTV cannot function behind the router s network address translation NAT service or firewall Based on what your Internet service provider ISP requires for the device to connect to th...

Страница 88: ...dvanced Setup VLAN Bridge Settings The VLAN IPTV Setup page displays 5 Select the Enable VLAN Bridge Setup check box The page expands 6 Select the By bridge group radio button The page expands 7 Selec...

Страница 89: ...VLAN tag group and enable the bridge 1 Launch a web browser from a computer or mobile device that is connected to the network 2 Enter http www routerlogin net A login window opens 3 Enter the router...

Страница 90: ...service provider Use this feature only if you subscribe to an IPTV service and your IPTV service requires an intranet address Some IPTV ports cannot work behind NAT because the IPTV port requires an I...

Страница 91: ...Typically you do not need to add static routes unless you use multiple routers or multiple IP subnets on your network As an example of when a static route is needed consider the following case Your m...

Страница 92: ...window opens 3 Enter the router admin user name and password The user name is admin The password is the one that you specified the first time that you logged in The user name and password are case se...

Страница 93: ...aved The static route is added to the table on the Static Routes page Edit a Static Route To edit a static route 1 Launch a web browser from a computer or mobile device that is connected to the router...

Страница 94: ...the table Enable or Disable MU MIMO Multiuser multiple input multiple output MU MIMO improves performance when multiple MU MIMO capable WiFi clients transfer data at the same time WiFi clients must su...

Страница 95: ...r to improve the aggregated file transfer speed To set up Ethernet port aggregation connect a device that supports Ethernet port aggregation and 802 3ad to Ethernet aggregate ports 1 and 2 on your rou...

Страница 96: ...time that you logged in The user name and password are case sensitive The BASIC Home page displays d Select ADVANCED Advanced Setup Ethernet Port Aggregation The Ethernet Port Aggregation page displa...

Страница 97: ...s mode disables Ethernet port aggregation on your router Ethernet ports 1 and 2 can be used as independent Ethernet ports Enable LACP IEEE 803 3ad The router communicates with the device connected to...

Страница 98: ...About the Router and the Internet and WiFi Settings Display Internet Port Statistics Check the Internet Connection Status View and Manage Logs of Router Activity View Devices Currently on the Network...

Страница 99: ...ce that is connected to the router network 2 Enter http www routerlogin net A login window opens 3 Enter the router admin user name and password The user name is admin The password is the one that you...

Страница 100: ...web browser from a computer or mobile device that is connected to the router network 3 Enter http www routerlogin net A login window opens 4 Enter the router admin user name and password The user name...

Страница 101: ...dmin user name and password The user name is admin The password is the one that you specified the first time that you logged in The user name and password are case sensitive The BASIC Home page displa...

Страница 102: ...uestions and provide answers to them 7 Click the Apply button Your settings are saved Recover the admin Password If you set up the password recovery feature you can recover your router admin password...

Страница 103: ...is the one that you specified the first time that you logged in The user name and password are case sensitive The BASIC Home page displays 4 Click the ADVANCED tab The ADVANCED Home page displays The...

Страница 104: ...Time The time elapsed since the router was last restarted Port The statistics for the WAN Internet port LAN Ethernet ports and WLANs For each port the window displays the following information Status...

Страница 105: ...ck the Connection Status button The Connection Status window opens and displays the following information IP Address The IP address that is assigned to the router Subnet Mask The subnet mask that is a...

Страница 106: ...ion that occurred such as whether Internet access was blocked or allowed Source IP The IP address of the initiating device for this log entry Target address The name or IP address of the website or ne...

Страница 107: ...onnection Device Name If the device name is known it is shown here IP Address The IP address that the router assigned to this device when it joined the network This number can change if a device is di...

Страница 108: ...dio button and enter the allowed hours in the Monthly limit field 7 If your ISP charges for extra data volume when you make a new connection enter the extra data volume in MB in the Round up data volu...

Страница 109: ...outer admin user name and password The user name is admin The password is the one that you specified the first time that you logged in The user name and password are case sensitive The BASIC Home page...

Страница 110: ...ntil the router finishes restarting Restore Configuration Settings To restore configuration settings that you backed up 1 Launch a web browser from a computer or mobile device that is connected to the...

Страница 111: ...the one that you specified the first time that you logged in The user name and password are case sensitive The BASIC Home page displays 4 Select ADVANCED Advanced Setup Remote Management The Remote M...

Страница 112: ...ess or location field followed by a colon and the custom port number For example if your external address is 134 177 0 123 and you use port number 8443 enter http 134 177 0 123 8443 in your browser Re...

Страница 113: ...CED Advanced Setup LED Control Settings The LED Control Settings page displays 5 To disable blinking select the Disable blinking on Internet LED LAN LED Wireless LED and USB LED when data traffic is d...

Страница 114: ...P server 1 Launch a web browser from a computer or mobile device that is connected to the router network 2 Enter http www routerlogin net A login window opens 3 Enter the router admin user name and pa...

Страница 115: ...ADVANCED ReadySHARE Media Server The Media Server Settings page displays 5 Specify the settings Enable Media Server Select this check box to enable this device to act as a media server Media Server N...

Страница 116: ...the password is password the LAN IP address is 192 168 1 1 which is the same as www routerlogin net and the DHCP server is enabled Use the Reset Button Caution This process erases all settings that yo...

Страница 117: ...SIC Home page displays 4 Select ADVANCED Administration Backup Settings The Backup Settings page displays 5 Click the Erase button The configuration is reset to factory default settings When the reset...

Страница 118: ...chapter contains the following sections USB Device Requirements Connect a USB Storage Device to the Router Access a Storage Device Connected to the Router From a Windows Based Computer Map a USB Devi...

Страница 119: ...Ext3 Ext4 HFS HFS Connect a USB Storage Device to the Router ReadySHARE lets you access and share USB storage devices that are connected to the appropriate router port If your USB storage device uses...

Страница 120: ...tomatically opens and displays the files and folders on the USB storage device Map a USB Device to a Windows Network Drive To map the USB storage device to a Windows network drive 1 Connect a USB stor...

Страница 121: ...a power supply connect it You must use the power supply when you connect the USB storage device to the router When you connect the USB storage device to the router s port it might take up to two minut...

Страница 122: ...ct the USB storage device to the router When you connect the USB storage device to the router s USB port it might take up to two minutes before it is ready for sharing By default the USB storage devic...

Страница 123: ...p right of the page and search for Disk Utility 4 Open the Disk Utility select your USB HDD click the Erase tab and click the Erase button 5 Click the Partition tab 6 In the Partition Layout menu set...

Страница 124: ...ime Machine to back up your Mac computers onto a USB hard disk drive HDD that is connected to one of the router s USB ports To back up your Mac onto a USB hard disk drive 1 Prepare your USB device wit...

Страница 125: ...disk list go to Mac Finder and click that USB partition It displays in the Time Machine list 12 When prompted select the Registered User radio button 13 Enter admin for the name and the router admin...

Страница 126: ...et A login window opens 3 Enter the router admin user name and password The user name is admin The password is the one that you specified the first time that you logged in The user name and password a...

Страница 127: ...er or mobile device that is connected to the router network 2 Enter http www routerlogin net A login window opens 3 Enter the router admin user name and password The user name is admin The password is...

Страница 128: ...tton The window closes Edit a Network Folder on a USB Storage Device You can edit network folders on a USB storage devices connected to a router USB port To edit a network folder 1 Launch a web browse...

Страница 129: ...routerlogin net A login window opens 3 Enter the router admin user name and password The user name is admin The password is the one that you specified the first time that you logged in The user name a...

Страница 130: ...access USB devices attached to the router s USB ports when you re not home This chapter includes the following sections Set Up and Manage Dynamic DNS Set Up FTP Access Through the Internet Your Perso...

Страница 131: ...ISP assigns a private WAN IP address such as 192 168 x x or 10 x x x the Dynamic DNS service does not work because private addresses are not routed on the Internet Set Up FTP Access Through the Inter...

Страница 132: ...New Dynamic DNS Account on page 133 2 Make sure that your Internet connection is working Your router must use a direct Internet connection It cannot connect to a different router to access the Interne...

Страница 133: ...he name that you want to use for your URL The host name is sometimes called the domain name Your free URL includes the host name that you specify and ends with mynetgear com For example specify MyName...

Страница 134: ...User Name field type the user name for your account 10 For a NETGEAR account at No IP in the Email field type the email address for your account 11 In the Password 6 32 characters field type the pass...

Страница 135: ...ensitive The BASIC Home page displays 4 Select ADVANCED Advanced Setup Dynamic DNS The Dynamic DNS page displays 5 Change your DDNS account settings as necessary 6 Click the Apply button Your settings...

Страница 136: ...ely Access a USB Device Using ReadyCLOUD NETGEAR ReadyCLOUD for routers lets you remotely access files stored on a USB storage device that is connected to the router Before you can use ReadyCLOUD you...

Страница 137: ...ters on your local area network LAN 3 Launch a web browser from a computer or mobile device that is connected to the network 4 Enter http www routerlogin net A login window opens 5 Enter the router us...

Страница 138: ...the Sign In button The ReadyCLOUD page displays the router that you registered and the contents of the USB storage device that is connected to the router User Manual 138 Use Dynamic DNS to Access USB...

Страница 139: ...N This chapter explains how to set up and use VPN access The chapter includes the following sections Set Up a VPN Connection Specify VPN Service in the Router Install OpenVPN Software Use a VPN Tunnel...

Страница 140: ...unt the VPN can use that IP address to connect to your home network Specify VPN Service in the Router You must specify the VPN service settings in the router before you can use a VPN connection To spe...

Страница 141: ...ftware on your Windows computer 1 Launch a web browser from a computer or mobile device that is connected to the router network 2 Enter http www routerlogin net A login window opens 3 Enter the router...

Страница 142: ...e Open VPN software on your computer click the openVPN install xxx exe file 11 Click the Next button 12 Read the License Agreement and click the I Agree button 13 Leave the check boxes selected as sho...

Страница 143: ...ed on your device For a client device with Windows 64 bit system the VPN client is installed at C Program files OpenVPN config by default 18 For a client device with Windows modify the VPN interface n...

Страница 144: ...The user name and password are case sensitive The BASIC Home page displays 4 Select ADVANCED Advanced Setup VPN Service The VPN Service page displays 5 Make sure that the Enable VPN Service check box...

Страница 145: ...box is selected 6 Specify any VPN service settings on the page For more information see Specify VPN Service in the Router on page 140 7 Click the For Smart Phone button to download the OpenVPN configu...

Страница 146: ...r Android device download and install the OpenVPN Connect app from the Google Play Store 9 On your computer unzip the configuration files that you downloaded and send the files to your Android device...

Страница 147: ...unch the OpenVPN application with administrator privileges The OpenVPN icon displays in the Windows taskbar Tip You can create a shortcut to the VPN program then use the shortcut to access the setting...

Страница 148: ...y in the Media Devices and Network Infrastructure sections 3 To access the USB device click the ReadySHARE icon 4 To access media on the router s network click the remote router icon Use VPN to Access...

Страница 149: ...6 Scroll down to the Clients will use this VPN connection to access section and select the All sites on the Internet Home Network radio button When you access the Internet with the VPN connection inst...

Страница 150: ...nly to your home network not to the Internet service for your home network 7 Click the Apply button Your settings are saved 8 Click For Windows or For Non Windows button and download the configuration...

Страница 151: ...4 When the VPN connection is established launch your Internet browser User Manual 151 Use VPN to Access Your Network Nighthawk AX12 12 Steam AX6000 WiFi Router...

Страница 152: ...You can use port forwarding and port triggering to set up rules for Internet traffic You need networking knowledge to set up these features This chapter includes the following sections Manage Port For...

Страница 153: ...erver computer a reserved IP address See Manage Reserved LAN IP Addresses on page 71 4 Launch a web browser from a computer or mobile device that is connected to the router network 5 Enter http www ro...

Страница 154: ...dmin The password is the one that you specified the first time that you logged in The user name and password are case sensitive The BASIC Home page displays 5 Select ADVANCED Advanced Setup Port Forwa...

Страница 155: ...k 2 Enter http www routerlogin net A login window opens 3 Enter the router user name and password The user name is admin The password is the one that you specified the first time that you logged in Th...

Страница 156: ...server on your local network you can use port forwarding to allow web requests from anyone on the Internet to reach your web server To make a local web server public 1 Assign your web server either a...

Страница 157: ...reply through the Internet to the computer or WiFi device that sent the web page request Port Triggering Port triggering is a dynamic extension of port forwarding that is useful in these cases An app...

Страница 158: ...ering page displays 5 Select the Port Triggering radio button The page adjusts 6 Click the Add Service button 7 In the Service Name field type a descriptive service name 8 From the Service User menu s...

Страница 159: ...ings 7 In the Port Triggering Timeout field enter a value up to 9999 minutes This value controls how long the inbound ports stay open when the router detects no activity This value is required because...

Страница 160: ...ort 113 traffic to your computer 5 The IRC server sends a return message to your router using the NAT assigned source port for example port 33333 as the destination port and sends an identify message...

Страница 161: ...k the NETGEAR support site at http support netgear com for product and contact information The chapter contains the following sections Quick Tips Troubleshoot With the LEDs You Cannot Log In to the Ro...

Страница 162: ...ter LAN port LEDs light WiFi Settings Make sure that the WiFi settings in the computer and router match exactly The WiFi network name SSID and WiFi security settings of the router and WiFi computer mu...

Страница 163: ...orking power outlet Make sure that you are using the power adapter that NETGEAR supplied for this product If the Power LED blinks slowly and continuously the router firmware is corrupted This can happ...

Страница 164: ...iFi radios are turned on You Cannot Log In to the Router If you are unable to log in to the router from a computer on your local network check the following If you are using an Ethernet connected comp...

Страница 165: ...ovides a fixed IP address your router requests an IP address from the ISP You can determine whether the request was successful using the ADVANCED Home page To check the WAN IP address 1 Launch a web b...

Страница 166: ...e router s configuration reboot your computer and verify the DNS address You can configure your computer manually with DNS addresses as explained in your operating system documentation The router migh...

Страница 167: ...web interface do the following When entering configuration settings always click the Apply button before moving to another page or tab or your changes are lost Click the Refresh or Reload button in th...

Страница 168: ...o reply You can easily troubleshoot a network using the ping utility in your computer or workstation Test the LAN Path to Your Router You can ping the router from your computer to verify that the LAN...

Страница 169: ...ess of a remote device such as your ISP DNS server If the path is functioning correctly messages display that are similar to those shown in Test the LAN Path to Your Router on page 168 3 If you do not...

Страница 170: ...omputer connected to that modem If your ISP does this configure your router to clone or spoof the MAC address from the authorized computer User Manual 170 Troubleshooting Nighthawk AX12 12 Steam AX600...

Страница 171: ...13 Supplemental Information This chapter includes technical information about your router The chapter covers the following topics Factory Settings on page 172 Technical Specifications on page 173 171...

Страница 172: ...com or www routerlogin net User login URL Router login admin User name case sensitive password Login password case sensitive Use default hardware address WAN MAC address Internet connection 1500 WAN M...

Страница 173: ...uction and network overhead lower actual data throughput rate Technical Specifications Table 4 Router specifications Description Feature TCP IP RIP 1 RIP 2 DHCP PPPoE PPTP Bigpond Dynamic DNS UPnP and...

Страница 174: ...1024 QAM support Data encoding standards Limited by the amount of WiFi network traffic generated by each node typically 50 70 nodes Maximum computers per wireless network WPA2 PSK and WPA WPA2 802 11...

Отзывы: