background image

22 


Ness SmartBell IP Intercom Installation and Users Manual.(series 2) 


  Version 1.5.4 


Version & Terminal equipment 


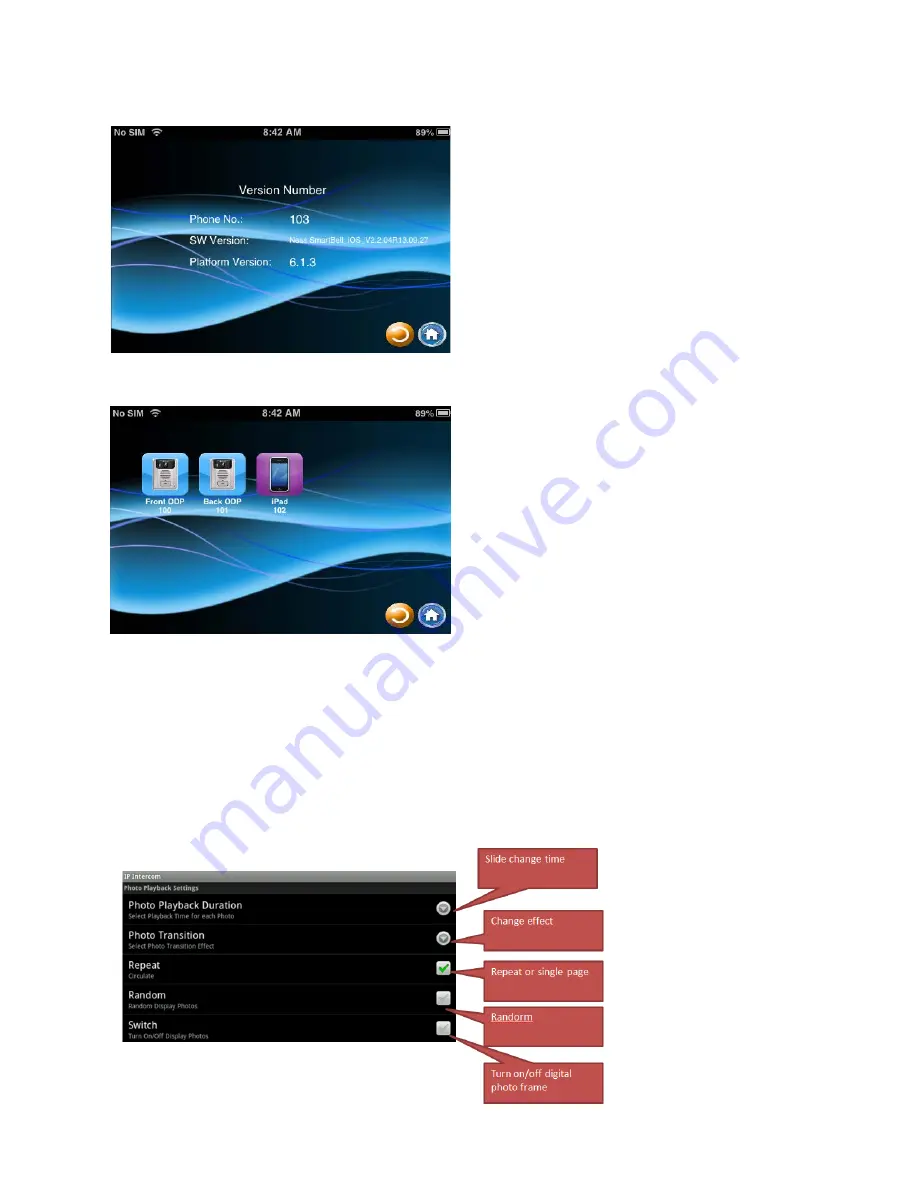
The Version setup allows you to see the version details of the App you are running. 


The Terminal equipment option allows you to view all other equipment that is currently registered / 
paired into the system that you can communicate with. 

Slideshow settings (only for Indoor Phone 101-132 (10” tablet) 


The 10” tablet (101-132) allows you to set a slide show to be displayed when it goes into “Screen 
Saver: mode. 
User Photos need to be stored in the SD-Card album folder.  
 
This is set by pressing the Slide show” button in the setup menu. 


Содержание SmartBell

Страница 1: ...1 Ness SmartBell IP Intercom Installation and Users Manual series 2 Version 1 5 4 Ness Smartbell IP Intercom Turn your iPhone Smart phone Tablet into Video Audio Intercom Installation and Users Manual ...

Страница 2: ...r Phone wire connection table 31 Connections to electronic door strike lock 32 Door Strike Wiring Examples 32 Indoor Phone Master Station 10 tablet 101 132 installation 35 Installation steps Device Pairing 38 Ness SmartBell eGateway Specifications 41 Outdoor Phone ODP Door Unit Device pairing to eGateway 42 Room Station 10 tablet Indoor Phone 101 132 pairing and setting flow 43 Device pairing of R...

Страница 3: ... iPad devices We need intercoms in daily life Office Reception Family member When away Office Home owner can monitor view visitor image displayed to 3G Smart phone or Wi Fi tablet Quick talk and door release from anywhere Seniors at home Senior at home one can view visitor image displayed to TV set Simply click on talk and communicate with door phone station Door release from safely inside buildin...

Страница 4: ...t Phone into an intercom Turn Your Smart Phone Tablet into intercoms Key features Control intercom on Wi Fi WAN networks Listen to activity for secure discreet monitoring Quick door release from safely inside building or anywhere Simply click on Talk Monitor to communicate with door phone station ...

Страница 5: ...t lit at all This is not considered a unit malfunction Door station is not weather resistant and do not spray with high pressure water Unit trouble could result For wiring specify CAT5e straight cable Due to the environmental sound around the unit it may hinder smooth communication but this is not a malfunction When outside temperature lowers sharply after rainfall etc the inside of camera may fog...

Страница 6: ...ustomer powering up the unit with the wrong power supply It s the installers responsibly to double check to ensure the correct power supply is being used Please note that Images depicted in this manual may differ from the actual images This manual may be revised or changed without prior notice Product specifications may be changed for the sake of improvement without prior notice It is the customer...

Страница 7: ...iscreet monitoring Click on Talk Monitor to communicate with door phone Quick door release from safely inside building or anywhere Connectivity Easy installation and maintenance free Control intercom on Wi Fi WAN networks Accessible in anywhere via the internet and 3G connectivity Applicable in multi OS iOS Android Windows with mobile devices Smart phone tablet Maximum Number of Devices ...

Страница 8: ...8 Ness SmartBell IP Intercom Installation and Users Manual series 2 Version 1 5 4 Home Screen of the Ness SmartBell INTERCOM on a Smart Device ...

Страница 9: ... the home screen and tap on the extension you which to call NOTE Video is only available when communicating with an Outdoor Phone Door station When calling an Outdoor phone station from the list the following screen will appear Switch between hands free speaker and handset speaker Unlock the door End Hang Up the call Mute Microphone on Smart Device ...

Страница 10: ...call will be notified of the incoming call as shown below If you want to reject the call you can just press the red phone icon To answer the call press the green phone icon iDevice Ringing Android Device Ringing On Apple Devices if the app is closed or the screen is turned off then a Push Notification will show telling you have an incoming call from another device or someone has pressed the door b...

Страница 11: ...en made the following screen will display iDevice In a Call Android Device In a Call By pressing this icon it will mute the sound coming from the other person By pressing this icon it will mute your microphone and the other person won t be able to hear you To end the call press the red hang up button ...

Страница 12: ... 2 Version 1 5 4 VISITOR LOG Photo snap shot Whenever a visitor comes to an outdoor phone it will take a series of snap shot images typically 5 and store them so you can view for later viewing Click on Visitor Log from the main screen to view the most recent visitors ...

Страница 13: ... to control your AV devices Note This feature is not available on the 10 inch Indoor Phone Touch Screen In the Push Project Editor you need to ensure you have a page called home All lower case as this is the page that the Ness Smartbell will open If you don t have the Push Controls app installed on your device and someone presses the Smart Home button it will display the following message ...

Страница 14: ...nd click Add New Button in the Push project editor GUI page Now you need to change the Navigation drop down menu to URL Scheme and enter in the URL Scheme to be nesssmartbell now when you press this button it will load up the Ness Smartbell app Note The URL Scheme has three s in the URL Scheme This URL scheme must also be in lowercase Monitoring the Camera on a Door Phone Press the Monitor button ...

Страница 15: ...r program the device into the eGateway Card Settings used to Add Delete disable Access Cards into a door station Volume Version Terminal Equipment SETUP Page for Mobile Device SETUP page for Indoor phone Master station 10 tablet 101 132 allows you to setup the following 8 features Ringtone Settings Background Settings Modify Registration Message Card Settings Volume Version Terminal Equipment Slid...

Страница 16: ...nd you can transfer the ringtones to your phone wirelessly over the Wi Fi using your computer https play google com store apps details id com sand airdroid Once the app is installed on your Android device you then need to make sure your computer is connected to the same Wi Fi Network as your Android Device Once you have confirmed your connected to the same Wi Fi network then open the AirDroid app ...

Страница 17: ... are going to be copying a ringtone you need to click on the Files icon in the web browser A window like below will then appear Now simply select SD Card from the left menu and scroll down into you get to ring Now you need to right mouse click in the empty space on the right and choose Upload ...

Страница 18: ...ed to this window you can then close the web browser Then on your Android device you can press the back button and press the OK button to close the app by pressing the home button you will find the app is still running in the title bar so you need to press the back button Now you need to open the Ness Smartbell app and click on the settings button down the bottom right of the screen Then select th...

Страница 19: ...19 Ness SmartBell IP Intercom Installation and Users Manual series 2 Version 1 5 4 Background Settings ...

Страница 20: ...tration information Account password Server Address of the eGateway eGateway s WAN IP address Your routers External IP Address Press this button to start the registration procedure To create or modify a new registration information Account password and server address this user will be registered to 1 First enable pairing registration mode in the eGateway 2 Registration on this device otherwise it ...

Страница 21: ... unit There is a Maximum of 32 cards that can be programmed and used on the system 1 From the main menu click on Setup Card Settings 2 To add a new access card Click the Start Detection button 3 Then present an Access Card to the Outdoor phone unit 4 To stop adding new card click the End Detection button To edit a card already in the system press and hold card number 5 Volume Settings The Outdoor ...

Страница 22: ...t option allows you to view all other equipment that is currently registered paired into the system that you can communicate with Slideshow settings only for Indoor Phone 101 132 10 tablet The 10 tablet 101 132 allows you to set a slide show to be displayed when it goes into Screen Saver mode User Photos need to be stored in the SD Card album folder This is set by pressing the Slide show button in...

Страница 23: ... defects of material and workmanship under normal use and service for a period of one year after delivery and will repair free of charge or replace at no charge should it become defective upon which examination shall disclose to be defective and under warranty We reserve unto itself the sole right to make the final decision whether there is a defect in materials and or workmanship and whether or n...

Страница 24: ... 4 Installation Steps Network Wifi setting Network connection Architecture DO NOT connect Outdoor or Indoor phones or room stations to the customers LAN All devices are wired in a closed network into the Ness IP e Gateway The eGateway is then connected to the LAN from the WAN port ...

Страница 25: ... Enable DHCP Server and set a different IP segment with DHCP setting of e Gateway Note The default IP segment of e Gateway is 192 168 0 10 The following screen shot is an example of the settings in a Wireless router You usually can find this setting from Network setting section in your wireless router 2 Reserve a fixed IP address to e Gateway You usually can find this setting from Network setting ...

Страница 26: ...onnect your computer to LAN1 on the eGateway 2 By default the LAN IP address of the eGateway is set to 192 168 0 10 Open a web browser such as Internet Explorer and enter in 192 168 0 10 then press enter When prompt for a username and password enter in Username admin Password admin 3 Once logged in select Settings LAN from the side menu ...

Страница 27: ...t you need to click the Apply button at the bottom of the page Then close the browser after clicking apply 5 Once the IP address has been set you will need to change your computers IP address so it s on the same network range as what you put in step 4 above and you will need to close the web browser For Example If your IP address you set in step 4 is 192 168 5 10 then you would change your compute...

Страница 28: ...routers IP address or if you know your ISP DNS server enter it into these fields Once those settings have been set click on the Apply button 9 Remove the LAN cable from the LAN1 port and plug it into the WAN port on the eGateway 10 Change your computers IP address to match the same network range as what you entered the IP address from step 8 11 Open Internet Explorer and enter in the IP address yo...

Страница 29: ...ect these units to your customers LAN data network Note The Indoor Outdoor ports on the eGateway module are POE Power over Ethernet Therefore Indoor Master Room stations and Outdoor Phones Door Stations connected to these ports are powered off these ports therefore no need to additional power supplies However If more than 2 devices are needed to be installed you can use LAN1 and LAN 2 ports on the...

Страница 30: ...ual series 2 Version 1 5 4 Accessory Accessories included 1 x Cinufoil Screw Driver 2 x Special Wooden Screw RH 1 x Special Screw M3 1 4mm Fe Ni PAN HEAP Torx 1 x Wall Mount box 1 x Screw cover 2 x Screw Plug Utility for Z In3 12 Back panel wall mount model ...

Страница 31: ...s Manual series 2 Version 1 5 4 Outdoor Phone wire connection table Mounting surface wiring 1 Mount the back box onto into the wall and secure 2 Pull the wire from the Wall 3 Wire connected with door phone unit 4 Connect cables to the Outdoor Phone unit ...

Страница 32: ...cations Do not use the unoccupied terminals and ports for other purposes In order to prevent incorrect wiring label both ends of each cable with the unit and terminal names to which they are to be connected For connecting other manufacturer s products refer to the instruction manuals for those products The illustration of the unit s rear panel differs from the actual one This is for simplifying th...

Страница 33: ...k Door strike is unlocked and requires power to lock Complete the installation The outdoor unit will be pressed into the wall mount and use the fixed star screws and wrench Cleaning Clean the units with a soft cloth dampened with a neutral household cleanser Do not use an abrasive cleanser or cloth ...

Страница 34: ... Version 1 5 4 Mounting locations Do not install this unit in any of the following locations where lighting or the ambient environment could impact the display on the Video monitor due to the characteristics of the door station s camera Mounting positions and image view ...

Страница 35: ...use the 48V power supply that comes with the switch Instead please use a 24Volt power supply 101 134 Sold separately with the PoE LAN switch 101 363 Powering up the 10 inch touch screen with the wrong voltage will void your warranty Note The Indoor Outdoor ports on the eGateway module are POE Power over Ethernet Therefore Indoor Master Room stations and Outdoor Phones Door Stations connected to th...

Страница 36: ...ation and Users Manual series 2 Version 1 5 4 Introduction of the unit Installing the Wall Mount bracket Mount the wall mount bracket to the wall and once secure place the Indoor Phone Room Station 10 Tablet onto the bracket as shown below ...

Страница 37: ...Ness SmartBell IP Intercom Installation and Users Manual series 2 Version 1 5 4 Insert SD Card Not supplied as standard USB port can be connected with USB keyboard or mouse HDMI port can be connected to TV ...

Страница 38: ...teway then they can be used in accordance with the intercom functionality as defined Setting list ODP 10 IDP IP Phone Mobile tablet Smart Phone iPhone NOTES The following list is a brief overview of the setting items available in the system settings The descriptions and the style and order of descriptions do not necessarily equate with the actual displays Make a note of the setting results you hav...

Страница 39: ...39 Ness SmartBell IP Intercom Installation and Users Manual series 2 Version 1 5 4 ODP IDP pairing and setting flow Devices connection to eGateway Connect the CAT5e cable of ODP to OUTDOOR port of e GW ...

Страница 40: ...d Users Manual series 2 Version 1 5 4 Connect the CAT5e cable of 101 132 10 tablet to INDOOR port of eGateway Connect ADSL Wire to eGateway WAN Port Connect Power to the eGateway Note Ensure you only use the power supply supplied with the eGateway ...

Страница 41: ...B SDRAM 16MB Flash FE 1 x FE fast Ethernet for WAN 4 x FE fast Ethernet for LAN USB Host 2 0 For Future use Digital Input 8 x DI For Future use Digital Output 4 x DO RS 485 1 X RS 485 For Future use Dimension 170 mm 115 mm 37mm L x W x H Support protocol SIP 2 0 RFC 3261 TCP IP UDP RTP HTTP ARP ICMP DHCP DNS TFTP NTP Outdoor phone pairing and setting flow ...

Страница 42: ...eGateway 2 The eGateway will identify the ODP unit and will automatically pair it ODP pairing completed Once completed the Unit Pairing status will show Connected Name your Outdoor station Once the unit is paired click on the tick box next to your ODP and click Edit Enter a name for your ODP such as Front Door and press the Save button Note Do not change other settings on this page ...

Страница 43: ...43 Ness SmartBell IP Intercom Installation and Users Manual series 2 Version 1 5 4 Room Station 10 tablet Indoor Phone 101 132 pairing and setting flow ...

Страница 44: ... and the other end into the Indoor port 4 Wait for about 30 40 seconds until the door phone is automatically detected and displayed in the Unit Pairing information table 5 SELECT the new device and click Edit Edit Unit Name Enter the appropriate name according to personal needs e g Kitchen Type Select INDOOR PHONE Account Please fill in the range of 100 to 109 ensuring this number is not registere...

Страница 45: ...t Server Address Server Address Please enter the LAN IP Address of the eGateway If you are not sure what the LAN IP is then in the Web GUI of the eGateway click on Settings LAN and record the LAN IP e g 192 168 5 10 Do not use the WAN IP address as you would with Smartphone devices Once all details are entered click on the Registration button To complete the Pairing process click on the Save butto...

Страница 46: ...Ness SmartBell IP Intercom Installation and Users Manual series 2 Version 1 5 4 Main IP intercom application App Once Registration Pairing is complete on the 10 Touch screen the main page will be displayed ...

Страница 47: ...s Smartbell Ness Smartbell Turn on Wi Fi connection in the Smart Phone Connect to eGateway via the Wi Fi AP Edit the device registration information in eGateway and then press Start Pairing Start the device App on the Smartphone and complete the registration details including Account Password eGateway IP address etc to match those of the eGateway and then press Registration Completed the paring of...

Страница 48: ... use the following as a guide 1 Open the settings app 2 Click on Wi Fi On some devices it may say Wireless and Networks 3 Ensure you are connected to the same network as your Ness Smartbell IP Intercom Android Smart Device pairing to the eGateway 1 Plug your computer into the same network as the WAN Port and connect using a web browser with the eGateway WAN IP address 2 Enter in the username and p...

Страница 49: ...rt phone has not been paired with eGateway the following registration screen will appear 7 Fill out the following items Extension No Enter Account 100 109 as per the pairing screen in the eGateway Password Enter password as per the pairing screen in the eGateway Default Server Address Please enter the eGateway s WAN IP Address Server Address Enter in your routers external IP address You can get th...

Страница 50: ...50 Ness SmartBell IP Intercom Installation and Users Manual series 2 Version 1 5 4 10 Once the Registration is complete the main page will be displayed ...

Страница 51: ...oading large files where a small delay is acceptable In the Ness Smartbell a typical symptom of when this needs to be enabled is where on an android phone you can hear the person on your Smartphone however they cannot hear you when you talk either at the Outdoor Phone ODP or on other Smartphones If you encounter this then please enable WMM on your wireless AP or Wireless router the Smartphone is c...

Страница 52: ...Smartbell Ness Smartbell Turn on Wi Fi connection in the iOS device Connect to eGateway via the Wi Fi AP Edit the device registration information in eGateway and then press Start Pairing Start the device App on the Smartphone and complete the registration details including Account Password eGateway IP address etc to match those of the eGateway and then press Registration Completed the paring of th...

Страница 53: ...rname and password Default User admin Pass admin 3 Click Settings Unit pairing 4 Click the Add button 5 SELECT the new device and click Edit Edit Unit Name Enter the appropriate name according to personal needs e g Fred s Phone Type Select Smart Phone Account Please fill in the range of 100 to 109 ensuring this number is not registered Password Enter in a password Press the Save button Then click ...

Страница 54: ...e eGateway Intranet Server IP Please enter the eGateway s WAN IP Address Internet Server IP Enter in your routers external IP address You can get this by typing in What is my IP into Google Server Port You should leave this as 5060 unless you have changed it in the eGateway Monitor View Mode This allows you to change the size of the image shown when a Outdoor station calls Recommend to leave it as...

Страница 55: ...ual series 2 Version 1 5 4 9 Once the items have been filled in press the Home button on the smart device 10 Find the Ness Smartbell app icon on the home screen and tap on it 11 Once the app has opened and it s connected press the save button in the web GUI ...

Страница 56: ...56 Ness SmartBell IP Intercom Installation and Users Manual series 2 Version 1 5 4 Function chart ...

Страница 57: ...Mute is Off Button is Green visitors will be able to hear you When ON Button is Red you will be muted and visitors will not be able to hear you Door Open Activates the Outdoor Phone relay Door lock and if programmed it will send a message to a 3rd party device such as the Ness M1 Security Automation controller Before the output or message is activated you will be prompted to confirm you wish to ac...

Страница 58: ...site account and personal domain name Implementation of mobile device to pairing to eGateway device in the Pairing page Implementation of mobile device to pairing to eGateway device in the Pairing page Implementation of mobile device to pairing to eGateway device in the Pairing page Fill in the registration information and eGateway IP Address for the registration process on a mobile device The DDN...

Страница 59: ...TIC IP addressing setting The following settings show the correct settings for using a static IP address in the eGateway Note Recommend you set a Static WAN IP address in the eGateway Use of DHCP addressing settings The following settings show the correct settings for using DHCP in the eGateway ...

Страница 60: ...ng IP address the browser will be able to connect to this IP address where the WWW server is Normally the DNS can only provide a static IP address query the DDNS Dynamic Domain Name Server function is to solve the DNS cannot query the problem of dynamic IP it can be automatically updated each time a user changes the floating IP and then with URL that corresponds to so that other Internet users thr...

Страница 61: ...omain in the DDNS website If you do not have a fixed IP address at your premises and you wish to access your Intercom externally e g via 3G you will need to connect to a DNS service There are many service available such as DynDNS No IP etc The following will provide details on how to setup and connect to the No IP service ...

Страница 62: ... SmartBell IP Intercom Installation and Users Manual series 2 Version 1 5 4 Check your mail box and open Subject No IP com Activation mail Back to no ip com homepage www no ip com and then login member section ...

Страница 63: ...63 Ness SmartBell IP Intercom Installation and Users Manual series 2 Version 1 5 4 Set the DDNS to WiFi router ...

Страница 64: ...1 5 4 When the WAN connection type of eGateway use DHCP Extension No Enter account is inputted in eGateway Registration No Enter password is inputted in eGateway Server Address Key in the DDNS of Domain name of eGateway The main page will pop out when registration is completion ...

Страница 65: ...ou want the LED to be turned on For Example In the example below the white LED the one left of the camera on the door station will be turned on between 18 00 and 06 00 6 00PM 6 00AM All other times the white LED will not turn on The Open Time is how long you want the relay on the Outdoor phone to activate for when you unlock the door from the app In the example below the relay will activate for ha...

Страница 66: ...he higher the number the louder it will be Mic Volume This will adjust the microphone sensitivity on the outdoor phone The higher the number the more sensitivity it will be making it easier to hear the person at the door Third Party Security System Integration Network Architecture The Ness IP Intercom system will support high level interface to 3rd part products such as the Ness Security and Autom...

Страница 67: ...part integration follow these steps below 1 Plug your computer into the same network as the WAN Port and connect using a web browser with the eGateway WAN IP address 2 Enter in the username and password when prompted Default User admin Pass admin 3 Click Settings Outdoor Unit 4 Scroll down the page into you find Third Party Integration ...

Страница 68: ...d party system then press the Apply button to save the settings IP Address This is the IP address you want to send the ASCII message to Port Number This the port number the IP above is listening on Command This is the message to send to the IP address Don t forget to include the as the carriage return if your 3rd party product requires it Example To make it activate output six for 5 seconds on a M...

Страница 69: ...ate file manually This will be very rarely used The APS Client Setting is a important field in the eGateway This is the location where the Ness Smartbell will automatically check to see if there are any new certificate files and will load them in For this feature to work you need to make sure it s set to Enable and that the server URL is set to smartbell ness com au The Manual Operation will test ...

Страница 70: ...l be sent to your Apple device However you will only get the Push Notification if your Apple device is paired and the app is not open on the device 2 Manually activating it in the eGateway Open the Device Overview Status Overview from the eGateway s web GUI Scroll down the page into you get to the bottom of the page and you will see the following Make sure your Apple Device is paired already in th...

Страница 71: ...r on the mobile phone network you need to ensure you have internet access on your smart device and that you have remote access to your Ness Smartbell eGateway It is easier to use DMZ to the WAN s IP address of the eGateway in the router modem when possible If DMZ is not available then you may need to open each port individually in your router modem Below is a list of ports that the Ness Smartbell ...

Страница 72: ...oid Device what can I do to fix it A Make sure in your router modem or even Wireless access point that WMM is enabled Q It works fine on my smart device when using a Telstra Sim card but when I switch the sim card in the same device to an Optus Sim card it stops working while on 3G 4G A We believe that Optus are starting to block port 5060 which the Ness Smartbell requires You may need to change t...

Страница 73: ...73 Ness SmartBell IP Intercom Installation and Users Manual series 2 Version 1 5 4 NOTES ...

Страница 74: ...lia Phone 61 2 8825 9222 email ness ness com au Sydney Office 02 8825 9222 Melbourne Office 03 9875 6400 Brisbane Office 07 3399 4910 Perth Office 08 9328 2511 Adelaide Office 08 8277 7255 Support Email customerservice ness com au Phone 1300 551 991 Within Australia 61 2 8825 9222 Outside Australia Online www youtube com nesscorporation ...

Отзывы: