Issue 4.1
UNIVERGE SV8100
3 - 72
Installing the SV8100 Chassis
3.3
Installing the External Batteries 9.5” Chassis
An optional, CHSGW SMALL BATT BOX can be installed to provide external
battery power to the CHS2U GW chassis during a power failure. The short-
term battery box will power the system for approximately 10 minutes.
3.3.1
Battery Installation
1.
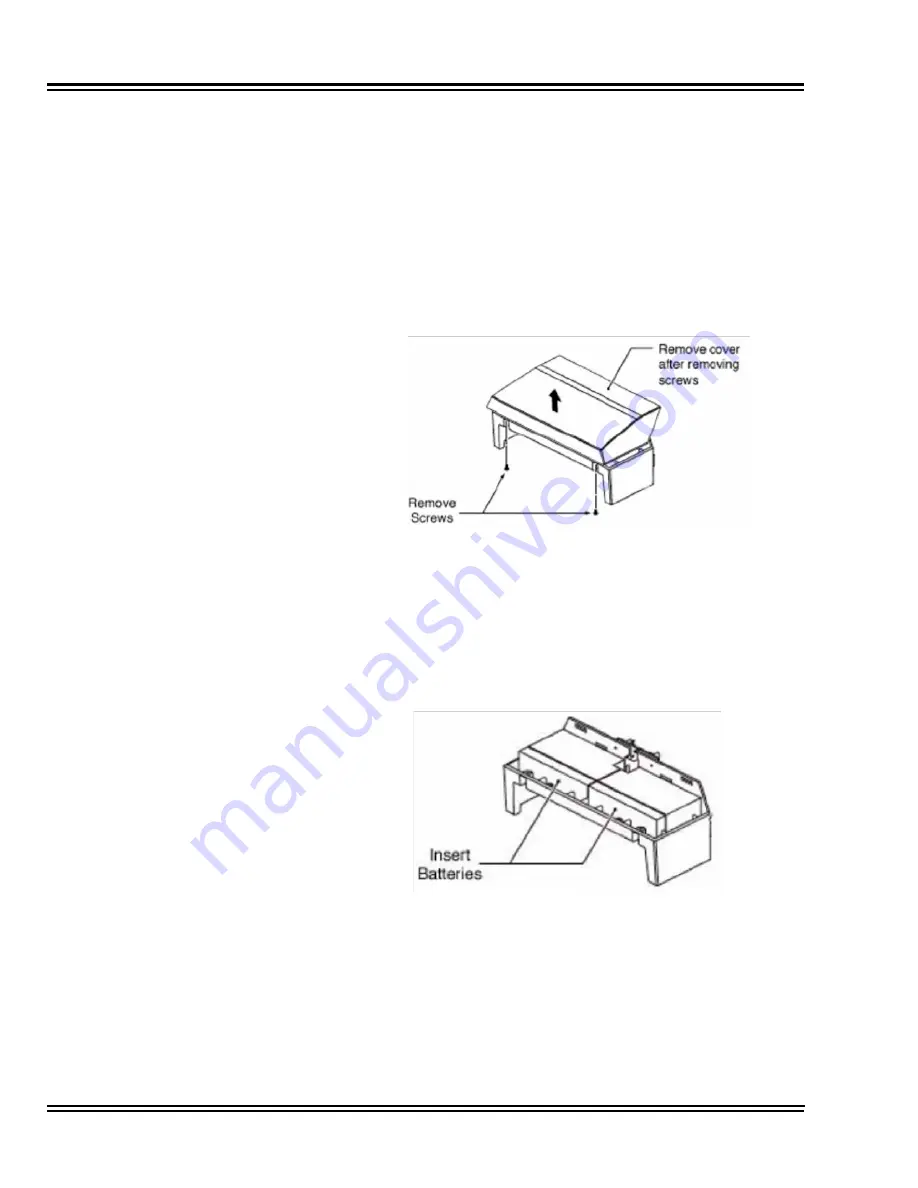
On the battery box compartment, remove the two screws then
lift and set aside the top cover.
2.
Remove the metal support bracket.
3.
Insert the two short-term batteries.
4.
Place the battery cable on top of the batteries and adjust to take
up the extra length. Allow enough length for the connections to be
made to the equipment.
Figure 3-93 Remove Top Cover of Battery Compartment
Figure 3-94 Installing the Batteries
Содержание Univerge SV8100
Страница 1: ...System Hardware Manual Issue 4 1 February 2011...
Страница 2: ...THIS PAGE INTENTIONALLY LEFT BLANK...
Страница 36: ...Issue 4 1 UNIVERGE SV8100 1 14 Introduction to SV8100...
Страница 40: ...Issue 4 1 UNIVERGE SV8100 2 4 SV8100 System Specifications Figure 2 1 SV8100 System Block Diagram...
Страница 68: ...Issue 4 1 UNIVERGE SV8100 2 32 SV8100 System Specifications...
Страница 75: ...UNIVERGE SV8100 Issue 4 1 System Hardware Manual 3 7 Figure 3 7 Install Wall Mount Brackets with Screws...
Страница 99: ...UNIVERGE SV8100 Issue 4 1 System Hardware Manual 3 31 Figure 3 34 Install Screws Option 2...
Страница 148: ...Issue 4 1 UNIVERGE SV8100 3 80 Installing the SV8100 Chassis...
Страница 191: ...UNIVERGE SV8100 Issue 4 1 System Hardware Manual 4 43 Figure 4 15 Connecting a IPLA Daughter Board to a Network PC...
Страница 207: ...UNIVERGE SV8100 Issue 4 1 System Hardware Manual 4 59 Figure 4 22 Installing the PZ 8LCE Daughter Board...
Страница 247: ...UNIVERGE SV8100 Issue 4 1 System Hardware Manual 4 99 Figure 4 34 Control Signal Connection...
Страница 258: ...Issue 4 1 UNIVERGE SV8100 4 110 Installing the SV8100 Blades NOTES...
Страница 335: ...UNIVERGE SV8100 Issue 4 1 System Hardware Manual 5 77 Figure 5 92 Bluetooth Handset Controls and Indicators...
Страница 354: ...Issue 4 1 UNIVERGE SV8100 5 96 Installing DT300 DT700 Series DTL ITL Digital and IP Multiline Terminals...
Страница 360: ...Issue 4 1 UNIVERGE SV8100 6 6 Installing SV8100 Optional Equipment Figure 6 5 PGD 2 U10 ADP Connection Diagram...
Страница 367: ...UNIVERGE SV8100 Issue 4 1 System Hardware Manual 6 13 Figure 6 11 Setting the PGD 2 U10 ADP for a Door Box...
Страница 368: ...Issue 4 1 UNIVERGE SV8100 6 14 Installing SV8100 Optional Equipment Figure 6 12 Installing a Door Box...
Страница 380: ...Issue 4 1 UNIVERGE SV8100 6 26 Installing SV8100 Optional Equipment Figure 6 17 PGD 2 U10 ADP Connections...
Страница 417: ...UNIVERGE SV8100 Issue 4 1 System Hardware Manual 6 63 Figure 6 64 Power Failure Connector CN3 Shown on CD 4COTA Blade...
Страница 418: ...Issue 4 1 UNIVERGE SV8100 6 64 Installing SV8100 Optional Equipment...
Страница 419: ...THIS PAGE IS INTENTIONALLY LEFT BLANK...


