


8-16 System Upgrade
Installing CPU/IO Module
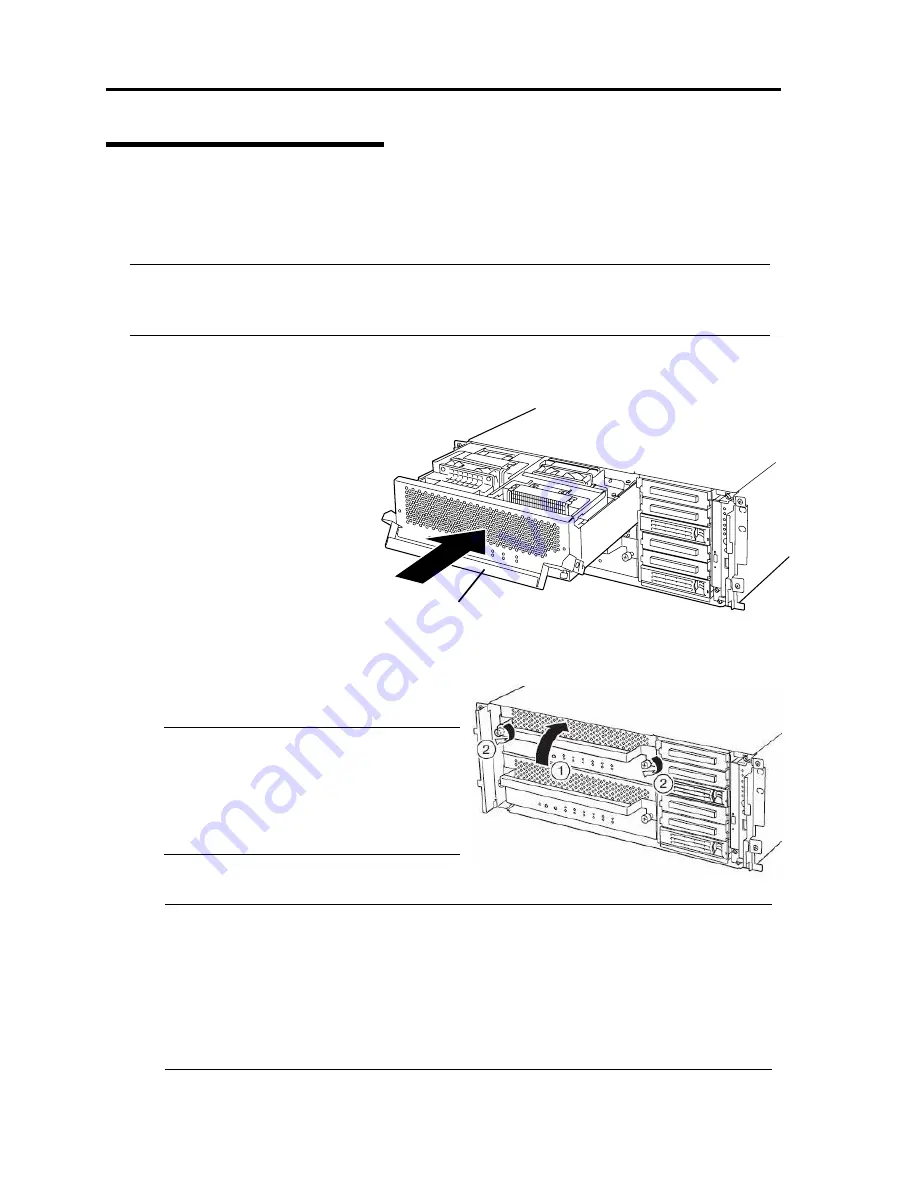
Follow the procedure below to install the CPU/IO module:
The 320Fb-MR model is used in the example quoted here. However steps you should take are the same
for other models.
IMPORTANT:
Make sure to read "ANTI-STATIC MEASURES" (page 8-3) and "PREPARING YOUR
SYSTEM FOR UPGRADE" (page 8-4) before starting installing or removing options.
1.
Firmly hold the CP/IOU module with both hands and insert it into the rack.
Hold the CPU/IO module in such a way that its back panel connector faces the back of the rack
and engage the guides of the
module and chassis, and insert it
slowly.
2.
Hold the handle to push the
module as far as it goes.
3.
Put the handle back in the position where it was.
The installed CPU/IO module will start
automatically.
IMPORTANT:
Connect the cables that you disconnected
before removing the CPU/IO module to
where they were originally connected.
Connect cables while the handle is leaned
toward you.
4.
Secure the handle with the screws.
IMPORTANT:
Secure the handle with the screws. If it is not secured by the screws, the CPU/IO will
not be powered on.
In some system statuses or settings, auto start up or integration does not take place
when the module is connected. In such a case, check the status by using the Server
Maintenance Utility or NEC ESMPRO Manager data viewer, and then power on by the
module POWER switch or start up the IO and CPU modules.
After installing CPU/IO module, always power on the module using the power switch.
Handle
Содержание N8800-096F
Страница 8: ...NEC Express5800 WARNING CAUTION CAUTION...
Страница 9: ......
Страница 15: ......
Страница 22: ...Precautions for Use 1 3 Rack model Front Rear...
Страница 24: ...Precautions for Use 1 5 Water Cooling kit...
Страница 34: ...Precautions for Use 1 15 SAFETY INDICATIONS WARNING 32 5 CAUTION...
Страница 35: ...1 16 Precautions for Use WARNING CAUTION P IW 9 6 7...
Страница 36: ...Precautions for Use 1 17 CAUTION 1...
Страница 37: ...1 18 Precautions for Use WARNING CAUTION...
Страница 38: ...Precautions for Use 1 19 CAUTION CAUTION...
Страница 39: ...1 20 Precautions for Use WARNING CAUTION...
Страница 40: ...Precautions for Use 1 21 CAUTION...
Страница 44: ...Precautions for Use 1 25 SAFETY INDICATIONS WARNING POWER CAUTION...
Страница 45: ...1 26 Precautions for Use WARNING CAUTION AC 4 5m 14 76 ft V 10A 6 7...
Страница 46: ...Precautions for Use 1 27 WARNING CAUTION...
Страница 47: ...1 28 Precautions for Use CAUTION NEC...
Страница 48: ...Precautions for Use 1 29 WARNING CAUTION...
Страница 49: ...1 30 Precautions for Use CAUTION CAUTION...
Страница 50: ...Precautions for Use 1 31 CAUTION EIA...
Страница 51: ...1 32 Precautions for Use 1 9 836 56 3RZHU KXWH3OXV a e a 173 WR e WR 1 SUHVV IW e 1...
Страница 52: ...Precautions for Use 1 33...
Страница 53: ...1 34 Precautions for Use 5 5 WARNING...
Страница 54: ...Precautions for Use 1 35 1 2 3 1 SUHVV IW 4 1 1 SUHVV IW 1 SUHVV KWWS ZZZ QHF FR MS H SUHVV LQGH KWPO...
Страница 55: ...1 36 Precautions for Use...
Страница 68: ...General Description 2 13 Rack model with the front door open...
Страница 73: ...2 18 General Description Rear View Tower model Rack model...
Страница 110: ...Windows Setup and Operation 3 15 7 Configure the mirror of the extended volume...
Страница 128: ...Windows Setup and Operation 3 33 4 The confirmation dialog box appears Click Yes button...
Страница 164: ...System Configuration 4 27 Exit Move the cursor onto Exit to display the Exit menu...
Страница 225: ...4 88 System Configuration This page is intentionally left blank...
Страница 286: ...Installing and Using Utilities 5 61 Sample screen of Server Maintenance Utility...
Страница 327: ...6 14 Maintenance This page is intentionally left blank...
Страница 328: ...Chapter 7 Troubleshooting If the product does not work properly see this chapter before deciding that it is a breakdown...
Страница 381: ...7 54 Troubleshooting This page is intentionally left blank...
Страница 424: ...Specifications A 3...
Страница 425: ......


