2x20 Customer Display Interface
9-105
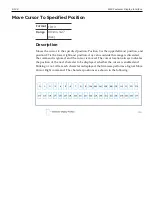
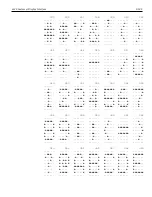
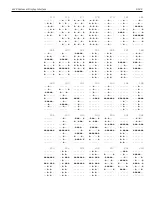
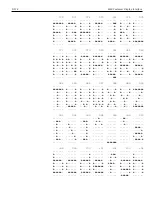
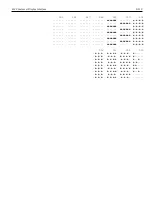
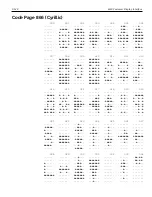
035 036 037 038 039 040 041
....... ....... ....... ....... ..●●... ....... .......
..●.●.. ...●... ●●....● ..●●●.. ...●... ....●.. ..●....
..●.●.. .●●●●●. ●●...●. .●...●. ..●.... ...●... ...●...
●●●●●●● ●..●... ....●.. ..●.●.. ....... ..●.... ....●..
..●.●.. .●●●●●. ...●... .●.●... ....... ..●.... ....●..
●●●●●●● ...●..● ..●.... ●...●.● ....... ..●.... ....●..
..●.●.. ●●●●●●. .●...●● ●....●. ....... ...●... ...●...
..●.●.. ...●... ●....●● .●●●●.● ....... ....●.. ..●....
....... ....... ....... ....... ....... ....... .......
042 043 044 045 046 047 048
....... ....... ....... ....... ....... ....... .......
....... ....... ....... ....... ....... ....... .●●●●●.
.●...●. ...●... ....... ....... ....... .....●. ●.....●
..●.●.. ...●... ....... ●●●●●●● ....... ....●.. ●.....●
●●●●●●● ●●●●●●● ....... ....... ....... ...●... ●.....●
..●.●.. ...●... ....... ....... ....... ..●.... ●.....●
.●...●. ...●... ..●●... ....... ..●●... .●..... ●.....●
....... ....... ...●... ....... ..●●... ●...... .●●●●●.
....... ....... ..●.... ....... ....... ....... .......
049 050 051 052 053 054 055
....... ....... ....... ....... ....... ....... .......
...●... .●●●●●. .●●●●●. ....●.. ●●●●●●● ..●●●.. ●●●●●●●
..●●... ●.....● ●.....● ...●●.. ●...... .●..... ......●
...●... ......● ......● ..●.●.. ●...... ●...... .....●.
...●... ...●●.. ...●●●. .●..●.. ●●●●●●. ●●●●●●. ....●..
...●... ..●.... ......● ●●●●●●. ......● ●.....● ...●...
...●... ●...... ●.....● ....●.. ●.....● ●.....● ...●...
..●●●.. ●●●●●●● .●●●●●. ....●.. .●●●●●. .●●●●●. ...●...
....... ....... ....... ....... ....... ....... .......
056 057 058 059 060 061 062
....... ....... ....... ....... ....... ....... .......
.●●●●●. .●●●●●. ....... ....... ...●... ....... ...●...
●.....● ●.....● ..●●... ..●●... ..●.... ....... ....●..
●.....● ●.....● ..●●... ..●●... .●..... ●●●●●●● .....●.
.●●●●●. .●●●●●● ....... ....... ●...... ....... ......●
●.....● ......● ..●●... ..●●... .●..... ●●●●●●● .....●.
●.....● .....●. ..●●... ...●... ..●.... ....... ....●..
.●●●●●. .●●●●.. ....... ..●.... ...●... ....... ...●...
....... ....... ....... ....... ....... ....... .......
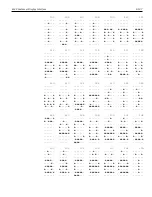
063 064 065 066 067 068 069
....... ....... ....... ....... ....... ....... .......
..●●●.. .●●●●●. ..●●●.. ●●●●●●. .●●●●●. ●●●●●.. ●●●●●●●
.●...●. ●.....● .●...●. ●.....● ●.....● ●....●. ●......
....●.. ●..●●.● ●.....● ●.....● ●...... ●.....● ●......
...●... ●.●.●.● ●.....● ●●●●●●. ●...... ●.....● ●●●●●..
...●... ●..●●●. ●●●●●●● ●.....● ●...... ●.....● ●......
....... ●...... ●.....● ●.....● ●.....● ●....●. ●......
...●... .●●●●●. ●.....● ●●●●●●. .●●●●●. ●●●●●.. ●●●●●●●
....... ....... ....... ....... ....... ....... .......
Содержание XR3 (7613)
Страница 1: ...User Guide NCR RealPOS XR3 7613 Release 1 0 BCC5 0000 5154 Issue B...
Страница 13: ...xi...
Страница 16: ...Product Overview 1 3 Mounting Configuration The NCR RealPOS XR3 is configured to be mounted on a countertop...
Страница 17: ...1 4 Product Overview Operator Controls Power Switch The Power Switch is located on the Front Panel of the POS...
Страница 20: ...Product Overview 1 7 Label Locations...
Страница 59: ...Disk Image Backup and Recovery Tool 4 46 2 Enter the Password The factory default password is Recovery1234...
Страница 62: ...4 49 Disk Image Backup and Recovery Tool 2 Click on the USB Button...
Страница 69: ...Disk Image Backup and Recovery Tool 4 56 A progress bar is displayed as the image is applied...
Страница 70: ...4 57 Disk Image Backup and Recovery Tool A message is displayed when the load is complete...
Страница 71: ...Disk Image Backup and Recovery Tool 4 58 5 Reboot the POS...
Страница 82: ...5 69 Power Management 2 Select Network Adapters Realtek PCIe GBE Family Controller 2...
Страница 98: ...7 85 BIOS Updating Procedure 5 Select Make Bootable...
Страница 124: ...2x20 Customer Display Interface 9 111 245 246 247 248 249 250 251 252 253 254 255...
Страница 132: ...2x20 Customer Display Interface 9 119 245 246 247 248 249 250 251 252 253 254 255...
Страница 140: ...2x20 Customer Display Interface 9 127 245 246 247 248 249 250 251 252 253 254 255...
Страница 144: ...10 131 Wireless Adapter Switching 6 Select Create a new package OK...
Страница 146: ...10 133 Wireless Adapter Switching 12 Click Yes 13 Enter a filename and choose a location to save the package file...
Страница 151: ...B 138 Touch Screen Calibration Do NOT touch the bezel with your other fingers...


