7-20 Chapter 7: Programming Guide
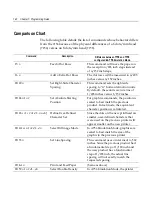
Comparison Chart
The following table details the list of commands whose behavior differs
from the
7156
because of the physical differences of a 6 dots/mm head
(
7156
) versus an 8 dots/mm head (
7158
).
Command Description
Difference between
7156
and
7158
configured inA
756
Emulation Mode.
15
n
Feed
n
Dot Rows
This command will move the paper on
the receipt in n/203 inch steps instead
of n/152 inch steps.
16
n
Add
n
Extra Dot Rows
The dot rows will be measured in n/203
inches versus n/152 inches.
1B 20
n
Set Right-Side Character
Spacing
This command sets the right side
spacing to “n” horizontal motion units.
By default, these units are in terms of
1/203 inches versus 1/152 inches.
1B 24
n1 n2
Set Absolute Starting
Position
For graphics commands, the position is
scaled to best match the previous
product. In text mode, the equivalent
character position is calculated.
1B 26
s c1 c2 n1 d1...nn dn
] Define
User-Defined
Character Set
Since the dots on the new printhead are
smaller, user-defined characters that
were used on the previous printer will
appear smaller on the new printer.
1B 2A
m n1 n2 d1...dn
Select Bit Image Mode
In A756 Emulation Mode, graphics are
scaled to best match the size of the
graphic in the previous printer.
1B 33
n
Set Line Spacing
This command uses
n
in terms of n/360
inches. Since the previous product had
a fundamental step of 1/180 inch and
the new product has a fundamental
step of 1/203 inch, the actual line
spacing will not exactly match the
requested spacing.
1B 4A
n
Print and Feed Paper
(Same as above)
1B 59
n1 n2 d1...dn
Select Double-Density
In A756 Emulation Mode, the printer
Содержание 7158
Страница 1: ...NCR 7158 Thermal Receipt and Impact Printer Release 1 0 Owner s Guide B005 0000 1112 Issue D...
Страница 26: ...1 8 Chapter 1 About the Printer...
Страница 50: ...3 12 Chapter 3 Using the Printer Clearing Check Flip Paper Jams Check Check Flip Window Door...
Страница 53: ...Chapter 3 Using the Printer 3 15 Configuration Menu and Print Test samples show approximately 60 of size...
Страница 56: ...3 18 Chapter 3 Using the Printer 1 Set DIP Switch 1 to On Front of Printer Reset Button Front Cover...
Страница 110: ...5 28 Chapter 5 Technical Specifications Code Page 437...
Страница 111: ...Chapter 5 Technical Specifications 5 29 Code Page 850...
Страница 112: ...5 30 Chapter 5 Technical Specifications Code Page 852...
Страница 113: ...Chapter 5 Technical Specifications 5 31 Code Page 858...
Страница 114: ...5 32 Chapter 5 Technical Specifications Code Page 860...
Страница 115: ...Chapter 5 Technical Specifications 5 33 Code Page 863...
Страница 116: ...5 34 Chapter 5 Technical Specifications Code Page 865...
Страница 117: ...Chapter 5 Technical Specifications 5 35 Code Page 866...
Страница 128: ...6 10 Chapter 6 Communication Interface...
Страница 286: ...7 158 Chapter 7 Programming Guide...
Страница 314: ...Index 8 W Weight of printer 5 36 X XON XOFF protocol 6 6...


