(00292)H 4 - 9
2)
Verify the list, and if changing the DRP camera head configuration to the camera head
currently connected, click "Yes".
If there is recorded data not yet saved on the DRP, or if using the DRP camera head
configuration unchanged, click "No".
If "Yes" is clicked, communication between the HXLink and the GX-5/GX-5F DRP is
temporarily suspended, and automatically reconnected when matched with the camera head
currently connected.
● Adding a Camera Head
1)
With the power to the GX-5 DRP off, connect the camera head to a free port.
2)
Turn the power to the GX-5/GX-5F DRP on and wait for it to startup.
Once the DRP starts up, the CM LED turns blue.
The LED of the port where the camera head was added flashes yellow (flashes slowly).
The LED for the port connected to the camera head matching the camera head
configuration turns green, and the LED for the port where the camera head is not
connected turns yellow.
3)
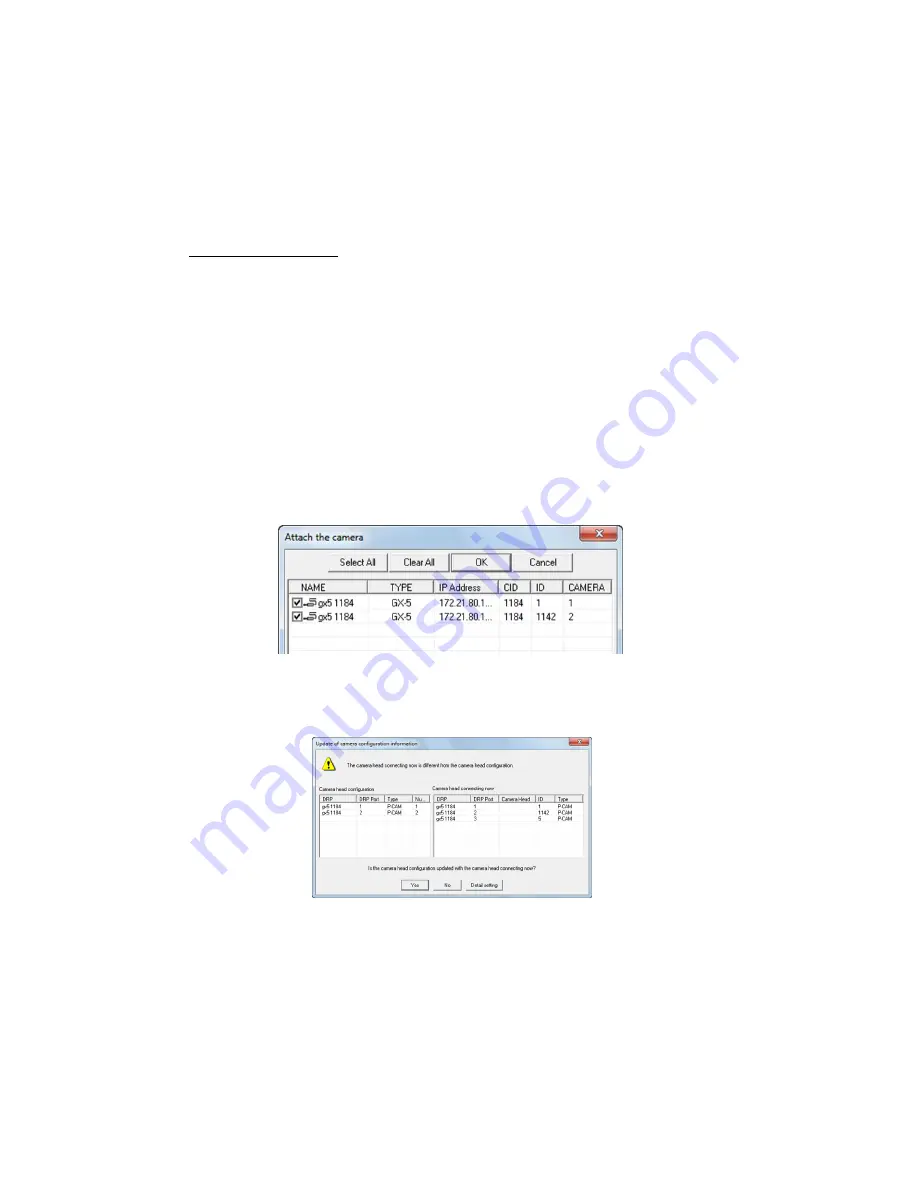
Startup the HXLink and click on "Connect Camera".
The camera head for the current camera head configuration is shown on the list for the
"Connect Camera" dialogue. The DRP port number is shown in the CAMERA column
of the list.
4)
Select the DRP for the camera head added from the list in the following "Connect
Camera" dialogue and click "OK".
5)
Click "Camera Configuration Settings" on the control menu to display the following
dialogue.
6)
Click "Yes" to set the camera head configuration.
Communication between the HXLink and the GX-5/GX-5F DRP is temporarily
disconnected, and automatically reconnected when matched with the currently
connected camera head.
Содержание SP-642
Страница 1: ...800292 0H Oct 2015 User s Manual DigitalHighSpeed HXLink SP 642 ...
Страница 2: ... Blank page ...
Страница 4: ... Blank page ...
Страница 6: ... Blank page ...
Страница 10: ...iv 00292 H Blank page ...
Страница 18: ...xii 00292 H Blank page ...
Страница 19: ... 00292 H 1 1 1 Overview ...
Страница 25: ... 00292 H 2 1 2 Installation ...
Страница 49: ... 00292 H 3 1 3 Basic Operations ...
Страница 77: ... 00292 H 4 1 4 Camera Operation ...
Страница 106: ...4 30 00292 H Q series Detail Settings dialog ...
Страница 179: ... 00292 H 5 1 5 File Operation ...
Страница 185: ... 00292 H 5 7 3 After the Set T 0 dialogue is displayed click Set Current Block T 0 4 The T 0 frame is updated ...
Страница 221: ... 00292 H 6 1 6 Camera Connection Settings ...
Страница 238: ...6 18 00292 H Blank Page ...
Страница 239: ... 00292 H 7 1 7 Setting Options ...
Страница 263: ... 00292 H 8 1 8 Settings for the Recording Methods ...
Страница 295: ... 00292 H 9 1 9 Menus ...
Страница 308: ...9 14 00292 H Blank page ...
Страница 309: ... 00292 H 10 1 10 System Settings HXUtility ...
Страница 326: ...10 18 00292 H Blank Page ...
Страница 327: ... 00292 H 11 1 11 Batch Conversion of Files Batch Conversion Software ...
Страница 340: ...11 14 00292 H Blank page ...
Страница 341: ... 00292 H 12 1 12 Auto Pilot ...
Страница 357: ... 00292 H 13 1 13 Measurement Functions ...
Страница 384: ...13 28 00292 H Blank page ...
Страница 385: ... 00292 H 14 1 14 Troubleshooting ...
Страница 400: ...14 16 00292 H blank page ...
Страница 401: ... 00292 H 15 1 15 Specifications ...
Страница 404: ...15 4 00292 H Blank page ...
Страница 405: ... 00292 H A 1 Appendix A ...
Страница 408: ...A 4 00292 H Blank page ...
Страница 409: ... 00292 H B 1 Appendix B ...
Страница 415: ... 00292 H C 1 Appendix C ...
Страница 418: ...C 4 00292 H Blank Page ...
Страница 419: ... 00292 H D 1 Appendix D ...
Страница 421: ... 00292 H E 1 Appendix E ...
Страница 425: ... 00292 H F 1 Appendix F ...
Страница 436: ...F 12 00292 H Blank Page ...


