background image


MI 


26


Innovation. Quality. Performance. Best in Industry. Worldwide.


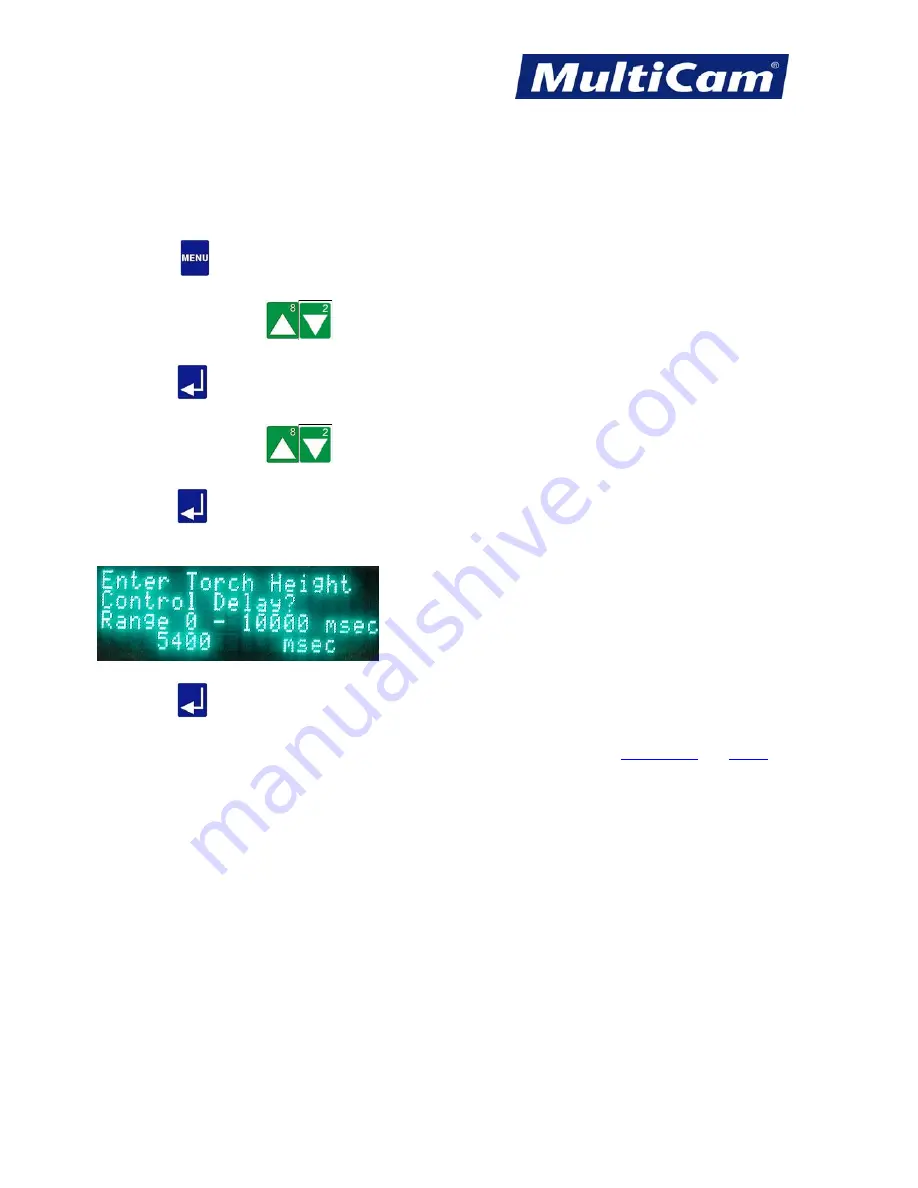
THC Delay 

The THC Delay function is used in conjunction with the capacitive cutting head and sensor to adjust the torch 
height control (THC) delay. 

THC Delay is only available if Z Tracking is enabled


1. Press 

Menu


 to access the menu system. 

2. Press 

X-axis Jog Arrows 

 until Params_2D is highlighted in blue. 

3. Press 

Enter 


to access the Params_2D sub-menu. 

4. Press 

X-axis Jog Arrows 

 until THC Delay is highlighted in blue. 

5. Press 

Enter 

 to adjust the torch height control delay. 


6. Enter the desired pierce delay value from the number keypad (e.g., 5400).  


7. Press 

Enter 

 to record the Torch Height Control and return to the Params_2D sub-menu. 


Params_2D


Menu


Routers * Lasers * Plasma * WaterJets * Knife Cutters  

                                                                                                                        www.MultiCam.com                        v. 11 10


Содержание Laser 2000 Series

Страница 1: ...User Manual Introduction IN 1 21 Fast Starts FS 1 29 Keypad and Functions KF 1 34 Menu Items MI 1 81 Options OP 1 3 Connections CN 1 19 Software SW 1 47 Read this manual before using this product Fai...

Страница 2: ...cause serious bodily damage up to and including possible death i The assembly installation and connection information is attached j The information relating to reducing noise and vibration is attache...

Страница 3: ...ce for ventilation q The operating method to be followed if the machine is involved in an accident or breakdown includes the operator or installation technician securing the work area so that the inst...

Страница 4: ...lter or filters on the vacuum hold down systems should be removed and cleaned All oil levels if applicable in the vacuum hold down system should be checked and filled if needed On MG Series routing sy...

Страница 5: ...rs should not use compressed air when cleaning out the cabinet as this action may cause unwanted particles to short out some of the electrical components MultiCam recommends that the belts on all tran...

Страница 6: ...the control box 3 Reseat the X axis motor assemblies in the rack 7 Slightly loosen the bolts connecting the X castings to the gantry 4 Connect the motor connectors for XA XB Y and Z to the control bo...

Страница 7: ...igger the perfect rectangle or square the more accurate Tighten Gantry Bolts Tighten both sides of the X axis moving gantry only Suite4 Machine Software Installation Reboot Machine Check for red lette...

Страница 8: ...his is a new setup 8 Refer to the ConnectionManager dialog and locate the specific machine connection 4 Check the box next to Auto Launch JobNameServer 9 Right click on the connection and select Repor...

Страница 9: ...for Safety 2 Power Lockout Instructions 4 Precautions When Handling the Electrical Components of a Laser 5 Safety Measures for Handling Oxygen 6 Labels 7 Labels Warnings and Cautions 12 Labels Warnin...

Страница 10: ...empt from following these requirements unless a Class IV energy source can be accessed during standard maintenance or service Members may refer to ANSI Z136 1 Standard for Safe Use of Lasers to review...

Страница 11: ...al parts 7 Avoid operating this and any other equipment if affected by alcohol drugs or any other substance or condition that may decrease judgment or alertness 8 Observe and follow all safety signs o...

Страница 12: ...Turn the main disconnect switch to the OFF position 2 Flip out the plastic lockout latch 3 Insert any padlock into one of the holes of the lockout latch With the plastic lockout latch in this positio...

Страница 13: ...t 4 Use only tools with insulated handles whenever working with electrical equipment 5 Report any electrical equipment that gives even the slightest indication of current 6 Assume that the floor under...

Страница 14: ...r manufacturer if repairs are needed on the oxygen cylinder valves At no point should an operator use a hammer or wrench to open the valves Like all pressurized gases used in cutting oxygen requires t...

Страница 15: ...ays capitalized and presented in bold format Any auxiliary equipment e g vacuum pump chiller will include vendor specific labels advising the customer of proper safety practices regarding those units...

Страница 16: ...the potential for death or serious injury and usually show the word WARNING in black writing against an orange background These labels are normally located in areas where serious injury could be susta...

Страница 17: ...IN 9 Innovation Quality Performance Best in Industry Worldwide Routers Lasers Plasma WaterJets Knife Cutters www MultiCam com v 11 10...

Страница 18: ...abels indicate the probability of death or serious injury and usually show the word DANGER in white writing against a red background These labels are normally located in areas where serious injury cou...

Страница 19: ...the front of the machine Serial Number The serial number label indicates the name and contact information for the company specific serial number for the machine and voltage and amp information for the...

Страница 20: ...FORMANCE OF PROCEDURES OTHER THAN THOSE SPECIFIED HEREIN MAY RESULT IN HAZARDOUS RADIATION EXPOSURE CAUTION THE USE OF OPTICAL INSTRUMENTS WITH THIS PRODUCT WILL INCREASE EYE HAZARD Labels The followi...

Страница 21: ...sponding Label 100 Watts 400 Watts 200 Watts 700 Watts 400 Watts 1400 Watts Cautions Each laser has specific cautionary labels that are required to be located in specific areas The non interlocked pan...

Страница 22: ...14 Innovation Quality Performance Best in Industry Worldwide The approximate locations are shown below Exterior Back Interior Back Routers Lasers Plasma WaterJets Knife Cutters www MultiCam com v 11...

Страница 23: ...IN 15 Innovation Quality Performance Best in Industry Worldwide Full XB Side Exterior Gantry and Carriage Routers Lasers Plasma WaterJets Knife Cutters www MultiCam com v 11 10...

Страница 24: ...trained and provided the proper eye wear Each laser will include at least 1 set of approved eye wear and customers will need to purchase any additional eye wear Part 24 00071 00 or 24 00071 01 for an...

Страница 25: ...R PERFORMANCE OF PROCEDURES OTHER THAN THOSE SPECIFIED HEREIN MAY RESULT IN HAZARDOUS RADIATION EXPOSURE CAUTION THE USE OF OPTICAL INSTRUMENTS WITH THIS PRODUCT WILL INCREASE EYE HAZARD Labels The fo...

Страница 26: ...and the gantry top plate and is based on the rated continuous power of the laser purchased Rated Continuous Power Peak Power Corresponding Label 100 Watts 400 Watts 200 Watts 700 Watts 300 Watts 1500...

Страница 27: ...pecific areas The non interlocked panel label is located on the safety shutter access panel and beam tube between beam benders 2 and 3 The interlocked panel label is located on the gantry front cover...

Страница 28: ...IN 20 Innovation Quality Performance Best in Industry Worldwide Interior Front Gantry Interior Back Gantry Routers Lasers Plasma WaterJets Knife Cutters www MultiCam com v 11 10...

Страница 29: ...ack Cover All personnel entering a Class IV area must be adequately trained and provided the proper eye wear Each laser will include at least 1 set of approved eye wear and customers will need to purc...

Страница 30: ...Failure 16 Restarting after Activation of Interlocks 17 Restarting GenV Lasers after E Stop 19 Restarting GenV Lasers after Power Failure 21 Restarting GenV Lasers after Activation of Interlocks 22 H...

Страница 31: ...otate knob to the ON position Verify the chiller is turned on The laser will not work without the chiller being on 5 Find Machine Hard Home Press Shift and Go Home to find the hard home 0 0 or the mac...

Страница 32: ...ess Z axis Jog Arrows to position the surface sensor over the material to be cut Press Zero to begin the surfacing routine This will cause the Z axis to move down slowly until the surface sensor comes...

Страница 33: ...Press Start to begin the cutting sequence Press Cancel to abort the cutting sequence Press Pause to yield the cutting sequence Operators should never leave a laser unattended during the cutting sequen...

Страница 34: ...n ferrous metals 4 Turn on Laser Rotate knob to the ON position Verify the chiller is turned on The laser will not work without the chiller being on 5 Find Machine Hard Home Press Shift and Go Home to...

Страница 35: ...height of the camera using the Ball Screw Locking Clamp Tighten the Screw Adjustment Handle once the fiducial is in focus 10 Capture the Fiducial Click on Live Feed in the toolbar and Jog the camera o...

Страница 36: ...Press Start to begin the cutting sequence Press Cancel to abort the cutting sequence Press Pause to yield the cutting sequence Operators should never leave a laser unattended during the cutting sequen...

Страница 37: ...be changed Lift Height distance the cutting head moves between cuts must always be positive Contrast may need to be adjusted per cut per image Brightness may need to be adjusted per cut per image All...

Страница 38: ...ottom toolbar next to the clock and open JobEditor 2 Open a raster file e g Raster and change the file of type to Raster Files 3 Highlight the file to be output on the system e g joker and select Open...

Страница 39: ...EnRoute These additional items will generate 2 separate files that are needed to merge images in Suite4 The following directions describe how operators can merge vector files 1 Close JobEditor if it...

Страница 40: ...obEditor will default to raster the image first SMM PICT in the code shown above indicates the raster image and then cut the vectors Operators can move or merge images in JobEditor 6 Click and name th...

Страница 41: ...ividually 9 Press DNC to pull up the file on the laser 10 Press Start twice to begin the cutting sequence Changing the Start Position JobEditor sets the start position for raster files at the center o...

Страница 42: ...les are outlined in gold One Point All Points 3 Make adjustments to the file Operators can choose one of 3 ways to change the start position Click on and then click in the image to manually identify 0...

Страница 43: ...aser after the E Stop has been pressed by following these instructions 1 Reset the E Stop a Keypad E Stop Rotate the knob clockwise until it pops up The arrows on the knob also indicate the correct di...

Страница 44: ...e Laser key fully clockwise to start the machine The key will automatically move back to the ON position when released 5 Rotate the Shutter key clockwise to open the shutter 6 Resume operation Fast St...

Страница 45: ...er 1 Press Shift and Go Home to find the Hard Home 0 0 or the Machine Home by indexing the gantry carriage and Z assembly off of the proximity limit switches 2 Move to the operator station 3 Rotate th...

Страница 46: ...nstrict the cable the system will pause motion and close the shutter Operators may continue the job file after the activation of the Interlocks by following these instructions 1 Correct the Interlock...

Страница 47: ...2 Continue the job file once the Interlocks have been properly secured a Press Jog Arrows until the blinking cursor is over the C in Continue b Press Enter to continue the job file Fast Starts Routers...

Страница 48: ...lose the shutter and remove power from the servo and stepper drives Operators may restart the laser after the E Stop has been pressed by following these instructions 1 Reset the E Stop a Keypad E Stop...

Страница 49: ...of the proximity limit switches This process may take a few minutes 4 Move to the operator station 5 Rotate the Laser key fully clockwise to start the machine The key will automatically move back to...

Страница 50: ...he laser 1 Press Shift and Go Home to find the Hard Home 0 0 or the Machine Home by indexing the gantry carriage and Z assembly off of the proximity limit switches 2 Move to the operator station 3 Rot...

Страница 51: ...ation the system will pause motion and close the shutter Operators may continue the job file after the activation of the Interlocks by following these instructions 1 Close the gantry front cover 2 Pre...

Страница 52: ...ty Restart Operators may press Find Home to index the machine Once the machine has found Home the operator should press Return to Home 0 to move the machine back to the last home position and set home...

Страница 53: ...al by the Service Technician If the customer is unable to find the answers in the User Manual he or she may contact the local MultiCam distributor If the customer still has questions he or she may con...

Страница 54: ...MultiCam Laser system should be cleaned thoroughly each week The filter on the control box should be vacuumed Any build up in the racks or rails should be blown out The filter or filters on the auxil...

Страница 55: ...out incoming power before opening the cabinet and then vacuum out any debris that may have entered the cabinet during regular working conditions Operators should not use compressed air when cleaning o...

Страница 56: ...tion Quality Performance Best in Industry Worldwide Maintenance Log Date Support Personnel Maintenance Performed Recommendations Fast Starts Routers Lasers Plasma WaterJets Knife Cutters www MultiCam...

Страница 57: ...filters timing belts hoses tooling dust brushes items consumed in normal use Also excluded from the warranty is any damage to the laser resulting from but not limited to shipping accident disaster mi...

Страница 58: ...ply to every MultiCam Laser Laser Warranty Card Laser Chiller Warranty Card Fume Extraction Warranty Card MultiCam CNC Cutting System Warranty Card These documents should be faxed or mailed to MultiCa...

Страница 59: ...Shift 14 DNC 14 Bar Code 16 Drive Enable 16 Cancel 17 Jog Speed 17 Help 17 Soft Homes 18 Enter 19 Find Home 19 Park Z Up or Down 20 Change Material Thickness 20 Proximity Restart 21 Return to Home 0...

Страница 60: ...the cut file Shift Mode is indicated by the arrow at the bottom right i e Normal Mode Shift Mode The computer connection is also indicated at the bottom right i e connected not connected Operators ma...

Страница 61: ...button must be pulled out when the main power switch is turned on Keypad Hot Keys for the Laser Hot Keys are the keys on the MultiCam Handheld Keypad which access functions without using the Menu Syst...

Страница 62: ...start Return to Home 0 Park X High Gas Pressure Test Park Y High Park Y Low Park X Low Drive Disable Controller Info Set Soft Homes Go Home The Go Home function is a return to the current 0 0 soft hom...

Страница 63: ...cuted on the machine Hot Keys Keypad Jog Z axis 1 Press and hold Z axis Up Jog Arrow or Z axis Down Jog Arrow to raise or lower the head assembly 2 Press Jog Speed to increase or decrease the Jogging...

Страница 64: ...as activated and continue with the commanded motion or the file 1 Press Pause to stop the machine for any reason 2 Press Jog Arrows until the blinking cursor is over the first letter of the command to...

Страница 65: ...e 5 Press Z axis Jog Arrows a Ferrous metals or machines with capacitive height sensors to lower the Z axis until the head assembly is approximately 1 4 above the material b Non ferrous metals or mach...

Страница 66: ...ill use this location as the software reference point home or origin 0 0 the machine will begin and return to this new origin and the X and Y coordinate locations are stored in the controller s memory...

Страница 67: ...from the Set Home position The Z value will reference from the surface of the material 1 Press Move 2 Enter the desired value for X using the number keypad e g 4 0 3 Press Enter to accept the value 4...

Страница 68: ...xes The Jog Arrows are used to Jog the location of the head assembly and to move through the menu Jog Speed can be pressed to change the Jogging speed of the machine 1 Left Arrow is the Y axis Positiv...

Страница 69: ...current percent power is displayed 2 Enter the desired percent power using the number pad e g 17 3 Press Enter to record the percentage value The keypad display prompts for the pulse duration 4 Press...

Страница 70: ...f some advanced features of the MultiCam Laser the operator can also adjust tools or duplicate shapes which create G Code files quickly 1 Press Menu to access the menu system 2 Press Jog Arrows until...

Страница 71: ...d in Params_2D to provide a starting point Any adjustments can be made to suit the operating conditions 1 Press Material Library 2 Press X axis Jog Arrows to position the cursor over the appropriate s...

Страница 72: ...1 Make sure that JobServer or JobNameServer has been activated on the computer before selecting this function 2 Press DNC The keypad will display a list of the directories in the DNC path after the sy...

Страница 73: ...o access the Dry Run function and once more to access the Step and Repeat function a Start will execute the selected job file b Cancel will end the selected job file c Pause will allow the operator to...

Страница 74: ...C path that is set up in JobPreviewer or JobServer e g C DNCfiles 1 Press Bar Code to execute the Bar Code function This will set the display to show when the system is bar code ready 2 Depress the tr...

Страница 75: ...ne will Jog Hot Keys Keypad Help The Help function allows the operator to learn the functions of any Hot Key selected There are 2 modes of the Help function Normal and Shifted In Normal mode the opera...

Страница 76: ...e operator to input a decimal into a numeric value 1 Press Soft Homes 2 Enter the appropriate number 1 9 to assign the proper value for the new home position e g 6 3 Press Enter to accept the soft hom...

Страница 77: ...ve to the right front of the table and index all X Y Z components starting with the Z axis 1 Press Shift and Go Home to index the gantry carriage and Z assembly off of the limit switches after one of...

Страница 78: ...Z axis Down Jog Arrow to lower the head assembly to the Lift Height position Hot Keys Keypad Change Material Thickness The Change Material Thickness function allows the operator to change the program...

Страница 79: ...ine 1 Press Shift and Start from the Home position where the file was originally executed 2 Press Jog Arrows to move the head assembly to a position within the restart tolerance of the desired point f...

Страница 80: ...X function will move the head and gantry assembly to a set park position that could be as far away as the maximum length of the table or all the way back in X axis This allows the operator to reload m...

Страница 81: ...the pierce gas or cut gas test 4 Press Cancel to cancel the gas pressure test and return to the main display Hot Keys Keypad Park Y High or Low The Park Y function will move the head assembly the max...

Страница 82: ...is also disabled The motors associated with stepper systems still have power after the drives are disabled but there is no output from the control board Hot Keys Keypad Controller Information The Con...

Страница 83: ...oved from the system 1 Press Jog Arrows to position the center of the head assembly where the new Soft Home location should be set 2 Press Jog Speed to change the Jogging speed if necessary 3 Press Sh...

Страница 84: ...nterface Board rev and ID Line 4 Keypad version Ethernet Information Screen Line 1 Ethernet Information Line 2 IP Address Line 3 Net Mask Line 4 DHCP Server Address Only shows up if DHCP enabled Press...

Страница 85: ...k Temperature Line 2 X Drive Temperature Y Drive Temperature Line 3 Z Drive Temperature Xb Drive Temperature Line 4 Bus Voltage Inputs Information Screen Each column shows the status of the specific l...

Страница 86: ...e Tool UP position never entering the material The keypad displays Tool 1 Up when the cutter would normally be in the UP position moving between contours The keypad displays Tool 1 Down when the cutte...

Страница 87: ...it impractical to square material sufficiently when heavy materials are loaded onto the table so this function allows the machine to adjust the parameters of the job file 1 Press Jog Arrows to positio...

Страница 88: ...C files that are available in that directory and directories or folders and any associated subfolders are displayed between brackets Press Enter while the blinking cursor is located over the 2 decimal...

Страница 89: ...ows to select whether the machine should step along the X or Y axis 13 Press X axis Jog Arrows to select Yes or No for the Serpentine option If X axis is selected above and serpentine is selected next...

Страница 90: ...on of the cut file tool specifications material descriptions and user notes The bar code label on the work order ensures that the correct job is accessed Advanced Keypad Safety Mat The Safety Mat is a...

Страница 91: ...ring can be completed Green The shutters are closed and the laser will not fire Advanced Keypad Dual Start The Dual Start function is available with most CNC systems and requires an Operating op stati...

Страница 92: ...nter to record the second Soft Home 4 Press DNC 5 Press X axis Jog Arrows until the blinking cursor is over the appropriate job file 6 Press Enter to access the job file 7 Push button 1 or 2 on the op...

Страница 93: ...ontrast 18 Brightness 19 Kerf Diam 20 Kerf Overlap 21 Laser Freq 22 Cont Wave 23 Z Tracking 24 Tactile Sensor 25 THC Delay 26 Settings 27 Update Material Library 28 Recording a Soft Home 29 SurfMap 30...

Страница 94: ...est 57 DNC_Mode 59 Laser Cal 61 Laser Ptr 62 Job_Time 63 ParkPos 64 Test Cap 65 Purge Gas 66 KerfComp 67 Vision 68 Fiducial Diameter 69 Job Scaling 70 Correlation 71 Retake Distance 72 Settling Time 7...

Страница 95: ...ary with the new values Some of these settings may not apply to all Laser systems 1 Press Menu to access the menu system 2 Press X axis Jog Arrows until Params_2D is highlighted in blue 3 Press Enter...

Страница 96: ...1 Cutting Pen 2 Engraving Pen 16 Rastering 1 Press Menu to access the menu system 2 Press X axis Jog Arrows until Params_2D is highlighted in blue 3 Press Enter to access the Params_2D sub menu 4 Pre...

Страница 97: ...been programmed in the NC file The machine will default to 15 IPM if the machine loses power or the controller is rebooted 1 Press Menu to access the menu system 2 Press X axis Jog Arrows until Param...

Страница 98: ...e g 400 watts is the maximum power for a 400 watt laser 1 Press Menu to access the menu system 2 Press X axis Jog Arrows until Params_2D is highlighted in blue 3 Press Enter to access the Params_2D su...

Страница 99: ...blue 3 Press Enter to access the Params_2D sub menu 4 Press X axis Jog Arrows until Cut Height is highlighted in blue 5 Press Enter to adjust the Cut Height 6 Enter the Cut Height using the number key...

Страница 100: ...axis to the new Lift Height position 1 Press Menu to access the menu system 2 Press X axis Jog Arrows until Params_2D is highlighted in blue 3 Press Enter to access the Params_2D sub menu 4 Press X ax...

Страница 101: ...access the menu system 2 Press X axis Jog Arrows until Params_2D is highlighted in blue 3 Press Enter to access the Params_2D sub menu 4 Press X axis Jog Arrows until Pierce Gas Delay is highlighted i...

Страница 102: ...to access the menu system 2 Press X axis Jog Arrows until Params_2D is highlighted in blue 3 Press Enter to access the Params_2D sub menu 4 Press X axis Jog Arrows until Cut Gas Delay is highlighted i...

Страница 103: ...Arrows until Params_2D is highlighted in blue 3 Press Enter to access the Params_2D sub menu 4 Press X axis Jog Arrows until Pierce Power is highlighted in blue 5 Press Enter to access the Pierce Powe...

Страница 104: ...Jog Arrows until Params_2D is highlighted in blue 3 Press Enter to access the Params_2D sub menu 4 Press X axis Jog Arrows until Pierce Time is highlighted in blue 5 Press Enter to adjust the Pierce T...

Страница 105: ...access the menu system 2 Press X axis Jog Arrows until Params_2D is highlighted in blue 3 Press Enter to access the Params_2D sub menu 4 Press X axis Jog Arrows until Power Control is highlighted in...

Страница 106: ...D is highlighted in blue 3 Press Enter to access the Params_2D sub menu 4 Press X axis Jog Arrows until Min Power is highlighted in blue 5 Press Enter to adjust the Minimum Power 6 Enter the power val...

Страница 107: ...material 1 Press Menu to access the menu system 2 Press X axis Jog Arrows until Params_2D is highlighted in blue 3 Press Enter to access the Params_2D sub menu 4 Press X axis Jog Arrows until VPPI is...

Страница 108: ...but to limit the minimum output power when cutting metals since most metals cannot be cut at a lower laser power 1 Press Menu to access the menu system 2 Press X axis Jog Arrows until Params_2D is hi...

Страница 109: ...system 2 Press X axis Jog Arrows until Params_2D is highlighted in blue 3 Press Enter to access the Params_2D sub menu 4 Press X axis Jog Arrows until Bidir_Coef is highlighted in blue 5 Press Enter t...

Страница 110: ...ss X axis Jog Arrows until Params_2D is highlighted in blue 3 Press Enter to access the Params_2D sub menu 4 Press X axis Jog Arrows until Contrast is highlighted in blue 5 Press Enter to change the c...

Страница 111: ...ess X axis Jog Arrows until Params_2D is highlighted in blue 3 Press Enter to access the Params_2D sub menu 4 Press X axis Jog Arrows until Brightness is highlighted in blue 5 Press Enter to change th...

Страница 112: ...Arrows until Params_2D is highlighted in blue 3 Press Enter to access the Params_2D sub menu 4 Press X axis Jog Arrows until Kerf Diameter is highlighted in blue 5 Press Enter to change the value 6 E...

Страница 113: ...eat 1 Press Menu to access the menu system 2 Press X axis Jog Arrows until Params_2D is highlighted in blue 3 Press Enter to access the Params_2D sub menu 4 Press X axis Jog Arrows until Kerf Overlap...

Страница 114: ...The overall frequency range is determined by the laser model 1 Press Menu to access the menu system 2 Press X axis Jog Arrows until Params_2D is highlighted in blue 3 Press Enter to access the Params_...

Страница 115: ...ugh its average power measures close to the average power of the continuous wave High vaporization is achieved with a pulsed current or Continuous Wave OFF 1 Press Menu to access the menu system 2 Pre...

Страница 116: ...eel that is warped in the middle The Z Tracking function is most often used with steel and other conductive materials 1 Press Menu to access the menu system 2 Press X axis Jog Arrows until Params_2D i...

Страница 117: ...rylic that is warped in the middle The Tactile Sensor function is most often used with acrylic and other non conductive materials 1 Press Menu to access the menu system 2 Press X axis Jog Arrows until...

Страница 118: ...menu system 2 Press X axis Jog Arrows until Params_2D is highlighted in blue 3 Press Enter to access the Params_2D sub menu 4 Press X axis Jog Arrows until THC Delay is highlighted in blue 5 Press En...

Страница 119: ...e the kerf width and lead in status a Kerf Width i Press Enter over Kerf Width ii Enter the corrected value using the number keypad Negative numbers should be used for an inside cut iii Press Enter to...

Страница 120: ...to access the menu system 2 Press X axis Jog Arrows until Params_2D is highlighted in blue 3 Press Enter to access the Params_2D sub menu 4 Press X axis Jog Arrows until Update Material Library is hig...

Страница 121: ...he system 1 Press Jog Arrows to position the center of the head assembly where the new Soft Home location is to be set 2 Press Menu to access the menu system 3 Press X axis Jog Arrows until Rec_Home i...

Страница 122: ...X axis Jog Arrows until SurfMap is highlighted in blue 3 Press Enter to access the SurfMap sub menu 4 Press X axis Jog Arrows until the appropriate option is highlighted in blue Certain menu items wi...

Страница 123: ...access the SurfMap sub menu 4 Press X axis Jog Arrows until Start Z Surf Mapping is highlighted in blue 5 Press Enter to access the Z surface map function 6 Press Jog Arrows to place the head assembl...

Страница 124: ...he menu system 2 Press X axis Jog Arrows until SurfMap is highlighted in blue 3 Press Enter to access the SurfMap sub menu 4 Press X axis Jog Arrows until Surf Mode is highlighted in blue 5 Press Ente...

Страница 125: ...Map is highlighted in blue 3 Press Enter to access the SurfMap sub menu 4 Press X axis Jog Arrows until X Distance or Y Distance is highlighted in blue 5 Press Enter to adjust the distances for either...

Страница 126: ...g Arrows until SurfMap is highlighted in blue 3 Press Enter to access the SurfMap sub menu 4 Press X axis Jog Arrows until Step Size is highlighted in bue 5 Press Enter to adjust the step size 6 Enter...

Страница 127: ...SurfMap is highlighted in blue 3 Press Enter to access the SurfMap sub menu 4 Press X axis Jog Arrows until Z Seek Speed is highlighted in blue 5 Press Enter to access the Z assembly speed 6 Enter th...

Страница 128: ...axis Jog Arrows until SurfMap is highlighted in blue 3 Press Enter to access the SurfMap sub menu 4 Press X axis Jog Arrows until Z Safe Lift is highlighted in blue 5 Press Enter to access the Z Safe...

Страница 129: ...highlighted in blue 3 Press Enter to access the SurfMap sub menu 4 Press X axis Jog Arrows until Save Surface Map is highlighted in blue 5 Press Enter to enter the surface map to be saved 6 Enter the...

Страница 130: ...he SurfMap sub menu 4 Press X axis Jog Arrows until Load Surface Map is highlighted in blue 5 Press Enter to access the saved surface map 6 Enter the value for the saved surface map using the number k...

Страница 131: ...og in the X and Y axes to verify the Z position If no surface map has been loaded then the status will remain inactive 1 Press Menu to access the menu system 2 Press X axis Jog Arrows until SurfMap is...

Страница 132: ...216 1 Press Menu to access the menu system 2 Press X axis Jog Arrows until SurfMap is highlighted in blue 3 Press Enter to enter the SurfMap sub menu 4 Press X axis Jog Arrows until Move To Probe Offs...

Страница 133: ...fMap is highlighted in blue 3 Press Enter to enter the SurfMap sub menu 4 Press X axis Jog Arrows until Test I O is highlighted in blue 5 Press Enter to test the input output 6 Press 1 to toggle the s...

Страница 134: ...n extended period of time 1 Press Menu to access the menu system 2 Press X axis Jog Arrows until Shutdown is highlighted in blue 3 Press Enter to begin the Shutdown sequence Operators may press Y axis...

Страница 135: ...l that is presently being cut 1 Press Menu to access the menu system 2 Press X axis Jog Arrows until Cut_Utils is highlighted in blue 3 Press Enter to access the Cut_Utils sub menu 4 Press X axis Jog...

Страница 136: ...red start position 3 Press Menu to access the menu system 4 Press X axis Jog Arrows until Cut_Utils is highlighted in blue 5 Press Enter to access the Cut Utilities sub menu 6 Press X axis Jog Arrows...

Страница 137: ...ss X axis Jog Arrows until Cut_Utils is highlighted in blue 4 Press Enter to access the Cut Utilities sub menu 5 Press X axis Jog Arrows until Square is highlighted in blue 6 Press Enter to access the...

Страница 138: ...ight and X Y Feedrate 2 Press Menu to access the menu system 3 Press X axis Jog Arrows until Cut_Utils is highlighted in blue 4 Press Enter to access the Cut Utilities sub menu 5 Press X axis Jog Arro...

Страница 139: ...2 Press X axis Down Jog Arrow to access the Dry Run function if needed This step is optional and can be skipped 13 Press Start to execute Radiused Rectangle Cut Cancel to abort the function or Pause t...

Страница 140: ...d start position 3 Press Menu to access the menu system 4 Press X axis Jog Arrows until Cut_Utils is highlighted in blue 5 Press Enter to access the Cut Utilities sub menu 6 Press X axis Jog Arrows un...

Страница 141: ...3 Press X axis Jog Arrows until Cut_Utils is highlighted in blue 4 Press Enter to access the Cut Utilities sub menu 5 Press X axis Jog Arrows until Circle is highlighted in blue 6 Press Enter to acce...

Страница 142: ...ut_Utils is highlighted in blue 4 Press Enter to access the Cut Utilities sub menu 5 Press X axis Jog Arrows until Rectangle is highlighted in blue 6 Press Enter to access the Rectangle function 7 Ent...

Страница 143: ...s Enter to access the Cut Utilities sub menu 5 Press X axis Jog Arrows until Polygon is highlighted in blue 6 Press Enter to access the Polygon function 7 Enter the number of sides ranging between 3 a...

Страница 144: ...enu to access the menu system 3 Press X axis Jog Arrows until Cut_Utils is highlighted in blue 4 Press Enter to access the Cut Utilities sub menu 5 Press X axis Jog Arrows until Flange is highlighted...

Страница 145: ...iameter using the number keypad e g 4 000 and press Enter 12 Press X axis Down Jog Arrow to access the Dry Run function if needed This step is optional and can be skipped 13 Press Start to execute Fla...

Страница 146: ...ications 1 Press Menu to access the menu system 2 Press X axis Jog Arrows until Utility is highlighted in blue 3 Press Enter to access the Utility sub menu 4 Press X axis Jog Arrows until the appropri...

Страница 147: ...from the menu system 1 Press Menu to access the menu system 2 Press X axis Jog Arrows until Utility is highlighted in blue 3 Press Enter to access the Utility sub menu 4 Press X axis Jog Arrows until...

Страница 148: ...s highlighted in blue 3 Press Enter to access the Utility sub menu 4 Press X axis Jog Arrows until Reboot is highlighted in blue 5 Press Enter to access the reboot process 6 Press Y axis Jog Arrows to...

Страница 149: ...st routine 6 Enter the first Z Step Distance using the number keypad e g 0 050 and press Enter 7 Enter the second Z Step Distance using the number keypad e g 0 010 and press Enter 8 Press Start to beg...

Страница 150: ...errous metals or machines with capacitive height sensors This will cause the Z axis to move down slowly until the tool comes in contact with the surface block and then move up above the surface block...

Страница 151: ...owing Error Writing File Out of Room The operator will need to delete a job file from the controller memory before adding any new job files 1 Press Menu to access the menu system 2 Press X axis Jog Ar...

Страница 152: ...s X axis Jog Arrows until the particular job file to be run is highlighted in blue 9 Press Enter to access the job file and then Start to execute the job file Deleting Files from Controller DNC 1 Make...

Страница 153: ...ility is highlighted in blue 3 Press Enter to access the Utility sub menu 4 Press X axis Jog Arrows until Laser Cal is highlighted in blue 5 Press Enter to access the Laser Cal sub menu 6 Press X axis...

Страница 154: ...is 1 Press Menu to access the menu system 2 Press X axis Jog Arrows until Utility is highlighted in blue 3 Press Enter to access the Utility sub menu 4 Press X axis Jog Arrows until Laser Ptr is highl...

Страница 155: ...to access the menu system 2 Press X axis Jog Arrows until Utility is highlighted in blue 3 Press Enter to access the Utility sub menu 4 Press X axis Jog Arrows until Job_Time is highlighted in blue 5...

Страница 156: ...g all the way to the rear every time 1 Press Menu to access the menu system 2 Press X axis Jog Arrows until Utility is highlighted in blue 3 Press Enter to access the Utility sub menu 4 Press X axis J...

Страница 157: ...ntil Cap Sensor is highlighted in blue 5 Press Enter to access the Capacitive Sensor sub menu 7 Scroll to a specific option and press Enter Select Mem 1 toggles between 1 and 2 This setting is specifi...

Страница 158: ...2 Press X axis Jog Arrows until Utility is highlighted in blue 3 Press Enter to access the Utility sub menu 4 Press X axis Jog Arrows until Purge Gas is highlighted in blue 5 Press Enter to purge the...

Страница 159: ...t size MultiCam uses left kerf almost exclusively so that CCW in the codes indicates internal cuts and CW indicates external cuts 1 Press Menu to access the menu system 2 Press X axis Jog Arrows until...

Страница 160: ...et once and then are stored in the controller memory until those settings are overwritten 1 Press Menu to access the menu system 2 Press X axis Jog Arrows until Vision is highlighted in blue 3 Press E...

Страница 161: ...enu to access the menu system 2 Press X axis Jog Arrows until Vision is highlighted in blue 3 Press Enter to access the Vision sub menu 4 Press X axis Jog Arrows until Fiducial Diameter is highlighted...

Страница 162: ...the first and third fiducial in automatic mode Fixed mode is used mainly for testing while most operators will use automatic mode 1 Press Menu to access the menu system 2 Press X axis Jog Arrows unti...

Страница 163: ...age If the correlation value is too low or too high it will be rejected 1 Press Menu to access the menu system 2 Press X axis Jog Arrows until Vision is highlighted in blue 3 Press Enter to access the...

Страница 164: ...nce e g 0 002 to get the best results under the Fiducial Check function 1 Press Menu to access the menu system 2 Press X axis Jog Arrows until Vision is highlighted in blue 3 Press Enter to access the...

Страница 165: ...with 1000 msec 1 Press Menu to access the menu system 2 Press X axis Jog Arrows until Vision is highlighted in blue 3 Press Enter to access the Vision sub menu 4 Press X axis Jog Arrows until Settling...

Страница 166: ...later fiducials by looking in the area of where they should be 1 Press Menu to access the menu system 2 Press X axis Jog Arrows until Vision is highlighted in blue 3 Press Enter to access the Vision s...

Страница 167: ...chever has been selected in the keypad is directly above the fiducial 1 Press Menu to access the menu system 2 Press X axis Jog Arrows until Vision is highlighted in blue 3 Press Enter to access the V...

Страница 168: ...cess the Vision sub menu 5 Press X axis Jog Arrows until Set Camera Scale is highlighted in blue 6 Press Enter to access the Set Camera Scale function The keypad display will prompt the operator for a...

Страница 169: ...Press Set Surface c Enter the material thickness e g 0 20 5 08mm The display will prompt the operator to set the surface d Press Z axis Jog Arrows Ferrous metals or machines with capacitive height se...

Страница 170: ...Time 0 4 Set Home at the center of the white paper a Press Jog Arrows to place the center of the head assembly over the white paper b Press Set Home c Press Enter to accept This will store the absolu...

Страница 171: ...the fiducial 1 Press Menu to access the menu system 2 Press X axis Jog Arrows until Vision is highlighted in blue 3 Press Enter to access the Vision sub menu 4 Press X axis Jog Arrows until Move to C...

Страница 172: ...conjunction with Retake Distance 1 Press Menu to access the menu system 2 Press X axis Jog Arrows until Vision is highlighted in blue 3 Press Enter to access the Vision sub menu 4 Press X axis Jog Ar...

Страница 173: ...ltiVision and JobServer applications The screen is for information only and operators can report any errors to Technical Support 1 Press Menu to access the menu system 2 Press X axis Jog Arrows until...

Страница 174: ...OP 1 Innovation Quality Performance Best in Industry Worldwide Options top Fume Extraction 2 Capacitive Cutting Head 3 Routers Lasers Plasma WaterJets Knife Cutters www MultiCam com v 11 10...

Страница 175: ...fumes and particulates that would be better handled by certain types of fume extraction systems Operators may refer to any MultiCam Technician for recommendations on a MultiCam Fume Extraction system...

Страница 176: ...apacitive Cutting Head system are the Height Sensing Unit HSU the large coax cable connecting the HSU and the transformer the transformer the small coax cable or interface wire between the transformer...

Страница 177: ...formation 2 Setup for Ethernet Connection 8 Ethernet Cables 10 Serial Setup for Serial Connection 11 Communication Troubleshooting 14 Communications Port Settings of Windows 16 Serial Line Amplifier 1...

Страница 178: ...et 10 100 MHz multiple port switch cannot be wireless or a router Ethernet patch cabling MultiCam Controller IP Subnet in the same class network IP Subnet as the Host PC Wireless communication is not...

Страница 179: ...This information is acknowledged by the computer and used in setting up that configuration Static Network Manual Configuration The static network has a manually configured setup for each computer or...

Страница 180: ...This information will be required if the technician has to change any of the addresses If the network has an active DHCP then DHCP Enabled will show Yes The technician must also have an assigned IP a...

Страница 181: ...of the computer the controller or both The following directions describe how technicians can change the IP and subnet addresses Computer Static IP Subnet Address 1 Access Network Connections by selec...

Страница 182: ...stry Worldwide 3 Highlight Internet Protocol TCP IP and select Properties 4 Click in the circle next to Use the following IP address and enter an IP address and the subnet mask Routers Lasers Plasma W...

Страница 183: ...in the IP address as 4 groups of 3 numbers e g 192 168 005 223 and press Enter to move between the groups 5 Press Enter and wait for the screen to prompt for the netmask 6 Type in the netmask address...

Страница 184: ...nection before attempting to automatically install the Ethernet connection The following directions assume that the operator has complied with all hardware requirements for Ethernet connections see Et...

Страница 185: ...at the Default Settings dialog All customers are encouraged to check the box next to Auto Launch Job Name Server so that JobNameServer will automatically activate once the machine is connected 4 Highl...

Страница 186: ...ork printer and a MultiCam Controller to a hub or switch However the patch cable is unable to provide a direct connection with the MultiCam Controller so the host PC must be connected through a switch...

Страница 187: ...s recommended over serial but operators may need to use serial connections for troubleshooting or quick fixes for communication 1 Right click on the Machine Connections icon in the toolbar and select...

Страница 188: ...lect the following information and select OK Connection Name e g MultiCam CNC Communications port e g COM2 Baud Rate 19200 Parity Even 4 Highlight the XMI files specific to the machine type and select...

Страница 189: ...in Industry Worldwide 5 Select Yes at the prompt to upload the modules from the controller and load the XMI file This will assign a connection name to the machine Connect Routers Lasers Plasma WaterJe...

Страница 190: ...The Windows Com Port settings especially the FIFO buffer are not correct See Communications Port Settings of Windows The serial cable is longer than 100ft and is used without a Line Amplifier See Ser...

Страница 191: ...use automatically If the machine works and the mouse does not then the computer Com Port is probably bad and will need to be repaired by the computer vendor If the communications are still not working...

Страница 192: ...n half the standard default setting Operators should reduce their Transmit FIFO levels when using a MultiCam Controller to lessen the chance for poor communications or loss of data that would result f...

Страница 193: ...ngs tab from the Communications Port Properties window and select Advanced 4 Drag the Transmit Buffer bar to Low 1 5 Select OK to all the windows that were opened and restart Windows to activate this...

Страница 194: ...ector and DB25 female connector and a serial cable with a DB9 male connector and DB9 female connector 1 Flip the line amplifier over and make sure that the 2 switches are positioned towards the middle...

Страница 195: ...sts in the cable for each direction of travel with 2 lines total A half duplex allows only 1 data line enabling communication in 1 direction at a time while the full duplex allows 2 data lines enablin...

Страница 196: ...Machine Connections 17 Suite4 Motion Controller Utilities 18 JobNameServer 18 JobEditor 19 JobReporter 19 MotionMechanic 20 ConnectionManager 20 JobConsole 21 Material Library Editor 22 JobServer Pro...

Страница 197: ...ATC ARP post processor interfaces with both ATC and multiple head systems while the MultiCam ARP post processor interfaces with single head systems and outputs a manual tool change command so that mul...

Страница 198: ...one of its authorized distributors for a copy of the OnePost file to use with the single post system 2 Copy the encrypted OnePost file into the LICOMDAT RPOSTS ALP directory This file has no extension...

Страница 199: ...ompatibility 1 Refer to the EnRoute Recommended System Requirements to make sure the host PC is compatible with the software package 2 Open EnRoute and select Setup Machine Setup from the toolbar at t...

Страница 200: ...cut speeds depth lift spindle speed and dwell and will override any parameters set at the keypad c MultiCam No Depth can be used on 2D and 3D MultiCam machines and will only output the tool path with...

Страница 201: ...along the gantry c Z lift Z axis up and down Lift Height above the table 3 Make sure the dimensions are correct before completing setup Completing EnRoute Setup 1 Select OK in the Machine Driver Dialo...

Страница 202: ...mouse button Return to the default settings by selecting Setup Toolbars Reset to Defaults The Preference Settings available in EnRoute 3 i e General Initialization Display Units Grids View Setup Star...

Страница 203: ...n Select Maximize Application and Document to open the program and any files at maximum window size Reserve the Display 4 Views option until toolpaths are in place and a particular view should be seen...

Страница 204: ...ar right checked in order to make certain commands user friendly and more functional Units Adjust the Length Time and Speed only when working with metric systems as most companies in the US use inches...

Страница 205: ...the size of the grid while Size describes the pixel size of the Style View Setup Adjust View Setup settings to show or hide the listed items when creating contours and toolpaths Avoid changing the opt...

Страница 206: ...e offset points can be adjusted manually during the cutting sequence Review the Long Edge configuration as this places the start point on the longest edge of the geometry Select the Edge Midpoint only...

Страница 207: ...Select the Windows Start button at the bottom left of the screen 2 Select Run 3 Select Browse on the Run Dialog box 4 Select the MultiCam Installation Folder from the directory 5 Select Setup Exe 6 S...

Страница 208: ...ams StartUp folder This shortcut will be created during installation of the software JobServer will automatically release the configured Com Port and enter a sleep mode when another program accesses t...

Страница 209: ...floor work orders Printed work orders can be used to communicate with customers and employees as well as providing special instructions for the work The work order contains a graphical representation...

Страница 210: ...ific job Once the report is created the data can be exported using many popular spreadsheet or database formats 1 Click Start Programs MultiCam Job Reporter to access the Job Reporter function from th...

Страница 211: ...dows systems tray at the bottom left Terminal Emulator provides direct access to the controller for development diagnostics or troubleshooting Text File Editor views edits or develops files related to...

Страница 212: ...ick Start Programs MultiCam Machine Connections to access the Machine Connections applet 2 Press Help for a detailed description of each button in the main Machine Tool Properties applet 3 Click Start...

Страница 213: ...ut the system a DNC allows the operator to select and execute jobs from the network or host PC using either a keypad or touch screen interface b HotWatch helps automate the production process by monit...

Страница 214: ...bs through resizing repositioning or modifying current job files in any way Software JobReporter The JobReporter generates reports on machine use The report results can be filtered and modified to obt...

Страница 215: ...nnectionManager helps in creating and configuring the connection between a host PC and the machine tool and has built in testing features for diagnosing communications issues and sending email corresp...

Страница 216: ...interface between a machine tool and the operator allowing the operator to preview and execute jobs as well as monitor the job progress pause and resume the job move to a specific point in the job and...

Страница 217: ...order to add or remove a particular material or material thickness from the stored information on each machine The following directions address how operators may add a material to an existing material...

Страница 218: ...stics to the new material This will automatically open the material attribute folder and request the new node name 2 Correct the material name to show the new material type e g Acrylic test and select...

Страница 219: ...lity Performance Best in Industry Worldwide 4 Highlight the material and select File Save 5 Select File Reload and close the Material Library Editor Routers Lasers Plasma WaterJets Knife Cutters www M...

Страница 220: ...material added so operators will need to update the information for the new material 3 Right click on any thickness under the new material and select Insert Copy This will automatically open the mate...

Страница 221: ...select OK Operators can only modify tools 3 15 only since tools 1 2 and 16 default to specific functions Tools 1 2 and 16 are defined in Material Library as the following Tool 1 Cutting Tool 2 Engravi...

Страница 222: ...ecides to make changes to the material library information currently available for that material then he or she should complete the following 1 Open Params_2D from the keypad 2 Change the parameters a...

Страница 223: ...and these directories can be changed at any time by clicking on the Browse button to select another path The HotWatch Status informs the operator of all activities that HotWatch is performing HotWatch...

Страница 224: ...er Any current setup connection will be displayed To edit a setup connection the operator must highlight the connection and select Properties The operator may select Remove to delete the entry and sel...

Страница 225: ...rmation on the Project settings is provided in the MotionMechanic documentation File extensions that JobServer will consider as executable jobs are listed under the File Extension section File extensi...

Страница 226: ...Browse button to the right of the edit box Once the correct path has been determined and the appropriate directory has been located the operator may select OK B File Names consists of several edit bo...

Страница 227: ...hed Soft Home 2 Incremental or relative mode G91 instructs the controller system to determine measurements from the last tool position B Multi Quadrant Mode refers to G74 multi quadrant mode off and G...

Страница 228: ...lled Tool Comp Values match the parameters of the job file Each tool has its own tool compensation distance and up to 10 values can be set to compensate for the tool width when cuts are being made Sof...

Страница 229: ...rc commands HPGL Resolution 1016 inch 40 Metric The following pages contain all of the supported commands A semi colon or a linefeed must terminate all commands and spaces cannot be substituted for re...

Страница 230: ...PA2630 1180 PD AA2540 1270 360 000000 PU PA7747 2540 PD AA5588 2540 90 000000 PA2540 381 AA2540 2540 180 000000 PA5588 4699 AA5588 2540 90 000000 PU PA8128 0 SP0 Multi Pass File without Lifting the Z...

Страница 231: ...teger value that draws an arc with its center at X Y A positive angle creates a counter clockwise arc ZA Z moves the Z axis to the absolute position specified This feature is for both 2D and 3D modes...

Страница 232: ...ith a place to enter values for the JobPreviewer function to use when estimating Job times These settings have no effect on the actual machine operation The White box to the right of the settings prov...

Страница 233: ...Kd d Fd d CCW 3D circular move G74 Incremental mode for G02 03 arcs G75 G90 G91 mode for G02 03 arcs G83 Rd d Zd d Dd d Fd d Peck drill G90 Absolute coordinate mode G91 Incremental coordinate mode G92...

Страница 234: ...wn to 0 1 above the material and a cut depth of 0 25 M90 G90 G70 G75 G00 T1 G00 Z 0 5 G00 X0 Y0 M12 G00 Z 0 1 G01 Z0 25 F1 667 G01 X5 F3 333 G01 Y5 G01 X0 G01 Y0 G00 Z 0 5 M22 G00 X0 Y0 M02 The follow...

Страница 235: ...add M Codes to an output on their existing machines assign the code to a particular device and set the active status by completing the following steps 1 Open MachineTools and select JobNameServer 2 S...

Страница 236: ...can be mapped per the operator s preference however JobConsole treats the M12 M22 coding specifically for the start end of a contour 6 Download and store an MCode_Device_Map uc file to location 3 For...

Страница 237: ...IV The highest level for lasers Class IV Lasers are hazardous to eyes skin and material through both direct and scattered radiation Manufacturers of Class IV Lasers are required to follow strict guide...

Страница 238: ...when power is applied to the system with the Emergency Stop button pushed in on the keypad pendant Feedrate Override A Hot Key used to adjust the cutting feedrate of the system while a file is being...

Страница 239: ...e cut Keypad The part of the pendant with the grid of Hot Keys Laser Light Amplification by Stimulated Emission of Radiation Lasers can be classified based on the level of laser and collateral radiati...

Страница 240: ...ovement from the rotation of the motors to the linear movement of the system by way of gears Raster A scan pattern of dots to form an image as of the print head in a printer in which an area is scanne...

Страница 241: ...The Tool Offset is also the distance between the desired geometry and the center of the tool path usually the radius of the laser Tool Path The path that the center of the laser takes during a cut Tr...

Страница 242: ...m com v 11 10 Z Carriage Plate The vertical plate on the vertical moving part of the carriage assembly where the cutting tool plate is mounted Z Motor Plate The horizontal plate on top of the Y carria...

Отзывы: