background image

Chapter 1 - Introduction and Description

7

MT128ISA/PCI

Product Overview

Introduction

Welcome to the world of ISDN communications. You have acquired one of the finest ISDN
terminal adapters (TAs) available today, the MultiModemISDN from Multi-Tech Systems.

The proliferation of PCs and LANs with bandwidth-intensive applications has generated a
powerful demand for high-speed connections.  The worldwide standardization of ISDN,
combined in many countries with its growing availability and falling cost, make it a natural
choice for enhancing data throughput. Terminal adapters provide high-performance solutions
for Internet access, file transfer, remote access service (RAS), and running existing modem
applications through the ISDN network.

Product Description

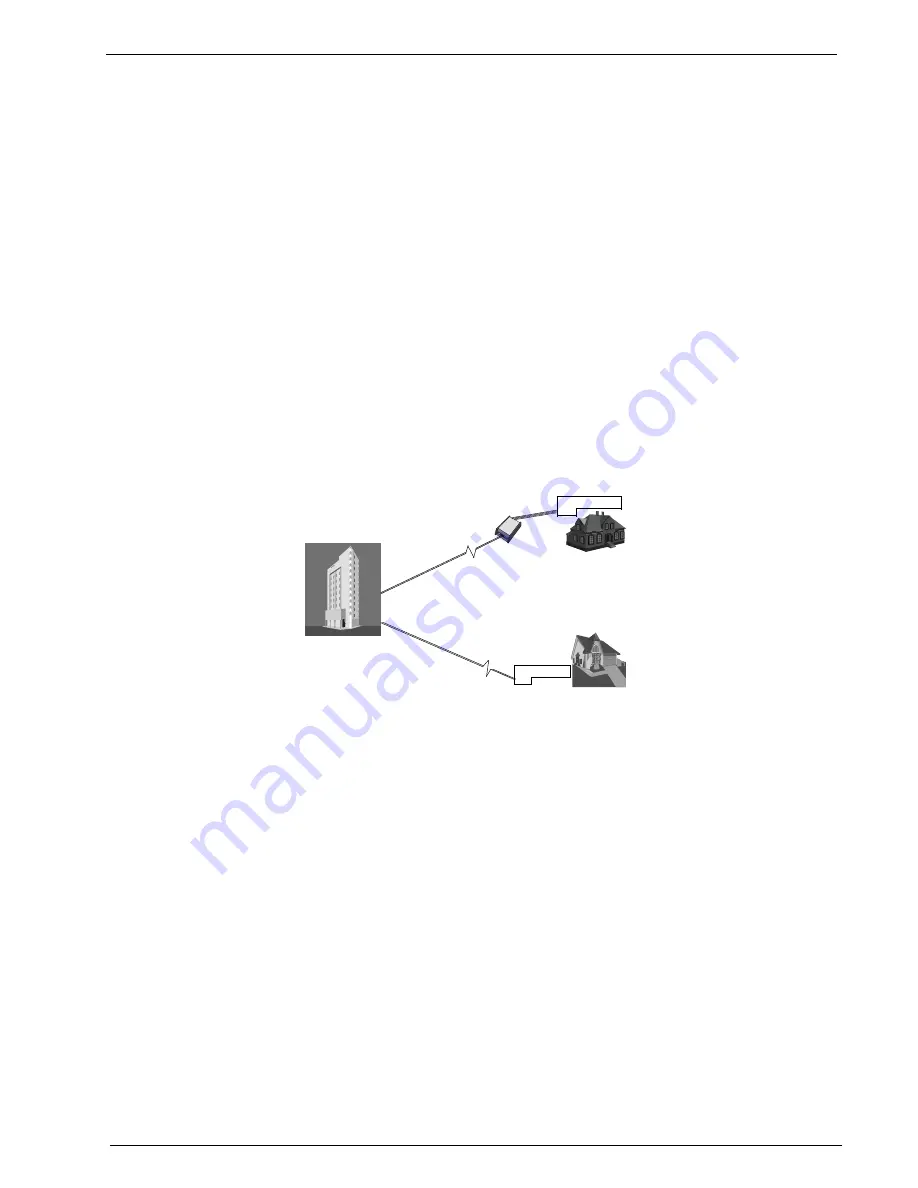
The MT128ISA and MT128PCI are internal PC cards for IBM personal computers; and fit into
a full-or half-sized expansion slot.  There are two ISDN interface options, ST and U.  If you
purchased the ST interface adapter (MT128PCI-SD/SV), you need an ISDN NT1device
connection to the ISDN switch.  If you purchased the U interface adapter (MT128ISA-UV), it
can directly connect to the ISDN switch (figure 1-1).

IS D N  ce n tra l office

custom e r site

N T1

IS

DN

 U

 in

ter

fac

e

T  inte

rface

IS D N

ISD

N U

 inte

rfac

e

I-IN 1 00 -U

I-IN 1 0 0-S T

custo m er site

          Figure 1-1. ”ST” and “U” Interface Options

Your internal ISDN PC card is compatible with prevalent ISDN switch protocols. It
communicates using ISDN BRI (2B+D) service, which provides up to 128K bps data
communications.

This manual documents the following models:

• MT128PCI-SD for ST interface no POTS port
• MT128PCI-SV for ST interface with one POTS port
• MT128ISA-UV for U interface with one POTS port

All of the current analog devices, including telephone set, G3 fax, answering machine,
modem, and PBX trunk line, can be connected to the POTS port via an RJ-11 jack in “V”
models.

This User Guide will help you install, configure, and operate your terminal adapter.

Содержание MultiModem ISDN MT128ISA-UV

Страница 1: ...Models MT128ISA UV MT128PCI SD MT128PCI SV User Guide...

Страница 2: ...ion Description A Manual released at Revision A 1 15 1998 B Manual revised to include updates for driver version version 2 52 for Windows 95 98 NT and version 3 40 for WIndows 2000 PCI adapter support...

Страница 3: ...Application Interface Setup 21 Windows 3 1 Removal of the ISDN Drivers 21 Windows 95 Installation and Configuration 22 Windows 95 and the NDISWAN interface 23 Windows 95 Single Channel Access NDISWAN...

Страница 4: ...ws 2000 POTS Voice Port Configuration 58 Windows 2000 Removal of the ISDN Drivers 59 Chapter 3 AT Commands 60 AT COMMANDS 61 Introduction 61 Commands and Descriptions 61 Chapter 4 Troubleshooting 63 T...

Страница 5: ...Chapter 1 Introduction and Description...

Страница 6: ...ed expansion slot There are two ISDN interface options ST and U If you purchased the ST interface adapter MT128PCI SD SV you need an ISDN NT1device connection to the ISDN switch If you purchased the U...

Страница 7: ...NDISWAN Miniport Automatic detection of incoming calls as voice or data V models Supports Windows 3 1 Windows 95 OSR 2 Windows 98 Windows NT and Windows 2000 Multilink PPP connection Supports Microsof...

Страница 8: ...interface This interface is similar to a modem interface and enables existing applications based on AT commands to access ISDN Chapter 3 describes AT commands used to control your MultiModem ISDN ter...

Страница 9: ...es WinISDN CAPI 2 0 Windows Comm API with AT command sets COM port emulation NDISWAN Miniport for Windows 95 Windows 98 Windows NT and Windows 2000 Supported Applications Applications with WinISDN int...

Страница 10: ...Chapter 2 Installation...

Страница 11: ...with the long length of the U loop and the noisy environment it operates in At the customer premises the U loop is terminated by an NT1 network termination 1 device An NT1 is a device which provides...

Страница 12: ...er Source 3 Not applicable 3 Tx Rx 4 Rx Tx 5 Rx Tx 6 Tx Rx 7 Power Sink 2 Not applicable 8 Power Sink 2 Not applicable Table 2 1 S T Interface Connector Specification U Interface The U interface uses...

Страница 13: ...ne has been disconnected at the network interface 5 Use caution when installing or modifying telephone lines 6 Avoid using a telephone other than a cordless type during an electrical storm There may b...

Страница 14: ...2 2 Internal ISDN ISA Adapter Illustration Figure 2 3 Internal ISDN PCI Adapter Illustration 2a Turn off your computer power and remove the PC cover 2b If you are using an ISA card select an empty IS...

Страница 15: ...connector cable Figure2 4 Modular Analog and BRI Connections 4a Make the ISDN connection by connecting the MT128PCI SD SV adapter and the NT1 with the RJ 45 cable connector and insert the ISDN BRI li...

Страница 16: ...et a remote Local Area Network or for RAS installations Upon installing NDISWAN the following adapters and protocols are installed on your system IINWAN95 ISDN Adapter NDISWAN IINWAN95 ISDN Adapter VC...

Страница 17: ...col is for connecting to Internet and other communications servers at 64 kilobits per second Only one B channel is used leaving the other free if supplied by your ISDN service provider for a different...

Страница 18: ...any will provide the necessary SPID values SPID1 refers to the first ISDN line SPID2 refers to the second ISDN line MSN POTS MSN Multiple Subscriber Number is a supplementary service generally used by...

Страница 19: ...Configuration dialog box see figure 2 5 Complete the necessary information in the text boxes of ISDN Configuration dialog box See Chapter 2 Before You Begin for more information about configuring you...

Страница 20: ...ernet and run applications such as Netscape Navigator TRUMPET users should modify the Network Configuration and Script files to access the Internet through terminal adapters See Appendix C for an exam...

Страница 21: ...installation Insert the ISDN driver diskette CD into the appropriate disk drive Follow the instructions to allow Windows 95 to automatically select the ISDN100 INF file and process the necessary insta...

Страница 22: ...program Windows 95 and the NDISWAN interface To connect through the NDISWAN adapter with Windows 95 you must have Microsoft Microsoft DUN Dial up Networking or the Microsoft Accelerator Pack installed...

Страница 23: ...he installation Reboot the system as prompted Windows 95 Single Channel Access NDISWAN Next you ll need to create a Dial Up Networking profile for this connection 1 Select Start Programs Accessories D...

Страница 24: ...on options by clicking Configure 6 Click on the Server Types tab to configure logon options encryption log file information and network protocol options including TCP IP settings for your remote serve...

Страница 25: ...ISWAN 128 MLP Setup Your NDISWAN adapter is now ready to make a multilinked connection to your ISP and access the Internet Double click on the Dial up Networking connection icon just created Enter you...

Страница 26: ...dem Installation Note The screens which follow will differ based on the modem type selected 4 Click Next and select the port to use with this modem Click Next Finish Figure 2 16 Linking the Virtual mo...

Страница 27: ...and select a device Click Next to continue Complete the area code and phone number fields for your connection Click Next Finish 2 From the Properties screen select the Configure tab for this ISDN Inte...

Страница 28: ...e system will install the modem Figure 2 20 Selecting a COM port 4 When the Modem Properties screen appears the ISDN Universal 1 Adapter is listed Click on Add to install the second adapter 5 Repeat i...

Страница 29: ...ome available to configure The following example uses the RVS ISDN V 120 modem Before beginning ensure the RVS COM Comm Center is running the icon will appear on the Windows 95 Task Bar CAPI Single Ch...

Страница 30: ...odem repeat the process associating the second modem with the second COM port defined in RVS COM Now you are ready to set up the Dial Up Networking for this 128K MLP connection 1 Make a new connection...

Страница 31: ...lecting Start Settings Control Panel Modem then Remove Do not reboot Windows 3 Remove the ISDN adapter from the multifunction adapters listing by selecting Start Settings Control Panel System Device M...

Страница 32: ...the Automatic setting can be selected as the Switch protocol If you have connection problems you will want to return to this screen and specify the actual ISDN switch type as provided by your ISDN ser...

Страница 33: ...ick OK The Windows 98 CAB cabinet files are required to complete the adapter installation You will be prompted to insert the original Windows 98 CD ROM or direct Windows 98 to the directory in which t...

Страница 34: ...is example 3 Click the Multi Link tab then the Use Additional Devices radio button Click Add and select the second IINWAN95 device MT ISDN Line 02 from the list box If the area code and phone number f...

Страница 35: ...model 3 Click Next and associate the virtual modem chosen to an available ISDN COM Port Each modem type will automatically issue the appropriate protocol command to the ISDN driver when you select it...

Страница 36: ...128K ML PPP connection first confirm that your ISP supports this function This example uses Universal 1 and Universal 2 virtual modems for the128K MLP connection Verify the ISDN Universal 1 and ISDN...

Страница 37: ...based on the CAPI API see Appendix B you must install an application such as RVS COM Lite Refer to Appendix C of this manual for RVS COM Lite installation instructions After installing RVS COM severa...

Страница 38: ...the second modem with the second COM port defined within RVS COM Now you are ready to set up Dial Up Networking for this 128K MLP connection 1 Make a new Dial Up Connection by clicking Start Programs...

Страница 39: ...apter COMports by selecting Start Settings Control Panel Modem Click Remove Do not reboot Windows 3 Next remove the ISDN multifunction adapter by selecting Start Settings Control Panel System Device M...

Страница 40: ...ou are using a PCI adapter select PCI Set the Bus Number to 0 Click OK 5 Windows NT copies the ISDN driver into your system and displays the ISDN PC Adapter Configuration screen as shown in figure 2 2...

Страница 41: ...inue The RAS Setup Message appears as shown in 2 27 Click OK to continue the installation Figure 2 27 Remote Access Service Setup Message 9 Click OK to install and setup RAS 10 The screen shown in fig...

Страница 42: ...nd Receive calls then click OK Figure 2 30 Configure Port Usage Installation If you choose Dial out only click OK and then click the Network tab Select the protocol you will use If you are going to ac...

Страница 43: ...ountry Region or Area code click on the Telephony dialing properties box and fill in your dialing information If your ISP or remote server has more than one phone number that can be dialed click on Al...

Страница 44: ...ready to make a connection with your ISP or remote server using multilinked channels To use this new MLP connection open the Dial Up Networking folder and select the NDISWAN multiple linked channel e...

Страница 45: ...st on the left side of the window The RVS modems will display in the models column on the right side of the window Select the RVS COM modem you would like to use for your ISDN connection in this examp...

Страница 46: ...the devices to RAS for this connection click Continue Restart the computer as prompted Note If you add a modem at a later date it must be added to Windows NT RAS before it can be used To add the modem...

Страница 47: ...y in this section You are now ready to create your Dial Up Networking connection for multilinking In this example the Single Channel Access connection will be modified to allow for multilinking 1 Clic...

Страница 48: ...2000 driver diskette in the A drive 2 Use Explorer to view the contents of the diskette in drive A 3 Double Click on the MT128 self extracting file icon 4 The WinZip Self Extractor will display The de...

Страница 49: ...e 2 39 Completing the installation of the ISDN MT128 Adapter When the installation is complete reboot the computer Configuring NDISWAN for Windows 2000 1 Use the Windows 2000 Device Manager to configu...

Страница 50: ...ur switch type requires ISDN Phone Number and SPID information screen similar to figure 2 42 appears Figure 2 42 Configuring ISDN Phone Number and SPID Information a Highlight the first Channel and en...

Страница 51: ...SWAN connection you must set up a Dial Up Networking connection To launch the Windows 2000 Network Dial Up Wizard select Start Settings Network Dial up Connections Make New Connection 1 At the Welcome...

Страница 52: ...ded You will be given an opportunity to configure your optional Internet Mail account When finished setting up your account and dial up connection information click Next Finish To use this new Dial Up...

Страница 53: ...ears select Yes to continue then Finish You will be returned to the Phone and Modem Options Modem tab If you need to add a second CAPI compliant device to set up a multilinking click the Add button an...

Страница 54: ...ext you ll create a Dial Up connection definition for this connection by modifying the CAPI Single Channel Access connection created in the previous section 1 Go to Start Settings Network and Dial Up...

Страница 55: ...es the fields used in configuring this device Alias Name Displays the alias name for this ISDN device You may change this field if desired ID This field displays the CAPI application ID as well as err...

Страница 56: ...ld blank if your ISDN provider does not use MSN services 3 When you have completed configuration of this screen click OK to return to the ISDNLink Configuration screen figure 4 48 You are now ready to...

Страница 57: ...w link and click Edit Enter the remote telephone number in the Call out number field If your telephone company provides a Call out subaddress enter it here Click OK on each screen to exit channel conf...

Страница 58: ...or SAD number before activating the device click on Enable Filter of the corresponding service Click on OK to complete the configuration Windows 2000 Removal of the ISDN Drivers Remove the ISDN adapt...

Страница 59: ...Chapter 3 AT Commands...

Страница 60: ...o Sync PPP modem ATB41 Async to Sync PPP conversion in ML PPP mode compatible with Microsoft ISDN Accelerator pack ATB42 Async to sync PPP conversion to MLPPP ATB43 Async to sync PPP conversion in MLP...

Страница 61: ...20 minutes default is 5 Disconnects second channel if average data flow is below n bytes set byATS53 in 5 minutes Only available in MLPPP BOD mode ATB43 ATVn Verbose command ATV0 Return digit result...

Страница 62: ...Chapter 4 Troubleshooting...

Страница 63: ...feature If you have a PnP BIOS and identify an IRQ conflict change the value manually to an unassigned IRQ Reboot the computer after making any changes Q In Windows 3 1 what does the message System i...

Страница 64: ...rror messages the ISDN card and driver are working properly In Windows 2000 you may run LINETEST EXE to perform a line test It will ask you to enter an ISDN telephone and make a call Enter a local num...

Страница 65: ...iver 4 Redefine the modems to RAS The two ISDN ports will appear Q How can I set the phone number for outgoing calls and MSN checking for incoming calls using the NDISWAN interface in Win95 and WinNT...

Страница 66: ...PnP operating system If Windows NT detects a PnP card during start up the operating system has previously installed ISAPNP this is commonly installed with sound cards such as SB16 or AWE32 When Windo...

Страница 67: ...atus of the ISDN B and D channels between the terminal adapter and the ISDN switch network will display Note Before using Line Test make sure your ISDN line is not in use LineTest Error Messages CAPI...

Страница 68: ...information for the ISDN B channels and CAPI is presented in Hex format Figure 4 2 Options Dialog Box CLOSE Terminates the ISDN Log function ISDN Log Error Messages You may encounter the following run...

Страница 69: ...ter Device Properties Resources Disable the Use automatic settings option Select Interrupt Request Change Setting and select an available IRQ value If IRQ 5 is not available IRQ 10 or 12 are often goo...

Страница 70: ...Chapter 5 Warranty Service and Technical Support...

Страница 71: ...d MTS WILL NOT BE LIABLE FOR CONSEQUENTIAL DAMAGES AND UNDER NO CIRCUMSTANCES WILL ITS LIABILITY EXCEED THE PURCHASE PRICE FOR DEFECTIVE PRODUCTS On line Warranty Registration If you would like to reg...

Страница 72: ...ultitech com support Service If your tech support specialist decides that service is required your terminal adapter may be sent freight prepaid to our factory Return shipping charges will be paid by M...

Страница 73: ...tech com Ordering Accessories SupplyNet Inc supplies replacement transformers cables and connectors for select Multi Tech products You can place an order with SupplyNet via mail phone fax or the Inter...

Страница 74: ...Appendices...

Страница 75: ...ompany will notify the customer as soon as possible Also you will be advised of your right to file a complaint with the FCC if you believe it is necessary 5 The telephone company may make changes in i...

Страница 76: ...ndesired operation Warning Changes or modifications to this unit not expressly approved by the party responsible for compliance could void the user s authority to operate the equipment Industry Canada...

Страница 77: ...ety and Terminal Directive Compliance EMC Safety and Terminal Directive Compliance The CE mark is affixed to this product to confirm compliance with the following European Community Directives Council...

Страница 78: ...mport Emulator and allows AT commands to enable ISDN features such as HDLC X 75 V 120 or Async to Sync PPP note this emulation does NOT support fax features In Windows 3 1 the VCOMM API is enabled onl...

Страница 79: ...s a Windows device driver interface that enables a single network interface card NIC to support multiple network protocols For example with NDIS a single NIC can support both TCP IP and IPX connection...

Страница 80: ...TCP IP stack including PPP and COM port interface You should change the following parameters to access ISDN 128K driver in Windows 3 1 Run AT Console first to enable COM port emulation 1 Select Setup...

Страница 81: ...n output atb4 13 if input 10 OK n display Modem is not responding n abort end setup our modem commands output at modemsetup 13 input 10 OK n send phone number n 0 repeat if n attempts display Too many...

Страница 82: ...modems to use the X 75 protocol you must include the ATB3n command in the Advanced Connection Settings screen as shown below Figure C 2 HyperTerminal for Point to Point or BBS Connection At the recei...

Страница 83: ...ar select Start Run Enter D SETUP EXE substitute the appropriate drive letter for your CD drive if necessary Click OK 3 You will be asked to type in the key for your copy of RVS COM Depending on the v...

Страница 84: ...inal 83 I Installation and Configuration 33 Internet Access 14 ISA 15 Configuring for Your ISDN Switch 19 ISDN BRI Line 12 ISDN Configuration Display 20 ISDN Group Folder 20 ISDN Line Test 55 ISDN LOG...

Страница 85: ...ation 58 Windows 2000 and the CAPI Interface 54 Windows 2000 Installation and Configuration 49 Windows 2000 Multilinked Access NDISWAN 53 Windows 2000 MLPPChannel Access CAPI 55 Windows 2000 Removal o...

Отзывы: