AutoCreaser Pro 33A
Setting up a job
1. Switch the power ‘on’ by turning the Emergency stop button clockwise
to release the safety latch.
Setting the page length
2. Set the page length of the paper as described on page 10.
Setting the vacuum suck
3. Set the vacuum suck as described on page 10. Setting number 1 for short suck and
setting number 2 for continuous suck (stream feed).
Setting the batch quantity
4. Select the button. On selection the status area is replaced with a calculator for
inputting new values.
Setting the crease positions
5. (i) Select the lower tab or from the status area to get to the
Crease Settings Page.
(ii) Set the creases as described on pages 11 and 12.
Storing the Job
6. The job that has been set can now be stored as follows.
(i) Select the lower tab or from the status area to get to the
Store Settings Page.
(ii) The job can be given a name and stored as described below. You can also retrieve
previously saved jobs, modify them or delete jobs that are no longer required.
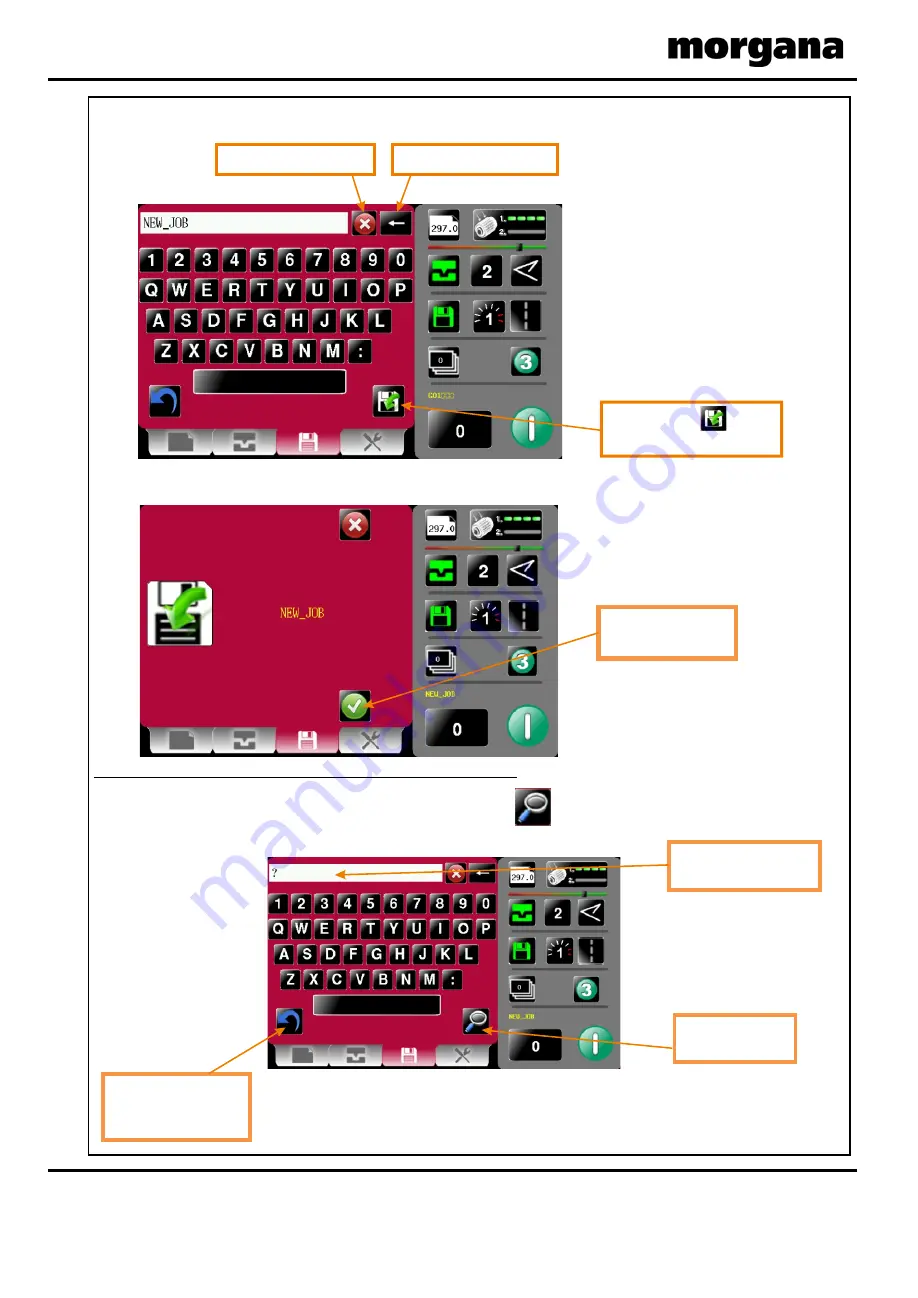
To create a new job name click in text area &
keyboard will open to input job name.
Load existing job from
store
Clicking to search
currently stored jobs
Clicking to delete
currently stored jobs
Clicking to save job
shown.
Current Job Name
Yellow Text Denotes Saved Job
Red Text Denotes Unsaved Job
Operating The Machine
Page 24
CREASING
Loading & Saving Jobs
Keyboard for entering job name.
Save confirmation screen.
Search for current jobs to load or modify.
You can search for jobs by clicking the search icon , this will bring up the search
keyboard for text input.
click save icon
to save
job to store
Delete last character
Delete all characters
To change your mind &
return to the previous
screen click here.
Type in job description
or first few characters
Press search icon
to start search
To confirm saving
of Job click here.
Operating The Machine
Page 25
SYSTEM
5500 NE Moore Court
Hillsboro, OR 97124
Toll Free: 1-800-944-4573
Local: 503-640-5920


