


Gpredict User Manual
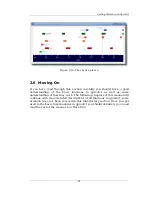
where at any given time. The map view shows both the position of the
satellites and their footprints. Moreover, the map view can also show
information about the current ground station, the next event, i.e. which
satellite comes up next, as well as information about the selected satellite.
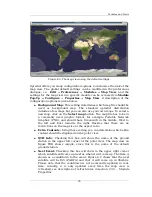
Figure 4.2 shows how the map view looks like using the default settings. As
you can see, the satellites are shown as small yellow squares with their
name is printed just below the square
4
. The footprints of the satellites is
drawn using the same colour as the satellite mark and label, and the area
covered by the footprint is highlighted using transparent white colour.
The footprint of a satellite is the area on the surface of the Earth where the
satellite is visible. On a sphere the footprint would be a circle, but since the
map view projects the sphere to a rectangular surface the footprints will
only look like a circle when the satellite is near the Equator.
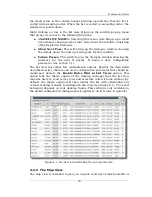
As you can see on figure 4.2, satellite AO-51 is drawn in white instead of
yellow. This means that AO-51 is selected. You can select a satellite by
simply clicking on it with the left mouse button. You can click anywhere
within its footprint area. The selected satellite will have its next AOS or
LOS time shown in the lower right corner of the map view. Selecting a
satellite will clear any other selection, that is you can have only one
satellite selected at a time. You can also clear your selection by clicking
once more on the selected satellite.
Each satellite has a pop-up menu associated to it. You can activate the pop-
up menu by right clicking on a satellite. The pop-up menu is very similar to
the one you have seen in section 4.2.1 for the list view, except that there
are a few items only applicable for the map view. Following items are
available in the satellite pop-up menu for the map view:
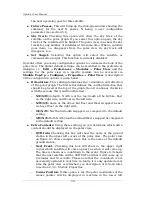
●
<SATELLITE NAME>:
Selecting this menu item brings up a small
info window showing some static data about the satellite consisting
of the Keplerian Elements.
●
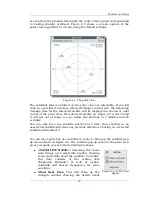
Show Next Pass:
This will bring up the dialogue window showing
the details about the next upcoming pass for this satellite.
●
Future Passes:
This will bring up the dialogue window showing the
summary for the next N passes, N being a user configurable
parameter (see section 5.1).
●
Highlight Footprint:
Selecting this option will highlight the area
covered by the footprint of the satellite.
●
Ground Track:
Selecting this option will show the ground track of
the satellite on the map. By default the ground track for the current
orbit will be shown. If you select this option again, the ground track
of the satellite will be deleted again. The map view can show the
ground tracks for any number of satellites at the same time and for
more than one orbit. The number of orbits can be configured in the
preferences dialogue or the module settings editor.
4 Satellites that are very close to the bottom or either side of the map have their
names printed above or on the side of the square, as is the case for TBD and
TBD on figure TBD.
34
Содержание Gpredict 1.2
Страница 1: ...Updated for Gpredict 1 2 by Alexandru Csete OZ9AEC Gpredict User Manual ...
Страница 5: ......


