


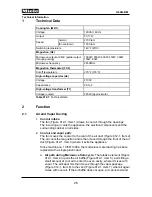


Technical Information
30
H 408x BM
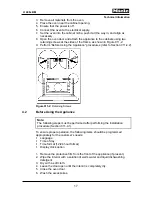
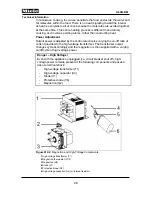
Figure 012-4:
Front Air Duct Removal
Note:
When installing the front air duct, make sure that the air baffle below it can
move freely.
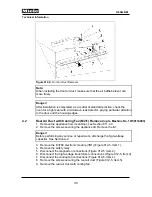
Danger!
After installation is completed, as a matter of standard practice, check the
oven for a tight seal with a microwave leak detector, paying particular attention
to the door and the housing edges.
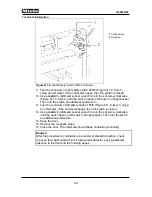
4.2
Rear Air Duct with Cooling Fan (M2/1) Removal
(up to Machine No. 10/59114003)
1. Remove the appliance from its cabinet; see Section 011-4.3.
2. Remove the screws securing the appliance lid. Remove the lid.
Danger!
Before performing any service or repair work, discharge the high-voltage
capacitor. See Section A-2.
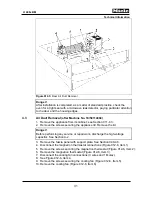
3. Remove the EV790 electronic module (3N1) (Figure 012-5, Item 1).
4. Remove the safety relay.
5. Disconnect the magnetron connections (Figure 012-5, Item 2).
6. Disconnect the high-voltage transformer connections (Figure 012-5, Item 3).
7. Disconnect the cooling fan connections (Figure 012-5, Item 4).
8. Remove the screws securing the rear air duct (Figure 012-5, Item 5).
9. Remove the rear air duct with cooling fan.
Содержание H 4080 BM
Страница 1: ...TECHNICAL INFORMATION H 408x BM Speed Ovens 2013 Miele USA ...
Страница 15: ...Technical Information 15 H 408x BM 011 Casing Door Lock ...
Страница 25: ...Technical Information 25 H 408x BM 012 Air Duct Magnetron ...
Страница 43: ...Technical Information 43 H 408x BM 020 Door ...
Страница 47: ...Technical Information 47 H 408x BM 031 Oven Cavity Wave Distribution ...
Страница 52: ...Technical Information 52 H 408x BM 032 Convection Fan Heaters ...
Страница 58: ...Technical Information 58 H 408x BM 040 Control Panel Electrical System ...


