background image

JETVARNISH 3DS 

9. How to use the 3DSHM 


User Manual 

- 98 - 


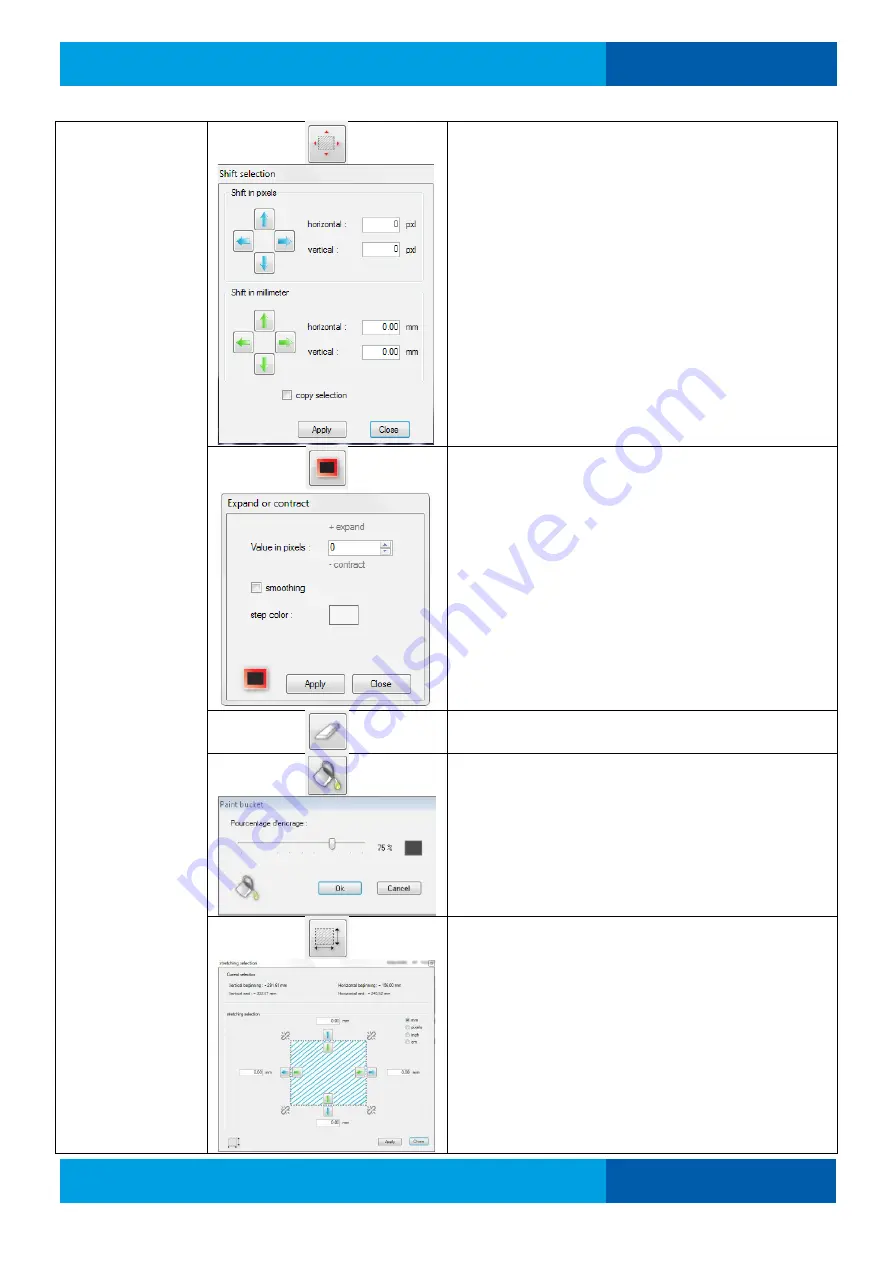
[4]  Selected tools: 


Used to move a selected area. 
Possibility  of  making  up/down  and  right/left 
adjustments. 
Adjustments are made in pixels or millimeters  
(1 pixel = 0.07mm). 


Used to remove or add one or more pixels around 
a shape. 
This adjustment is particularly used in 3D mode to 
bold or unbold a text. a shape. 


Used to erase the image within the selection. 


Used  to  fill  a  selection  area  according  to  a  color 
percentage. 
Mainly  used  upon  file  misprocessing  (90%  black 
but not 100%). 


Used to stretch or compress a selected area along 
the vertical and horizontal axes. 
The  stretch  or  compression  is  expressed  in  mm. 
inches or pixels. 
It is possible to fix a corner to stretch of compress 
proportionally in both directions. 

Содержание JETVARNISH 3DS

Страница 1: ...Version 6 0 06 06 2017 User Manual JETVARNISH 3DS EN Original instructions ...

Страница 2: ... laws of judicial court protection This includes without exception the contents generated by software and displayed on the screen such as format patterns symbols screen display layout MGI the MGI logo and all MGI products mentioned in this document are trademarks of MGI Digital Technology in France FR and or other countries All brand names and products mentioned are trademarks of their respective ...

Страница 3: ...ETVARNISH 3DS 13 2 8 JETVARNISH 3DS Safety Instructions 14 3 Machine specifications and configurations 16 3 1 Machine specifications 16 3 2 Expected print speeds 18 3 3 Machine configurations 19 3 4 Working Conditions 21 4 General description 25 4 1 Feeder 25 4 2 Margin Table 25 4 3 Printer 25 4 4 Dryer 26 4 5 Stacker 26 4 6 Pilot presentation 26 4 7 JETVARNISH 3DS Tactile Interface presentation 3...

Страница 4: ...r 70 9 How to use the 3DSHM 72 9 1 Main menu 72 9 2 Standard printing 75 9 3 Print menu 76 9 4 Printing summary 87 9 5 History 89 9 6 Supervision menu 90 9 7 Settings menu 94 9 8 Information and Cost Calculator 95 9 9 How to use the MGI Spot Varnish Editor 97 9 10 Login Management 102 9 11 Remote access 103 9 12 Automatic cleaning of the print heads 104 10 MGI ARC system 109 10 1 Substrate 109 10 ...

Страница 5: ...12 1 Error codes 138 12 2 Jam procedure 142 12 3 Emergency stop procedure 148 12 4 Power failure procedure 150 12 5 Paper feeding issue 151 12 6 File troubleshooting 152 12 7 Varnish image troubleshooting 153 13 Glossary 158 14 Appendix 161 14 1 Pilot tree view 161 14 2 3DS Hub Manager tree view 167 ...

Страница 6: ...on Version Date Comments Version 4 0 12 05 2015 Updates Version 5 0 02 11 2016 Certified version Version 5 1 26 01 2017 Mark and safety symbol changes Version 6 0 06 06 2017 Wording changes and better descriptions Varnish thicknesses Cost Calculator changes New error message table New printhead height setting ...

Страница 7: ...anual must assume all risks of personal injury and or damage to the product while servicing the product for which this Technical Manual is intended Therefore this Technical Manual must be carefully read before doing service work both in the course of technical training and even after that for performing maintenance and control of the product properly Keep this Technical Manual also for future serv...

Страница 8: ...or skin injury High Temperature Risk of burn when touched Never remove the safety cover while the product is in operation Maintenance work should be conducted only after confirming the power supply is cut off and the temperature reaches low and safe level Moving Parts Risk of injury when hand or finger is caught by the moving parts Caution to be taken not to pinch your hand or finger in the moving...

Страница 9: ...mmediately when torn or any change in appearance dimension color flexibility etc is noticed When maintaining varnish or cleaning solution area replace gloves every 30 minutes Use only powder free gloves Foreign Materials Do not introduce foreign materials or leave jigs in the product Do not put any weight on this part as it might damage it Additional advice Food beverages and tobacco products shoul...

Страница 10: ...aken against high voltage Electrification may cause fatal or serious injury Handling of the product is allowed only for the qualified service engineer Make sure to open the covers only after disconnecting the corresponding electric supply line Skin and Hand Protections Avoid skin contact Wear impermeable gloves and suitable protective clothing Wear eye face protection such as chemical splash proof...

Страница 11: ...ty and Safety Rules Technical Manual 11 Inside Inside Inside Note red dotted rectangle indicates an internal part of the machine Inside Note red dotted rectangle indicates an internal part of the machine Inside Inside Inside ...

Страница 12: ...JETVARNISH 3DS 2 Security and Safety Rules Technical Manual 12 Inside Note red dotted rectangle indicates an internal part of the machine 2 6 Emergency stop buttons location ...

Страница 13: ...the Reset button to change the state of the JV3DS from RED to GREEN 2 7 Before doing service work apply security rules when using the JETVARNISH 3DS 2 7 1 General using security rules For security purposes always disconnect the main power plug before any maintenance or reparation on the equipment 2 7 2 Moving parts For security purposes when you see this Logo take care of moving parts disconnect t...

Страница 14: ...s of UV varnish are chemical residues which shall therefore be transformed by a specialized company Safety Fire extinguisher As any machine using elements heating up to more than 70 C the JETVARNISH 3DS shall have a fire extinguisher nearby Tips and tricks Post curing that could be termed delayed drying is a well known phenomenon in UV printing processes It is recognized that regardless of the pow...

Страница 15: ...s immediately clean Dispose of all cleaning materials in containers provided for this purpose Machine precautions Hold the printing unit doors closed The varnish was specially developed for the JETVARNISH 3DS it can harden through the action of UV LED nevertheless varnish left in the open may polymerize under the effect of solar radiation or neon tubes Holding the printing system as far away as po...

Страница 16: ...he production speeds per drop Registration Fully motorized and automatic left side lay guide New feature of automated registration using MGI ARC System with optical detection of printed crop marks Overall registration of 200 µm Formats Min 21 0x29 7 cm 8 x 11 8 in portrait mode i e long side first Max 36 4x10² 0 cm 14 33x40 15 Max print width 35 3 cm or 353 mm new data as of September 2016 Substra...

Страница 17: ...atic cleaning system From cold start to production in less than 10 minutes Remote troubleshooting support via included video web camera high speed internet connection required Operator panel Integrated user friendly LCD touch screen Options Variable data package Barcode 1D and 2D camera reader to spot varnish on the fly Twin bar Increase the maximum thickness up to 200 232 µm and double the print ...

Страница 18: ... 21 3 0 3 0 15 29 4 0 28 0 14 36 5 0 24 0 12 43 6 0 212 0 106 51 7 0 182 0 091 58 8 0 159 0 0795 65 9 0 141 0 0705 73 10 0 127 0 0635 80 11 0 116 0 058 87 12 0 106 0 053 94 13 0 098 0 05 102 14 0 091 0 05 109 15 0 085 0 05 116 16 0 079 0 05 JETVARNISH 3DS with 2 printhead bars with the optional twin bar Varnish thickness in µm Droplet number Speed in meter per sec Standard varnish coverage 50 High...

Страница 19: ... slower than 0 05 meter per second It is not possible to print in less than 3 droplets equivalent to 21µm of thickness 3 3 Machine configurations JETVARNISH 3DS Paper Feeder Main body with the IJ Print Engine Computer with the 3DS Hub Manager Banner extensions AIS SmartScanner might be optional and not represented on this picture Variable data option 1D and 2D barcode reader camera 3 with JETVARNI...

Страница 20: ...Security and Safety Rules User Manual 20 AIS SmartScanner Artificial Intelligence SmartScanner for an automated registration and make ready Replace totally the ARC System XY cameras Refer to the AIS Scanner User manual ...

Страница 21: ...cuit depression system 3 4 3 Temperature Humidity The UV coating is applied using an UV inkjet system It is important to ensure its viscosity is adequate so the machine needs an operating environment between 18 25 C 65 77 F The humidity needs to stay in the range of RH 35 55 without condensation To optimize the quality of the prints and avoid damage to the heads it is highly recommended to work in...

Страница 22: ...his also applies even more dramatically to synthetic materials such as PVC or polypropylene An air conditioning system is also a good solution to keep the air dry when there is too much humidity RH Do not hesitate to ask your paper supplier about the best storage conditions for its substrates Acclimation before production Before production the paper should reach the production room to be acclimate...

Страница 23: ...ds Such damages are not covered under the warranty and also by the maintenance agreement Likewise using a new varnish will not eliminate the consequences generated by the use of varnish which expiration term was exceeded on the JETVARNISH 3DS A full cleaning and control of machine is required to verify whether the electronic circuits and other components were not damaged 3 4 12 Fire protection We ...

Страница 24: ...ine running in printing with foiling 79 dB A For continuous and all day use at close proximity of the equipment it is recommended to wear ear protection 3 4 16 Risk of sliding stumbling of fall To avoid that an operator slides stumbles or falls on the electrical cables on the floor between the machine and power supply The installation of over floor trunking is recommended ...

Страница 25: ...kew if necessary The pressure on paper is adjustable by the type and quantity of balls applied on the paper We supply 3 types of ball depending on the paper type plastic glass and metal The HMI so called PILOT which is the interface between the operator and the machine is located on the front of margin table module and will allow the operator to access the different parts of the machine 4 3 Printe...

Страница 26: ...n Manage the side lay position and skew Activate or deactivate the machine dryers for further printing Set the margin and printing belts speed Activate or deactivate the double sheet sensor Activate deactivate or set the vacuum capacity of the printing belt Move the head plate The pilot is also used to display important information such as Appearance of error messages on the printing system Precis...

Страница 27: ...double sheet detection 6 Print head maintenance screen access button Access to various print head maintenance 7 Buzzer enable disable button 8 Technical menu MGI mode service access button Reserved for technicians a password it is necessary to access it 9 Printing information Display information about printing Quantity asked and Stacker sheet counter the thickness of the substrate 10 Varnish level...

Страница 28: ...PLC serial number and the IP address of the pilot 14 Production information Display the counter of sheet 15 Software version Display the version of the panel pilot Air Ink Air Varnish circuit and the 3DSHM 16 Date Display the date and hour 17 Consumable list On this screen you have the lifetime of the curing modules the cleaning unit and the 3 maintenance kits You can reset the counter of a consum...

Страница 29: ...ction Select the custom width of your substrate 19 Paper width selection Select the width of your paper to move the side lay 20 Printer side left side position adjustment 21 Feeder side right side position adjustment 22 Side lay position value 4 6 4 Machine parameters The purpose of this screen is to give an access to settings of the machine Refer to Chapter 4 6 1 Main screen for access 23 Double ...

Страница 30: ...rinting belt turn to clean it Refer to 5 4 Cleaning of the printing belt 25 Drum stop offset Length of substrate vacuum by the drum 26 Print heads move to purge position button 4 6 5 Print head maintenance screen access button This screen shows the cleaning maintenances of the machine Refer to Chapter 4 6 1 Main screen to access 27 ...

Страница 31: ... the selected cleaning 29 Purge timing You can select the duration of a purge of 3 seconds 5 seconds or 8 seconds 30 Printhead selection for the Fill Ink cleaning maintenance 4 6 6 Technical menu MGI mode service access button This screen shows how to access to technical mode via a password Refer to Chapter 4 6 1 Main screen to access 28 29 30 ...

Страница 32: ...l physical components of the JETVARNISH 3DS This application is automatically run upon starting of the 3DSHM and configuration interface MGI ARC System configures the cameras Refer to Chapter 10 MGI ARC system VeriSens configures the barcode reader optional MGI Access allows for remote access Refer to Chapter 9 11 Remote access Here is the interface of the 3DSHM such as it will be displayed to the...

Страница 33: ...on 4 Menu selection There are 3 menus available Printing menu Management menu and Technician menu 5 Information message Here is displayed all information messages state of the machine warning and error messages 6 Printing status Substrate format printing speed in sheet hour remaining time of printing and varnishes level in percentage 7 Administration icons For Varnish registration User management ...

Страница 34: ...k 5 1 Maintenance chart JETVARNISH 3DS MAINTENANCE LIST Operation Time Clean the green cleaning roller Every morning Clean all the print heads Every evening Clean the printing belt Every week Clean the top cell reflectors Every week The description and the maintenance procedure will be detailed in the following chapters 5 2 Cleaning of the cleaning roller 1 Latches Open the latches 1 on each side ...

Страница 35: ... User Manual 35 Then rub with a cloth soaked with water onto the entire length of the green roller Do not wipe the roller to keep its adhering effect Put the green cleaning roller in its position on the cleaning unit and close the latches 1 ...

Страница 36: ...ear protective equipment gloves and glasses Caution Wipe the heads foam in horizontal position without applying excessive pressure Skin and Hand protections Avoid skin contact Wear impermeable gloves and suitable protective clothing Wear eye face protection such as chemical splash proof goggles or face shield Barrier creams may help to protect the exposed areas of the skin they should however not ...

Страница 37: ...aning of the printing belt Localize the dry varnish on the printing belt Apply a very strong tape on this varnish Remove the tape by sharply pulling Should varnish do not stick onto please find a stronger tape Repeat the operation for all surfaces with dry varnish ...

Страница 38: ...eflectors 1 Printing belt 2 Reflector Caution Use only cleaning solutions and cleaning foam validated by MGI Caution Insert the stick properly in foam Caution During this operation wear protective equipment gloves and glasses Caution Do not put cleaning solution on the printing belt 1 2 ...

Страница 39: ...Make move the printing belt 1 to reveal a reflector 2 Use cleaning foam with cleaning solution on it and apply on the reflector 2 to remove dust and varnish Be careful to not put cleaning solution on the printing belt 1 Make move the printing belt 1 to access to the other reflector 2 and clean it ...

Страница 40: ...ALLING THE MACHINE CONSUMABLES 6 1 Installation of the Cleaning Agent Waste and Varnish Containers The varnish cleaning agent and waste containers are installed at the back side of the machine Open the back door 1 Varnish container 2 Waste container 3 Cleaning agent container 1 2 3 ...

Страница 41: ...NISH 3DS 6 Erreur Résultat incorrect pour u ne table User Manual 41 6 1 1 Cleaning agent container Open the cleaning agent container by unscrewing its cap Insert the pipe with the pierced cap on the container ...

Страница 42: ...e User Manual 42 Place the container to its location and connect the pipe connector To remove the cleaning agent container do the previous steps in reverse order 6 1 2 Waste container The waste container is located on the left of the cleaning agent container ...

Страница 43: ...g its cap Place the waste container to have the two pipes inside one black pipe coming from the cleaning circuit and a white pipe coming from the purge tray 6 1 3 Varnish container The varnish container is located on the back of the machine A hatch dedicated to its access is located on the left of the back door ...

Страница 44: ...ce the pipe on the holder next to the container with a tissue underneath Before opening and placing the new varnish container you can register it on the 3DSHM Refer to 6 2 Varnish registration procedure Then open the new container and place it at the emplacement inside the machine Put the metallic pipe inside the container and push on it to well seal the rubber cap ...

Страница 45: ...hecked for compatibility with the equipment The validity date of each varnish in the machine to be checked in order to prevent problems at the inkjet print heads This registration shall mandatorily be achieved every time a container is installed in the machine or in advance when long production is to be provided for Note Should varnish be not registered the machine is blocked Here is the registrat...

Страница 46: ... register screen The above icon opens the window below The top of the screen indicates the JET Code and Control Code which are used to identify the machine These codes are required to activate the consumables on the site The center of the screen displays the list of varnishes which were registered on the JETVARNISH 3DS The button below hides the empty pockets ...

Страница 47: ...ate is the varnish expiration date Should the expiration date be exceeded the varnish has to be replaced The checkbox of the In use field is used to change consumable License contains a red pictogram should the consumable license be invalid or not entered and a green pictogram should the license be entered and valid Double clicking the red pictogram enables an activation key to be entered 6 2 2 Pr...

Страница 48: ...ne in the world and know the person responsible for the machine 5 The following window asks you to scan or manually enter the two items of information specific to the varnish container placed in the machine Serial number and Key 6 Validating these codes automatically generates a valid license for that varnish pocket only An email is automatically sent to the machine production manager in order to ...

Страница 49: ...Key Activation key Identify whether the pocket is being used or not by checking the Use pocket box and then pressing Register to validate pocket registration Note Please note that if the pocket has no license it can be pre saved but upon its use only 10 of the pocket is available Registration will have to be validated through a license to unblock the remaining 90 ...

Страница 50: ...Touch Screen the starting procedure appears It is mandatory to follow up step by step this procedure For Starting and Shutdown procedure check icon are display to inform the state of each step of the procedure There are 4 states for this icon Step of procedure not done yet Step in progress Step to validate to be able to go to the next step Step done ...

Страница 51: ...e first step is to disable all emergency buttons which are activated when the machine is shutdown and switch on the power of electronic boards next to the pilot panel This step needs to be acknowledged 2 Then press the blue button next to the switch power of the electronic boards 1 2 3 4 5 6 ...

Страница 52: ...ization the printing plate and purging tray are initialized 5 The next step is to start the 3DSHM on the computer The software makes the communication with all cameras and pilot Then it checks the RCB and ICB communication To finish it checks the print heads licence The following window appears Select the LOGIN and enter the PASSWORD As soon as you are logged the pilot go automatically to the next...

Страница 53: ... you are starting the machine A wiping of print heads is mandatory Follow the wiping procedure Refer to 9 12 for Automatic cleaning of the print heads Once the wiping procedure is done the machine is ready to print 7 3 Shutdown 7 3 1 Close the 3DSHM Close the 3DSHM and select to Shutdown the printer Then confirm your choice ...

Страница 54: ...ow up the shutdown procedure It is mandatory to follow up step by step this procedure every time you shutdown the machine 7 3 2 Cleaning of the print heads 1 Start the cleaning Click on the blue icon to start the automatic cleaning of the print heads Refer to 9 12 for Automatic cleaning of the print heads ...

Страница 55: ...ur u ne table User Manual 55 2 Switch off the power of the electronic boards and press an emergency button This step needs to be acknowledged 3 Shutdown the computer once you have finish to close everything on it This step needs to be acknowledged ...

Страница 56: ...r Résultat incorrect pour u ne table User Manual 56 4 Wait for the machine extinction When all the steps are finished a timer starts to end the shutdown procedure Once it is finished the pilot screen turns to the save screen ...

Страница 57: ... Back stop pile holding weight shaft 3 Stop pile holding weight 4 Side guides 8 1 2 Feeder panel 2 versions available First generation up to S N 122 Second generation from S N 123 5 Substrate suction test button blue or white color 6 Double feed reset button red or yellow color 7 UP button 8 DOWN button 1 3 2 4 7 8 5 6 7 8 5 6 ...

Страница 58: ...goes ON Before printing it is mandatory to adjust height of paper pile to avoid jam or double sheets trouble To do it setup the upper pile limit sensor Refer to Chapter 8 1 3 Upper pile limit sensor 8 1 3 Upper pile limit sensor 9 Upper pile limit sensor adjusting handle 10 Upper pile limit sensor 11 Upper pile limit sensor switch To setup upper pile sensor 1 Put top of paper pile in contact with ...

Страница 59: ...omatic mode it height follow the upper pile sensor height 8 1 4 Vacuum drum setting 12 Vacuum drum 13 Vacuum drum height handle 14 Vacuum drum angular handle Adjust the height of vacuum drum 12 according to the substrate thickness For that screw or unscrew the vacuum drum height handle 13 Depending on the thickness and weight of the paper the position of the slot inside the vacuum drum needs to be...

Страница 60: ... and closed with a 3mm Allen screwdriver Each hole is instead three holes which can be adjusted OPEN CLOSE All blowing holes 15 outside the substrate pile have to be closed In order to test the air flow the substrate pile has to be in the upper position then use the Pump button 5 Only the first substrate has to be separated 15 ...

Страница 61: ...Tips Between the maximum to the end and the minimum handle release you can make 3 turns To be at 30 turn until the handle is release then make 1 turn in direction 8 1 7 Side cleats stack adjustment 20 Handles To adjust the width of side cleats stack first release the two handles 20 to be able to slide the side cleats stack on the ruler Move aside the side cleats stack at maximum distance Put the p...

Страница 62: ...8 1 9 Printing substrate feeder error code During use of printing substrate feeder this error code can be displayed E566 Double sheets E572 Paper jam E586 Paper missing Refer to Chapter 12 1 Error code to clean this error message 8 1 10 Sidelay adjustment Caution this adjustment needs to be checked during the JETVARNISH 3DS installation Remove the ball holder plate Select the format 210 mm on the ...

Страница 63: ...JETVARNISH 3DS 8 How to use the machine User Manual 63 Remove the 2 ball guide holder bars To do so unscrew the 2 Allen screws with Allen key number 3 ...

Страница 64: ...JETVARNISH 3DS 8 How to use the machine User Manual 64 Remove the sidelay from the margin table For that remove these 3 following screws ...

Страница 65: ...ith wrench key number 7 When the side lay is out of the margin table you can setup it Uptight the 4 following screws When the lower part of the side lay is free put 3 plastic cards between the lower and the upper part of the side lay It is necessary to place the plastic cards exactly as the same place than 4 the screws ...

Страница 66: ... the upper part of the side lay If you feel some hard point you have to do again the setting Put back the side lay on the margin table Caution it is mandatory to setup the distance between the side lay and the belt of the margin table to avoid to damage it To do so put 3 pieces of 200 gsm paper at these 4 specific points Caution This setting must be done on top the belt ...

Страница 67: ...JETVARNISH 3DS 8 How to use the machine User Manual 67 When it is done fix the side lay with the 3 screws and the counter nuts Put back the 2 ball guide holder bars then put back the ball guide ...

Страница 68: ... the substrate from the feeder to the margin table A green cleaning roller 2 in contact with the grey roller which is used through its adhering surface to remove all impurities present on the substrate to be printed dust printing substrate residues powder if printing substrates are offset printed etc These rollers have to be cleaned daily they will prevent dust to be transported under the print he...

Страница 69: ...he middle of this one According to the registration side of the substrate use the corresponding side lay Turn the margin belt to make it move toward the used side lay Use the pick up button to put the substrate at the entrance of the margin table belt 1 Adjust the position of the side lay to make the substrate enter at the middle of this one use the position adjustment handles at each end Otherwis...

Страница 70: ... the machine User Manual 70 Refer to Chapter 12 1 Error code to clean these error messages 8 4 Stacker 8 4 1 Stacker presentation 1 Side cleats stack 2 Top cleat stack 3 Cleats shaft 4 Stacker plate 5 Top pile sensor 2 1 3 1 4 5 ...

Страница 71: ...11 buttons control the stacker When the stacker plate 4 reaches the top pile detection sensor 5 the stacker plate stop If you press one time the down button 11 the automatic mode will start and both up 10 and down 11 buttons will light up When the automatic mode is ON the stacker plate 4 goes down automatically when a printed substrate stays more than 2 seconds in front of the top pile detection s...

Страница 72: ...al 72 9 HOW TO USE THE 3DSHM 9 1 Main menu 1 Folder selection Listing of folder present on the computer Path of folders Refresh button Sorting button in alphabetical order or reverse Searching button Rename delete or import a folder 8 2 1 3 5 7 6 4 ...

Страница 73: ...e only with the Variable Data option Merging printing In Development Historic Refer to Chapter 9 5 History Supervision menu Refer to Chapter 9 6 Supervision menu Technical checking charts Available only for technician with Distributor login Settings menu Refer to Chapter 9 7 Settings menu Electronic settings Available only for technician with Distributor login Printhead adjustment Available only f...

Страница 74: ...nish and for varnish registration Refer to Chapter 6 2 for Varnish registration procedure User management management of operator and administrator logins Refer to Chapter Login Management MGI access TeamViewer with MGI connection for remote access internet assistance and updates Refer to Chapter 9 11 for Remote access 8 Cleaning This tab displays the cleaning maintenance procedures Refer to Chapte...

Страница 75: ...ion button Custom selection Select all or custom you selection 3 File management Rename the selected file Delete the selected file Information button with the Cost calculator Refer to Chapter 9 8 for Information and Cost calculator Script application on the selected file Open MGI Spot Editor Refer to Chapter How to use the MGI Spot Varnish Editor 4 Job ticket management Copy the job ticket of the ...

Страница 76: ...etting 2 File name Display the name of the file you are printing 3 Print menu tabs Click to open the settings for substrate and file position Refer to Chapter 9 3 2 Position Click to open the settings for printing quality Refer to Chapter 9 3 3 Quality Click to open the setting for cameras Refer to Chapter 9 3 4 Camera 4 Print menu management Navigate between Position Quality and Cameras tabs Save...

Страница 77: ...ll the parameters before to be able to print Once it is done the button become green 9 3 2 Position 7 Paper format You can select the format of the substrate Measure the substrate and select the good format Create delete or modify a paper format 8 Margin and position This is the preview of the file position on the substrate The arrow shows the printing direction 7 8 9 ...

Страница 78: ...e in X direction horizontal and Y direction vertical Minus signs are to move to the top or to the left Plus signs are to move to the bottom or to the right You can select which unit of measure you want to use to change the position of the file The X and Y horizontal and vertical positions are display here You can click on these value to directly modify them Add value to move to the right or to the...

Страница 79: ... want to apply By clicking on this value you can adjust the thickness This is the number of drop of varnish the machine apply on each pixel to have the wanted thickness Display the printing speed depending of the thickness of the varnish and the length of the printing substrate 11 Heads configuration You select two different mode for the overlap adjustment mode_2D for varnish thickness under 30µm ...

Страница 80: ... cameras Refer to Chapter 10 for MGI ARC system 14 Crop mark position If you use both cameras you have to indicate to the 3DSHM the position of the crop mark on the substrate 1 Measure the distance between the left edge of the substrate and the left crop mark then put it on the first value Only if you use both cameras 2 Measure the distance between the two crop marks then put it on the second valu...

Страница 81: ...ting tab and go back to the print menu Refer to Chapter 9 3 Print menu Display the activation of the curing unit and the power adjustment Refer to Chapter 9 3 5 5 Curing tab to adjust the curing Display the printing belt speed adjusted in the printer tab Refer to Chapter 9 3 5 4 Printer tab Display the varnish thickness adjusted in the print menu in quality tab Refer to Chapter 9 3 3 Quality 9 3 5...

Страница 82: ...d 0 means that the margin table belt goes at the same speed than the printing belt A negative value means that the margin table belt goes slower than the printing belt Be careful to avoid positive value to prevent against registration and jam issues 20 Drum speed Change the value to adjust the speed of the vacuum drum This value is a relative speed 0 means that the vacuum drum goes at the same spe...

Страница 83: ...ly adjusted with the varnish thickness You can reduce the printing belt speed to allow the varnish to spread 24 Printing belt vacuum adjustment You can adjust the vacuum power of the zones Z1 under cameras Z2 under print heads and Z3 under curing 1 depending of the substrate flatness To have a perfect flat surface increase the power of vacuum for thick substrates and reduce the power for light sub...

Страница 84: ...he varnish circuit diagram 9 3 5 5 Curing tab 27 Stacker speed adjustment You can adjust the speed of the stacker 28 Curing unit location DRY 1 UV LED 5W located just after the print heads to freeze the varnish DRY 2 UV LED 12W located before the stacker to deeply cure the varnish 29 27 28 ...

Страница 85: ...an adjust the power of each unit with the corresponding slider Default values DRY 1 UV LED 100 DRY 2 UV LED 100 9 3 6 Monitoring screen 30 Machine settings Refer to Chapter 9 3 5 for Feeder Printer and Curing settings 31 Cameras information Use only if you have the Variable Data option Display the code read by the barcode camera and the corresponding file 35 36 37 ...

Страница 86: ...fly file positioning Refer to Chapter 9 3 2 Position to move the file position 32 Printing management Display the name of the printing file Display the quantity to print Click to pause the printing Click to stop the printing 9 3 7 Machine start button The PRINT PAUSE button at the front of the machine starts blinking in green when the operator click on the Print starting button Refer to Chapter 9 ...

Страница 87: ...trate 2 Cameras summary Total good detections for all cameras Total bad detections for all cameras Camera 1 good in green and bad in red detections Camera 2 good in green and bad in red detections Only available if you have the Variable Data option Camera 3 good in green and bad in red detections 3 Close button Click on this button to close this window 4 Details icon Click to access to the detail ...

Страница 88: ... or bad in red detection 8 X adjustment Crossed direction correction depending of the crop mark position on the substrate in pixel 9 Y adjustment Feeding direction correction depending of the crop mark position on the substrate in pixel 10 Printing skew Only if you use both camera Skew correction depending of the crop marks position on the substrate 11 Substrate skew Only if you use both camera Sk...

Страница 89: ...r has printed the file Mode the varnish used 3D Copies number of copies was printed and asked Thickness the thickness of the varnish Image which file was printed 2 History settings Date selection A blue day means that at least a printing was done this day Select All or select a specific operator Select All or select a specific varnish Refresh button Total of printed file Total of printed time 1 2 ...

Страница 90: ...hich operator has printed the file Thickness the thickness of the varnish Paper size format of paper used Refer to Chapter 9 3 2 Position camera ok percentage of good camera detection iFOIL if the iFOIL was used for this job Mode the varnish used 3D Consumption quantity of varnish used for the printing 5 Job access Click to this icon to access to the selected file 9 6 Supervision menu 1 Range sele...

Страница 91: ...rt Display a chart for the consumption of varnish or the production in number of sheets depending of the selected range 5 Scrolling buttons Buttons used to change from an hour for a selected day a day for a selected week a week for a selected month and a month for a selected year Buttons used to change to the previous or next day week month or year depending of the selected range 6 Chart settings ...

Страница 92: ...JETVARNISH 3DS 9 How to use the 3DSHM User Manual 92 9 6 2 Pie chart 7 Pie chart Operator distribution pie chart for the selected range 7 ...

Страница 93: ...xport Picture File name Copies asked Number of copies asked Copies printed Number of copies printed Thickness Thickness of the varnish Print bars activated Which print bars were used Print mode Which varnish was used 3D Paper size Format name of the substrate Paper width Width of the substrate Paper height Length of the substrate Operator Which operator print the file Percent camera Accuracy of th...

Страница 94: ...ce You can change the varnish price and the unit of the money 5 Interface settings Change the language between English French and Portuguese Change the keyboard configuration between AZERTY or QWERTY Change the unit of measurement between millimeters mm and inches inch You can choose the day for cleaning message of the top sensors reflectors 6 Incoming alert Enable or not the message informed a ne...

Страница 95: ... and length Colors display if the file is in grayscale or in color The file must be in GRAYSCALE to be printed Bits per pixels display the colors depth per pixel 1 bit means 1 bit per pixels monochrome 8 bit means 8 bit per pixels grayscale Resolution display the resolution used to define the file The file must be in a resolution of 360 x 360 dpi to be correctly printed File size File size in Mega...

Страница 96: ...age Covered surface given by the file Thickness Maximum thickness adjusted by the operator Copies Number of sheet to print by default 1 000 Consumption Quantity of varnish calculated with the Ink coverage The Thickness and the number of Copies Price per liter Indicate the price par liter for the varnish 7 Total cost Total Price 0 08 Display the varnish pricing for the number of copies wanted defau...

Страница 97: ... tool Used to move the image 2 Zoom tool Used to zoom into a selected area 3 Selection tools Used to make a rectangle selection of the image Used to make a selection using a magic wand tool on a shape as a function of its black density Adjustment of the density tolerance is possible as well as activation or deactivation of the contiguous pixel parameter all shapes having the same black density Use...

Страница 98: ...is adjustment is particularly used in 3D mode to bold or unbold a text a shape Used to erase the image within the selection Used to fill a selection area according to a color percentage Mainly used upon file misprocessing 90 black but not 100 Used to stretch or compress a selected area along the vertical and horizontal axes The stretch or compression is expressed in mm inches or pixels It is possi...

Страница 99: ... in mm and the direction is negative in clockwise 5 Image tools Used to redefine the printing substrate format This function trims or enlarges the working zone without modifying the image maybe trimmed Used to adjust the stretch of the printing substrate due to image stretching during printing This stretch can be defined in length printing substrate feed direction or width ...

Страница 100: ...90 6 Script This function is used to apply an existed script or save a new set of settings stretch skew etc and apply them to all selected files This function is useful in two cases Machine compensation if a printing machine regularly stretches on a given printing substrate perhaps the setting is identical for all sheets output from this machine and a script can be created for that machine on that...

Страница 101: ...You can still create a script from actions selected in the log Used to return to the previous step Caution a selection is considered as an action 9 Shortcuts This icon is used to see all shortcuts available in this image retouching software Ctrl Zoom in Ctrl Zoom out Ctrl A Select all the image Ctrl Shift I Reverse the current selection Shift Add a selection to the current selection Shift Alt Remo...

Страница 102: ... A User operator can only modify his own password Fill the actual password then a new one and confirm it To finish click on Change your password 9 10 2 Administrator An Admin operator can also modify his password and can add or delate a User login He can also modify the rights for a User ...

Страница 103: ... the right to modify a Pilot settings in the Quality tab Refer to Chapter 9 3 3 Quality Delete a preset Enable for the User the right to delete a Pilot settings in the Quality tab Refer to Chapter 9 3 3 Quality Click on Apply to save these User s rights 9 11 Remote access This icon starts the Remote Access software TeamViewer Refer to Chapter 9 1 Main menu To make a technical intervention on the m...

Страница 104: ...ning of the print heads This action prevents varnish polymerization on the print heads As cleaning often implies wiping wiping is automatically selected when cleaning is selected Two cases of cleaning are possible In the evening after a working day all print heads are automatically cleaned but not wiped MANDATORY ACTION On demand by the operator with the possibility to select which print heads to ...

Страница 105: ... action The Fill Ink action is similar to a printing with activation of the nozzles of the print heads The advantages of the Fill Ink action are Possibility to select one or more print heads Wiping is not mandatory the Fill Ink action is a clean cleaning maintenance Before starting the Fill Ink action select the duration of this one You can select between Short 3 seconds Medium 5 seconds Long 8 se...

Страница 106: ...Before starting a purge select the duration of this one You can select between Short 3 seconds Medium 5 seconds Long 8 seconds or Custom choose from 1 to 10 seconds When the duration is chosen click on the starting button and wait that the procedure is completed Wiping Wiping can be done after a print head cleaning and is mandatory after a purge of the JETVARNISH 3DS printing system Wiping is comm...

Страница 107: ...iping towel is flat Put back the wiping unit into the machine in wiping position top position Once the wiping unit is in position the message for wiping can be acknowledge Once the wiping is validated the machine moves in wiping position Wait until the wiping is completed ...

Страница 108: ...JETVARNISH 3DS 9 How to use the 3DSHM User Manual 108 3 Depressure display The actual and standard value of depressurization into the Air Varnish circuit 4 Starting and Stopping button 5 Close icon ...

Страница 109: ...pre printed pages 10 1 Substrate Put the substrate under cameras The lead edge has to be under the camera sensors and the substrate perfectly inside the side lay as should be during the printing triggering 10 2 Camera connection Go to Connections IP address to select which camera you want to set Once the camera is selected click on Connect ...

Страница 110: ...JETVARNISH 3DS 10 MGI ARC system User Manual 110 You are now connected to the camera in Monitor mode 10 3 Camera setting Click on Application to set the camera ...

Страница 111: ...Do not delete or modify the MGI Default folder some settings are already made to avoid any mistake or forgetting Choose the name of the setting The camera setting is to set a Crop mark so give the name of the Crop mark and not the name of the job The camera setting is created and you have now to configure it Click on Edit to modify it ...

Страница 112: ...quality Select the Display mode Live and the Lightning External Then click on Extended options tab in order to validate that the Exposure time is set to 230 µs if needed up to 300 µs If the quality is not good enough adjust the camera lamp orientation and focus ...

Страница 113: ...turn it to have the maximum of light at screen 2 angles can be adjusted printing direction or crossed direction 10 4 2 Focus Use the small screwdriver provided with the machine to adjust the focus screw on top of the camera Look at the screen to have a good image sharpness Then press Next Crossed direction Printing direction ...

Страница 114: ...u are now in the Model definition tab in which you will configure the two optical marks as regards registration of the printing substrate i e crop mark Crop and edge of the printing substrate Paper Check that the All models parameter is selected Select Crop and click on Edit ...

Страница 115: ... purple square which appears on the camera image Adjust this purple square to highlight in green the Crop mark Make the purple square the smallest as possible to just select the crop mark Go to Extended options check if the Sensitivity is on Low and the Contour smoothing is Auto Click on Next ...

Страница 116: ...ymmetries Define the Search Zone on the image taken by the camera The blue search area should be 3 times bigger in high and width than the defined model of the crop mark Change the Minimum match to 60 If the software has detected one or several symmetries go to the Orientation symmetry tab if you are not already in ...

Страница 117: ...ptimized Go to Detailed evaluation tab and check if the Detail evaluation mode is OFF Then click on Test model to check if the parameters are good The Contour match has to be 60 at least You can test 2 or 3 times to check if the Contour match is stable If it is not the case adjust again the Image quality ...

Страница 118: ...GI ARC system User Manual 118 Finally press Next and accept the modification you have made The Crop mark configuration is complete perform the same procedure for the lead edge Paper of the substrate Select Paper then Edit ...

Страница 119: ...ight in green the edge of the substrate Make the purple square the smallest as possible to just select few centimeters 1 5 of the screen high Check that the Search Zone of the paper edge is not aligned with the crop mark to avoid any confusion between the edge and the crop mark Then go to Extended options check if the Sensitivity is on Low and the Contour smoothing is Auto ...

Страница 120: ...s done click on Next and acknowledge the message of detection of symmetries Adjust the Search Zone to be slightly bigger than the model in high and 1 3 of the screen width On the Orientation symmetry tab select the parameter to user defined speed optimized ...

Страница 121: ...evaluation mode is OFF Then click on Test model to check if the parameters are good The Contour match have to be at least 60 You can test 2 or 3 times to check if the Contour match is stable If it is not the case adjust again the Image quality Finally press Next and accept the modification you have made ...

Страница 122: ...I ARC system User Manual 122 10 6 Overall function test Then click 3 times on Next to go to the Overall function test page to test the whole configuration previously created Click Test application then this window appears ...

Страница 123: ...configurations previously set up A percentage is given as regards the picture taken by the camera and its correspondence with the configured model The result should be around 95 Make 2 or 3 tests to check if the Contour match is stable And be sure that the Evaluation time is under 200 ms Then select Test application to OFF and press Next ...

Страница 124: ...ions and Disconnect to disconnect from the configuration of camera 10 7 3DSHM camera configuration Back in the 3DSHM please enter the mark configuration number for each camera According to our example number 2 has to be entered for camera 1 Note the two cameras can have different configuration numbers Once the configuration of each crop mark is indicated click at the top of the Cameras tab on the ...

Страница 125: ...ending the first sheet of a new job to the machine green P Production this mode is active once the marks have been seen for the first time by the two cameras so as to compensate for the printing movements in relation to the first Calibration sheet As we are sending the first sheet of the print job use the Calibration mode ...

Страница 126: ...a job to be varnished and covers the simplest working method for operating the JETVARNISH 3DS 1 Load the printing substrates Place the pile of substrate on the feeder plate at the center Then move the 2 side cleats do not tight too much to avoid blocking the pile Move the plate up until the Upper pile sensor stops automatically the plate Left side cleats Right side cleats Up ...

Страница 127: ...tch on the automatic mode movement of the plate the light of the up button is on Adjust the heigh of the pile with the heigh adjustment handle The default high adjustment for the pile is when the top of the pile is at the lower hole in middle plate of the feeder just under the vacuum drum Heigh adjustment handle Blowing holes ...

Страница 128: ...he folder in which the file was located and then select the file to be printed Press print button in order to open the printing parameters of the job to be varnished 3 Check that the file and printing substrate feed are consistent In the correct direction given by the preview on the 3DSHM if this is not the case it must be edited in the Spot Varnish Editor using the 90 rotation function ...

Страница 129: ...JETVARNISH 3DS 11 Working method with the JETVARNISH 3DS User Manual 129 Printing direction Printing preview ...

Страница 130: ... The profile is used to automate the setting part thickness printing mode machine speed drying etc A profile is associated with a varnish thickness which determines a printing speed drying and many other parameters If no profile was defined please follow the following steps if a profile is selected please skip steps 7 12 13 and 14 7 In the Quality tab please indicate the maximum thickness desired ...

Страница 131: ... possible should printing defects be visible 9 In the Cameras tab select which camera you want to use Red is disable Green is enable Click on the to open the MGI ARC System to set the camera Refer to 10 MGI ARC system Then put the ID number Crop mark id of the camera configuration If you use both cameras you have to measure the distance between the left side of the substrate to the left crop mark ...

Страница 132: ...lick on the to access to the parameters 12 Select the Feeder tab and set the following parameters Double sheet sensor ON Margin table speed 0 Drum speed 0 13 Select the Printer tab and set the following parameters Z1 50 Z2 80 Z3 100 Paper length compliant with that of the substrate at the machine infeed Speed maximum 100 ...

Страница 133: ...y 2 100 Stacker speed 100 15 Once theses parameters are set you can click on the green flashing button next to the keyboard 16 The machine sends the sheet to the margin table then printing starts under the inkjet print heads and finally the sheet is dried and the sheet goes out of the machine to the stacker that you must adjust for this new job ...

Страница 134: ...ARNISH 3DS 11 Working method with the JETVARNISH 3DS User Manual 134 You may have the following result 17 The first step is to adjust the top left corner of the varnish print to match with the CMYK printing ...

Страница 135: ...l 135 To do that go to the Position tab Refer to 9 3 2 for Position and move the varnish print with the manual adjustment The second sheet can be adjusted by millimeter and the third one can be adjusted by 0 1 mm Now open the Spot Varnish Editor Refer to Chapter 0 for ...

Страница 136: ...ETVARNISH 3DS User Manual 136 18 How to use the MGI Spot Varnish Editor in order to adjust skew and stretching Adjust the skew with the bottom left corner of the printing Then adjust the stretching with the bottom right corner of the printing 3 ...

Страница 137: ...S User Manual 137 Once the position is set you can use the Spot Varnish Editor to adjust an object bold unbold move stretch skew etc Now that varnish is registered with the CMYK print please enter the number of substrates to be printed and validate with OK ...

Страница 138: ... E514 Reserve fonctionnement E514 Reserve fonctionnement E515 Reserve fonctionnement E515 Reserve fonctionnement E516 Reserve fonctionnement E516 Reserve fonctionnement E517 Reserve fonctionnement E517 Reserve fonctionnement E518 Reserve fonctionnement E518 Reserve fonctionnement E519 Reserve fonctionnement E519 Reserve fonctionnement E520 Reserve fonctionnement E520 Reserve fonctionnement E521 Re...

Страница 139: ...ve avertissement E551 Reserve avertissement E551 Reserve avertissement E552 Reserve avertissement E552 Reserve avertissement E553 Reserve avertissement E553 Reserve avertissement E554 Reserve avertissement E554 Reserve avertissement E555 Reserve avertissement E555 Reserve avertissement E556 Reserve avertissement E556 Reserve avertissement E557 Reserve avertissement E557 Reserve avertissement E558 ...

Страница 140: ...ng position E582 Essuyeur en position essuyage E583 Door not locked E583 Porte non verrouillée E584 Printing system not initialized E584 Système impression non initialisé E585 Incorrect paper thickness E585 Epaisseur papier incorrecte E586 Paper missing E586 Manque papier E587 Capping station cleaning necessary E587 Nettoyage capping st nécessaire E588 Air reservoir full E588 Réservoir d air plein...

Страница 141: ...acity This message warns the user that a consumable is not registered on the Internet and hence has no license for the varnish container A non registered consumable can only be used up to 10 of its maximum capacity This message warns the user that a consumable is not registered and hence can no longer print ...

Страница 142: ...1 Jam sensors identification 1 C1 Cleaning unit entrance sensor feeder 2 C2 Double sheet sensor 3 C3 Cleaning unit exit sensor margin table 4 C10 C11 Camera triggering sensors camera 5 C6 C7 Curing 2 entrance sensor 6 C8 Paper exit sensor stacker 3 2 1 4 5 6 1 3 4 5 6 ...

Страница 143: ...he transmitter and receiver The receptor light up green no blinking No error Double sheets detected The receiver light up red No blinking E 566 Double sheets error on the pilot screen and on the 3DS Hub Manager No sheet detected between the transmitter and receiver The receptor light up both red and green blinking No error The transmitter and receiver are not facing each other As result the error ...

Страница 144: ...C1 C3 C10 C11 a jam will occur If the printing substrate is detected for more than 10 of the printing substrate length by C6 C7 C8 a jam will occur If the printing substrate is detected by C10 C11 or C6 C7 for more than 70 mm plus the printing substrate length then a jam will occurs C10 20 10 20 20 10 70 mm 70 mm C8 C7 C6 C11 C3 C1 C2 ...

Страница 145: ... occurs again yes check the substrate flatness the substrate is flat check the paper path in order to detect any issue the substrate is NOT flat increase the vacuum of the printing belt the jam occurs again yes change the substrate no no no check if the jam sensors are centering on the printing belt holes OK check if the jam sensors are working as there is a sensor state led on each of them OK not...

Страница 146: ...JETVARNISH 3DS 13 Glossary User Manual 146 12 2 4 How to remove jam substrate First remove the jammed substrate indicated on the pilot screen by a green or a red dot ...

Страница 147: ...JETVARNISH 3DS 13 Glossary User Manual 147 Once the jammed substrate is removed press on Sheet ejection on the pilot screen and wait few seconds The PRINT button at stacker side will blinking ...

Страница 148: ...ce all substrates are out of the machine you can acknowledge the jam error message 12 3 Emergency stop procedure If an emergency button is activated the machine is automatically stopped Refer to 2 6 for Emergency stop buttons location If the machine was printing follow the Unjam procedure to remove all substrates inside the machine Refer to 12 2 4 for How to remove jam substrate ...

Страница 149: ...ct a technician Once the problem is solve you can clear all the error messages following the next steps 1 Release all emergency buttons 2 The power need to be initialized press the blue RUN button next the pilot panel 3 The printing system lost its position and need to be initialized press the flashing blue RESET button next the keyboard 4 You are ready to print again ...

Страница 150: ...r failure procedure In case of power failure Unplug the depressure circuit Remove manually the sheets Caution sheets between printhead and curing module number 2 are not dry It is recommended to use gloves to remove these sheets Call a trained technician ...

Страница 151: ...ER THE TOP PILE DETECTION SENSOR RAISE THE TOP PILE DETECTION SENSOR CHECK THE VACUUM BLOWING PUMP ADJUSTMENT 100 VACUUM AND ADJUST FROM 30 TO 50 THE BLOWING CHECK THE DRUM VACUUM ANGLE ADJUSTMENT IT SHOULD BE VERTICAL IS IT WORKING WITH THE SAME PAPER SHEET BUT NOT PRE PRINTED BLANK SHEET TO CHECK IF THE PROBLEM IS A STATIC PROBLEM ISSUE IS THE PAPER 100 FLAT IS THE FEEDING WORKING WHEN YOU PRESS...

Страница 152: ...between the smallest and the largest formats that the JETVARNISH 3DS can print 21 0 x 29 7 cm your image size 36 4 x 10² 0 cm 8 x 11 8 your image size 14 33 x 40 15 12 6 2 Colors Color of image that you want to print must be grayscale to be recognized by the software 12 6 3 Bits per pixels Bits per pixels of image that you want to print must be 8 bits to be able to put different thickness of varni...

Страница 153: ...int which renders the text and designs excessively bold 12 7 1 1 Explanation This phenomenon is explained by the surface energy of the substrate The more significant the surface energy the more varnish spreads and vice versa On some lamination this phenomenon is even worst 12 7 1 2 Solution 1 Check the printing substrate thickness entered in the 3DS Hub Manager it should correspond to that of the ...

Страница 154: ...ectively corresponds to the printhead overlap by setting the pixel overlap to 5 If the missing varnish lines appear at the same level as the bumps and dents then the problem is effectively a pixel overlap problem 12 7 3 Problem 3 Dots appear in varnish 12 7 3 1 Explanation This phenomenon is explained by dust on the printing substrate or offset printing powder or printing substrate relief 12 7 3 2...

Страница 155: ...n Inkjet print heads eject varnish through nozzles of the order of few microns should dust adhere to the print heads some areas will be unprinted 12 7 4 2 Solution 8 Check the printing substrate thickness entered in the 3DS Hub Manager it should correspond to that of the printing substrate used 9 Increase the varnish thickness 10 Try another substrate 11 Run purging and cleaning so as to remove du...

Страница 156: ...nifold pipes and printhead pipes 12 7 6 Problem 6 Varnish spreads at the start and on the sides of the print 12 7 6 1 Explanation Varnish is a liquid which is ejected from the inkjet print heads during printing should an airflow disturb such drop onto the substrate the varnish spot is deviated 12 7 6 2 Solution 13 Check the printing substrate thickness entered in the 3DS Hub Manager it should corr...

Страница 157: ...ads and the printing substrate CAUTION Print heads are consumables their price is positively higher than the job to be printed If the printing substrate is not flat it is more judicious to proceed with its printing process than risking damaging one or more print heads 12 7 7 2 Solution 16 Check the printing substrate thickness entered in the 3DS Hub Manager it should correspond to the printing sub...

Страница 158: ...s 1 and 2 to locate the color print position on the printing substrate Double sheet When two sheets or more are picked up by the vacuum drum DPI Drops Per Inch unit which defines the resolution of a print DPI Dots Per Inch unit which defines the resolution of a print file Fast coupling female Clamp type coupling fitted with a ball providing for pressure tight closing Fast coupling male Clamp type ...

Страница 159: ...ng them Pixel overlap Overlap area between two staggered print heads Polymerization Chemical reaction which dries and hardens varnish under ultraviolet light Positioning pin Pin used to accurately position one part in relation to another Power inverter Device which continuously supplies electrical power in case of power failure Printed substrate Substrate onto which varnish has been deposited mach...

Страница 160: ... order to dry varnish UV dissipator Guard attached to the LEDs to prevent UV light from reaching the print heads Vacuum adjustment Adjustment of the vacuum capacity of the printing substrates under the printing belt Vacuum area Portion of the printing belt where the printing substrates are vacuumed up so as to be held there Vacuum drum Roller which vacuums up the printing substrate and used to fee...

Страница 161: ... change button 2 Information screen access button 3 Margin table centering skew screen access button 4 Machine parameter screen access button 5 Print head maintenance screen access button 6 Buzzer enable disable button 7 Technical menu MGI mode service access button 8 Machine status message warning acknowledgment 9 Back main menu 9 ...

Страница 162: ...JETVARNISH 3DS 14 Appendix User Manual 162 14 1 2 Information screen The purpose of this screen is to give all machine information in particular the hours of use of the dryers ...

Страница 163: ...JETVARNISH 3DS 14 Appendix User Manual 163 14 1 3 Margin table skew screen This screen purpose the skew and centring adjustment ...

Страница 164: ...JETVARNISH 3DS 14 Appendix User Manual 164 14 1 4 Machine parameter screen This screen purpose the adjustment of the printing belt vacuum putting into service the double sheet detection ...

Страница 165: ...JETVARNISH 3DS 14 Appendix User Manual 165 14 1 5 Print head maintenance screen This screen purpose the various print head maintenance ...

Страница 166: ...JETVARNISH 3DS 14 Appendix User Manual 166 14 1 6 Technical menu MGI mode service This menu is reserved for technicians a password it is necessary to access it ...

Страница 167: ...JETVARNISH 3DS 14 Appendix User Manual 167 14 2 3DS Hub Manager tree view ...

Страница 168: ...JETVARNISH 3DS 14 Appendix User Manual 168 2 1 ...

Страница 169: ...JETVARNISH 3DS 14 Appendix User Manual 169 1 5 3 ...

Страница 170: ...JETVARNISH 3DS 14 Appendix User Manual 170 2 7 6 ...

Страница 171: ...JETVARNISH 3DS 14 Appendix User Manual 171 3 5 ...

Страница 172: ...JETVARNISH 3DS 14 Appendix User Manual 172 See Print ON See Print ON See Print ON 6 9 ...

Страница 173: ...JETVARNISH 3DS 14 Appendix User Manual 173 7 8 ...

Страница 174: ...JETVARNISH 3DS 14 Appendix User Manual 174 8 ...

Страница 175: ...JETVARNISH 3DS 14 Appendix User Manual 175 9 ...

Страница 176: ...JETVARNISH 3DS 14 Appendix User Manual 176 end ...

Отзывы: