background image

MI 3394 CE 

MultiTester

XA


Auto Sequences

®


115


7.2.1.2 

Auto Sequence

®

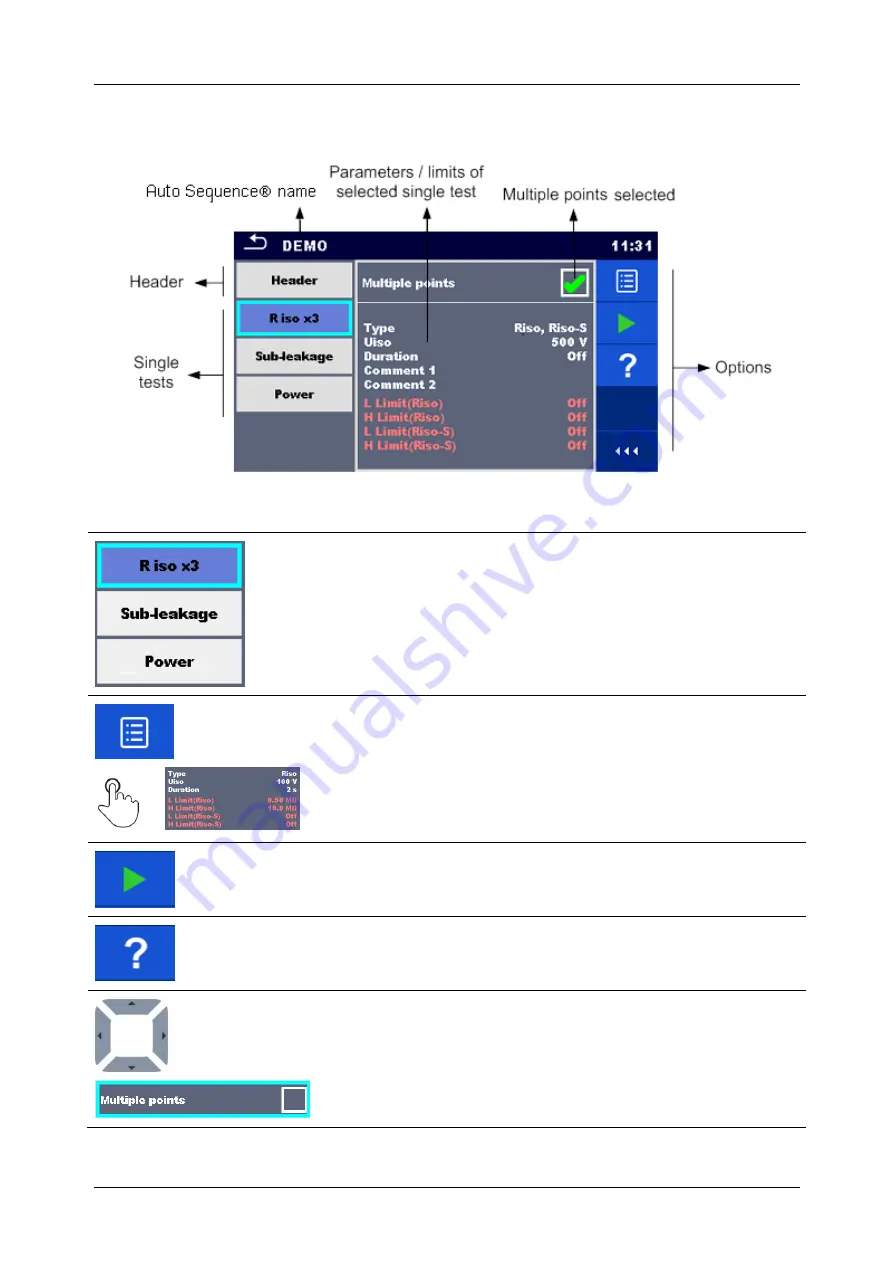
 view menu (measurement is selected) 


Figure 7.5: Auto Sequence

®

 view menu 

– measurement selected 

Options 


Selects single test. 


on 


Opens  menu  for  changing  parameters  and  limits


of  selected 

measurements. 

Refer to chapter 

6.1.1.2 Setting parameters and limits of single 

tests

  for  more  information  how  to  change  measurement 

parameters and limits.


Starts the selected Auto Sequence

®


Opens the Help menu of selected test. 


Selects Multiple points. 

Содержание MI 3394 CE MultiTesterXA

Страница 1: ...CE MultiTesterXA MI 3394 Instruction manual Ver 3 4 13 Code no 20 752 432...

Страница 2: ...at this equipment meets the requirements of the all applicable EU European Union regulations 2019 Metrel The trade names Metrel Smartec Eurotest Autosequence are trademarks registered or pending in Eu...

Страница 3: ...iTesterXA its key features functionalities and use It is intended for technically qualified personnel responsible for the product and its use Please note that LCD screenshots in this document may diff...

Страница 4: ...ecks 13 4 4 Symbols and messages 13 4 5 Instrument main menu 17 4 6 General settings 18 4 6 1 Language 19 4 6 2 Date and time 19 4 6 3 Profiles 19 4 6 4 Workspace Manager 19 4 6 5 Auto Sequence groups...

Страница 5: ...nts of selected structure object 54 5 1 5 10 Copy Paste a measurement 55 5 1 5 11 Cut Paste a Structure object with sub items 56 5 1 5 12 Delete a Structure object 56 5 1 5 13 Delete a measurement 57...

Страница 6: ...17 7 2 2 Step by step execution of Auto Sequences 117 7 2 3 Auto Sequence result screen 119 7 2 4 Auto Sequence memory screen 121 8 Maintenance 122 8 1 Periodic calibration 122 8 2 Fuses 122 8 3 Servi...

Страница 7: ...Auto Sequence Editor workspace 141 E 2 Managing of Auto Sequence groups 142 E 2 1 Auto Sequence Name Description and Image editing 144 E 2 2 Search within selected Auto Sequence group 145 E 3 Element...

Страница 8: ...and accessories if any damage is noticed Regularly check the instrument and accessories for correct functioning to avoid hazard that could occur from misleading results Consider all generally known p...

Страница 9: ...akage Ipe Leakage Touch Leakage Power Leak s Power Load currents higher than 10 A can result in high temperatures of fuse holders and On Off switch It is advisable not to run tested devices with load...

Страница 10: ...and held probe assemblies for electrical measurement and test EN 61557 Electrical safety in low voltage distribution systems up to 1 000 V a c and 1 500 V d c Equipment for testing measuring or monito...

Страница 11: ...ty test lead red 1 5 m 2 5 mm2 Test lead black 2 5 m Test lead red 2 5 m Alligator clips black 2 pcs Alligator clips red 3 pcs Mains cable 2 m wire cross section 3 x 1 5 mm2 RS232 cable USB cable Cali...

Страница 12: ...ions TC1 for external test adapters 6 Mains test socket 7 P S probe connector 8 Keypad 9 HV output connectors 10 HV output warning lamp 11 Continuity connectors 12 Insulation Subleakage connectors 13...

Страница 13: ...control panel show detailed view of options HV Test key is used to start and stop HV tests 4 2 General meaning of touch gestures Tap briefly touch surface with fingertip is used to select appropriate...

Страница 14: ...d messages 4 4 Symbols and messages Supply voltage warning Possible causes No earth connection Instrument is connected to an IT earthing system Press YES to continue normally or NO to continue in a li...

Страница 15: ...an external voltage between C1 P1 and C2 P2 terminals was detected The measurement was cancelled Press OK to continue In pre test a too high external voltage was detected between P and PE terminals T...

Страница 16: ...et settings Press OK to continue The instrument is overheated The measurement can t be carried out until the icon disappears Press OK to continue The device under test should be switched on to ensure...

Страница 17: ...ailed Conditions on the input terminals allow starting the measurement consider other displayed warnings and messages Conditions on the input terminals do not allow starting the measurement consider d...

Страница 18: ...gure 4 1 Main menu Options Single Tests Menu with single tests see chapter 6 Single tests Auto Sequences Menu with customized test sequences see chapter 7 Auto Sequences Memory Organizer Menu for work...

Страница 19: ...nipulation with project files Refer to chapter 4 8 Workspace Manager for more information Auto Sequence groups Manipulation with lists of Auto Sequences Refer to chapter 4 9 Auto Sequence groups for m...

Страница 20: ...nguage In this menu the language of the instrument can be set Figure 4 3 Select language menu 4 6 2 Date and time In this menu date and time of the instrument can be set Figure 4 4 Setting data and ti...

Страница 21: ...ccount password consists of an up to 4 digit number Individual users can change their passwords The administrator password consists of an up to 15 characters Factory set administrator password is ADMI...

Страница 22: ...manager screen is opened as presented on Figure 4 7 4 6 6 2 Changing user password signing out After user completed Sign in procedure User profile menu screen is presented Same screen is presented if...

Страница 23: ...irst step Second step enter new user password and confirm entry Password change is confirmed with short message appearance 4 6 6 3 Managing accounts To access Account manager menu Administrator should...

Страница 24: ...n First step enter current Administrator password and confirm entry Wrong entry is reported by message Confirm message clear wrong password and repeat first step Second step enter new Administrator pa...

Страница 25: ...e 4 8 Edit accounts screen user list on the left user selected on the right User accounts selected Options Add New user account Add New menu appear on the screen Add New selection options Username ope...

Страница 26: ...er password and confirm entry Old user password is automatically overwritten without warning or confirmation Delete selected user account Warning message appears on the screen Warning message selectio...

Страница 27: ...tring disables password Confirm entry Blackbox password is changed 4 6 7 Change password for HV functions In this menu the password to enable starting of HV functions can be set changed or disabled Fi...

Страница 28: ...sts will be skipped Proceeds if fail Auto Sequence will proceed even if fail status of measurement inspection is detected Ext Keyboard ON enable external BT keyboard See A 1578 manual for details OFF...

Страница 29: ...the correct value or leave it as it is if not needed Alternate DNS server XXX XXX XXX XXX In manual mode depending on the network topology the use can enter the correct value or leave it as it is if...

Страница 30: ...rinted date Selects date printed on label text area Options Test date Retest date See Appendix C Print labels and write read RFID NFC tags for details Auto save Sets simultaneous saving of finished Au...

Страница 31: ...tings menu Warning Following customized settings will be lost when setting the instruments to initial settings Measurement limits and parameters Global parameters and System settings in General settin...

Страница 32: ...they can be selected in this menu Refer to Appendix B Profile Notes for more information about functions specified by profiles Options Loads the selected profile The instrument will restart automatic...

Страница 33: ...To work on the instrument an Export should be imported first from the list of Exports and converted to a Workspace To be stored as Export data a Workspace should be exported first from the list of Wo...

Страница 34: ...nizer Opens the selected Workspace in Memory Organizer Refer to chapters 5 Memory Organizer and 4 8 2 4 Opening a Workspace for more information Deletes the selected Workspace Refer to chapter 4 8 2 5...

Страница 35: ...Workspace from Export Refer to chapter 4 8 2 6 Importing a Workspace for more information 4 8 2 3 Adding a new Workspace New workspaces can be added from the Workspace manager screen Enters option fo...

Страница 36: ...kspace manager The opened Workspace is marked with a blue dot The previously opened Workspace will close automatically 4 8 2 5 Deleting a Workspace Export Workspace Export to be deleted should be sele...

Страница 37: ...rt file to be imported from Workspace manager Export list Enters option Import Before the import of the selected Export file the user is asked for confirmation The imported Export file is added to the...

Страница 38: ...e exported to an Export file Enters option for Export Before exporting the selected Workspace the user is asked for confirmation Workspace is exported to Export file and is added to the list of Export...

Страница 39: ...ings menu followed by selection of Auto Sequence groups menu Another option to access it is from Main Auto Sequences menu see chapter 7 1 Selection of Auto Sequences In this menu lists of Auto Sequenc...

Страница 40: ...from the list of Auto Sequence groups Enters option for selecting a highlighted group Selected group of Auto Sequences is marked with a blue dot Note Previously selected group is closed automatically...

Страница 41: ...MI 3394 CE MultiTesterXA Instrument operation 40 A group of Auto Sequences is deleted Note Selected Auto Sequences group marked with blue dot cannot be deleted warning message appear on the screen...

Страница 42: ...E MultiTesterXA has a fixed three level structure The hierarchy of Structure objects in the tree is shown on Figure 5 1 0 th level 1 st level 2 nd level 3 rd level NODE APPLIANCE FD full description m...

Страница 43: ...esults failed finished single test with test results finished single test with test results and no status empty single test without test results Overall statuses of Auto Sequence tests or at least one...

Страница 44: ...tatus indication under the Structure object Overall status of measurements under each structure element sub element can be seen without spreading tree menu This feature is useful for quick evaluation...

Страница 45: ...ure element sub element have passed or if there is an empty structure element sub element without measurements 5 1 3 Selecting an active Workspace in Memory Organizer Memory Organizer and Workspace Ma...

Страница 46: ...ase organization of data in the Memory Organizer One Node is a must others are optional and can be created or deleted freely Procedure Press the active Workspace in Memory Organizer Menu Select Add Ne...

Страница 47: ...chapters 6 1 1 5 Single test memory screen and 7 2 4 Auto Sequence memory screen for more information Starts a new measurement The instrument goes to the measurement start screen Refer to chapters 6...

Страница 48: ...cted After proper type is selected the instrument goes to single test or Auto Sequence selection screen Refer to chapters 6 1 Selection of single tests and 7 1 Selection of Auto Sequences for more inf...

Страница 49: ...child items sub structures and measurements can be moved to any allowed location in structure tree Refer to chapter 5 1 5 11 Cut Paste a Structure object with sub items for more information Views and...

Страница 50: ...press Enter key to enter menu for editing parameters Parameters Figure 5 9 Example of View Edit parameters menu In menu for editing parameters the parameter s value can be selected from a dropdown lis...

Страница 51: ...Tap on a structure type selection window A list of available structure items is displayed Select one from a list Arrow indicates the position where structure item will be inserted Child item to the cu...

Страница 52: ...or press ENTER key to modify Last added single test measurement is offered by default To select another measurement press Enter to open menu for selecting measurements Refer to chapters 6 1 Selection...

Страница 53: ...ure and options Select the structure object to be cloned Clone Select Clone option from control panel The Clone Structure object menu is displayed Sub elements of the selected structure object can be...

Страница 54: ...y measurement to the same level in the structure tree Procedure and options Select the measurement to be cloned Clone Select Clone option from control panel The new empty measurement is displayed 5 1...

Страница 55: ...ng and Pasting sub elements of selected structure object a The selected structure object and elements are copied pasted to selected position in the tree structure b Returns to the tree menu without ch...

Страница 56: ...bject and sub levels will be copied too 5 1 5 10 Copy Paste a measurement In this menu selected measurement can be copied to any allowed location in the structure tree Procedure Select the structure o...

Страница 57: ...Select the structure item to be moved Cut Select Cut option from Control panel Select new location where structure object with sub structures and measurements should be moved Paste Select Paste option...

Страница 58: ...ontrol panel A confirmation window will appear a Selected structure object and its sub elements are deleted b Returns to the tree menu without changes 5 1 5 13 Delete a measurement In this menu select...

Страница 59: ...MI 3394 CE MultiTesterXA Memory Organizer 58 A confirmation window will appear a Selected measurement is deleted b Returns to the tree menu without changes...

Страница 60: ...ct can be renamed Procedure Select the structure object to be renamed Rename Select Rename option from control panel Virtual keypad will appear on screen Enter new text and confirm 5 1 5 15 Recall and...

Страница 61: ...wed but cannot be edited Select Retest in Control panel Measurement retest starting screen is displayed a Parameters and limits can be viewed and edited Select Run in Control panel to retest the measu...

Страница 62: ...ntrol panel to open Search setup menu The parameters that can be searched for are displayed in the Search setup menu Name and status are referred to all structure objects If searching by status instru...

Страница 63: ...Clear filters Clears all filters Sets filters to default value Search Searches through the Memory Organizer for objects according to the set filters The results are shown in the Search results screen...

Страница 64: ...attachments of the Structure object can be viewed or edited Refer to Chapter 5 1 5 3 View Edit parameters and attachments of a Structure object for more information Attachments Name and link of attach...

Страница 65: ...nizer s main and submenus In Single test main menu there are four modes for selecting single tests Options All A single test can be selected from a list of all single tests The single tests are always...

Страница 66: ...all single tests that belongs to the selected group is displayed Cross selector This selection mode is the fastest way for working with the keypad Groups of single tests are organized in a row For the...

Страница 67: ...ters white and limits red Statuses info warnings Options Figure 6 1 Single test screen organisation 6 1 1 1 Single test start screen Single test screen can be opened from Memory organizer or from Sing...

Страница 68: ...limit red Selects value of parameter or limit In case of many multiple pages of parameters or limits The scroll bar on the right side of screen can be used With right left keys it can be jumped page u...

Страница 69: ...A Single tests 68 Figure 6 4 Single test screen during measurement Options during test Stops the single test measurement Proceeds to the next step of the measurement if measurement consists of more st...

Страница 70: ...y default The user can select another Structure object or create a new Structure object By pressing the key in Memory organizer menu the measurement is saved under selected location An empty measureme...

Страница 71: ...g parameters and limits of single tests for more information 6 1 1 5 Single test memory screen Figure 6 6 Single test memory screen Options Retest Enters screen with empty measurement on Opens menu fo...

Страница 72: ...checked are displayed In addition on line statuses and other information are displayed Figure 6 7 Inspection screen organisation 6 1 2 1 Single test inspection start screen Figure 6 8 Inspection start...

Страница 73: ...ms Applies a checked status to the selected item or group of items on A status can be applied direct to the checkbox successive tap toggle between statuses Power is applied to the mains test socket to...

Страница 74: ...can have different status types For example some basic inspections don t have the checked status 6 1 2 3 Single test Inspection result screen Figure 6 10 Inspection result screen Options after inspec...

Страница 75: ...and then restarted A new measurement will be saved under the selected Structure object Opens Help screen see chapter 6 1 3 Help screens for more information 6 1 2 4 Single test inspection memory scre...

Страница 76: ...4 CE MultiTesterXA Single tests 75 6 1 3 Help screens Help screens contain diagrams for proper connection of the instrument Figure 6 12 Examples of help screens Options on Goes to previous next help s...

Страница 77: ...circuit Figure 6 14 Visual inspection test circuit Visual inspection procedure Select the appropriate Visual inspection Start the inspection Perform the visual inspection of the appliance equipment Ap...

Страница 78: ...n Duration Off 2 s 180 s U test Enables U test On Off Wire section Wire section for U test 0 5 mm2 6mm2 Test limits H Limit R H limit Off Custom 0 01 9 L Limit R L limit Off Custom 0 01 9 H Limit U H...

Страница 79: ...cedure Select the Continuity function Set test parameters limits Connect test leads to C1 P1 P2 and C2 terminals on the instrument 4 wire or connect test lead to P S terminal 2 wire measurement P S PE...

Страница 80: ...MI 3394 CE MultiTesterXA Single tests 79 Figure 6 19 Examples of Continuity measurement results...

Страница 81: ...stance Connection for compensating the resistance of test leads Figure 6 20 Shorted test leads Compensation of test leads resistance procedure Select the Continuity function Parameter Output must be s...

Страница 82: ...s Table is based on VDE 0701 0702 standard for nominal current In 16A L wire length R Limit L 5 m 0 3 5 m L 12 5 m 0 4 12 5 m L 20 m 0 5 20 m L 27 5 m 0 6 27 5 m L 35 m 0 7 35 m L 42 5 m 0 8 42 5 m L...

Страница 83: ...tom value Length and Cross section entry with on screen keyboard when Custom is selected from the value list Examples of parameter value lists VDE rule Length parameter list Calculator rule Length par...

Страница 84: ...est menu Test results sub results I test current U measured a c test voltage Ir resistive portion of test current Ic capacitive portion of test current Test parameters AC test voltage U test 100 V 510...

Страница 85: ...esults optional Figure 6 25 Examples of HV AC measurement results Note First HV measurement after power on the instrument if password protection is enabled or first HV measurement after enabling or ch...

Страница 86: ...ts High limit I H limit Custom 0 05 mA 10 0 mA Low limit I L limit Off Custom 0 05 mA 10 0 mA Test circuit Figure 6 27 HV DC measurement HV DC measurement procedure Select the HV DC function Set test...

Страница 87: ...rd for enabling HV test Refer to chapter 4 6 7 Change password for HV functions for more information 6 2 5 HV AC programmable IMPORTANT SAFETY NOTE Refer to chapter 1 1 Warnings and notes for more inf...

Страница 88: ...e t start 1 s 120 s Duration of ramp t ramp 2 s 60 s Duration of test voltage t end Off 1 s 120 s Test limits High limit I H limit Custom 0 5 mA 100 mA Low limit I L limit Off Custom 0 5 mA 100 mA Tes...

Страница 89: ...est results Note First HV measurement after power on the instrument if password protection is enabled or first HV measurement after enabling or changing password require entering password for enabling...

Страница 90: ...ogrammable test menu Test results sub results U measured test voltage I test current Ic capacitive portion of test current Ir resistive portion of test current Test parameters Starting DC test voltage...

Страница 91: ...ect HV test leads to device under test Start measurement Measurement can be stopped manually or by timer Save results optional Figure 6 35 Examples of HV DC programmable test results Note First HV mea...

Страница 92: ...V 100 V 250 V 500 V 1000 V Duration Duration Off 2 s 180 s Type of test Type Riso Riso S Riso Riso S Output connections Riso ISO ISO Socket LN PE Socket LN P S Output connections Riso S Socket LN P S...

Страница 93: ...Riso function Set test parameters limits Connect test leads to ISO ISO terminals on the instrument then connect test leads to device under test or Connect device to mains test socket For Riso S test...

Страница 94: ...Test results sub results Isub Sub leakage current Isub S Sub leakage current S Test parameters Type of test Type Isub Isub S Isub Isub S Duration Duration Off 2 s 180 s Output connections Isub SUB1 S...

Страница 95: ...CE MultiTesterXA Single tests 94 Test circuits Figure 6 42 Measurement of Sub leakage SUB1 SUB2 Figure 6 43 Measurement of Sub leakage socket LN PE Figure 6 44 Measurement of Sub leakage Sub leakage S...

Страница 96: ...l Figure 6 45 Examples of Sub leakage measurement results Note When P S probe is connected during the Sub leakage measurement then the current through it is also considered 6 2 9 Differential Leakage...

Страница 97: ...L N PE P S Test circuit Figure 6 47 Measurement of Differential Leakage current Differential Leakage measurement procedure Select the Differential Leakage function Set test parameters limits Connect d...

Страница 98: ...urrent in two sequential steps with delay in between The phase voltage is firstly applied to the right live output of the mains test socket and secondly to the left live output of the mains test socke...

Страница 99: ...current Ipe Leakage measurement procedure Select the Ipe Leakage function Set test parameters limits Connect device under test to mains test socket Start measurement Measurement can be stopped manual...

Страница 100: ...rrent in two sequential steps with delay in between The phase voltage is firstly applied to the right live output of the mains test socket and secondly to the left live output of the mains test socket...

Страница 101: ...test parameters limits Connect device under test to mains test socket Connect test lead to P S terminal on the instrument and on device under test Start measurement Measurement can be stopped manually...

Страница 102: ...rameters Duration Duration Off 2 s 180 s Output connections Socket L N Test limits H Limit P H limit Off Custom 10 W 3 50 kW L Limit P L limit Off Custom 10 W 3 50 kW Test circuit Figure 6 56 Measurem...

Страница 103: ...MI 3394 CE MultiTesterXA Single tests 102 Figure 6 57 Examples of Power measurement results...

Страница 104: ...asures leakage current in two sequential steps with delay in between The phase voltage is firstly applied to the right live output of the mains test socket and secondly to the left live output of the...

Страница 105: ...wer measurement procedure Select the Leak s Power function Set test parameters limits Connect device under test to mains test socket and optionally to P S terminal Start measurement Measurement can be...

Страница 106: ...ple of the Discharging time function is as following Phase The device under test is connected to supply voltage via an external socket The instrument monitors the voltage on supply or internal connect...

Страница 107: ...ure 6 63 Discharging Time test Output External Discharging Time test procedure Output External Select the Discharging Time function Set test parameters limits Connect test leads to the DISCHARGING TIM...

Страница 108: ...instrument disconnects the DEVICE UNDER TEST from the supply and the voltage at the supply connections starts to fall Disconnection moment is always at peak voltage Phase After the voltage drops below...

Страница 109: ...l Power measurement test the parameters and limits are the same as set in the Power single test see chapter 6 2 12 Power Test circuit Figure 6 68 Functional inspection Functional inspection procedure...

Страница 110: ...MI 3394 CE MultiTesterXA Single tests 109 Save results optional Figure 6 69 Examples of Functional Inspection results...

Страница 111: ...o Chapter 4 9 Auto Sequence groups for more details Auto Sequence to be carried out can then be selected from the Main Auto Sequences menu which can be organized in structural manner with folders and...

Страница 112: ...r Auto Sequences on base of their Name or Short code Procedure Select Auto Sequence group header in Auto Sequences menu by taping on it Select Search from options menu to open Search setup menu The pa...

Страница 113: ...e results are shown in the Search results screen presented on Figure 7 1 and Figure 7 2 Figure 7 1 Search results screen Page view Options Next page Previous page Note Search result page consist of up...

Страница 114: ...e coupled Changing of parameters or limits in any of the coupled Auto Sequences will influence on the original Auto Sequence and all its shortcuts Figure 7 3 Structure organization of Auto Sequence gr...

Страница 115: ...est sequence is finished the Auto Sequence result menu is shown Details of individual tests can be viewed and the results can be saved to Memory organizer 7 2 1 Auto Sequence view menu In the Auto Seq...

Страница 116: ...selected Options Selects single test on Opens menu for changing parameters and limits of selected measurements Refer to chapter 6 1 1 2 Setting parameters and limits of single tests for more informat...

Страница 117: ...esented on Figure 7 6 below Available settings are organized in groups each group starts with concerned Single test name Limit Calculator is referred to Continuity function Refer to Single test descri...

Страница 118: ...s ticker will be executed in a continuous loop It is possible to exit the loop anytime at the end of each individual measurement The Multiple points setting is valid only for the actual Auto Sequence...

Страница 119: ...of single tests pre programmed loop or multiple points execution and proceeds to the next step in the test sequence on Opens menu for viewing parameters and limits of a current measurement Adds comme...

Страница 120: ...strument goes to menu for viewing details of the Auto Sequence see Figure 7 10 Adds comment to the Auto Sequence The instrument opens keypad for entering a comment Saves the Auto Sequence results A ne...

Страница 121: ...tag Refer to Appendix C Print labels and write read RFID NFC tags for supported tag types Write RFID NFC tag and Save Auto Sequence results simultaneously Option is available if Devices parameter Auto...

Страница 122: ...equence result screen for more information Print label See chapter 4 6 9 Devices for details how to enable and set the printer For more information refer to chapter Appendix C Print labels and write r...

Страница 123: ...chapter 3 1 Front panel Warnings Switch off the instrument and disconnect all test accessories and mains cord before replacing the fuses or opening the instrument Replace blown fuses only with the sa...

Страница 124: ...to configure a Bluetooth link between instrument and PC Switch On the instrument On PC configure a Standard Serial Port to enable communication over Bluetooth link between instrument and PC Usually no...

Страница 125: ...ich external devices and functionalities are supported See Chapter 4 6 9 Devices for details how to set the external Bluetooth devices 9 4 Ethernet communication The instrument is also capable of comm...

Страница 126: ...ct USB communication cable to 4 pin communication signal connector It is intended only for connection to test adapters 9 7 INPUTs The DB9 connector INPUTs is intended for connection of external contro...

Страница 127: ...external devices are provided Figure 9 3 OUTPUT connector pin layout Legend Pins Description Type 4 9 OUT_1 Control output 1 NO relay Umax 24V Imax 1 5 A Output low open contact Output high closed con...

Страница 128: ...ve Output voltage 100 V 1000 V 0 10 1010 V 5000 V 0 5 floating to earth Trip out time if apparent current exceeds high limit 30 ms Short circuit current 200 mA Output power 500 VAmax Test terminals Fu...

Страница 129: ...rsus wire cross section Wire cross section mm2 Limit voltage drop V 0 5 5 0 0 75 5 0 1 3 3 1 5 2 6 2 5 1 9 4 1 4 6 1 0 Operating range acc to EN 61557 4 0 08 199 9 Test currents 0 2A 4A 10A 25A Curren...

Страница 130: ...V 1200 V 1 V 3 of reading 2 D Operating range acc to EN 61557 2 0 08 M 199 9 M Nominal voltages Un d c 50 V 100 V 250 V 500 V 1000V 0 10 Short circuit current max 2 0 mA Test terminals Function Conne...

Страница 131: ...d current 0 02 mA A Test terminals Function Connections Differential leakage Mains test socket LN TC1 10 7 PE leakage current PE leakage current Range Resolution Accuracy Ipe 0 00 mA 19 99 mA 0 01 mA...

Страница 132: ...W 5 of reading 5 D 20 0 W 199 9 W 0 1 W 5 of reading 200 W 1999 W 1 W 5 of reading 2 00 kW 3 70 kW 10 W 5 of reading Power apparent Range Resolution Accuracy S 0 00 VA 19 99 VA 0 01 VA 5 of reading 10...

Страница 133: ...y is valid within 0 5c PF 0 8i Test terminals Function Connections Power Mains test socket TC1 10 10 Leak s Power Power active Range Resolution Accuracy P 0 00 W 19 99 W 0 01 W 5 of reading 5 D 20 0 W...

Страница 134: ...Range Resolution Accuracy I 0 mA 999 mA 1 mA 3 of reading 5 D 1 00 A 16 00 A 10 mA 3 of reading Differential leakage current Range Resolution Accuracy Idiff 0 00 mA 19 99 mA 0 01 mA 3 of reading 5 D O...

Страница 135: ...nal DISCH1 DISCH2 Discharging time Socket Mains test socket L N TC1 10 12 General data Power supply Supply voltage frequency 110 V 230 V AC 50 Hz 60 Hz Supply voltage tolerance 10 Max power consumptio...

Страница 136: ...5 A max Dimensions w h d 43 5 cm 29 2 cm 15 5 cm Weight 17 kg Reference conditions Reference temperature range 15 C 35 C Reference humidity range 35 65 RH Operation conditions Working temperature rang...

Страница 137: ...ent Symbol Default name Description Node Node Project Project Location Location Element Universal element Appliance Appliance basic description Appliance FD Appliance full description Machine Electric...

Страница 138: ...MI 3394 CE MultiTesterXA Appendix B 137 Appendix B Profile Notes There are no specific profile notes for CE MultiTesterXA MI 3394...

Страница 139: ...st if printed from memory Following table describe tag content arrangement and its data for supported form size and chosen label type Label type Form size W x H mm Tag content arrangement Label data S...

Страница 140: ...nting from object currently signed in user Following table describes tag content arrangement and its data for supported label form size Form size W x H mm Tag content arrangement Data 50 x 25 5 Text P...

Страница 141: ...f Auto Sequences Pre programmed DEMO Auto Sequences No Name Description 1 DEMO_1 This Auto Sequence is just for demonstration of manipulation of Auto Sequence operation 2 DEMO_2 This Auto Sequence is...

Страница 142: ...workspace select in Home Tab of Metrel ES Manager PC SW Auto Sequence editor workspace is divided in four main areas On the left side structure of selected group of Auto Sequence is displayed In the...

Страница 143: ...gure E 3 Example of a measurement step Figure E 4 Example of an Auto Sequence result E 2 Managing of Auto Sequence groups The Auto Sequences can be divided into different user defined Auto Sequence gr...

Страница 144: ...Saves Saves as the opened Auto Sequence Group to a file Closes the file Auto Sequence Group Group of Auto Sequences view options Expand all folders subfolders Auto Sequences Collapse all folders subf...

Страница 145: ...n the object name allows it name edit DOUBLE CLICK Auto Sequence name Edit Auto Sequence name Folder name Edit folder name Drag and drop of the selected Auto Sequence or Folder Subfolder moves it to a...

Страница 146: ...n Figure E 7 appear on the screen By entering the text into search box found results are automatically highlighted with yellow background Search functionality is implemented in Folders Subfolders and...

Страница 147: ...can also be added to the Result step E 3 2 Single tests Single tests are the same as in Metrel ES Manager Measurement menu Limits and parameters of the measurements can be set Results and sub results...

Страница 148: ...on the appropriate place in any Auto Sequence step Changing position of flow command within measurement step By a click on an element and use of keys Viewing changing parameters of flow commands or s...

Страница 149: ...t of menu window Parameters Pause type Show text and or warning check to show warning icon Show picture browse for image path Duration Number in seconds infinite no entry Output state Sets outputs OUT...

Страница 150: ...ge will be applied to WITHSTANDING HV and HV test terminals as soon as all input conditions will be fulfilled Green lamp OUT_2 ON means that dangerous voltage is present at WITHSTANDING HV and HV test...

Страница 151: ...re information Parameters State On enables No notifications mode Off disables No notifications mode Appliance info Instrument enables to automatically add the appliance name to the Auto Sequence Param...

Страница 152: ...stopped and statuses can be applied manually Inspection Expert mode is disabled by default Parameters State On enables automatic settings of tickers in Visual and Functional tests Off disables automa...

Страница 153: ...case the measurement passed failed or ended without a status Manual The test sequence stops and waits for appropriate command TEST key external command to proceed Auto The test sequence automatically...

Страница 154: ...d by selecting icon from Auto Sequences main menu It is divided in two main areas as presented on Figure E 8 Custom Inspection Editor workspace Custom Inspection Name and Scope of inspection Visual or...

Страница 155: ...he name Actions could be performed with keyboard also Press right mouse button to activate Edit menu and select appropriate action as presented on the left figure Menu is case sensitive options curren...

Страница 156: ...le checkbox status assignment options are Pass_Fail_Checked_Empty Pass Fail Checked Empty default Pass_Fail_Empty Pass Fail selection Empty default value E 6 2 Applying Custom Inspections Custom inspe...

Страница 157: ...irmation of selection new Inspection Data file is opened and list of available Custom Inspections is changed Note If Metrel ES Manager Work scope is changed opened Inspection Data file remains active...

Отзывы: