background image

48

Installation de l’appareil

Étant donné la multitude de peintures et d’encaustiques utilisées, il n’est pas exclu que
les pieds de l’appareil laissent des traces sur les meubles dues à une réaction chimique.
Pour cette raison, il est recommandé de protéger vos meubles précieux ou fragiles avant
d'y placer l'appareil. 

Montage dans une baie:
Vissez à fond l'unité de commande et l'unité lecteur du lecteur CD dans les trous de fixation 
dans une baie de 19 pouces.

N’essayez pas de percer ou de visser de vis supplémentaires dans le boîtier afin d´éviter de toucher des
tensions dangereuses.
Veillez à une aération suffisante lors du montage dans une baie avec d´autres équipements.

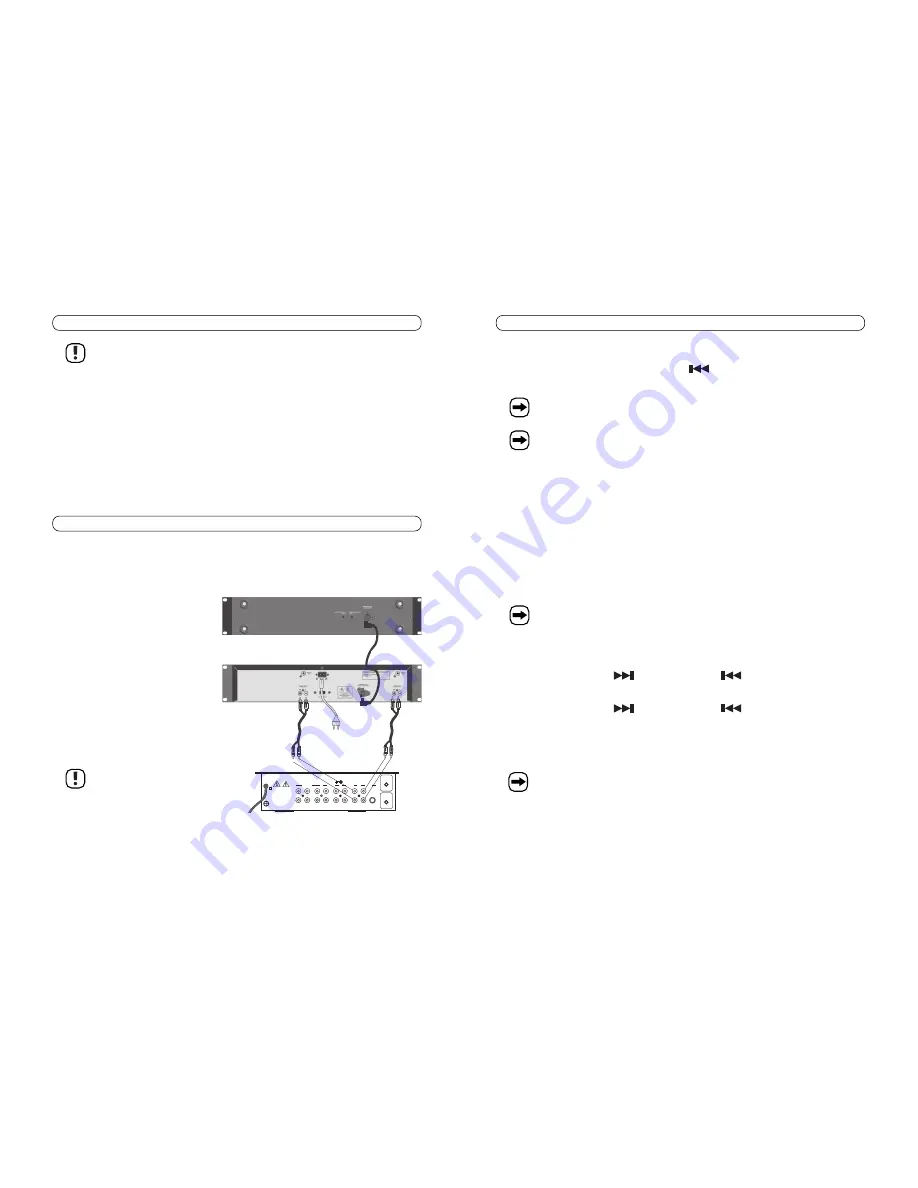
Raccordement

Avant de brancher le lecteur de CD et tous les autres appareils, mettez celui-ci et tous les autres appareils
qui doivent y être connectés hors tension (débrancher la fiche de la prise de courant).

Raccordement des sorties Cinch:

Utilisez les câbles Cinch fournis pour
effectuer le raccordement.
Raccordez à la sortie Cinch Lecteur 
1 (26) une entrée Cinch libre de votre amplifica-
teur/table de mixage, p. ex. CD 1 an.
Raccordez à la sortie Cinch Lecteur 2 (26) une
entrée Cinch libre de votre amplificateur/table
de mixage, p. ex. CD 2 an.

La prise de sortie Cinch blanche (L) du lecteur
doit être raccordée à l'entrée gauche de l'ampli-
ficateur/de la table de mixage.
La prise de sortie rouge (R) du lecteur doit être
raccordée à l'entrée droite de l'amplificateur/de
la table de mixage.

Pour éviter toute distorsion ou
désadaptation susceptibles
d´endommager l'appareil, ne
raccorder aux sorties que des
appareils équipés d'une sortie
Cinch audio.

Bedienteil

AC INPUT
   19W

PHONO

PHONO

LINE

LINE

LINE

LINE

BOOTH

BOOTH

MASTER

MASTER REC.

REC.

CD1

CD1

CD2

CD2

MIC

MIC

230V~

50/60Hz

L

R

CAUTION

OUTPUT

CH 2

CH 3

CH 1

GND

GND

Mischpult

REMOTE

CONTROL
CD1

REMOTE

CONTROL
CD2

REMOTE Kabel

Laufwerkseinheit

Front  panel  
replay  unit

CINCH
Kabel

CINCH
Kabel

Unité de commande

Unité lecteur

Câble REMOTE

Table de mixage

CINCH
Câble

CINCH
Câble

33

Initial operation

2. During playback/pause, press the 10 TRACK SKIP BUTTON (17) to jump 10 tracks forwards. 

3. During playback/pause, press the track skip button 

(14) to jump to the start of the track or to the pre-

vious track.

If you keep the track skip button depressed, the CD player skips the tracks until you let
the button go again.

The device automatically sets the CUE point new after each track selection with the track
skip buttons. The CUE point is set at the beginning of the selected track. The CUE LED
(16) flashes twice briefly in the process.

Selecting a section in a track

1. The shuttle jog wheel (12) serves to quickly locate a certain point in a track. The search speed depends on

how much the wheel is turned to the left or to right side. After letting go of the wheel, this returns to the middle
position automatically. In order to search forwards, turn the wheel to the right. In order to search backwards,
turn the wheel to the left.

2. The shuttle jog wheel (13) serves to quickly locate a certain point in a track. In the pause function, quick set-

ting of the beat start is very easy as the track is scanned in very small steps (frames) and the search takes pla-
ce in audible steps. In order to search forwards, turn the wheel to the right. In order to search backwards, turn
the wheel to the left. 

2.

In playback mode, the playback speed is altered with the JOG wheel (13). The change of the playback speed
depends on the rotation speed of the wheel.

You can work in pause or playback mode with the SHUTTLE or JOG wheel.  In pause
mode, the CD player switches to "stutter mode" as soon as one of the wheels is operated.

Programming CD track sequences

1. Press the PROGRAM button (5); the display shows TRACK "- -" and for the time "P- 01 00". The PROGRAM

LED (6) is lit. 

2. Press the track skip button

(15), the track skip button 

(14) or one of the keys on the keypad

(17) to select the first track.

3. Press the PROGRAM button (5) for confirmation. The display changes from "P- 01 00" to "P- 02 01".
4. Press the track skip button

(15), the track skip button 

(14) or one of the keys on the keypad

(17) to select the second track.

5. Press the PROGRAM button (5) for confirmation. The display changes from "P- 02 01" to "P- 03 02".
6. Repeat steps 4 and 5 until you have programmed all the desired tracks.
7. Press the PLAY/PAUSE button (19) to start the playback.
8. To delete programming, press and hold the PROGRAM button (5). The PROGRAM LED (6) goes off. 

You can program as many as 20 tracks.

Содержание DJ-2250

Страница 1: ...Erfassung in elektronischen Datenverarbeitungsanlagen bed rfen der schriftlichen Genehmigung des Herausgebers Nachdruck auch auszugsweise verboten Diese Bedienungsanleitung entspricht dem technischen...

Страница 2: ...Sie deshalb diese Bedienungsanleitung zum Nachlesen auf Alle enthaltenen Firmennamen und Produktbezeichnungen sind Warenzeichen der jeweiligen Inhaber Alle Rech te vorbehalten Bei technischen Fragen...

Страница 3: ...t nur f r den Anschluss an 230V 50Hz oder 115V 60Hz Wechselspannung zugelassen Eine Verwendung ist nur in geschlossenen R umen nicht im Freien erlaubt Der Kontakt mit Feuchtigkeit z B im Badezimmer u...

Страница 4: ...tion der Wiedergabegeschwindigkeit 17 Handhabung 18 Wartung Pflege Entsorgung 18 Wartung 18 Tipps zur Handhabung von CD s 19 Entsorgung 19 Behebung von St rungen 20 Technische Daten 21 75 Technische g...

Страница 5: ...uitend door een erkend vak man worden uitgevoerd 7 Sicherheits und Gefahrenhinweise Dieses Zeichen auf dem Ger t weist den Benutzer darauf hin dass er vor der Inbetrieb nahme des Ger tes diese Bedienu...

Страница 6: ...auf eine ausreichende Bel ftung des Ger tes Alle Personen die dieses Ger t bedienen installieren aufstellen in Betrieb nehmen oder warten m ssen ent sprechend ausgebildet und qualifiziert sein und die...

Страница 7: ...mit den jeweiligen Gefahren vertraut ist durchge f hrt werden Eine unsachgem ausgef hrte Einstellarbeit kann eine gef hrliche Laserstrahlung zur Folge haben Im CD Fach des Ger tes befindet sich ein L...

Страница 8: ...er Einstellung der korrekten Netzspannung 28 Netzbuchse Hier wird die beiliegende Netzleitung eingesteckt 71 Ingebruikneming 2 Om het CUE punt handmatig in te stellen moet u de weergave op de gewenste...

Страница 9: ...elke nummerkeuze d m v de Track toetsen 14 15 17 Het CUE punt wordt ingesteld aan het begin van het gekozen nummer De CUE LED 16 knippert daarbij kort Anschluss und Bedienelemente Aufstellen der Anla...

Страница 10: ...e gaan Als de Track toets nummertoets wordt vastgehouden gaat de cd speler zolang door met het aflopen van de nummers tot de toets weer wordt losgelaten Het apparaat stelt automatisch na elke nummerse...

Страница 11: ...s een van de cd units zich gedurende een langere periode in de pauzemodus bevindt wordt deze ter bescherming van de laser in de SLEEP modus geschakeld Druk op de PLAY PAUSE toets 19 om de SLEEP modus...

Страница 12: ...etzt Die CUE LED 16 blinkt dabei zweimal kurz Befindet sich eine CD Einheit f r einen l ngeren Zeitraum im Pausemodus so schaltet sich diese zur Schonung des Lasers in den SLEEP Modus Dr cken Sie die...

Страница 13: ...n Titel zu springen Wird die Titelsprungtaste gedr ckt gehalten durchl uft der CD Spieler die Titelnummern bis Sie die Taste loslassen Das Ger t setzt automatisch nach jeder Titelanwahl mittels der Ti...

Страница 14: ...E Punkt auch automatisch nach jeder Titelwahl mittels der Titelsprungtasten 14 15 17 neu Der CUE Punkt wird am Anfang des gew hlten Titels gesetzt Die CUE LED 16 blinkt dabei kurz 65 Aansluitingen en...

Страница 15: ...iebnahme 2 Um den CUE Punkt manuell zu setzen m ssen Sie die Wiedergabe an der gew nschten Stelle mit der PLAY PAUSE Taste 19 unterbrechen Das Ger t wechselt in die Pausefunktion Eine pr zise Einstell...

Страница 16: ...worden uitgevoerd door een erkend vakman die op de hoogte is van de hieraan verbonden risi co s Ondeskundig uitgevoerde afstelwerkzaamheden kunnen gevaarlijke laserstraling tot gevolg hebben In de cd...

Страница 17: ...langere tijd niet gebruikt Zorg voor voldoende ventilatie rond het apparaat Alle personen die dit apparaat bedienen installeren opstellen in bedrijf nemen of onderhouden moeten daartoe voldoende gekw...

Страница 18: ...lie lich durch einen autorisier ten Fachmann durchzuf hren 61 Veiligheidsvoorschriften en risico s Dit teken op het apparaat betekent dat de gebruiker v r ingebruikneming van het appa raat deze gebrui...

Страница 19: ...nctie 70 Synchronisatie van de afspeelsnelheid 71 Gebruikstips 72 Onderhoud verzorging afvalverwerking 72 Onderhoud 72 Tips voor het gebruik van cd s 73 Afvalverwerking 73 Verhelpen van storingen 74 T...

Страница 20: ...van het audio uitgangssignaal is laag en moet derhalve ter versterking worden doorgestuurd naar een externe versterker gebruik eventueel een mengpaneel resp voorversterker Het apparaat is niet geschi...

Страница 21: ...r playing audio CDs in private households and in the semi pro fessional sector For amplification the low voltage signal must be transferred to an external amplifier poss by using a mixing desk or pre...

Страница 22: ...f the playback speed 35 Handling 36 Servicing maintenance and disposal 36 Maintenance 36 Useful notes on handling CDs 37 Disposal 37 Troubleshooting 38 Technical data 39 57 Caract ristiques techniques...

Страница 23: ...r la table de r glage balance de mixage Le c ble de raccordement cinch est Remplacez le c ble cinch d fectueux Les r parations autres que celles qui ont t pr c demment d crites doivent tre uniquement...

Страница 24: ...dingly and observe these operating instructions On industrial sites the accident prevention regulations of the association of the industrial workers society for electrical equipment and utilities must...

Страница 25: ...iblement endommag 27 Safety instructions and hazard warnings This product is equipped with a laser class 1 Never open the device Setting or maintenance tasks must only be executed by a trained special...

Страница 26: ...er le point CUE manuellement vous devez interrompre la lecture au moment souhait l aide de la touche PLAY PAUSE 19 L appareil passe au mode pause Un r glage pr cis du point de d part CUE peut tre effe...

Страница 27: ...ment au d but du premier titre apr s chaque premi re lecture du CD Egalement l appareil place automatiquement apr s chaque s lection d un titre l aide des touches de saut de titre 14 15 17 un nouvau p...

Страница 28: ...touche L appareil place automatiquement un nouveau point CUE apr s chaque s lection de titre effectu e l aide des touches de saut de titre Le point CUE est plac au d but du titre s lectionn La DEL CU...

Страница 29: ...CUE est replac automatiquement La diode CUE LED 16 clignote deux fois bri vement Si une unit CD est en mode pause pendant une dur e prolong e cette unit commute dans ce cas en mode SLEEP pour m nager...

Страница 30: ...to SLEEP mode to pro tect the laser Press the PLAY PAUSE button 19 to terminate SLEEP mode Selecting tracks 1 During playback pause press the track skip button 15 to select the next track 49 Raccordem...

Страница 31: ...back pause press the track skip button 14 to jump to the start of the track or to the pre vious track If you keep the track skip button depressed the CD player skips the tracks until you let the butto...

Страница 32: ...Installation de l appareil Lorsque vous choisissez le lieu d installation tenez compte des dispositions de la pi ce comme par exemple l endroit o se trouve la prise la plus proche etc Lors du choix d...

Страница 33: ...signaux de sortie audio droit et gauche du lecteur de CD Rac cordez ici l entr e audio de la table de mixage ou de l amplificateur 27 Commutateur de s lection de tension Cet interrupteur permet de r g...

Страница 34: ...r alis s dans les r gles de l art peuvent entra ner un rayonnement laser dange reux Un panonceau d avertissement laser se trouve dans le lecteur CD de l appa reil L appareil est quip d un laser de la...

Страница 35: ...roc der au nettoyage de l appareil en cas d orage en cas d inutilisation prolong e de l appareil Veiller ce une a ration suffisante de l appareil Toute personne susceptible d utiliser de monter d inst...

Страница 36: ...ur l appareil indique l utilisateur qu il doit lire le pr sent mode d emploi avant la mise en service de l appareil et qu il doit le respecter pendant le fonctionnement Le symbole de l clair dans un t...

Страница 37: ...Fonction CUE 52 Synchronisation de la vitesse de lecture 53 Manipulation 54 Entretien nettoyage et limination 54 Entretien 54 Conseils pour la manipulation des CD 55 limination 55 D pannage 56 Caract...

Страница 38: ...redi de 8h00 12h00 13h00 17h00 41 Utilisation conforme Le double lecteur McCrypt DJ 2250 sert lire les cd audio estin e l usage personnel et semiprofessionnel Le signal de la sortie audio bas niveau d...

Отзывы: