background image

2 - 12

160 ATJ ET 180 ATJ

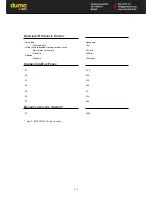
- Maximum authorised tilt or slope: 9% or 5°
- Maximum authorised load: 230 kg, i.e. two people.

REMINDER

M

AXIMUM AUTHORISED TILT OR SLOPE AND MAXIMUM AUTHORISED LOAD

Содержание 160 ATJ

Страница 1: ...J 547370 EN 22 11 2006 BP 249 Z I 44158 ANCENIS CEDEX FRANCE TEL 33 0 2 40 09 10 11 YOUR DEALER OPERATOR S MANUAL THIS INSTRUCTION LEAFLET MUST BE KEPT PERMANENTLY ON THE ACCESS PLATFORM AND BE READ A...

Страница 2: ......

Страница 3: ...m developments ch 3 following production of the MAINTENANCE SCHEDULE 05 07 2006 Corrections Ch 2 4 add backup pump power fuse Ch 3 corrections to MAINTENANCE SCHEDULE Ch 5 ajout de l option Roues 20 P...

Страница 4: ......

Страница 5: ...OF THE ACCESS PLATFORM RESCUE PROCEDURE 3 MAINTENANCE FILTERS CARTRIDGES AND BELTS LUBRICANTS MAINTENANCE SCHEDULE A Every day or every 10 hours of operation B Every 50 hours of operation C Every 250...

Страница 6: ......

Страница 7: ...1 1 1 OPERATING AND SAFETY INSTRUCTIONS 1 OPERATING AND SAFETY INSTRUCTIONS...

Страница 8: ......

Страница 9: ...g a risk from the legal viewpoint The certificate of compliance only binds the maker for parts chosen or produced under the maker s control The practicalities of maintenance terms are set out by the m...

Страница 10: ...ther or not a person will make a suitable driver OBTAIN INFORMATION ON How to behave when there is a fire The location of the nearest first aid kit and fire extinguisher The emergency telephone number...

Страница 11: ...dealer for information C MODIFYING THE PLATFORM For your safety and that of others you must not change the structure and settings of the various components used in your platform hydraulic pressure cal...

Страница 12: ...uvres not described in the operator s manual must necessarily be forbidden right from the start Follow the safety advice and the instructions on the platform Ypu must necessarily replace the operator...

Страница 13: ...ot replaced with lighter ones compromising stability Safety goggles are always worn when charging the batteries The batteries are not charged in an explosive environment There is no smoking and no nak...

Страница 14: ...the driver s seat extending arms or legs or in general any part of the body outside the basket is forbidden Safety helmets must be worn MANITOU recommends a safety harness in the operator s size be p...

Страница 15: ...a long period there is a risk that the basket will rest on this structure because of the oil cooling in the cylinders or a minor leak in the cylinder locking system To eliminate this risk Regularly c...

Страница 16: ...elease the ignition key and let the engine run at tick over speed NB In very cold weather see 2 DESCRIPTION INSTRUMENTS AND CONTROLS Do not engage the starter motor for more than 15 seconds and carry...

Страница 17: ...y at an appropriate speed for the operating conditions land configuration load in the basket take extreme care if manoeuvring the platform with the basket in the high position Ensure you have adequate...

Страница 18: ...ing period leave the I C engine idling for a few moments to allow the coolant liquid and oil to lower the temperature of the I C engine and transmission Do not forget this precaution in the event of f...

Страница 19: ...nts to be welded without damaging the electronic components The power supply to the welding equipment must be via an earthed socked and any extension required just also be earthed In all cases ensure...

Страница 20: ...your platform in good working conditions Failure to perform the periodic service may cancel the contractual guarantee LUBRICANT AND FUEL LEVELS Use the recommended lubricants never use contaminated lu...

Страница 21: ...or the live ring If the platform is equipped with an electronic control unit disconnect this before starting to weld to avoid the risk of causing irreparable damage to electronic components WASHING TH...

Страница 22: ...inutes then switch off Replace the I C engine oil and oil filter see 3 MAINTENANCE Add the protective product to the engine oil Run the I C engine for a short time so that the oil and cooling liquid c...

Страница 23: ...t the engine cut off solenoid Refit and reconnect the battery Remove the protection from the cylinder rods Perform the daily service see 3 MAINTENANCE Empty and replace the fuel and replace the fuel f...

Страница 24: ...fy NOTE For the owner s convenience it is recommended that a note of these numbers is made in the spaces provided at the time of the delivery of the access platform PLATE MANUFACTURER OF THE ACCESS PL...

Страница 25: ...1 19 REAR AXLE ASSEMBLY FIG E Axle type Serial Nr Maker s N E...

Страница 26: ...essary For operation under average climatic conditions i e between 15 C and 35 C correct levels of lubricants in all the circuits are ensured in works For operation under more severe climatic conditio...

Страница 27: ...HOURS SERVICE FUEL SYSTEM Check that all fuel lines are secured If necessary drain the fuel filter and bleed the fuel system of air ELECTRICAL CIRCUIT Check the level and the density of the electrolyt...

Страница 28: ...1 22...

Страница 29: ...2 1 2 DESCRIPTION 2 DESCRIPTION...

Страница 30: ......

Страница 31: ...2 3...

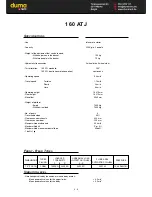
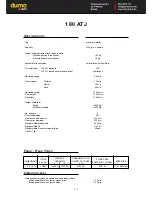
Страница 32: ...ons A2FM80 with fixed cubic capacity ENGINE Type No of cylinders Number of phases Injection system Firing sequence Cubic capacity Bore Stroke Volume ratio Nominal revs Tick over Max revs empty Power I...

Страница 33: ...A 60 A 250 A AUXILIARY HYDRAULIC CIRCUIT Pump type Cubic capacity Lifting tilting telescope steering rotation circuit Flow at max revs empty Pressure Filtration Pressure CONNECTION BOX FUSES F1 F2 F3...

Страница 34: ...Max permitted tilt Max permitted manual horizontal force 1 daN 1kg FRONT REAR TYRES VIBRATION LEVEL Vibrations perceived by the hands arms and body overall Mean quadratic values for the upper limbs 2...

Страница 35: ...speed Travel speed Tortoise Ramp Hare Operating height Floor height Max offset Weight of platform Empty With nominal load No of gears Traversable slope Clearance under chassis Clearance under door Ma...

Страница 36: ...2 8 DIMENSIONS 160 ATJ 160 ATJ A 7025 A1 5020 B 2200 C 2370 C1 2530 D 2300 E 425 F 325 G 1325 H 3665 I 3820 J 6215 K 2730 L1 3201 L2 4120 L3 8540 L4 7665 M1 14210 M2 12790 M3 7150 M4 305...

Страница 37: ...2 9...

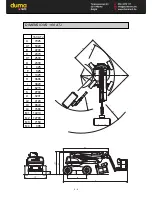
Страница 38: ...2 10 DIMENSIONS 180 ATJ 180 ATJ A 7775 A1 5770 B 2200 C 2370 C1 2560 D 2300 E 425 F 325 G 1325 H 3665 I 4530 J 6875 K 2730 L1 3660 L2 4580 L3 10040 L4 9160 M1 15635 M2 14250 M3 7150 M4 120...

Страница 39: ...2 11...

Страница 40: ...2 12 160 ATJ ET 180 ATJ Maximum authorised tilt or slope 9 or 5 Maximum authorised load 230 kg i e two people REMINDER MAXIMUM AUTHORISED TILT OR SLOPE AND MAXIMUM AUTHORISED LOAD...

Страница 41: ......

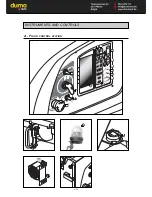
Страница 42: ...676992 2 14 INSTRUMENTS AND CONTROLS 677323 A FLOOR CONTROL STATION 15 14 13 17 16 19 18 3 1 4 2 10 11 12 9 7 8 5 6...

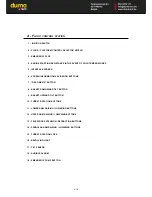
Страница 43: ...INFORMATION VALIDATION BUTTONS 7 DEAD MAN S BUTTON 8 BASKET DOWNWARD TILT BUTTON 9 BASKET UPWARD TILT BUTTON 10 TURRET ROTATION BUTTONS 11 LOWER ARM RAISING LOWERING BUTTONS 12 UPPER ARM RAISING LOWE...

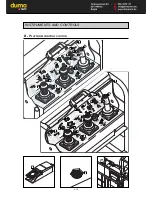
Страница 44: ...AND CONTROLS B PLATFORM CONTROL STATION 6 7 6 6 8 3 A 676674 41 6 7 7 7 1 9 677718 24 24 28 31 31 36 36 34 34 37 32 22 22 37 30 30 25 25 26 26 29 29 27 27 21 21 39 38 39 38 40 20 35 35 28 42 23 23 33...

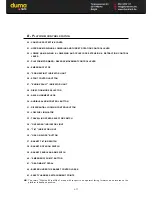
Страница 45: ...E SELECTOR 29 AXLE ALIGNMENT LEDS 30 AUDIBLE ALARM CONTROL BUTTON 31 DIFFERENTIAL LOCKING CONTROL BUTTON 32 LOW FUEL INDICATOR 33 TRAVELLING SPEED SELECTOR SWITCH 34 OVERLOAD INDICATOR LIGHT 35 TILT I...

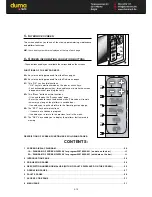
Страница 46: ...o the right to deactivate it the switch returns to its original position automatically This control button takes priority in all cases even when movement is being controlled from the platform 4 HELP I...

Страница 47: ...d to open the Access code page Enter the code to reach the desired menu This code will remain in memory as long as the platform is switched on It enables you to exit and return to the Operating screen...

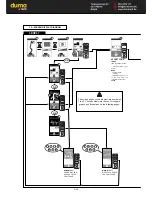
Страница 48: ...LAY DIAGRAM 8 OR OR LEVEL 1 MINOR FAULT PRESS DEF FOR ACCESS TO THE FAULT PAGE MAJOR FAULT DIRECT ACCESS TO THE FAULT PAGE OR 1 2 3 4 5 6 8 9 7 23 SECRET CODE input from the standby screen SECRET CODE...

Страница 49: ...page only VALID COUNTERS Level 2 Screen scrolling 8 counters high and low Level 3 screen scrolling 8 counters location counter high and low reinitialising counter VALID twice ENGINE Level 2 and 3 Cho...

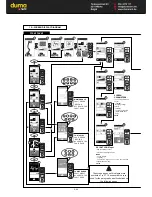
Страница 50: ...e of digits low Validate the digit move on to the next digit and validate the entire code VALID 1B SCREEN DISPLAY DIAGRAM User level 25 52 26 53 27 54 23 13 14 12 10 15 9 9 20 21 19 17 18 22 16 47 45...

Страница 51: ...nents ENGINE Choice validation NOTE In the event of an engine fault major fault the appropriate fault icon is highlighted COUNTERS Page scrolling 8 counters location counter high and low Reinitialisin...

Страница 52: ...g pre heating and the bar graph increases proportionally to the lapsed pre heating time 41 CONTROL CAN TRANSFER PAGE Control system update time needed is in excess of preheating time 3 START UP PAGE W...

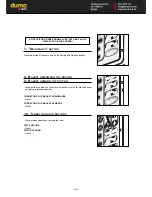
Страница 53: ...able you to correct the basket level or to fold the basket completely in transport position CORRECTING THE BASKET DOWNWARDS Press 8 CORRECTING THE BASKET UPWARDS Press 9 10 TURRET ROTATION BUTTONS The...

Страница 54: ...wering the upper arm RAISING THE UPPER ARM Press 1 LOWERING THE UPPER ARM Press 2 13 TELESCOPE EXTENSION RETRACTION BUTTONS These buttons are used to extend and retract the telescope RETRACTING THE TE...

Страница 55: ...e system 6 WORKING FROM THE BASE PAGE at least one fault TO DISPLAY present or all types of faults validated except SLOPE and OVER LOAD FAULTS NOTA The warning triangle may be displayed during the wor...

Страница 56: ...PLY FAULT PAGE 11 LOW DIESEL LEVEL FAULT PAGE NB PROGRAM W678600 002 SCREEN PAGE DELETED 12 ENGINE WATER TEMPERATURE FAULT PAGE 13 ENGINE OIL PRESSURE FAULT PAGE 14 BATTERY CHARGE FAULT PAGE 15 ARM PO...

Страница 57: ...TURRET ROTATION MANIPULA TOR FAULT PAGE 17 OVERLOAD FAULT PAGE 18 TILT DEFAULT PAGE 19 MANIPULATOR FORWARD FAULT PAGE 20 LOWER ARMS MANIPULATOR FAULT PAGE 21 UPPER ARMS MANIPULATOR FAULT PAGE 22 TELES...

Страница 58: ...operations ends 44 OIL CHANGE MAINTENANCE FAULT PAGE 45 OIL FILTER MAINTENANCE FAULT PAGE 46 AIR FILTER MAINTENANCE FAULT PAGE 47 DIESEL FILTER MAINTENANCE FAULT PAGE 48 HYDRAULIC FILTER MAINTE NANCE...

Страница 59: ...rs on pages 25 and 26 can be reinitialised as default parameters See pages 52 and 53 For this version of the program the setting menu gives access to submenus 55 systems parameters gives access to the...

Страница 60: ...the pin to the left Push the pin into the hole in the turret provided for this purpose Swivel the pin to the right and engage the bolt in the opening Bolt it in position by re inserting the clip Do n...

Страница 61: ...rom various types of work After each day of platform use or during work where there is a risk of flying particles close the protective casing 21 UPPER ARM RAISING LOWERING AND TURRET ROTATION CONTROL...

Страница 62: ...ENT CONTROL LEVER This lever 23 enables you to move the platform You must press trigger A and the dead man s pedal 41 to make any movements via the platform s control box No commands are possible when...

Страница 63: ...the base time identical to bargraph evolution on the screen Or by re arming the Emergency Stop on the basket s console on the platform 26 START CONTROL BUTTON Wait for the Pre heating light to go out...

Страница 64: ...t wheels first selection 1 or 3 Then align the rear wheels selection 2 30 AUDIBLE ALARM CONTROL BUTTON When you press button 30 the audible alarm 18 sounds 31 DIFFERENTIAL LOCKING CONTROL BUTTON NB Th...

Страница 65: ...DICATOR LIGHT This indicator light illuminates when the basket is overloaded 35 TILT INDICATOR LIGHT This LED is lit and any raising movement of the arms is blocked when the platform reaches the maxim...

Страница 66: ...ards LOWERING THE PENDULAR ARM Pull the contactor backwards 40 EMERGENCY PUMP BUTTON This button enables all the basket s movements to be performed to bring it back to the ground if a breakdown occurs...

Страница 67: ...e blocked except for lowering the arms thereby enabling the machine to return to an acceptable level If continuous when the platform is overloaded all movements are blocked The load in the machine mus...

Страница 68: ...and engine pre heating Turn the ignition switch to position 3 to start the IC engine Do not operate the starter for more than 30 seconds and pre heat between all fruitless attempts to start Release t...

Страница 69: ...xample you must use an access ramp to fit the platform on a truck s flat bed If the slope is steep remove all load from the basket use reverse gear SETTING UP AT THE WORK SITE It is important to clear...

Страница 70: ...ired command at the same time Beeping remains activated even after engaging the tilt unlocking button Take care not to increase the platform s offset There is a risk of overturning REMINDER SEE PAGE 2...

Страница 71: ...THE EVENT OF AN ACCIDENT OR BREAKDOWN ELECTRICAL FAILURE When an accident or a breakdown occurs making the electrical control boxes unusable the machine has manual systems for performing all the platf...

Страница 72: ...valve 4 Fig H Press button 3 Fig C to supply the distributor and simultaneously pull the lever Fig G towards B Reset valve 4 Fig H To rotate the turret right set the lever to IV Set valve 4 Fig H Pre...

Страница 73: ...pper arm Rotate the turret right left and raise lower the pendular arm I TROUBLESHOOTING FROM THE BASKET Press button 6 Fig I to supply the distributor and simultaneously operate the basket controls S...

Страница 74: ...2 46 MAIN DISTRIBUTOR Basket rotation Turret rotation Steering Pendular arm Tilt compensation...

Страница 75: ...3 MAINTENANCE 3 MAINTENANCE...

Страница 76: ......

Страница 77: ...ety cartridge 227960 1000 H 4 Hydrostatic transmission oil filter cartridge 518250 500 H 5 Auxiliary hydraulic oil filter cartridge 518251 500 H 6 Fuel filter cartridge 109401 500 H 7 Fan belt 702738...

Страница 78: ......

Страница 79: ...L 499 237 REDUCTION BRAKE mechanical transmission 25 L 161 585 oil for axles and boxes 56 L 466 238 215 L 490 208 HYDRAULIC OIL RESERVOIR 55 L MANITOU ISO 46 25 L 161 588 Hydraulic oil 56 L 453 265 21...

Страница 80: ...e Start of hydrostatic transmission regulations TYRES Tightening wheelnuts Condition of wheels and tyres Change a wheel HYDRAULICS Auxiliary hydraulic oil filter cartridge Hydraulic oil level Hydrauli...

Страница 81: ...Slope sensor Overload sensor Machine stickers ACCESS PLATFORM Purge the fuel supply circuit Attach a sling to the platform Transport the platform on a skid Set to Free wheel Maintenance stay At the f...

Страница 82: ...tly grease the filling hole to assist in removing and replacing the radiator cap To avoid any risk of spraying or burning wait until the I C engine has cooled down before removing the cooling circuit...

Страница 83: ...he engine stopped The oil level must be in the middle of the indicator 1 Fig A5 Add oil if necessary see the LUBRICANTS section via filling hole 2 Fig A5 A6 CONDITION OF MANIPULATOR BOOTS CHECK For th...

Страница 84: ...nts The level must be 1 cm above the battery plates If necessary top up with clean distilled water stored in a glass container Clean and dry the two caps 3 Fig B1 3 and put them back in place Check th...

Страница 85: ...REDUCERS 1 FIG B2 1 AND 2 FIG B2 2 8 grease points GREASE POINTS FOR THE FRONT AXLE OSCILLATING SHAFT 3 FIG B2 3 AND 4 FIG B2 4 2 grease points CARDAN TRANSMISSION GREASE NIPPLES FRONT AXLE 5 6 FIG B...

Страница 86: ...change it if necessary Then refit the cartridge and the lid Never wash a dry air filter cartridge Under no circumstances clean the safety cartridge situated inside the filter cartridge replace it with...

Страница 87: ...f necessary If the alternator belt has to be changed check the tension again after the first 20 hours of operation C5 OIL LEVEL IN FRONT AND REAR WHEEL REDUCERS CHECK Set the platform on a horizontal...

Страница 88: ...the wheel nuts Fig C7 Failure to do this can cause the wheel pins to deteriorate and break and the wheels to deform C8 BACKUP PUMP CHECK Stop the I C engine Make sure the backup pump is working proper...

Страница 89: ...ng breather cap The oil capacity is 1 3 litres Re insert the filling breather cap 1 Fig C10 C11 ACCESS PLATFORM SLEW RING GREASE The bearings and the gears must be greased every 250 hours of operation...

Страница 90: ...t 2 grease points 1 grease point 1 grease point 2 grease points 2 grease points 2 grease points 2 grease points 1 grease point 1 grease point 2 grease points 2 grease points 1 grease point 2 grease po...

Страница 91: ...ation extend the arms Position the platform on a steeper slope than is authorised see 2 DESCRIPTION SPECIFICATIONS Movements to extend the telescope and raise the arms must be locked the slope signal...

Страница 92: ...on fluffy cloth Lightly oil the new seal Refit the oil filter in its support Only tighten the oil filter by hand and then use the filter spanner to lock it with a quarter turn FILLING WITH OIL Ensure...

Страница 93: ...and the cover If using the machine in a very dusty atmosphere see the FILTER ELEMENTS AND BELTS section D4 FUEL FILTER CARTRIDGE REPLACE Open the left hand cover Carefully clean the exterior of the fi...

Страница 94: ...o the transmission s hydraulic circuit and the hydrostatic pump CLEANING THE HYDRAULIC CIRCUIT Let the engine run for 5 minutes without using the platform D7 AUXILIARY HYDRAULIC OIL FILTER CARTRIDGE R...

Страница 95: ...ir completely with hydraulic oil see the LUBRICANTS section through the filling hole 4 Fig D8 2 The oil level should be above the red mark on the gauge 6 Fig D8 3 Dispose of the drained oil in an envi...

Страница 96: ...ge Mark the drain plug 3 located on the bottom of the reducer unit on the right hand side Fig D11 Place a small receptacle to catch the oil Loosen the drain plug Dispose of the oil in an environmental...

Страница 97: ...ecautions Wear protective goggles Handle batteries horizontally Never smoke or work near a naked flame Work in a well ventilated area In the event of electrolyte being spilled onto the skin or splashe...

Страница 98: ...ition of the hoses and the fixings and replace the hoses if necessary Rinse out the circuit with clean water and use a cleaning product if necessary FILLING WITH COOLANT Retighten the purge screw 1 Fi...

Страница 99: ...sion or a fire Place a receptacle under the drain plug 1 Fig E2 1 and unscrew the drain plug Let the diesel flow out and rinse with ten litres of clean diesel via the filling hole 2 Fig E2 2 Refit the...

Страница 100: ...when the oil is flush with the hole Check for any leaks around the drain plugs Reinsert and tighten the filling cap 2 Fig E4 3 front axle Fig E4 2 rear axle and 4 Fig E4 3 differential tightening tor...

Страница 101: ...K ADJUST CONSULT YOUR DEALER E6 2 E6 HYDRAULIC CIRCUIT STRAINER CLEAN Oil change see chapter D8 Loosen the six fixing screws 1 Fig E6 1 on the locking plate 2 Fig E6 1 Unscrew the strainer 3 Fig E6 2...

Страница 102: ...JUST F2 WATER PUMP AND THERMOSTAT CHECK F3 ALTERNATOR AND STARTER CHECK F4 HYDRAULIC OIL TANK CLEAN CONSULT YOUR DEALER F EVERY 3000 HOURS OF OPERATION Perform the operations described previously as w...

Страница 103: ...ng PURGING THE INJECTORS Loosen the hose connections 3 Fig G1 3 on one of the injectors Press the starter until the diesel flows air free from the hose connections 3 Fig G1 3 Tighten the hose connecti...

Страница 104: ...hey can be easily remo ved Place the jack under the axle housing as close to the wheel as possible and adjust the jack fig G2 1 Lift the wheel slightly until it leaves the ground and set the safety ax...

Страница 105: ...3 31...

Страница 106: ...latform see Fig G3 2 Take into account the platform s centre of gravity when lifting it Insert the hooks or shackles into the anchoring points A provided for this purpose Encircle the ends of the fron...

Страница 107: ...3 33 G3 2 Centre of gravity Platform s total weight 8090 Kg...

Страница 108: ...oading ramps to the flat bed so as to achieve the lowest angle possible for loading the platform Use ramp speed Do not try to cross steep inclines with a heavy load in the basket In this case attack t...

Страница 109: ...ns because the machine will have no brakes Remove the engine cover Screw the HP relief valves 1 Fig G5 1 on the hydrostatic pump up to the hard point plus 1 turns with a No 13 flat and No 6 hex spanne...

Страница 110: ...4 Fig G6 3 being careful to lock it in place Fig G6 4 From the basic control desk lower the lower arms until the upper joint comes into contact with the maintenance foot Fig G6 4 release the controls...

Страница 111: ...4 ELECTRICITY 4 ELECTRICITY 4 1...

Страница 112: ...4 2...

Страница 113: ...e fuses Fig A3 A4 A5 F1 Emergency pump supply 7 5 Amps F2 Base unit supply 20 Amps F3 Base unit supply 20 Amps F4 Basket unit supply 20 Amps F5 Plus supply after contact 5 Amps F6 BRC box power supply...

Страница 114: ...4 4...

Страница 115: ...5 1 5 OPTIONAL ACCESSORIES FOR THE RANGE 5 OPTIONAL ACCESSORIES FOR THE RANGE...

Страница 116: ...5 2...

Страница 117: ...ES GENERATOR OPTION Precautions for use for users of access platforms equipped with this option Do not connect electrical devices not equipped with switches When starting up the generator voltage surg...

Страница 118: ...ing height Floor heigh Weight of platform Empty With nominal load FRONT REAR TYRES 17 670 mm 15 670 mm 8465 Kg 8695 Kg On the dimension drawing opposite you will find only the modified dimensions for...

Страница 119: ...5 5 180 ATJ 20 Wide basket option A 7800 A1 5795 C 2413 C1 2595 D 2300 E 460 F 360 N 50 20 Wheels Wide basket 2 10 m...

Страница 120: ...5 6...

Страница 121: ...6 1 6 MAINTENANCE HANDBOOK 6 MAINTENANCE HANDBOOK...

Страница 122: ......

Страница 123: ...ou a variety of maintenance contracts to suit your various needs so as to guarantee maximum efficiency through his skill and use of original MANITOU parts We recommend that this MAINTENANCE HANDBOOK b...

Страница 124: ...HOURS COMMENTS 500 HOURS DATE MECHANIC S SIGNATURE DEALER S STAMP ACTUAL No OF HOURS COMMENTS 300 HOURS DATE MECHANIC S SIGNATURE DEALER S STAMP ACTUAL No OF HOURS COMMENTS 350 HOURS DATE MECHANIC S S...

Страница 125: ...URS COMMENTS 800 HOURS DATE MECHANIC S SIGNATURE DEALER S STAMP ACTUAL No OF HOURS COMMENTS 600 HOURS DATE MECHANIC S SIGNATURE DEALER S STAMP ACTUAL No OF HOURS COMMENTS 650 HOURS DATE MECHANIC S SIG...

Страница 126: ...RS COMMENTS 1100 HOURS DATE MECHANIC S SIGNATURE DEALER S STAMP ACTUAL No OF HOURS COMMENTS 900 HOURS DATE MECHANIC S SIGNATURE DEALER S STAMP ACTUAL No OF HOURS COMMENTS 950 HOURS DATE MECHANIC S SIG...

Страница 127: ...No OF HOURS COMMENTS HOURS DATE MECHANIC S SIGNATURE DEALER S STAMP ACTUAL No OF HOURS COMMENTS HOURS DATE MECHANIC S SIGNATURE DEALER S STAMP ACTUAL No OF HOURS COMMENTS HOURS DATE MECHANIC S SIGNATU...

Страница 128: ...No OF HOURS COMMENTS HOURS DATE MECHANIC S SIGNATURE DEALER S STAMP ACTUAL No OF HOURS COMMENTS HOURS DATE MECHANIC S SIGNATURE DEALER S STAMP ACTUAL No OF HOURS COMMENTS HOURS DATE MECHANIC S SIGNATU...

Страница 129: ...No OF HOURS COMMENTS HOURS DATE MECHANIC S SIGNATURE DEALER S STAMP ACTUAL No OF HOURS COMMENTS HOURS DATE MECHANIC S SIGNATURE DEALER S STAMP ACTUAL No OF HOURS COMMENTS HOURS DATE MECHANIC S SIGNATU...

Страница 130: ......

Страница 131: ...Powered by TCPDF www tcpdf org...

Отзывы: