


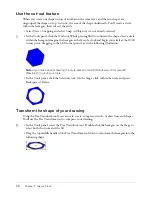


Add a guide layer
45
Add a mask layer
Using a mask layer provides a simple way to selectively reveal portions of the layer or layers below
it. Masking requires making one layer a mask layer and the layers below it masked layers.
You’ll use the rectangular shape on the Stage to mask part of the road graphic and animation so
that the animation fits better on the Stage.
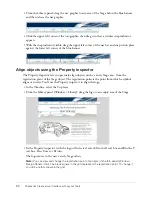
1.
On the Stage, with the Selection tool selected, click the rectangular shape below the road.
2.
Drag the shape straight up and align the left edge of the shape with the left edge of the road.
3.
Right-click (Windows) or Control-click (Macintosh) the Mask layer in the Timeline and select
Mask from the context menu.
The layer converts to a mask layer, indicated by a blue diamond-shaped icon. The layer
immediately below the layer is linked to the mask layer. The masked layer’s name is indented,
and its icon changes to a blue layer icon.
4.
In the Timeline, drag the Road layer to the Mask layer, placing it below the Car layer.
The mask layer and the layers it masks are automatically locked.
5.
To view the mask effect, select Control > Test Movie.
6.
When you finish viewing the mask effect, close the SWF file window to return to
your document.
Add a guide layer
So far you’ve learned about regular layers and mask layers. The third type of layer is a guide layer.
You use guide layers to hold content that you don’t want to appear in your published or exported
file. For example, you could place instructions to others working on your document on a guide
layer. As you take lessons in Flash, you’ll notice that many of the lesson FLA files contain
placeholders, which indicate where to place a Stage object, on guide layers. You’ll create a guide
layer now.
1.
In the Timeline, select the Background layer, then click the Insert Layer button to create a
new layer.
2.
Name the new layer
Notes
and press Enter or Return.
3.
Right-click (Windows) or Control-click (Macintosh) the Notes layer and select Guide from the
context menu.
An icon next to the layer name indicates that the layer is a guide layer.
4.
With the Notes layer still selected, click the Text tool in the Tools panel. Then, in the area of
the Stage above the car and road, enter
Production note: Animation with no stop (); actions
loop by default
.
5.
Save your document and select Control > Test Movie.
No content that you added to the guide layer appears in the SWF file window.
6.
When you finish viewing the SWF file, close the window to return to the document.
Содержание FLASH MX 2004-LEARNING FLASH
Страница 1: ...Learning Flash...
Страница 8: ...8 Contents...
Страница 34: ...34 Chapter 3 Write Scripts with ActionScript...
Страница 54: ...54 Chapter 6 Create a User Interface with Layout Tools...
Страница 62: ...62 Chapter 7 Draw in Flash...
Страница 68: ...68 Chapter 8 Create Symbols and Instances...
Страница 76: ...76 Chapter 9 Add Animation and Navigation to Buttons...
Страница 104: ...104 Chapter 13 Add Interactivity with ActionScript...
Страница 112: ...112 Chapter 14 Create a Form with Conditional Logic and Send Data...
Страница 122: ...122 Chapter 15 Work with Objects and Classes Using ActionScript 2 0...


