Torq 1.5 User Guide
Chapter 1
21
Torq 1.5 User Guide
Chapter 3
21
<
MIDI Keyboard Control
1. Make sure that your MIDI keyboard or control surface has been properly installed and is configured
to work with Torq. Please see chapter 6 for more information about configuring your external MIDI
hardware to control Torq.
2. Right-click (CTRL-click, Mac) on the Key Display. It will turn red indicating that it’s waiting for an
assignment.
3. Press a key on your MIDI keyboard. This key will automatically be assigned as the “root key” of the Torq
Key Adjust.
4. If you press a MIDI key that is 1 semitone ABOVE the root key, the Deck’s Key will be changed to +1
(semitones).
5. If you press a MIDI key that is 2 semitones BELOW the root key, the Deck’s Key will be changed to -2
(semitones).
6. The range of Key transposition is plus or minus (+/-) 12 semitones. This makes it possible to control the
Key Adjust of both Decks using a single MIDI controller keyboard, as long as the keyboard has enough keys
to make up four (4) octaves.
✓
Note:
Torq will allow notes from the same controller and same MIDI channel to be used as long as the root
keys are at least two octaves apart.
<
External Control
When using external Vinyl or CD control, Torq will preserve the pitch of the music even if you change the speed
of the turntable or CD player. When you scratch, Torq will disable time-stretching and will re-enable it when
you let the music play again. If you want Torq to respond like a true vinyl record, turn on the Key/Speed Lock
button so that key and speed are locked together. You will then hear pitch changes when altering the speed of
the turntable or CD player.
Sync Button
The Sync button provides an automatic method of synchronizing the beat and BPM of one Deck to the other or the
Global Tempo. When you engage Sync on a Deck (the Sync icon is on), it will change that Deck’s tempo to match the
other Deck or Global Tempo. Furthermore, when you press Play, Torq will align the song to the phase of the other Deck
or Global Tempo. Essentially, the Synced Deck will be “slaved” to the other Deck (which would be the “master”).
Sync will remain active until you turn it off by clicking the Sync button again. While Sync is active, the Deck will be
affected by tempo changes made to the opposite Deck or Global Tempo. If you slow down the “master” Deck, the
“slaved” Deck will also slow down in kind. If you attempt to scratch or re-align the “slaved” Deck, Torq will automatically
snap it back into alignment to match the phase of the “master” Deck.
Tempo Master
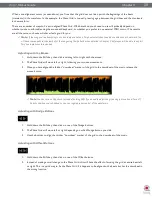
Torq also has the ability to use a Deck as a Tempo Master for the entire program. Simply hold SHIFT while pressing the
Sync button on a Deck. When doing this, you’ll see that the Sync button starts to flash, indicating that it is the Tempo
Master. Additionally, the Global Tempo will be activated and will follow the tempo of the Deck. With a Deck set as the
Tempo Master, all other aspects of the program will follow its tempo even if there are tempo changes (set with Tempo
Anchors). Looped samples will follow the Deck. The opposite Deck will also follow if its Sync button is turned on.
When you turn Sync off on a Deck, it will keep the tempo setting allowing the song to keep playing in time with the other
Deck. However, Torq will no longer attempt to keep the two Decks in sync if you make changes to them. Torq will no
longer snap the songs back into alignment if you move one of them, nor will Torq continue to match tempos if you change
them.
✓
Note:
Setting a Deck as a Tempo Master is the only way to hear the original timing of the song after adding Tempo
Anchors.
Содержание Torq 1.5
Страница 1: ...user guide 1 5 ...


