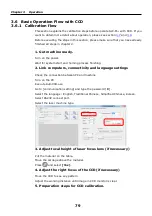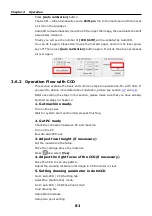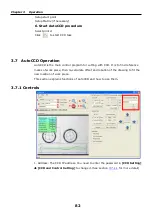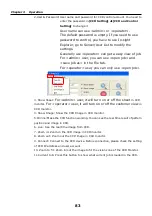
background image

Chapter 3      Operation 


92 


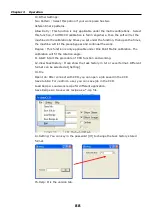
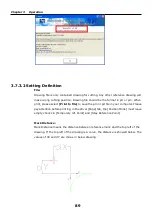
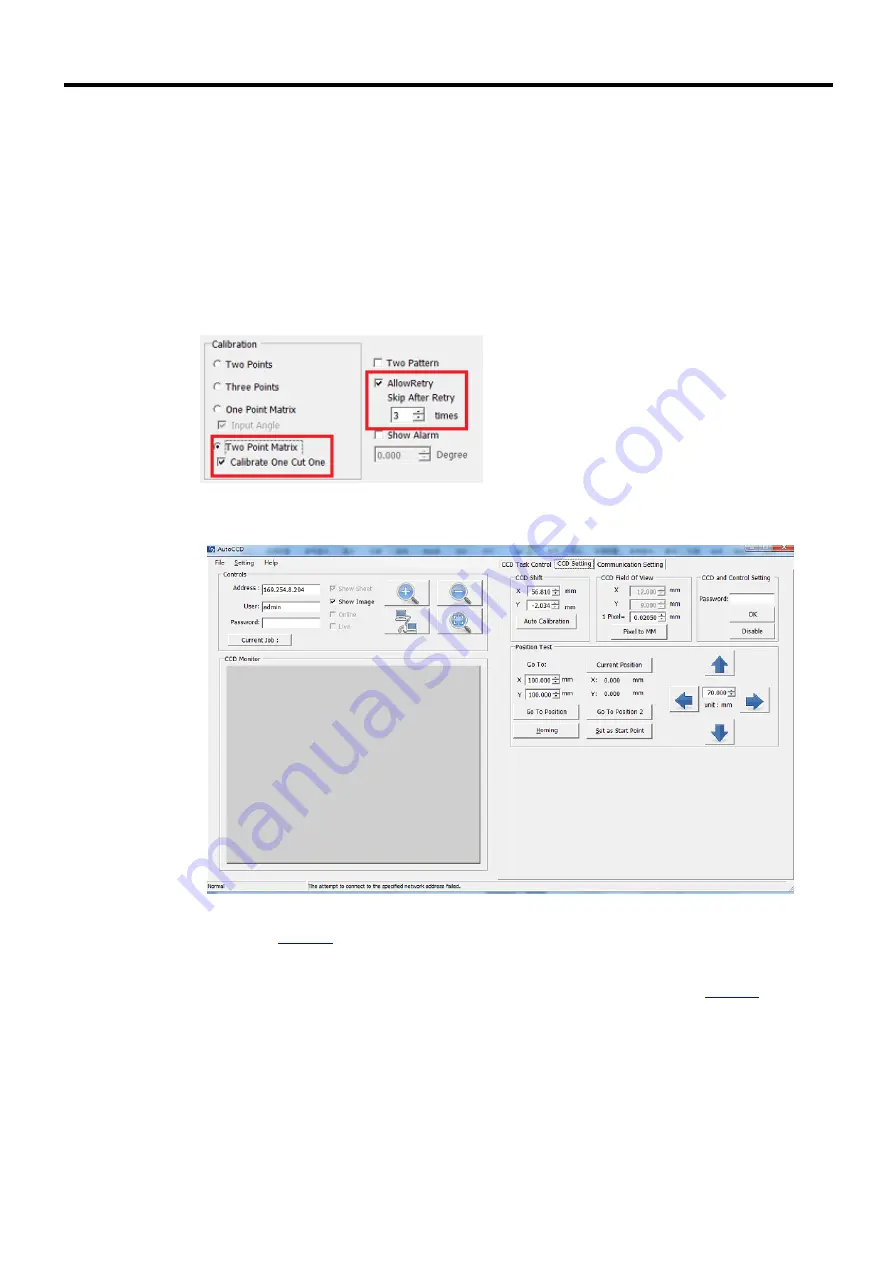
Two Points Matrix:


Under this function, AUTOCCD will take two points for calibration for 
every piece. 
With its sub-function [Calibrate One Cut One], will let machine cut one 
piece after done one calibrate, till all pieces are done. 
With its sub-function [Allow Retry] to retry calibration or bypass the 
failed piece. 
Under this calibrate function, you will get a better calibrate/cutting 
quality. 


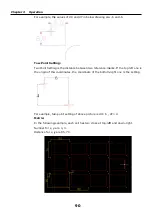
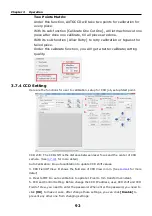
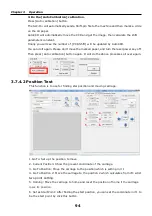
3.7.4 CCD Setting


Here are the functions for user to calibration, setup for CCD job, setup Start point. 


CCD shift: The CCD shift is the distance between laser focus and the center of CCD 

camera. (See 

3.7.4.1

 for more detail) 

Auto Calibration: Do auto calibration to update CCD shift values. 

3. CCD Field Of View: It shows the field size of CCD View in mm. (See 

3.7.4.1

 for more 

detail) 

4. Pixel to MM: Do auto calibration to update 1 Pixel to mm transform constant. 

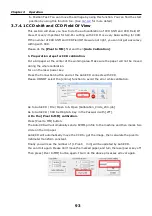
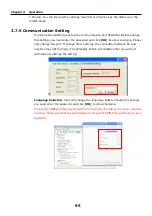
5. CCD and Control Setting: Before change the CCD IP address, user, CCD shift and CCD 

Field of View, you need to enter the password. When enter the password, you need to 

click 

[OK]

 to make it work. After change those settings, you can click 

[Disable]

 to 

prevent any other one from changing settings. 

Содержание SLC-M+ Series

Страница 1: ...Laser Tools Technics Corp User Manual Version 1 1 e SLC M Series Copyright in this manual is owned by LTT Inc 2014 ...

Страница 2: ...21 Lane 99 Pu Ding Road Hsin Chu City Taiwan R O C The information provided in this document is believed to be reliable However no responsibility is assumed for any possible inaccuracies or omissions Specifications are subject to change without notice The Windows 2000 XP Vista trademarks of Microsoft Other trademarks are the property of their respective reserves the right to make changes without f...

Страница 3: ...er 27 2 5 3 Change USB Cable to Another Port 30 2 6 CorelDRAW Setup 32 2 7 AutoCad Setup 34 2 8 LTT Product Tools 42 2 8 1 Install Procedure 42 2 8 2 Uninstall Procedure 46 2 9 In Sight Explorer Installation 47 2 9 1 Install Procedure 47 2 9 2 Uninstall Procedure 50 2 10 AutoCCD Installation 51 2 10 1 Install Procedure 51 2 10 2 Uninstall Procedure 54 Chapter 3 Operation 56 3 1 Operator Position 5...

Страница 4: ...nction description 87 3 7 3 2 Setting Definition 89 3 7 4 CCD Setting 92 3 7 4 1 CCD shift and CCD Field Of View 93 3 7 4 2 Position Test 94 3 7 5 Communication Setting 95 3 7 6 Tips of AutoCCD 96 3 8 CCD Jobs Description 97 3 8 1 Single Pattern Job 97 3 8 2 Two Pattern Job 98 3 8 3 Circle Pattern Job 100 3 8 4 Calibration Job 101 3 8 5 Set the Default Job 102 3 8 6 Job Copy Save and Delete 103 Ch...

Страница 5: ...When operating the SLC M series be sure to always comply with the safety regulations as following Do not attempt to modify or disassemble any component of the machine without technical support Do not open the doors of chassis and access the laser tube or electronic components especially while the machine power is on Connect the machine to a grounded outlet Verify that the voltage of the outlet is ...

Страница 6: ... near the machine at any time Blowing materials with air flow from nozzle while cutting or engraving can avoid fire occurring and also obtain good quality Verify that materials used in the cutting are proper for lasing Never cut substrates that contain PVC or Teflon Good efficiency of exhaust system makes you avoid breathing dust debris or poison gas Please comply with maintenance schedule as chap...

Страница 7: ...ved If they are damaged or tampered for any reason please request for LTT immediately to replace them 1 2 3 4 Laser Tools Technics Cor poration Model No SLC M Serial No 20150001 Specification Vi60 220 240V 30A Manufacture Date 2015 01 No 121 L an e 99 P U DING RO AD HS I N CHU CI TY TAI WAN R O C TE L 886 3 5727772 FAX 886 3 5728898 ...

Страница 8: ...Chapter 1 Safety 7 5 ...

Страница 9: ...ose Front door opens Laser Switch Laser switch on control panel can shut down the power of laser system immediately and it has no effect on motion system Compared with interlock Turning off laser switch can save power When you turn on laser switch the LED indicator of LASER on control panel will be on it needs to take more than 5 seconds to warm up laser tube while you turn it on ON OFF ...

Страница 10: ...essing the red pushbutton can shut down the main power of system immediately when emergency condition occurs And turning right the red pushbutton can recover the power Before recovering power please clear the trouble in the machine first ON OFF ...

Страница 11: ...0 Chapter 2 Installation 2 1 Unpack and Locate Machine This section explains how to unpack and locate machine 1 Locate the machine and keep the recommended space for maintenance Unit mm 2 Lock the wheels to locate the machine ...

Страница 12: ...age contents of the SLC The package includes the following components Before using the unit check that all components have been included in the package 1 Box 5 LaserCAM Driver CD Rom 2 Cotton Swab 6 USB Cable Driver CD Rom 3 Alcohol Dropper 7 Power Cable 4 Allen Wrench 7 6 4 3 2 1 5 ...

Страница 13: ...r safety If you open this door the laser will be not emitted 2 Front Door of chassis Mostly opening this door is for maintaining Do NOT open this door if it s not necessary especially the machine power is on 3 Side Door Left Right of chassis Mostly opening this door is for maintaining Do NOT open this door if it s not necessary especially the machine power is on 1 2 3 3 ...

Страница 14: ...assis Mostly opening this door is for maintaining Do NOT open this door if it s not necessary especially the machine power is on 6 Rear Door Right of chassis Mostly opening this door is for maintaining Do NOT open this door if it s not necessary especially the machine power is on 7 Air Filter These parts can dissipate the heat in the chassis which is caused by laser generator 6 7 5 4 ...

Страница 15: ...ter 4 9 4th Mirror This part reflects laser beam to carriage Also it should be cleaned this lens daily See chapter 4 10 Table This part can carry materials for cutting 11 Carriage This part includes 5th mirror focal lens nozzle and auto focusing set You can move it left right forth and back by the keys on control panel See section 3 3 1 8 9 10 11 ...

Страница 16: ...tiing Also it should be cleaned this lens daily See chapter 4 14 Auto Focal System This part can adjust focal height automatically by touching material 15 Air Assist Adjustment This part can adjust air flow which is out of the nozzle 16 Nozzle This part can provide a air assist to protect focal lens against dust or debris 17 Real time Exhaust This part can remove dust immediately 12 13 15 14 16 17...

Страница 17: ...hen the air of work table can be sucked 22 Table Suction Off Press this switch can turn off the air suck 23 Run Press this switch can start to run the work 24 Reset Press this switch can reset work 25 Lcd Display LCD display shows the operating menu and information from system If you want to obtain more detail about operating menu please see section 3 3 1 26 Control Panel Control panel can operate...

Страница 18: ... 4 laser device For your safe please wear protective goggles see section 1 1 28 PC Power Switch This switch controls the power of the built in computer turn on the computer before use the machine 29 LED Light Switch This switch controls the light inside the machine 30 CCD Light regulator This part control the CCD light adjust it depending on using demand 31 CCD Light Switch This switch controls th...

Страница 19: ...is part provide extra filtered for water vapor in the air This part is the total air inlet for this machine 36 Serials Port This part is used for the expansion of I O module 37 RJ 45 Ethernet Port SLD M provides built in computer instead of external computer it provides computer Internet or LAN through this port 38 Power Inlet This part can provide main power through cable from wall power supply 3...

Страница 20: ...ble 3 Connected 19 2 4 Hardware Installation This section explains the installation steps with other hardware 1 Check environment Power supply Power supply 220 VAC Single Phase Environment 15 30 Relative humidity 35 85 Other Avoid to dust dirt oil mist strong vibration or sudden temperature changes 2 Connect AC power cable onnected the pipes from blower to machine This section explains the install...

Страница 21: ...Chapter 2 Installation 20 4 Connect air tube from filter port to Air Compressor 5 Connect RJ 45 Ethernet cable to machine It provides the built in computer Internet or LAN ...

Страница 22: ...all Driver This section explains the installation steps for driver on computer 1 Put the CD ROM of installation into CD DVD drive 2 Go to the Printers and Devices window and select the Add a printer option 3 Select Add a local printer then click the Next button ...

Страница 23: ...Chapter 2 Installation 22 4 Select Use an existing port then select USB00 USB printer support then click the Next button means the port number of the USB printer support port number 5 Select Have Disk ...

Страница 24: ...Chapter 2 Installation 23 6 Select Browse 7 Please select the inf install file Please select the file which named match the machine name to install 8 Select Next ...

Страница 25: ...Chapter 2 Installation 24 9 You can define the name of machine after the setting click OK 10 Select Install this driver software antway ...

Страница 26: ...not share this printer 12 Click Next If you want this machine to be the default printer then please select Yes or please select No If there are no other drivers installed on your computer the SLC M will automatically be set as your default printer ...

Страница 27: ...Chapter 2 Installation 26 13 Go to Printer and Devices page and right click SLC M then select Properties Then click Version to confirm the version of the driver ...

Страница 28: ...river 1 Go to Devices and Printers window 2 Select the Printer you want to delete and then press the Delete this Printer button 3 Press the Yes button 4 After the uninstall process please select random printer then select Print server properties ...

Страница 29: ... 2 Installation 28 5 Switch to Drivers tab and choose the Printer you have just deleted Press Remove button 6 Select Remove driver and driver package then click OK 7 Click Yes to confirm the uninstall process ...

Страница 30: ...Chapter 2 Installation 29 8 click Delete 9 Click OK to close the window after remove the driver 10 Close the Devices and Printers window 11 Go to Computer C LTT then remove all files under the folder ...

Страница 31: ... Change USB Cable to Another Port This section explains that the steps when change USB port Once you contact the USB Cable to computer we strongly suggest that do not change it to another USB port If you must change USB cable to another port you have to also change the printer settings of SLC M If this happens please follow 1 Connect the USB cable to another port well with SLC Devices and Printers...

Страница 32: ...Chapter 2 Installation 31 4 Switch to Ports label Switch the USB00 which is belong to the new port and click OK 5 Done ...

Страница 33: ...r s page size before you begin editing files Here you will learn how to setup your page and learn how to keep those settings that you don t have to setup again next time If you are a autocad user please see section 2 7 Go to Layout Page Setup Modify Width and Height according to work area See Appendix 1 Click Save Custom Page button ...

Страница 34: ...allation 33 Name this paper type It is recommended to name with the machine type Then click OK to save Click OK to complete the paper size adjustment Next time you can select template style while you create new file ...

Страница 35: ...mand line then press Enter key Then press Enter key to set the bottom left corner to 0 0 Setting the top right corner according to work area See Appendix 1 Then press Enter key Turn on the grid by typing grid on the command line or turn on directly by pressing the GRID button which located under the command line The grid shows the page area so that can help user to see boundary ...

Страница 36: ...Save button to save the Template style Write down some description for the template and set the measurement unit system you want You can select the template file you created whenever open AutoCAD Next time when you use the same page size you can use the template file directly so that you don t have to setup the page anymore ...

Страница 37: ...6 2 Print Setting Go to File Plot When the Plot window shows select printer driver and click Properties button Select Modify Standard Paper Sizes on the tree list box Select the option which starts with LTT Press Modify button ...

Страница 38: ...Chapter 2 Installation 37 Modify Top Down Left and Right to zero press Next button to continue Press Next button to continue Press Finish button to continue ...

Страница 39: ...Chapter 2 Installation 38 Select Custom Properties and click Custom Properties button at middle Modify Laser settings if need Press OK to finish driver setting ...

Страница 40: ...Chapter 2 Installation 39 Press OK to back to print setting Select Save changes to the following file and press OK to continue ...

Страница 41: ...n 40 You will find the printer option that you just created pc3 on Name box Please select the new printer instead of original in the future Select Plot style table to acad ctb Press Edit button Press Yes button to continue ...

Страница 42: ...e Linetype to solid and the Lineweight to 0 0000 mm Press Save close button to continue Please follow the settings below Switch to Plot Settings tab Select the Plot scale to 1 1 Select the Plot area to Limits The Drawing orientation should be set to Landscape Then Press OK to send file to machine ...

Страница 43: ...which can send prn or plt file update firmware and change the Ethernet settings This section explains the installation steps on your computer 1 Double click setup exe the file is included in the installation CD 2 When you see the diagram below please press the Accept key to go on If not please go to Step 4 ...

Страница 44: ...Chapter 2 Installation 43 3 When you see the diagram below please wait for some minutes 4 When you see the diagram below please press the Next key to go on ...

Страница 45: ...Chapter 2 Installation 44 5 When you see the diagram below please choose a position to install the software or use the default value And press Next key to go on 6 Press Next key to go on ...

Страница 46: ...allation 45 7 Press Close key to finish the setup procedure 8 After the setup procedure you can open the software from two shortcuts The first one locates on the Desktop and the second one is placed in the Start Manu ...

Страница 47: ...Chapter 2 Installation 46 2 8 2 Uninstall Procedure 1 Click Start Settings Control Panel 2 Double click Add or Remove Programs 3 Click LTT Product Tools Press Remove key ...

Страница 48: ...47 4 Please choose Yes 5 Done 2 9 In Sight Explorer Installation 2 9 1 Install Procedure 1 Please copy the file Cognex In Sight Software 4 7 0 exe to your PC and double click it the file is included in install CD 2 Click Next ...

Страница 49: ...Chapter 2 Installation 48 3 Choose I accept the terms in the license agreement and then click Next 4 Key in the user name and organization Then click Next 5 Choose Complete and press Next ...

Страница 50: ...g for install procedure When seeing blow window Click Finish to finish install procedure for In Sight Explorer 8 After the setup procedure you can open the software from two shortcuts The first one locates on the Desktop and the second one is placed in the Start Manu ...

Страница 51: ...Chapter 2 Installation 50 2 9 2 Uninstall Procedure 1 Click Start Settings Control Panel 2 Double click Add or Remove Programs 3 Click Cognex In Sight Software 4 7 0 Press Remove key ...

Страница 52: ...re AutoCCD is the main control program for cutting with CCD camera This section explains the installation steps to your PC 1 Please find the AutoCCD folder from installation CD Double click setup exe 2 When you see the diagram below please press the Accept key to go on If not please go to Step 4 ...

Страница 53: ...e wait for few minutes 4 When you see the diagram below please press the Next key to go on 5 When you see the diagram below please choose a position to install the software or use the default value And press Next key to go on AutoCCD C Program Files LTTCorp AutoCCD ...

Страница 54: ... Press Next key to go on 7 Press Close key to finish the setup procedure 8 After the setup procedure you can open the software from two shortcuts The first one locates on the Desktop and the second one is placed in the Start Manu ...

Страница 55: ...Chapter 2 Installation 54 2 10 2 Uninstall Procedure 1 Click Start Settings Control Panel 2 Double click Add or Remove Programs Click AutoCCD Press Remove key ...

Страница 56: ...Chapter 2 Installation 55 4 Please choose Yes ...

Страница 57: ...Chapter 3 Operation 56 Chapter 3 Operation 3 1 Operator Position This section shows the position when you operate machine ...

Страница 58: ...ine ready Turn on the power Wait for system start and homing process finishing 2 Send file to machine Open a drawing file or draw a new one on CorelDraw or AutoCAD Execute the Print or Plot function Modify the settings of driver See section 3 4 Click OK to send file 3 Adjust focal height if necessary Put the material on the table Move the carriage above the material Press and select Yes 4 Execute ...

Страница 59: ...scape Cursor Down Decrease Values Enter Previous File Next File Stop Run Pause Move to P1 Move to P2 Red Beam Switch Laser Move Carriage Left X Move Carriage Right X Move Carriage Forward Y Move Carriage Back Y Homing Ready Indicator Laser Indicator Door Indicator Focal Lens Up Auto Focusing Focal Lens Down 2 1 3 4 7 8 6 5 9 10 11 17 18 19 14 16 13 15 20 21 22 12 ...

Страница 60: ...ve the cursor down or decrease values menu or confirm the selection Select previous file in file list Select next file in file list Give up the file that is in pause mode You can t stop file directly which is not in pause 8 Run Pause Run the file when system is ready or in pause mode Pause the file when it is running 9 Move Carriage to P1 Move the carriage to the location of P1 The way to set loca...

Страница 61: ...aster please press and hold this key Move the carriage to home and reset the position of home After the homing process you have to press so that you can leave the homing 17 Ready Indicator This indicator will be on when system is ready to run file and no file is in pause mode 18 Laser Indicator This indicator will be on when laser tube is ready for emission 19 Door Indicator This indicator will be...

Страница 62: ...ng is described in section 3 4 3 COPY 3 Indicates that the file will repeat 3 times automatically if you press one time The way to modify this setting is described in section 3 4 3 Time 0 29 0 00 The first timer records the pass time at present when a file is executed The second timer will record the total time if the file has ever finished at one time Free 63 15 MB dpi 0 If no file is executed th...

Страница 63: ...lete all files in memory Net Status This selection can show the settings of Ethernet 1 WORK DISPLAY 2 FILE MANAGER 3 LASER PARAMETER 4 SYSTEM SETUP 1 11 PICTURE 2 Del the file 134B Delete all files Net Status You Sure Yes No You Sure Yes No 1 11 PICTURE 2 Del the file 134B Delete all files Net Status 1 11 PICTURE 2 Del the file 134B Delete all files Net Status 1 11 PICTURE 2 Del the file 134B Dele...

Страница 64: ...r Control by file Laser tickle setup Rate 5 khz Idle width 1 usec Live width 1 usec Color setup Color control Laser tickle setup Alignment mode Color setup Color control Laser tickle setup Alignment mode Color setup Color control Laser tickle setup Alignment mode Setting Pen 1 Blac Power 50 Speed 100 PPI 1000 Alignment mode Tickle output 1 Continuous off Fast move off ...

Страница 65: ...e defined based on print driver for single file by panel color settings are defined based on Color Setup for all files Laser Tickle Setup The laser tickle pre ionizes the gas into a plasma state so that it is just below the laser threshold Increasing tickle width beyond 1 µs will add enough energy to the plasma to cause laser emission By applying a laser tickle the laser will respond predictably t...

Страница 66: ...cusing X Y homing Configuration Position setup Status About SLC M C60M Rule unit step Sleep mode 10 min Auto run off Arc comp off X loc 600 000mm Y loc 500 000mm Set as P1 Set as P2 Adjust X Y axis Focus Length Auto Focusing X Y homing Adjust X Y axis Focus Length Auto Focusing X Y homing Focus 1 500 inch You Sure Yes No You Sure Yes No Adjust X Y axis Focus Length Auto Focusing X Y homing ...

Страница 67: ...ease move the carriage to the position that you want set for P1 or P2 Then press Enter when the cursor is on the right side of Set as P1 or Set as P2 Focus Length This function can change focal length for auto focusing if you change the size of focus lens Auto Focusing Focusing the laser automatically This function is the same with X Y homing Move the carriage to home and reset the position of hom...

Страница 68: ...Chapter 3 Operation 67 Status This function can show the position of carriage and table About SLC M This function can show the firmware version and the machine serial number ...

Страница 69: ...d and PPI for eight colors Other functions enable user to save and load configuration files of driver settings check driver information tune machine and customize the language of driver Color SLC M system can cut with eight groups of power speed and PPI according to the color in drawing If the color in drawing does not belong any one of these eight colors then driver will choose a similar one acco...

Страница 70: ...or cutting It is recommended to decrease PPI for dull materials like wood and increased for polished materials like acrylic Setup The settings of power speed and PPI can be modified by editing the text boxes and dragging the sliders Then please click the setup button to save the new values for each setting Save Clicking this button will pop up a Save Setup File window User can save all settings in...

Страница 71: ...is button will pop up a Advanced window Enter the Password ltt and press OK and user can set the Shape Adjustment from 9500 to 10500 This parameter allows the file to be enlarged or reduced the size between 95 and 105 Left bottom is the reference point and the graphic s position and size will both be changed ...

Страница 72: ...ll mirror the drawing horizontally However we suggest mirroring your drawing in the graphics program which will allow you to accurately preview the drawing before the job is sent to the machine Pulse Mode This mode can be enabled for drilling holes For details on holes drilling contact technical support Vector Optimization This mode can modify the working path base on positions of vector in the dr...

Страница 73: ...isregard any potions of the graphics that instruct the laser to vector cut Engraving mode is not supply at this time For more precise control the boxes below each color allow the user to disable the cut options independently for each color By Color When By Color is selected vector are cut according to the predefined color order And vectors of the same color are cut in the sequence they have been d...

Страница 74: ...rmation of machine 2 Job Title The Job Title input box allows the user to input a title for the job being sent to the machine The title entered will be the top line of the job file on the display of the machine 3 Repetition The Repetition section allows the user to modify the setting of Copy and Quantity which will be shown on panel See section 3 2 2 4 Material This function is not support for SLC...

Страница 75: ...ifferent positions on the boundary of drawing in application software Relative Point There are nine relative points They are Top Left Top Middle Top Right Middle Left Center Middle Right Bottom Left Bottom Middle and Bottom Right Those points mean different positions on the boundary of drawing in application software Stay Reference Point If you want to stay on reference point after job finished yo...

Страница 76: ...Chapter 3 Operation 75 3 4 4 Power Scale The Power Scale tab is divided into two sections Power Scale and Custom Power Scale This function is for Engrave not support for SLC M ...

Страница 77: ...e machine through this software And don t need to open any the drawing software It is suitable for stable mass production Note LTT Product Tools provides only file transfer it can t change any parameter of the drawing speed power ect Make a plt or prn file Select Print Plot to file function after all parameters setting select Print then you will get a plt or prn file ...

Страница 78: ... be provided from LTT The file type is ice While upgrade is processing and the power is turned off or the cable is disconnected the SLC M may not be upgraded for the moment If this situation happens please contact LTT 1 Turn off the SLC M and check that the SLC M is connected with PC through USB cable 2 Turn on the SLC M and computer Press and hold on the control panel right after turning on SLC M...

Страница 79: ...he firmware of SLC M 5 You will hear two short beeps along with the following display showing that the upgrade has completed successfully 6 Press on the Control Panel and you will hear a beep after which SLC M returns to main menu 7 Check the firmware version in the 4th line of the ABOUT submenu See section 3 3 2 firmware upgrade complete ...

Страница 80: ... Link computers connectivity and language settings Check the connection between PC and machine Turn on the PC Execute AutoCCD exe Go to communication setting and type the password ltt Select the language English Traditional Chinese Simplified Chinese Korean Select RS232 connect port Select the laser machine type 3 Adjust focal height of laser focus lens if necessary Put the material on the table M...

Страница 81: ...tab Key in the Password with LTT 6 Do the Pixel to MM calibration Press Pixel to MM button The AutoCCD will automatically send a P2MM prn file to the machine and then marks two circle on the A4 paper AutoCCD will automatically move the CCD to get the image then calculate the pixel to millimeter transform constant Finally you will see the number of 1 Pixel mm will be updated by AutoCCD You can do i...

Страница 82: ...to obtain more detail about operation please see section 3 7 and 3 8 Before executing the steps in this section please make sure that you have already finished all steps in chapter 2 1 Get machine ready Turn on the power Wait for system start and homing process finishing 2 Get PC ready Check the connection between PC and machine Turn on the PC Execute AutoCCD exe 3 Adjust focal height if necessary...

Страница 83: ...ting with CCD It is to find reference marks of work piece then re calculate offset and rotation of the drawing to fit the new location of work piece This section explains functions of AutoCCD and how to use them 3 7 1 Controls 1 Address The CCD IP address You need to enter the password in CCD Setting CCD and Control Setting to change it See section 3 7 1 1 for more detail 1 2 3 4 5 6 7 8 9 10 11 ...

Страница 84: ...b 3 Show Sheet For admin user it will turn on or off the sheet in CCD monitor For operator user it will turn on or off the customer view in CCD monitor 4 Show Image Show the CCD Image in CCD monitor 5 Online Make the CCD function working You can see the real time result of pattern position and image in CCD 6 Live See the real time image from CCD 7 Zoom in Zoom in the CCD image in CCD monitor 8 Zoo...

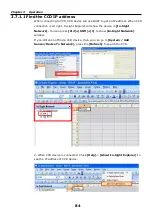
Страница 85: ...ight In sight Explorer will show the device in In Sight Network You can press Ctrl Shift 1 to show In Sight Network window If you still can not find a CCD device then you can go to System Add Sensor Device To Network press the Refresh to search the CCD 2 When CCD device is connected Chick Help About In Sight Explorer to see the IP address of CCD device ...

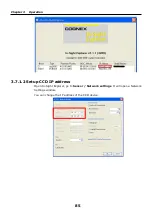
Страница 86: ...Chapter 3 Operation 85 3 7 1 2 Setup CCD IP address Open In Sight Explorer go to Sensor Network settings It will open a Network Settings window You can change the IP address of the CCD device ...

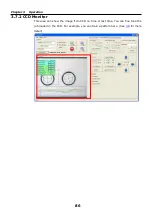
Страница 87: ...pter 3 Operation 86 3 7 2 CCD Monitor This area can show the image from CCD on time or last time You can fine tune the job loaded in the CCD For example you can train a pattern here See 3 8 for more detail ...

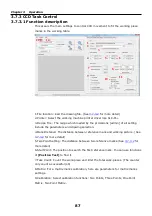
Страница 88: ...ion 4 Mark Distance The distance between reference mark and working picture See 3 7 3 2 for more detail 5 Two Point Setting The distance between two reference marks See 3 7 3 2 for more detail 6 Start Point The position to search the first reference mark You can use functions of Position Test to find it 7 Task Count Count the work piece and limit the total work pieces The counter only count a succ...

Страница 89: ...gree This function is only applicable under One Point Matrix calibration The calibration will fit the rotation angle 11 Start Start the procedure of CCD function and working 12 View Task History It can show the task history in txt or excel format Different format can be selected at Setting 13 File Open Job After connect with CCD you can open a job saved in the CCD Save Job As For admin user you ca...

Страница 90: ...lect Print to file to save the prn or plt file in your computer Please pay attention before printing in the driver Page tab the Position Mode must leave empty checks in Temporary ref Point and Stay Reference Point Mark Distance Mark Distance means the distance between reference mark and the top left of the drawing If the top left of the drawing is a curve the distance is showed below The values of...

Страница 91: ...below drawing are Tow Point Setting Two Point Setting is the distance between two reference marks If the top left one is the origin of the coordinates the coordinate of the bottom right one is the setting example two point setting of above picture is dX 6 dY 4 In the following example each cell has two cross at top left and down Number for x y are 4 3 Distance for x y are 85 70 dY in below drawing...

Страница 92: ...er this function AUTOCCD will take only one point for calibration for every piece With its sub function Input Angel then enter the angel in Degree to specifies the default rotation angle With its sub function Allow Retry to retry calibration or bypass the fail piece Under the calibrate function you will get the shorter working time ...

Страница 93: ...p for CCD job setup Start point CCD shift The CCD shift is the distance between laser focus and the center of CCD camera See 3 7 4 1 for more detail Auto Calibration Do auto calibration to update CCD shift values 3 CCD Field Of View It shows the field size of CCD View in mm See 3 7 4 1 for more detail 4 Pixel to MM Do auto calibration to update 1 Pixel to mm transform constant 5 CCD and Control Se...

Страница 94: ...r will not be moved during the whole calibration Turn on the laser power key Press the Connection button and let the AutoCCD connects with CCD Please DO NOT select the online function to avoid the error while calibration Go to AutoCCD File Open Job Open Calibration_Circle_200 job Go to AutoCCD CCD Setting tab Key in the Password with LTT 2 Do the Pixel to MM calibration Press Pixel to MM button Th...

Страница 95: ...alibration button again It will do the above processes all over again 3 7 4 2 Position Test This function is to use for finding star position and moving carriage 1 Go To Set up the position to move 2 Current Position Show the present coordinate of the carriage 3 Go To Position Move the carriage to the position which is setting in 1 4 Go To Position 2 Move the carriage to the position 2 which calcu...

Страница 96: ... you need enter the password and click OK to allow changing Please only change the port If change other settings the connection between PC and machine may not be made The Disable button can disable other one without permission to change the setting Language Selection User can change the language Before change this setting you need enter the password and click OK to allow changing COM port that con...

Страница 97: ... quantity production You can connect a mini number keyboard Setup parameters first Then you can just load unload work pieces and press Enter Other Hot Keys Controls Connect Alt C CCD Task Control Browse Alt B Run Enter CCD Setting Go To Position Alt G Go To Position 2 Alt 2 Homing Alt H Set as Start Point Alt S Up Alt U Down Alt D Left Alt L Right Alt R Ok Alt O Communication Setting Ok Alt O ...

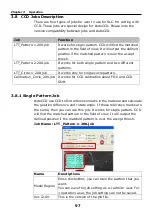
Страница 98: ... only for single circle pattern Calibration_Circle_200 job It works for CCD calibration about FOV and CCD Shift 3 8 1 Single Pattern Job AutoCCD use CCD to find reference marks in the material and calculate the position difference and rotate angle If these reference marks are the same then you can use this job It works for single pattern CCD will find the matched pattern in the field of view It wi...

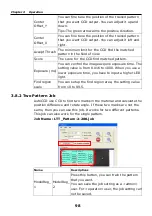
Страница 99: ... exposure time The setting value is from 0 016 to 1000 When you use a lower exposure time you have to input a higher LED light Find region scale You can setup the find region area the setting value from 10 to 99 5 3 8 2 Two Pattern Job AutoCCD use CCD to find two marks in the material and calculate the position difference and rotate angle If these two marks are not the same then you can use this j...

Страница 100: ...D output You can adjust it left and right Accept Thresh_1 Accept Thresh_2 The minimum limit for the CCD find the matched pattern in the field of view Score_1 Score_2 The score for the CCD find matched pattern Exposure ms You can control the image acquire exposure time The setting value is from 0 016 to 1000 When you use a lower exposure time you have to input a higher LED light Find region scale Y...

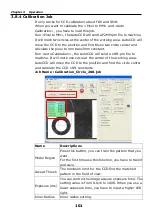
Страница 101: ... saved Accept Thresh_M The minimum limit for the CCD find the matched pattern in the field of view Score_M The score for the CCD find matched pattern Inner Radius Inner radius setting Outer Radius Outer radius setting Accept Thresh_C The minimum limit for the CCD find the matched circle between inner radius and outer radius You can adjust the level for different image Find Circle Score The score f...

Страница 102: ... a shift prn file to machine It will mark one circle at the center of the working area AutoCCD will move the CCD to the position and find the circle center and calculate the CCD shift constants Job Name Calibration_Circle_200 job Name Descriptions Model Region Press this button you can train the pattern that you want For the first time use this function you have to train it and save Accept Thresh ...

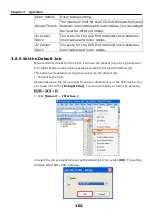
Страница 103: ...adius 3 8 5 Set the Default Job When AutoCCD connects to the CCD it will use the present job in In sight explorer If In Sight Explorer does not be executed AutoCCD will load the default job This section will explain how to setup a job to be the default job 1 Connect to the CCD Please make sure the job you want to set as a default job is in the CCD device You can check it from the In Sight Files Yo...

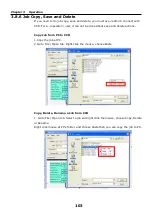
Страница 104: ...it can not be done about save and delete actions Copy Job from PC to CCD 1 Copy the job at PC 2 Go to File Open Job Right click the mouse choose Paste Copy Delete Rename a Job from CCD 1 Go to File Open Job Select a job and right click the mouse choose Copy Delete or Rename Right click mouse at PC s folder and choose Paste then you can copy the job to PC ...

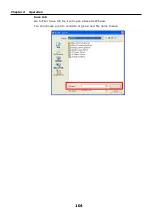
Страница 105: ...Chapter 3 Operation 104 Save Job Go to File Save Job As it will open a Save As Window You can choose a job to overwite or give a new file name to save ...

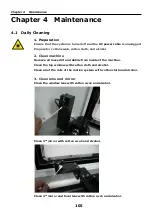
Страница 106: ...nd alcohol 2 Clean machine Remove all loose dirt and debris from inside of the machine Clean the top window with cotton cloth and alcohol Clean all of the rails of the motion system with cotton cloth and alcohol 3 Clean lens and mirror Clean the window lens with cotton swab and alcohol Clean 3rd mirror with cotton swab and alcohol Clean 4th mirror and focal lens with cotton swab and alcohol ...

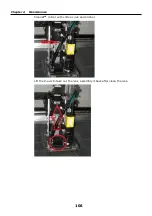
Страница 107: ...Chapter 4 Maintenance 106 Clean 4th mirror with cotton swab and alcohol Lift the Z axis to take out the lens assembly it back after clean the lens ...

Страница 108: ...ive air which is waterless and oil free dry brush cotton swab and alcohol 2 Clean machine Clean all electric components with compressive air and dry brush Clean exhaust port with brush Clean all cooling fans with compressive air Clean all filter cottons 3 Clean lens and mirror Clean 2nd mirror with cotton swab and alcohol Remove the left alignment cover ...

Страница 109: ...Chapter 4 Maintenance 108 Remove the reflection mirror protection cover Clean the mirrors assembly back after clean ...

Страница 110: ... Close all doors with interlocks See section 2 3 The temperature of laser generator is too high Stop job for a certain time to cool laser generator Check the fans of laser and clean them Laser beam is misalignment Realign by adjusting mirrors The setting of laser power is too low Increase the setting See section 3 4 2 Laser generator has breakdown Please contact LTT See Introduction Cutting or eng...

Страница 111: ...sec 15 7 sec Resolution DPI 4064 2032 1354 1016 812 677 Memory Buffer 64MB Interface USB port Laser generator 30W 60W 100W air cooled CO2 laser Power supply 220 240V AC 30 Amp 50 60 Hz Exhaust requiring at least 16 0 m min air flow for two 4 connection Regulatory Compliance RoHS directive Standard Auto Focusing Red beam Pointer Beam Expender Honeycomb cutting table Options Blower Air compressor ...

Страница 112: ...Appendices 111 Appendix 2 Dimensions This section describes the dimensions of SLC M series SLC M series Unit mm ...

Страница 113: ...00 Cutting 3 mm 3 100 1000 5 mm 2 100 1000 10 mm 0 5 100 1000 Anodized Aluminum Engraving 100 40 500 1000 Card Stock Cutting 40 100 250 Cermark Engraving 25 100 500 Ceramic Tile Engraving 60 100 500 Coated Brass Engraving 100 50 1000 Crystal Engraving 100 30 500 Denim Engraving 100 30 500 Cutting 20 100 500 Glass Engraving 100 50 500 Granite Engraving 60 40 333 Laser Foil Cutting 50 100 1000 Laser...

Отзывы: