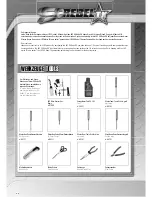


SO MESSEN SIE DIE MOTORTEMPERATUR
WAYS TO MEASURE THE ENGINE TEMPERATURE
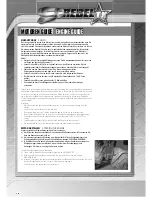
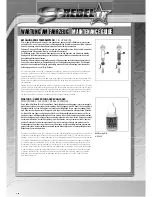
• Infrarot Thermometer (empfohlen): Messen Sie direkt nach dem Fahren. Halten Sie das Thermometer direkt über den Motor und messen Sie auf die
Glühkerzenöffnung.
• Spucke Methode: Bringen Sie direkt nach dem Fahren etwas Spucke auf den Kühlkopf. Die Spucke sollte kochen und in 2-3 Sekunden
verschwunden
sein.
• Temperature gauge method (recommended): Pull in quickly and immediately take a temperature reading. Place the gauge directly over the engine
pointed at the glow plug.
• Spit method: Pull in quickly and immediately put some spit on the engine’s head. The spittle should just slowly boil off (2-3secs).
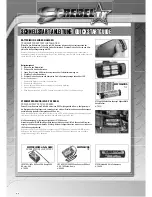
NACH DEM FAHREN
AFTER RUN
Verwenden Sie spezielles After-Run Öl um den Motor nach dem Fahren zu pflegen. After-Run Öl hilft beim nächsten Start und schützt den Motor vor
Rost. Verwenden Sie nur After-Run Öl, welches speziell für RC Motoren hergestellt wird. Verwenden Sie kein Silikon Öl oder ähnliches, da dieses ihrem
Motor schadet. Wir empfehlen unser LRP After-Run Öl (Art.Nr. 37910), welches Sie regelmäßig nach dem Fahren anwenden sollten.
Ablauf:
Lassen Sie den Tank im Leerlauf vollständig leer laufen, bis kein Kraftstoff mehr vorhanden ist (versuchen Sie mehrfach den Motor neu zu starten).
Als Nächstes geben Sie ein paar Tropfen „After-Run“ Öl in den offenen Vergaser, sowie in die Glühkerzenöffnung des Motorkopfes. Ziehen Sie 5x am
Seilzugstarter. Das Öl ist nun im Motor verteilt.
Use after-run oil to keep everything lubricated after you have finished your day. After-run oil
helps for an easy start the next time and protects your internals against rust. Use only „after-run oil especially formulated for R/C engines. Do not use
silicone shock oil or similar as they will seriously damage your engine. We recommend to use our LRP After-Run oil
(Order No. 37910), which you should use regularly after using your engine.
Procedure:
First let the tank run completely empty at idle until it runs out of fuel (try re-starting it several
times), next put a few drops down the open carburetor and a few drops down the glow plug hole. Spin it over with the Pullstart at least 5 times and you
are done.
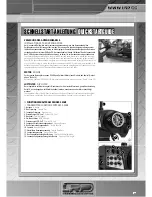
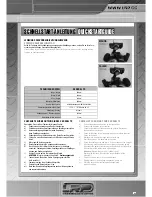
WARTUNG
MAINTENANCE
Behandeln Sie Ihren Motor mit Vorsicht und warten Sie ihn regelmäßig. Durch die hohe Drehzahl des Motors und kann jedes Problem schweren Scha-
den verursachen. Alle bewegten Teile im Inneren des Motors sind Verschleiß ausgesetzt. Sie müssen also darauf achten, ob Kolben, Laufbuchse oder
Pleuel abgenutzt sind und ausgetauscht werden müssen. Wenn Sie ein Teil austauschen, überprüfen Sie bitte, ob alle anderen Teile in gutem Zustand
sind. Laufbuchse und Kolben müssen immer zusammen gewechselt werden.
Einige wichtige Dinge:
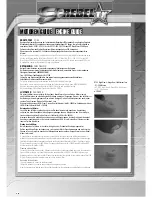
• Säubern Sie den Motor gründlich von außen, bevor Sie ihn öffnen. Jedes bisschen Staub oder Dreck, was in den Motor kommt, kann Schäden hervorrufen.
• Überprüfen Sie das Pleuel regelmäßig. Wenn Sie es tauschen wollen, prüfen Sie, ob der Kurbelwellenzapfen rund und in gutem Zustand ist. Wenn
nicht, tauschen Sie auch die Kurbelwelle.
• Wenn Sie den Motor wieder zusammenbauen, gehen Sie sicher, dass jedes Teil absolut sauber ist und verwenden Sie etwas Öl (After-Run Öl ist
dafür gut geeignet), um die Teile zu schmieren.
• Achten Sie darauf, dass alle Teile in der richtigen Ausrichtung eingebaut sind, speziell Kolben, Laufbuchse und Pleuel. Sowohl der niedrigere Teil
des Kolbens, als auch das “Schmier-Loch” des Pleuels müssen nach vorne zeigen (in Richtung des Vergasers).
• Bevor Sie den Brennraum einbauen, prüfen Sie genau, dass Sie alle Scheiben eingebaut haben!
• Verwenden Sie einen Inbus Schlüssel um die Schrauben anzuziehen. Schrauben Sie die Schrauben nicht gleich ganz fest, sondern ziehen erst alle
Schrauben nur leicht an. Ziehen Sie dann die Schrauben abwechselnd über Kreuz fest an. Seien Sie vorsichtig, dass Sie keine Schrauben überdrehen!
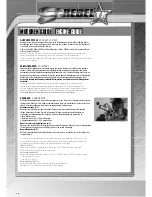
Treat your engine with care and check it frequently. Because of such high RPM any problem can cause serious damage. All moving parts inside the
engine are subject to wear, you must know if a piston/liner/con rod has worn out and if they need to be replaced. If you replace one part, please check
if everything else is still in good shape at the same time. If you only change one part and other parts are in bad shape, there’s the possibility that there
will be a new failure soon!
Some important matters:
• Clean the outside of the engine properly before you open it. Any dust or dirt which gets into the engine could make severe damage.
• Check the con rod frequently. If you want to replace the con rod, be sure the big end of your crankshaft is still round and at a good size. If not, also
replace the crankshaft.
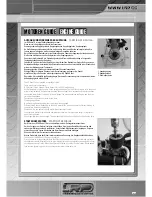
• When you start putting your engine back together, make sure that each part is totally clean before installation and please use some oil (after-run is
suited well) to lubricate everything.
• Be careful that each part has its correct direction, especially piston/liner/con rod. Both the lower part of the piston and the lubrication hole in the
con rod should be facing to the front (direction to the carburetor).
• Before you install the burnroom, please doublecheck that you have installed all head shims.
• Use a hex wrench to install the screws. When you start to feel resistance, stop turning the screw. Repeat this for each screw, use the star-tech
nique to tighten all the screws completely. Do not overtighten them!
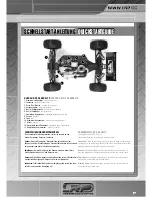
MOTOREN GUIDE
MOTOREN GUIDE ENGINE GUIDE
ENGINE GUIDE
P. 16
P. 16
Содержание S8 REBEL TX
Страница 25: ...NOTIZEN NOTIZEN NOTES NOTES P 25 P 25 ...
Страница 39: ...NOTIZEN NOTIZEN NOTES NOTES P 39 P 39 ...
Страница 40: ...P 40 P 40 ...
Страница 41: ...P 41 P 41 ...
Страница 42: ...P 42 P 42 ...
Страница 43: ...P 43 P 43 ...
Страница 44: ...P 44 P 44 ...
Страница 45: ...P 45 P 45 ...
Страница 46: ...P 46 P 46 ...
Страница 47: ...P 47 P 47 ...
Страница 48: ...P 48 P 48 ...
Страница 49: ...P 49 P 49 ...
Страница 50: ...P 50 P 50 ...
Страница 51: ...NOTIZEN NOTIZEN NOTES NOTES P 51 P 51 ...
Страница 59: ...NOTIZEN NOTIZEN NOTES NOTES P 59 P 59 ...
Страница 64: ...NOTIZEN NOTIZEN NOTES NOTES P 64 P 64 ...
Страница 70: ...NOTIZEN NOTIZEN NOTES NOTES P 70 P 70 ...
Страница 71: ...NOTIZEN NOTIZEN NOTES NOTES P 71 P 71 ...