background image

109

Android App

English

• 

Schedule Recording: 

Camera will record according to settings set in the recording 

schedule.

NOTE: 

To enable Motion detection recording using Android, you must used Schedule 

recording. Then, create a schedule in the Scheduling menu with 

Motion trigger

PIR 

trigger

, or both Motion trigger and PIR trigger selected.

7. Under 

When disk space full

 select 

Circular

 recording to set the camera to overwrite 

the oldest recordings when the microSD card is full or select Stop recording to set 
the camera to stop recording when the microSD card is full.

8. Tap 

Update

 to save your settings.

6.3.13 CONFIGURING THE RECORDING AND ALARM SCHEDULE

Configure schedules for recording and alarms. Schedules can be configured separately 
for alarms and recording. You can configure up to 12 schedules.

To create a schedule for alarms or recording:

1. First, you must enable alarms or recording to use the schedule.

2. In Camera List, tap 

 next to the camera you would like to edit.

3. Tap 

Camera Settings

.

4. Tap 

Schedule

 then 

Scheduling

.

5. Tap 

Add Schedule

.

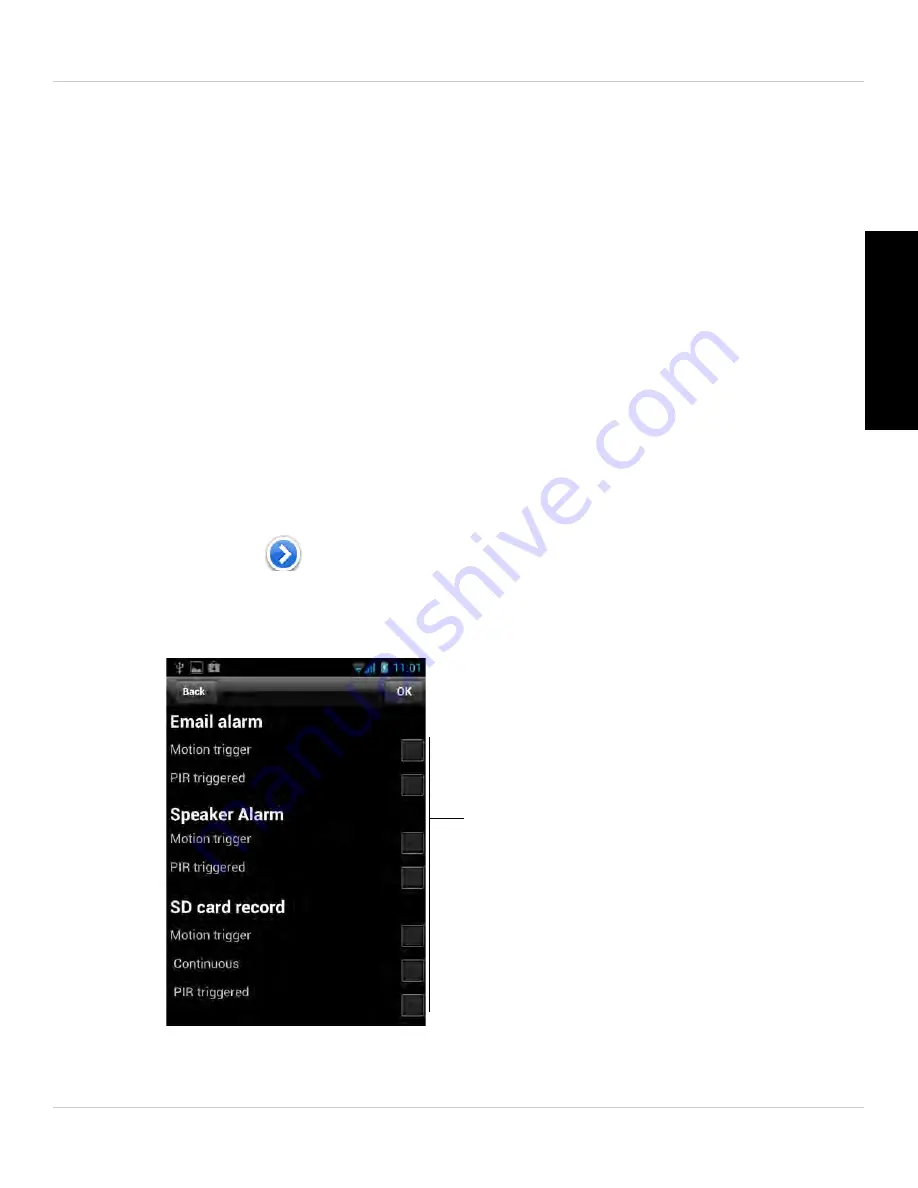
6. Under 

Email Alarm

, check 

Motion trigger

 to send an email alarm based on video 

motion, select 

PIR trigger

 to use the PIR motion sensor, or select both.

Select alarm and recording types
for the schedule

Содержание LNC104

Страница 1: ...www lorextechnology com LNC104 ENGLISH VERSION 1 0 WIRELESS NETWORK CAMERA USER S GUIDE ...

Страница 2: ......

Страница 3: ...nology com support If you require further installation assistance please visit www lorextechnology com installation or contact a professional installer Please note that once the components of this product have been unsealed you cannot return this product directly to the store without the original packaging THIS PRODUCT MAY REQUIRE PROFESSIONAL INSTALLATION BEFORE YOU START Please make sure to regi...

Страница 4: ...produit directement au magasi Favor de leer la guía de instalación rápida y la guía del usuario antes de instalar este product Puede conseguir las guías del consumidor y los cursos en enseñanza video sobre el Internet visitando www lorexcctv com support Si necesita ayuda para la instalación visite www lorextechnology com installation o contacte un especialista en instalaciones Favor de notar que u...

Страница 5: ...tomer Service for warranty matters 1 888 425 6739 1 888 42 LOREX Tech Support for technical installation issues 1 877 755 6739 1 877 75 LOREX Mexico 001 800 514 6739 International 800 425 6739 0 Example From the UK dial 00 instead of By Phone Online For all other matters visit www lorextechnology com Product Support is available 24 7 including product information user manuals quick start up guides...

Страница 6: ... produits les guides de l utilisateur les guides de démarrage rapide et les foires à questions www lorextechnology com support En Ligne 2 maneras sencillas de comunicarse con nosotros Norte América Atención al cliente en materia de garantía 1 888 425 6739 1 888 42 LOREX Soporte técnico para asuntos técnicos la instalación 1 877 755 6739 1 877 75 LOREX Mexico 001 800 514 6739 Internacional 800 425 ...

Страница 7: ... This user s guide refers to the following models LNC104 Contents Before you start make sure you have the contents listed below 1 x Camera 1 x Camera power adapter and USB power cable 1 x Ethernet cable 1 x Mounting kit 1 x Quick Start Guide 1 x Software documentation CD ...

Страница 8: ...not use the camera near a heat source such as a radiator Do not point the camera directly towards the sun or a source of intense light Do not disassemble the camera Periodic cleaning may be required Use a damp cloth only Do not use harsh cleaners or aerosol cleaners Do not cover the camera with a towel or blanket Keep all power and network cables out of reach of children Use only the included powe...

Страница 9: ...mounting counter wall ceiling As our product is subject to continuous improvement Lorex Technology subsidiaries reserve the right to modify product design specifications prices without notice and without incurring any obligation 1 Up to 4 simultaneous camera views available on PC Mac and tablets Selectable single camera viewing on smartphones 2 Connection speed may vary depending internet bandwidt...

Страница 10: ...iv ...

Страница 11: ... 27 3 2 1 Display Sub Menu 29 3 2 2 All Camera Action 30 3 3 Camera List Managing Cameras 31 3 3 1 Adding Cameras to Camera List 31 3 3 2 Saving Camera Passwords 32 3 3 3 Deleting Cameras 32 3 3 4 Configuring Mobile Streaming Settings 33 3 3 5 Configuring Night Mode Control 34 3 4 Playing Back Recordings on the microSD card with L View 36 3 5 Configuring Camera Video Settings 37 3 5 1 Quality Tab ...

Страница 12: ...54 4 4 4 Editing Camera Mobile Streaming Settings 55 4 4 5 Editing Camera Video Settings 56 4 4 6 Configuring LED Control and Motion Detection Sensitivity 57 4 4 7 Configuring Night Mode Settings 58 4 4 8 Editing Camera Wired Network Settings 60 4 4 9 Editing Camera WiFi Network Settings 61 4 4 10 Enabling Email Notifications 62 4 4 11 Enabling Speaker Alarms 63 4 4 12 Configuring microSD Recordin...

Страница 13: ...ng the Camera 91 5 5 Using Local Search to Add Cameras 92 6 Android App 93 6 1 Live Viewing with Lorex Ping for Android 93 6 1 1 Using 2 way Audio Intercom 94 6 1 2 Saving Snapshots 94 6 2 Playing Back Video Recorded on microSD on Android 94 6 3 Using Camera List to Edit Camera Settings 96 6 3 1 Editing Camera Connection Settings 97 6 3 2 Deleting Cameras from Camera List 97 6 3 3 Editing Camera M...

Страница 14: ...4 Night Mode 121 7 4 Schedule 123 7 4 1 Email FTP Alarm Settings Configuring Email Alarms 123 7 4 2 Speaker Alarm Configuring Audio Alarms 124 7 4 3 SD Card Configuring microSD Recording 125 7 4 4 Scheduling Configuring Recording and Alarm Schedules 126 7 5 Admin 128 7 5 1 Admin Login 128 7 5 2 Led Control 130 7 5 3 Date Time 131 7 5 4 Upgrade 131 7 5 5 Reboot 133 8 Technical Specifications 134 9 ...

Страница 15: ... microSD card not included is inserted Flashes during recording Network Glows when connected to an ethernet or WiFi network Flashes when sending or receiving data Status Glows when camera is connected to the Internet Flashes when there is a connection problem 5 PIR Motion Sensor Allows the camera to detect motion by tracking body heat 6 Infrared LED Allows the camera to see in the dark 7 DC IN Con...

Страница 16: ...f 32GB 10 Audio Out Connect to an external speaker not included using a 3 5mm headphone jack to enable 2 way audio and alarms 11 Mounting Stand For mounting instructions see Wall or Ceiling Mounting on page 137 12 Reset Button While the camera is powered on press with a pin or small object for at least 4 seconds to reset the camera to factory defaults This is useful if you have forgotten the passw...

Страница 17: ...the power adapter cable to the power adapter using the USB connector 2 Connect the power adapter to a surge protector or power outlet Connect the power adapter cable to the DC IN port on the camera The camera LEDs will begin flashing Power Adapter Power Adapter Cable 1 2 ...

Страница 18: ... until the WPS light turns on Then press the WPS button on the camera within 1 minute The camera will automatically connect to your WiFi network and the blue Network LED on the camera will turn on NOTE Not all routers support WPS and the location of the WPS button on your router depends on your router model Check your router s instruction manual for details or see WiFi Setup on page 18 for instruc...

Страница 19: ...eps to connect to cameras depends on if you are connecting to a camera on a local network i e your computer is connected to the same router as the camera or over the Internet NOTE For PC system requirements see System Requirements on page 26 To install L View 1 Insert the CD into your computer The Autorun screen will appear Click Run Lorex exe 2 Click Software then L View for PC to begin the insta...

Страница 20: ...word If this is the first time connecting to the camera the password is lorex Click OK 4 If you have connected to this camera before L View connects to the camera If this is the first time connecting to the camera L View will prompt you to create your own password for the camera Click OK Or double click camera under Auto Search Click and drag camera to a display screen Click OK ...

Страница 21: ...r the camera then click OK to connect L View connects to the camera If you would like to save the camera password in L View see Saving Camera Passwords on page 32 Connecting to a Camera Over the Internet 1 Double click the L View icon to run L View 2 Click next to Camera List 3 Under Name enter a camera name of your choice 4 Under CamID enter the Cam ID number printed on the camera Enter a new pas...

Страница 22: ... the first time connecting to the camera L View will prompt you to create your own password for the camera Click OK 8 Under New Password enter a password that will be used for the camera Under Confirm Password enter the password again Click OK 9 Double click the camera again under Camera List to connect For detailed instructions on using L View see L View 104 Software on page 26 Enter a camera nam...

Страница 23: ...the App Store NOTE Lorex Ping is a free application but it requires a valid iTunes account to download Lorex Ping requires iOS v4 0 and higher 2 Tap the Lorex Ping icon from the home screen to open Lorex Ping Lorex Ping opens to the Camera List 3 Tap to add a camera 4 Under Name enter a name for your camera This can be anything of your choice Tap Enter a name for your camera of your choice ...

Страница 24: ...R Manually enter the CamID printed on the camera 6 Under Password enter the camera password If this is the first time connecting to the camera enter lorex Press Done Press to scan the QR code printed on the back of the camera OR manually enter the CamID printed on the camera Line up the QR code to the middle using the phone camera Enterthecamerapassword The default password is lorex ...

Страница 25: ...e prompted to create your own password Tap OK 9 Under New password enter a new password for the camera and repeat the password under Confirm password Tap OK 10 Tap the name of the camera in Camera List again to connect to the camera For details on using the iPhone app see iPhone App on page 48 Tap the name of the camera to connect Tap OK Enter a new password confirm your password and then tap OK ...

Страница 26: ...era using iPad 1 Download the Lorex Ping iPad app from the App Store NOTE Lorex Ping is a free application but it requires a valid iTunes account to download Lorex Ping requires iOS v4 0 and higher 2 Tap the Lorex Ping icon from the home screen to open Lorex Ping Lorex Ping opens to the Camera List 3 Tap to add a camera Tap ...

Страница 27: ... will automatically be entered OR Manually enter the CamID printed on the camera NOTE QR code setup is not compatible with 1st generation iPads If you have a 1st generation iPad manually enter the CamID printed on the camera into ID Enter a name for your camera of your choice Press to scan the QR codeprintedontheback of the camera OR manually enter the CamID printed on the camera Line up the QR co...

Страница 28: ...Press Done 7 Tap the name of the camera in the Camera List to connect to the camera Lorex Ping connects to the camera 8 If this is the first time connecting to the camera you will be prompted to create your own password Tap OK Enter the camera password The default password is lorex Tap the name of the camera to connect Tap OK ...

Страница 29: ...d App on page 71 2 2 4 CONNECTING TO YOUR CAMERA ON ANDROID The app for Android is called Lorex Ping To connect to your camera using Android 1 Download the Lorex Ping app from the Google Play store NOTE Lorex Ping requires Android v 2 3 or higher 2 Tap the Lorex Ping icon from the home screen or app list to open Lorex Ping Lorex Ping opens to the Camera List 3 Tap to add a camera Enter a new passw...

Страница 30: ...ck of the camera using the camera on the Android phone or tablet The CamID will automatically be entered OR Manually enter the CamID printed on the camera Enter a name for your camera of your choice Press to scan the QR code printed on the back of the camera OR manually enter the CamID printed on the camera Line up the QR code to the middle using the camera on the phone or tablet ...

Страница 31: ...cting to the camera you will be prompted to create your own password Tap OK 9 Under New password enter a new password for the camera and repeat the password under Confirm password Tap OK 10 Tap the name of the camera in Camera List again to connect to the camera For details on using the Android app see Android App on page 93 Enterthecamerapassword The default password is lorex Tap the name of the ...

Страница 32: ... be connected to the same router as the camera and connect to the camera For details see Connecting to Your Camera using a PC on page 5 2 Right click on the camera ID in the Auto Search area and click Web Configure 3 Enter the camera admin user name and password By default the admin user name is admin and the admin password field is left blank Click Log in The Web Configure interface opens in your...

Страница 33: ...nglish 5 Click WiFi Scan and select your WiFi network from the list 6 Under WPA PSK Key or WEP Key enter the WiFi password Click Save and Apply WiFi Scan Click your WiFi network from the list Save Apply Enter WiFi Password ...

Страница 34: ...od signal 9 Remove the Ethernet cable from the camera wait 60 seconds and then reconnect to your camera in L View 2 3 2 IPHONE WIFI SETUP NOTE The camera must be connected to your router using an Ethernet cable before you can set it up to use WiFi 1 Connect to your camera using Lorex Ping iPhone For details see Connecting to your Camera on iPad on page 12 Your iPhone must be connected to your WiFi...

Страница 35: ...mera scans for available networks in range 6 Tap the name of your WiFi network enter the password and tap OK 7 Wait for the update to complete 8 Remove the Ethernet cable from the camera It will connect to the wireless network When it is connected the blue Network LED will be on or flashing 9 Press Camera Settings ID Password and then Back to exit the edit camera screen Network WiFi Network Slide ...

Страница 36: ...ou can set it up to use WiFi 1 Connect to your camera using Lorex Ping iPad For details see Connecting to your Camera on iPad on page 12 Your iPad must be connected to your WiFi not your 3G mobile network 2 Press to open the edit camera screen 3 Tap Camera Settings Enter the camera s admin username and password By default the admin username is admin and the password is left blank Tap OK 4 Tap Netw...

Страница 37: ...ra List to connect If you cannot connect check to make sure you have entered the correct wireless password and that the camera is in signal range of your wireless router 2 3 4 ANDROID WIFI SETUP NOTE The camera must be connected to your router using an Ethernet cable before you can set it up to use WiFi 1 Connect to your camera using Lorex Ping For details see Connecting to your Camera on Android ...

Страница 38: ...user name is admin and the password is left blank Tap OK 4 Tap Network then WiFi Network 5 Check the WiFi checkbox The camera will scan for available networks 6 Tap the name of your WiFi network enter the password then tap OK Wait for the update to complete Check WiFi Tap the name of your WiFi network ...

Страница 39: ...nnected the blue Network LED will be on or flashing 8 Press Camera Settings then Camera List to exit the edit camera screen 9 Tap the camera in the Camera List to connect If you cannot connect check to make sure you have entered the correct wireless password and that the camera is in signal range of your wireless router ...

Страница 40: ...amera using L View see Connecting to Your Camera using a PC on page 5 3 1 SYSTEM REQUIREMENTS NOTE For Mac software and instructions please visit www lorextechnology com Description Minimum System Requirements CPU 2 0 GHz dual core recommended Memory 2GB Operating System Windows Windows XP SP 2 and higher Windows 7 Basic Home Premium Ultimate Mac OS X 10 6 8 Snow Leopard Intel Processors only Hard...

Страница 41: ...oomed in click and drag the camera image to pan the camera Double click to open the display area in full screen Double click again to exit full screen Right click to open the display sub menu See Display Sub Menu on page 29 2 Image Recording Controls Video Settings Click to edit the camera s video settings See Configuring Camera Video Settings on page 37 1 2 3 5 6 7 9 11 10 12 8 13 15 14 ...

Страница 42: ...page 31 NOTE Cameras may appear in red before you have connected to them the first time 8 Auto Search Auto Search shows cameras located on your local network LAN Double click the camera name or click and drag the camera to the display area to view the camera Drag the camera to the Camera List to save the camera Right click and select Web Configure to configure the camera settings using a browser S...

Страница 43: ...tors Click to select single camera view or to select 4 camera view 14 Full Screen Click to open the camera display area in full screen Press ESC to exit full screen 3 2 1 DISPLAY SUB MENU The Display sub menu opens when you right click on a camera s display area It contains additional camera controls The Display sub menu contains the following controls Full window Open the camera in single camera ...

Страница 44: ...L CAMERA ACTION Press to open the All Camera Action menu The All Camera Action Menu contains the following controls Snapshot all Take a snapshot from all connected cameras Play all Connect to all cameras selected in display grid Pause all Pause video for all connected cameras Click Pause all again to resume video Disconnect all Disconnect from all connected cameras Clear all connection info Remove...

Страница 45: ...ist Cameras not connected are shown in red If your camera is red check the network connection NOTE Cameras may appear in red before you have connected to them the first time 3 3 1 ADDING CAMERAS TO CAMERA LIST If the camera is on the local network click and drag a camera from the Auto Search list to Camera List to add it If the camera is not on the local network i e you are connecting over the Int...

Страница 46: ...he camera in Camera List and click ID Password settings 2 Under Name enter a name for the camera that will appear in Camera List This can be anything of your choice 3 Under Password enter the camera password to save the password in L View 4 Click OK 3 3 3 DELETING CAMERAS 1 Right click on the camera in Camera List and click Delete Camera 2 Click Delete to confirm Right click to open the Camera Lis...

Страница 47: ...on select the resolution that will be used when connecting to the camera using a smart phone or tablet 640x480 VGA 320x240 QVGA or 160x120 QQVGA Under Frame rate select the frame rate that will be used when connecting to the camera using a smart phone or tablet between 30fps highest and 1fps lowest 4 Under Microphone select Enable to enable audio streaming to smart phones and tablets or Disable o ...

Страница 48: ...e settings 1 Right click on the camera you want to configure and select Night mode control 2 Select one of the following Automatic day and night mode switch Camera will automatically switch between day mode or night mode based on the amount of light in the room Scheduled time of night mode Camera will switch between day mode and night modeatascheduledtimeseachday Ifusingthisoption usethefirstsetof...

Страница 49: ...option under Mode select Day for day mode or Night for night mode 3 Click Update to apply changes to your camera Enter the admin username default admin and password default left blank for the camera and click OK 4 The camera will disconnect when the setting is changed Double click the camera in Camera List to reconnect Start of night mode 8 00 PM Return to day mode 6 00 AM Select day or night mode...

Страница 50: ...ect to the camera you would like to playback recordings from 2 Click the microSD button on top of the camera display area Enter the camera password if required 3 A list is created of all days with recordings available in the format yyyymmdd for example 20120730 is July 30 2012 4 Click the next to a day to view recordings from that day Recordings from that day are shown from earliest to latest Reco...

Страница 51: ...3 5 CONFIGURING CAMERA VIDEO SETTINGS The Video Settings menu allows you to adjust the quality of the camera video To open the Video Settings menu Click on the top of the display area for the camera you would like to configure NOTE The camera will disconnect after making changes to video settings Wait about 15 seconds after clicking Update and double click the camera in Camera List or Auto Search ...

Страница 52: ...rate If you are manually configuring the resolution and frame rate configure the following Resolution Manually select either VGA 640x480 or QVGA 320x240 resolution VGA resolutionwillgive youabetter more detailedpicture butrequiresmorebandwidth QVGA allows the camera to maintain a higher frame rate when available bandwidth is low Framerate Manuallyselecttheframeratebetween30fps highest and1fps lowe...

Страница 53: ...admin user name default admin and password default left blank and click OK The camera will disconnect Wait about 15 seconds and then double click the camera in Camera List or Auto Search to reconnect to the camera 3 5 2 VIDEO TAB CONFIGURE GENERAL VIDEO SETTINGS The Video tab allows you to configure general video settings such as color and brightness settings To configure general video settings 1 ...

Страница 54: ...mal orientation 5 Under Brightness select the brightness of the image between 10 highest and 1 lowest 6 Under Low Light Sensitivity set the camera s sensitivity in low light environments between Very High highest High and Normal lowest 7 Check Enable time display on video to turn on video time stamps or uncheck it to disable video time stamps 8 Under Microphone select Enabled to enable the built i...

Страница 55: ...wing Normal Status and network LED s will function as normal For details on LED functions see Camera Overview on page 1 Always turn off Status and network LED s are turned off at all times Turn off after connected Status and network LED s turn on when the camera is powered on and turn off once a network connection is made 2 Click Update to save changes Enter the camera admin user name default admi...

Страница 56: ...tion will be triggered if a moving object is larger than 1 of the video area If it is set to 10 a moving object must be larger than 10 of the video area to trigger motion detection 2 Click Update to save changes Enter the camera admin User Name default admin and Password default left blank and click OK The camera will disconnect Wait about 15 seconds and then double click the camera in Camera List...

Страница 57: ... saved It allows you to open or change the Snapshot folder To open the Snapshot folder Click Open To change the Snapshot folder 1 Click Change 2 Select a new Snapshot folder and click OK to save changes 3 6 2 STARTUP OPTIONS The Startup options menu allows you to configure startup options for L View Change folder Open folder Snapshot folder location ...

Страница 58: ...mera layout and connect to all the previously open cameras when L View opens 3 Click OK to save changes 3 6 3 FIXED IP ACCESS The Fixed IP Access menu is for advanced users only It must be used if you have assigned your camera a fixed IP address on your router Check for L View to open automatically when your computer turns on Check to restore camera layout and connect to previously open cameras wh...

Страница 59: ...o save changes 3 In the camera list right click the camera you would like to configure and select Assign IP Address 4 Enter the camera s internal IP address and click OK 3 6 4 LOGIN ENABLING PASSWORD TO ACCESS L VIEW The Login menu allows you to enable a password to open L View To enable a password for L View 1 Select Enable Assign IP address Select Enable Enter a User Name Enter a Password ...

Страница 60: ...e Image Ratio menu allows you to configure L View to preserve the original aspect ratio of the video or to allow the video to stretch to fill the display area To configure Image Ratio 1 Check Keep Image Ratio to not allow any stretching of the image bars may appear on the sides of the image Uncheck Keep Image Ratio to stretch the image to the entire size of the display 2 Click OK to save changes C...

Страница 61: ...l the update It will also check for camera updates when a new firmware is available If a new camera firmware is available click OK and enter the admin user name default admin and password default left blank Then wait for the upgrade to complete DonotunplugthecamerapowercableorEthernetcableduringfirmwareupdates The camera will reboot during the firmware upgrade process To manually check for an upda...

Страница 62: ...NE You can use Lorex Ping in portrait or landscape mode Tilt the phone to switch between portrait or landscape Video information Disconnect button only shown in portrait mode Record video to phone memory press again to stop recording Save a snapshot of the camera on your phone Play an audio alarm on the camera speaker required not included Activate 2 way audio intercom using the phone microphone s...

Страница 63: ...y audio 4 1 2 TAKING SNAPSHOTS 1 While viewing tap to take a snapshot from the camera You can view snapshots using the Camera app or save photos to your computer by connecting your iPhone to your computer using a USB cable 4 1 3 RECORDING VIDEO TO IPHONE You can manually record video from your camera directly to your iPhone s built in memory To record video to your iPhone s memory 1 While viewing ...

Страница 64: ...o return to the Camera List Disconnect only appears when holding the phone in portrait mode 2 Tap the name of the camera you would like to select 3 Tap the date of the video recording you would like to playback Then tap the desired video file to start playback 4 Use the on screen video controls to control playback Tap Stop to return to the file list 4 3 PLAYING BACK VIDEO RECORDED ON MICROSD ON IP...

Страница 65: ... The camera scans for recorded video files and shows a list of days with recorded video Tap a day to view recordings created on that day 5 Tap a recording to play it 6 Tap Disconnect to return to the recordings list 4 4 USING CAMERA LIST TO EDIT CAMERA SETTINGS You can use the Camera List to adjust the connections settings or other settings for your camera To access Camera Settings 1 Tap Camera Li...

Страница 66: ...e if your device is on the same local network as the camera If menus are missing connect to the same WiFi network or router as the camera using your phone 4 4 1 EDITING CAMERA CONNECTION SETTINGS You can edit your camera connection information This is useful if you change the password of the camera or if you want to save the admin user name and password so you don t have to enter it to make settin...

Страница 67: ...is 4 Under Save admin password select ON to have Lorex Ping save the admin user name and password the next time you enter it or OFF to require the admin user name and password whenever settings changes are made 5 Tap Back to save changes and return to camera list 4 4 2 DELETING CAMERAS FROM CAMERA LIST 1 In Camera List tap Move Edit Camera Name Edit Password Enable disable icon automatic icon upda...

Страница 68: ...d is detected by the camera Push Alarm Notifications go directly to the notifications area on your device To enable Push Alarm Notifications 1 In Camera List tap next to the camera 2 Tap Alarm notification Then Tap Delete Tap here Example of Push Notification Enable disable push notifications for video motion detection Enable disable push notifications for sound Select sensitivity for sound push n...

Страница 69: ...west and 10 highest 6 Tap Update to save your settings 4 4 4 EDITING CAMERA MOBILE STREAMING SETTINGS Configure the camera image quality settings for streaming to mobile devices i e smart phones and tablets Please note that less bandwidth is generally available over mobile networks than over WiFi or Ethernet To edit mobile streaming settings 1 In Camera List tap next to the camera 2 Tap Stream Set...

Страница 70: ...t will be used when connecting to the camera using a smart phone or tablet between 30fps highest and 1fps lowest 5 Under Microphone select OFF to turn off audio streaming to your mobile device or tap to select ON to turn on audio streaming to your mobile device 6 Tap Update to save your settings 4 4 5 EDITING CAMERA VIDEO SETTINGS 1 In Camera List tap next to the camera 2 Tap Video Settings 3 Tap ...

Страница 71: ...e image quality or the frame rate when bandwidth increases or decreases Select Video Motion to have the camera maintain the frame rate and reduce image quality when bandwidth is insufficient Select Image Quality to have the camera maintain image quality and reduce frame rate when bandwidth is insufficient Select Better Quality to have the cameramaintainframerateandincreasequalitywhenbandwidthissuf...

Страница 72: ...Control menu 7 Under Motion Sensitivity select the motion detection sensitivity between 1 High and 10 Low If Motion Detection Sensitivity is set to 1 motion detection will be triggered if a moving object is larger than 1 of the video area If it is set to 10 a moving object must be larger than 10 of the video area to trigger motion detection Tap Control to return to the Control menu NOTE This setti...

Страница 73: ...based on the amount of light in the room Schedule Camera will switch between day mode and night mode at a scheduled times each day If using this option tap under Schedule time of night mode use the sliders to set the Start time when night mode begins each day and End time when night mode ends each day then tap OK Select Night Mode control type Select Schedule to scheduleday night mode switch Tap t...

Страница 74: ...G CAMERA WIRED NETWORK SETTINGS Configure the camera IP address when connected using Ethernet Select DHCP or Fixed IP To edit camera wired network settings 1 In Camera List tap next to the camera you would like to edit 2 Tap Camera Settings 3 Tap Network then Wired Network Select Manual Select Day or Night mode Select DHCP or Static If Static configure IP address information ...

Страница 75: ...the camera you would like to edit 2 Tap Camera Settings 3 Tap Network then WiFi Network 4 Slide WiFi to ON to enable WiFi on the camera and scan for available networks 5 Tap a WiFi network and enter the password to connect To connect to a hidden WiFi network tap Other Enter the SSID and select the security type and tap Add Tap the network name from the list and enter the password 6 Wait for the up...

Страница 76: ...er Email trigger select ON to enable email notifications or OFF to disable Then under Send Email select ON to enable email notifications 5 Under Motion sensitivity select the motion detection sensitivity between 1 High and 10 Low If Motion Detection Sensitivity is set to 1 motion detection will be triggered if a moving object is larger than 1 of the video area If it is set to 10 a moving object mu...

Страница 77: ...elect both PIR and Motion to receive alarms from both motion triggers Schedule Send email alarms based on the settings configured in the Scheduling menu Disable Disable email alarms 7 Enter up to 3 email addresses under Recipient1 3 that will receive email alarms 8 Tap Update to save your changes NOTE If you want to use a custom SMTP server to send Email messages click SMTP Settings enter your SMT...

Страница 78: ...in front of the camera to determine if there is motion PIR motion detection is less effective at higher temperatures NOTE You may also select both PIR and Motion to receive alarms from both motion triggers Schedule Create audio alarms based on the settings set in the Scheduling menu Disable Disable speaker alarms 5 Under Alarm Loop Times select the number of times you would like the speaker alarm ...

Страница 79: ...ecord continuously at all times Schedule Recording Camera will record according to settings set in the recording schedule NOTE To enable Motion detection recording using iPhone you must used Schedule recording Then create a schedule in the Scheduling menu with Motion trigger PIR trigger or both Motion trigger and PIR trigger selected 7 Under When disk space full check Overwrite to set the camera t...

Страница 80: ...would like to edit 3 Tap Camera Settings 4 Tap Schedule then Scheduling 5 Tap Add Schedule 6 Under Email Alarm check Motion trigger to send an email alarm based on video motion select PIR trigger to use the PIR motion sensor or select both Motion Trigger and PIR trigger 7 Under Speaker Alarm check Motion trigger to create an audio alarm based on video motion check PIR trigger to use the PIR motion...

Страница 81: ...apply to Tap Start and End and use the sliders to configure the start and end time for the schedule Tap OK Every day Create a daily recording schedule Tap then tap Start and End and use the sliders to configure the start and end time for the schedule Tap OK Fixed time Create a one time schedule for example if you are going on vacation and would like to record all the time Tap then tap Start and En...

Страница 82: ...ate and time The camera syncs with an Internet NTP time server to automatically provide the correct time once you have configured your time zone and daylight savings time settings To set the camera date and time 1 In Camera List tap next to the camera you would like to edit 2 Tap Camera Settings 3 Tap Admin then Date Time 4 Tap Time Zone Swipe from left to right and then tap delete to delete a sch...

Страница 83: ...e your changes Tap OK The camera will reboot to apply the new time zone 4 4 15 REBOOTING THE CAMERA 1 In Camera List tap next to the camera you would like to edit 2 Tap Camera Settings 3 Tap Admin then Reboot 4 Tap OK to confirm 4 5 USING LOCAL SEARCH TO ADD CAMERAS You can use the Local Search Menu to automatically add the ID s for cameras on your local network To add cameras using local search S...

Страница 84: ... The Add camera screen comes on with the camera ID already entered 4 Enter a Name of your choice and enter the camera Password If you have not connected to your camera before the password is lorex 5 Tap Done The camera is now added to camera list Tap the camera name in camera list to connect to the camera Tap Search to re scan Tap a camera to add to camera list ...

Страница 85: ...sing iPad see Connecting to your Camera on iPhone on page 9 5 1 LIVE VIEWING WITH LOREX PING IPAD Perform action to all cameras View selected camera in single channel view 4 camera view 6 camera view Full screen Mute Audio Adjust volume Disconnect connect to camera Information Record to iPad Snapshot Activate 2 way audio ...

Страница 86: ...shots you must connect the iPad to your computer using a USB cable 5 1 3 RECORDING VIDEO TO IPAD You can manually record video from your camera directly to your iPad s built in memory To record video to your iPhone s memory 1 While viewing tap to start recording 2 Tap again to stop recording To view the recorded video see Playing Back Video Recorded to iPad on page 72 5 2 PLAYING BACK VIDEO RECORD...

Страница 87: ...ck video recorded on the camera microSD card not included on your iPad For details on setting up microSD recording see Configuring MicroSD Recording on page 87 NOTE You must be connected to the same WiFi network or router as the camera to access microSD recordings To play back video recorded on the camera microSD card Tap to Select Camera Tap to Select Day Tap to play file Tap in the display area ...

Страница 88: ...ws a list of days with recorded video Tap a day to view recordings created on that day 4 Tap a recording to play it 5 Tap the Camera List button to exit playback 5 4 USING CAMERA LIST TO EDIT CAMERA SETTINGS You can use the Camera List to adjust the connections settings or other settings for your camera Tap to Select Camera Tap to Select Day Tap to play file ...

Страница 89: ...if your device is on the same local network as the camera If menus are missing connect to the same WiFi network or router as the camera using your phone 5 4 1 EDITING CAMERA CONNECTION SETTINGS You can edit your camera connection information This is useful if you change the password of the camera or if you want to save the admin user name and password so you don t have to enter it to make settings...

Страница 90: ...ges are made 5 Tap Done to save changes 5 4 2 DELETING CAMERAS FROM CAMERA LIST 1 In Camera List tap Move 2 Tap next to the camera you would like to delete then tap Delete to confirm Tap Done 5 4 3 EDITING ALARM NOTIFICATIONS SETTINGS PUSH NOTIFICATIONS Push Alarm Notifications can be set up to create a notification straight to your iPhone when motion or sound is detected by the camera Push Alarm ...

Страница 91: ...cted using video motion detection or OFF to disable 4 Under PIR select ON to enable Push Alarm Notifications when motion is detected using the PIR motion sensor or OFF to disable Example of Push Notification Alarm Notification Enable disable push notifications for video motion detection Enable disable push notifications for sound Select sensitivity for sound push notifications Enable disable push ...

Страница 92: ...ettings 1 In Camera List tap next to the camera 2 Tap Stream Settings 3 Under Bandwidth select the bandwidth for your mobile connection If you are mainly connecting using WiFi you may set this setting higher 4 Under Auto select ON to have the camera automatically select the resolution and frame rate based on available bandwidth Or select OFF to manually select the resolution and frame rate If you ...

Страница 93: ... return to Video settings Brightness Manually adjust the brightness of the image between 10 highest and 1 lowest Tap Done to return to Video settings Sharpness Manually adjust the sharpness of the image between 10 highest and 1 lowest Tap Done to return to Video settings LowLightSensitivity Set the camera s sensitivity in low light environments between Very High highest High and Normal lowest Tap ...

Страница 94: ...est Quality to have the camera maintain the frame rate and increase quality to the maximum speed of the connection Tap Done to return to Video settings Time Display on Video Select ON to enable time stamps on video or OFF to disable time stamps Video flip Select ON to flip the camera image vertically and horizontally or select OFF for the normal orientation This is useful if the camera has been mo...

Страница 95: ... the motion detection sensitivity between 1 High and 10 Low If Motion Detection Sensitivity is set to 1 motion detection will be triggered if a moving object is larger than 1 of the video area If it is set to 10 a moving object must be larger than 10 of the video area to trigger motion detection Tap Control to return to the Control menu NOTE This setting does not affect the PIR motion detector 6 T...

Страница 96: ...rt time when night mode begins each day and End time when night mode ends each day then tap Done Manual Manually select day mode or night mode If using this option select Day for day mode or Night for night mode 4 Tap Update to save your changes 5 4 8 EDITING CAMERA WIRED NETWORK SETTINGS Configure the camera IP address when connected using Ethernet Select DHCP or Fixed IP To edit camera wired net...

Страница 97: ...onfigure your IP Address Subnet mask Default gateway DNS1 and DNS2 5 Tap Update to save your settings 5 4 9 EDITING CAMERA WIFI NETWORK SETTINGS Configure WiFi network settings for the camera To setup the camera with a WiFi network see iPad WiFi Setup on page 22 To edit camera WiFi settings 1 In Camera List tap next to the camera you would like to edit 2 Tap Camera Settings Select DHCP or Static I...

Страница 98: ...i network When it is connected the blue Network LED will be on or flashing 8 Tap next to the camera to exit the edit camera screen 9 Tap the camera in the Camera List to connect If you cannot connect check to make sure you have entered the correct wireless password and that the camera is in signal range of your wireless router 5 4 10 ENABLING EMAIL NOTIFICATIONS Configure email alarms The camera c...

Страница 99: ...10 a moving object must be larger than 10 of the video area to trigger motion detection Tap Email alarm to return to the Email Alarm menu NOTE This setting does not affect the PIR motion detector 6 Check the following trigger options for email alarms Motion Use Video motion detection to trigger email alarms Video motion detection looks for movement in the image to determine if there is motion This...

Страница 100: ...Recipient1 3 that will receive email alarms 8 Tap Update to save your changes NOTE If you want to use a custom SMTP server to send Email messages click SMTP Settings enter your SMTP server information and tap OK 5 4 11 ENABLING SPEAKER ALARMS Configure audio alarms using a speaker not included connected to the camera Audio alarms can be set up to go off when the camera detects motion This is helpf...

Страница 101: ...th PIR and Motion to receive alarms from both motion triggers Schedule Create audio alarms based on the settings set in the Scheduling menu Disable Disable speaker alarms 5 Under Alarm Loop Times select the number of times you would like the speaker alarm to repeat when alarms occur Tap Done 6 Tap Alarm Test to sound a test alarm 7 Tap Update to save your settings 5 4 12 CONFIGURING MICROSD RECORD...

Страница 102: ...gger and PIR trigger selected 7 Check Circular recording to set the camera to overwrite the oldest recordings when the microSD card is full or select Stop recording to set the camera to stop recording when the microSD card is full 8 Tap Update to save your settings 5 4 13 CONFIGURING THE CAMERA RECORDING AND ALARM SCHEDULE Configure schedules for recording and alarms Schedules can be configured se...

Страница 103: ... Speaker Alarm check Motion trigger to create an audio alarm based on video motion check PIR trigger to use the PIR motion sensor or select both 8 Under SD card record check Continuous for the camera to record to microSD continuously during the scheduled time Check Motion trigger to record when video motion is triggered during the scheduled time select PIR trigger to record when the PIR motion sen...

Страница 104: ...e Start and End using the sliders to configure the exact date and time when you would like the schedule to start and end Tap Done 10 Tap Done to save the schedule Tap Update to save your settings To delete a Schedule 1 From the Scheduling menu swipe the schedule you would like to delete from left to right 2 Tap Delete 3 Tap Update to save your changes 5 4 14 CONFIGURING THE CAMERA DATE AND TIME Co...

Страница 105: ... to configure the start and end time for Daylight Savings Time and then tap Done 6 Tap Update to save your changes Tap OK The camera will reboot to apply the new time zone 5 4 15 REBOOTING THE CAMERA 1 In Camera List tap next to the camera you would like to edit 2 Tap Camera Settings 3 Tap Admin then Reboot Tap Time Zone Select your Time Zone Enable Daylight Savings and configure start and end tim...

Страница 106: ...as on your local network Tap Search to re scan 3 Tap a camera from the list The Add camera screen comes on with the camera ID already entered 4 Enter a Name of your choice and enter the camera Password If you have not connected to your camera before the password is lorex 5 Tap Done The camera is now added to camera list Tap the Camera List button and then tap the camera name in Camera List to conn...

Страница 107: ... see Connecting to your Camera on Android on page 15 6 1 LIVE VIEWING WITH LOREX PING FOR ANDROID You can use Lorex Ping in portrait or landscape mode Tilt the phone to switch between portrait or landscape Disconnectbutton only shown in portrait mode Video information Save Snapshot Activate 2 way audio intercom using the phone microphone ...

Страница 108: ... your computer connect your device to your computer using a USB cable See you Android device s Instruction Manual for details 6 2 PLAYING BACK VIDEO RECORDED ON MICROSD ON ANDROID You can playback video recorded on the camera microSD card not included on your Android phone or tablet For details on setting up microSD recording see Enabling microSD Recording on page 108 NOTE You must be connected to...

Страница 109: ...e video files Files are shown in a list according to the date they were recorded 4 Tap a day to view recordings for that day Tap a recording to view it 5 Tap Disconnect to return to the recording list SD card playback Tap to view recordings from that day Tap to view a recording ...

Страница 110: ...camera If menus are missing connect to the same WiFi network or router as the camera using your phone To access Camera Settings 1 Tap Camera List Then tap next to the camera you would like to edit The Camera List Settings Menu appears 2 For certain menus you will need to enter the camera admin user name and password before you may change settings By default the admin user name is admin and the pas...

Страница 111: ... Under Save Admin Account select ON to save the admin user name and password so you do not have to enter it when making setting changes Or select OFF to not save the admin user name and password The admin user name and password will be saved the next time you enter it to make a setting change 6 Tap OK to save changes 6 3 2 DELETING CAMERAS FROM CAMERA LIST 1 In Camera List tap next to the camera y...

Страница 112: ...ution select the resolution that will be used when connecting to the camera using a smart phone or tablet 160x120 Q2WGA 320x240 QVGA or 640x480 VGA Under Frame rate select the frame rate that will be used when connecting to the camera using a smart phone or tablet between 30fps highest and 1fps lowest 5 Under Microphone tap to select OFF to turn off audio streaming to your mobile device or tap to ...

Страница 113: ...ttings select 60Hz light freq or 50Hz light freq to adjust the camera for the frequency of your indoor lighting Favor Preference Select whether you would like the camera to reduce the image quality or the frame rate when bandwidth increases or decreases Select Video Motion to have the camera maintain the frame rate and reduce image quality when bandwidth is insufficient Select Image Quality to hav...

Страница 114: ... and motion detection sensitivity 1 In Camera List tap next to the camera you would like to edit 2 Tap Video Settings Then tap Control 3 Under Status LED select one of the following Normal Status and network LED s will function as normal For details on LED functions see Camera Overview on page 1 Always turn off Status and network LED s are turned off at all times Turn off after network connected S...

Страница 115: ... When day mode is on the camera sees in color When night mode is on the camera sees in black and white and the Infrared LED turns on to enable night vision To configure Day Night mode 1 In Camera List tap next to the camera you would like to edit 2 Tap Video Settings Then tap Night Mode Control 3 Select one of the following Auto Camera will automatically switch between day mode or night mode based...

Страница 116: ...ight for night mode 4 Tap Update to save your changes 6 3 7 ENABLING PUSH ALARM NOTIFICATIONS Push Alarm Notifications can be set up to create a notification straight to your Android device when motion or sound is detected by the camera Push Alarm Notifications go Select Schedule to scheduleday nightmode switch Tap to configure day night mode schedule SelectManualformanual day night mode selection...

Страница 117: ...tap to select ON to enable Push Alarm Notifications when sound is detected by the camera or OFF to disable Under Sound Sensitivity select a sensitivity for Sound Push Alarm Notifications between 1 lowest and 10 highest 6 Tap Update to save your settings 6 3 8 EDITING CAMERA WIRED NETWORK SETTINGS Configure the camera IP address when connected using Ethernet Select DHCP or Fixed IP To edit camera w...

Страница 118: ...atic configure your IP Address Subnet mask Default gateway DNS1 and DNS2 5 Tap Update to save your settings 6 3 9 EDITING CAMERA WIFI NETWORK SETTINGS Configure WiFi network settings for the camera To setup the camera with a WiFi network see Android WiFi Setup on page 23 To edit camera WiFi settings 1 In Camera List tap next to the camera you would like to edit 2 Tap Camera Settings Select DHCP re...

Страница 119: ...will be on or flashing 8 Press Camera Settings then Camera List to exit the edit camera screen 9 Tap the camera in the Camera List to connect If you cannot connect check to make sure you have entered the correct wireless password and that the camera is in signal range of your wireless router 6 3 10 ENABLING EMAIL NOTIFICATIONS Configure email alarms The camera can be set up to send email alerts wh...

Страница 120: ...l alarms Video motion detection looks for movement in the image to determine if there is motion This means that there may be false alarms caused by changes in lighting trees moving in the wind etc PIR Use the PIR motion detector to trigger email alarms The PIR motion detector uses changes in temperatures e g from a person moving around in front of the camera to determine if there is motion PIR mot...

Страница 121: ... the number of times you would like the speaker alarm to repeat when alarms occur 6 Select from the following speaker alarm triggers Motion Use Video motion detection to trigger audio alarms Video motion detection looks for movement in the image to determine if there is motion This means that there may be false alarms caused by changes in lighting trees moving in the wind etc PIR Use the PIR motio...

Страница 122: ...uded is inserted into the camera It is recommended to format the microSD card before using it with the camera 2 In Camera List tap next to the camera you would like to edit 3 Tap Camera Settings 4 Tap Schedule then SD Card 5 Under Recording tap to select ON to enable microSD recording or OFF to disable 6 Select one of the following recording options Always Recording Camera will record continuously...

Страница 123: ...p recording when the microSD card is full 8 Tap Update to save your settings 6 3 13 CONFIGURING THE RECORDING AND ALARM SCHEDULE Configure schedules for recording and alarms Schedules can be configured separately for alarms and recording You can configure up to 12 schedules To create a schedule for alarms or recording 1 First you must enable alarms or recording to use the schedule 2 In Camera List...

Страница 124: ...reate a weekly recording schedule Tap and check the days you wouldlikethescheduletoapplyto TapStartandEndandusethesliderstoconfigure the start and end time for the schedule Tap OK Every day Create a daily recording schedule Tap then tap Start and End and use the sliders to configure the start and end time for the schedule Tap OK Fixed time Create a one time schedule for example if you are going on...

Страница 125: ...gure the camera date and time The camera syncs with an Internet NTP time server to automatically provide the correct time once you have configured your time zone and daylight savings time settings To set the camera date and time 1 In Camera List tap next to the camera you would like to edit 2 Tap Camera Settings 3 Tap Admin then Date Time Press the Android menu button Tap Delete Then tap Delete Se...

Страница 126: ...igure the start and end time for Daylight Savings Time and then tap OK 7 Tap Update to save your changes 6 3 15 REBOOTING THE CAMERA 1 In Camera List tap next to the camera you would like to edit 2 Tap Camera Settings 3 Tap Admin then Reboot 4 Tap OK to confirm Tap Time Zone Select Time Zone Check to enable Daylight Savings Time adjustments Configure Start Time and End Time for Daylight Savings Ti...

Страница 127: ...as on your local network Tap Search to re scan 3 Tap a camera from the list The Add camera screen comes on with the camera ID already entered 4 Enter a Camera Name of your choice and enter the camera Password If you have not connected to your camera before the password is lorex 5 Tap OK The camera is now added to camera list Tap the camera name in camera list to connect to the camera Tap Search to...

Страница 128: ...gure NOTE Your computer must be on the same network as the camera to use Web Configure 2 Enter the camera admin user name and password By default the admin user name is admin and the admin password field is left blank Click Log in The Web Configure interface opens in your default web browser NOTE Your camera admin user name and password differs from the password used to connect to your camera to v...

Страница 129: ...amera Internet Explorer only 4 Schedule Configure recording settings and schedules Configure email and audio alarms speaker required not included 5 Admin Configure the camera date and time passwords and LEDs Restart the camera Perform system upgrades 6 Language Select the language for the Web Configure interface 7 2 NETWORK Configure networking settings for WiFi or Ethernet connection 7 2 1 WIRED ...

Страница 130: ...selected Use the following IP address configure the following IP address Enter the IP address the camera will use Make sure it is available on your network Subnet mask Enter the Subnet Mask Default Gateway Enter the Default Gateway address Obtain DNS server address automatically Select to have the camera automatically select a DNS server Use the following DNS server address Select and then manuall...

Страница 131: ...esh the page and select WiFi test When the test is successful disconnect the camera from Ethernet To configure a fixed IP address for the camera when connected over WiFi click IP address configure the settings as needed and click Save Apply To test configured WiFi settings click WiFi test 7 3 VIDEO Configure camera video and streaming settings Watch live video from the camera Internet Explorer onl...

Страница 132: ...his computer and follow the prompts to install ActiveX controls Once ActiveX controls are installed you can view live video from the camera Double click inside the video area to open the video in full screen Double click again to exit full screen 7 3 2 VIDEO SETTINGS Adjust the video quality settings Set the password to access camera video through L View or apps Double click inside the video area ...

Страница 133: ...lect to manually select the video resolution and frame rate for the camera Note that the image quality may decrease if there is not enough bandwidth for your selected settings Resolution Manually select either VGA 640x480 or QVGA 320x240 resolution VGA resolutionwillgive youabetter more detailedpicture butrequiresmorebandwidth QVGA allows the camera to maintain a higher frame rate when available b...

Страница 134: ...Indoor Video setting 60Hz light freq 50Hz light freq If necessary select 60Hz light freq or 50Hz light freq to adjust the camera for the frequency of your indoor lighting These settings are not available when the camera is set to Oudoor video Enable audio microphone Disable audio microphone Select Disable audio microphone to disable the built in microphone in the camera or select Enable audio micr...

Страница 135: ...he resolution and frame rate 3 Under Resolution select the resolution that will be used when connecting to the camera using a smart phone or tablet VGA 640x480 or QVGA 320x240 4 Under Frame rate select the frame rate that will be used when connecting to the camera using a smart phone or tablet between 30fps highest and 1fps lowest 5 Select Enable audio to enable audio streaming to smart phones and...

Страница 136: ...ht mode Camera will switch between day mode and night modeatascheduledtimeseachday Ifusingthisoption usethefirstsetofdrop down menus to select in 24 hour time what time the camera will switch to night mode and the second set of drop down menus to select when the camera will return to day mode Manual night mode control Manually select day mode or night mode If using this option under Mode select Da...

Страница 137: ...can be set up to send email alerts when motion is detected Email alarms include a jpg attachment To configure Email Alarms 1 Under Email FTP Trigger select one of the following alarm triggers Motion Use Video motion detection to trigger email alarms Video motion detection looks for movement in the image to determine if there is motion This means that there may be false alarms caused by changes in ...

Страница 138: ...ty is set to 1 motion detection will be triggered if a moving object is larger than 1 of the video area If it is set to 10 a moving object must be larger than 10 of the video area to trigger motion detection NOTE This setting does not affect the PIR motion detector 3 Under Trigger Interval enter the minimum time in seconds the camera will wait in between email alarms If this Interval is set too lo...

Страница 139: ...peratures e g from a person moving around in front of the camera to determine if there is motion PIR motion detection is less effective at higher temperatures NOTE You may also select both PIR and Motion to receive alarms from both motion triggers Schedule Create audio alarms based on the settings set in the Schedule see Scheduling Configuring Recording and Alarm Schedules on page 126 Disable Disa...

Страница 140: ...y all the time to microSD card Schedule Recording Record according to the settings set in the Schedule Disable Recording Do not record 3 Under When disk space full select Overwrite for the camera to record over the oldest recordings when the microSD card is full or select Stop recording for the camera to stop recording when the microSD card is full 4 Click Save Apply 7 4 4 SCHEDULING CONFIGURING R...

Страница 141: ...ng the scheduled time Select Motion triggered to record when video motion is triggered during the scheduled time select PIR triggered to record when the PIR motion sensor is triggered during the scheduled time or select both 3 Select one of the following to configure the times that will be used for this schedule Every week Create a weekly recording schedule Check the days you would like the schedu...

Страница 142: ...ant to delete To edit a schedule 1 Click Edit next to the schedule you want to delete 2 Edit the schedule settings as needed 3 Click Update Schedule 7 5 ADMIN Configure the camera date and time passwords and LEDs Restart the camera Perform system upgrades 7 5 1 ADMIN LOGIN Configure the admin user name and password for the camera The admin user name and Click Delete to delete a schedule ...

Страница 143: ...ettings to the camera Restart the camera by disconnecting and reconnecting the power adapter or pressing the Reboot button see Reboot on page 133 To configure the Web access port advanced users only You do not need to change the Web access port unless you have multiple cameras on the same network and wish to access Web Configuration for them from a remote location i e over the Internet If you wish...

Страница 144: ...work LED s This is useful if you want the camera to be harder to spot at night NOTE This does not affect the SD LED Removing the microSD card will turn off the SD LED but it will also disable microSD recording To configure the status and network LED s 1 Select one of the following Normal LED display Status and network LED s will function as normal For details on LED functions see Camera Overview o...

Страница 145: ...observes Daylight Savings Time Configure the Start Time and End Time for Daylight Savings Time if needed 3 Click Save Apply to apply settings to the camera 7 5 4 UPGRADE Upgrade the camera firmware When firmware upgrades are released they will be available as a free download from www lorextechnology com NOTE Your computer must be on the same network as the camera to upgrade the firmware To upgrade...

Страница 146: ... blank and click Ok to log into the camera 4 Click Admin then click Upgrade 5 Select Upgrade from local file 6 Click Browse locate the firmware upgrade file and then click Open 7 Click Upgrade Wait for the firmware upgrade to complete Do not disconnect the power or network cable during the firmware upgrade The camera will reboot once firmware upgrade is complete Right click the camera under Auto S...

Страница 147: ... a Web Browser English 7 5 5 REBOOT Restart the camera from your Internet browser This is useful if you need to restart the camera to apply settings changes or if the camera requires an error To restart the camera 1 Press the reboot button ...

Страница 148: ...ns 8 TECHNICAL SPECIFICATIONS As our product is subject to continuous improvement Lorex Technology subsidiaries reserve the right to modify product design specifications prices without notice and without incurring any obligation ...

Страница 149: ...g please do not try to repair it yourself Contact customer service for assistance Disposal of the Device At the end of the product lifecycle you should not dispose of this product with normal household waste but take the product to a collection point for the recycling of electrical and electronic equipment The symbol on the product User s Guide and or box indicates this Some of the product materia...

Страница 150: ...unit electrical shock and fire hazard injury In order to improve the features functions and quality of this product the specifications are subject to change without notice from time to time Caution To maintain compliance with the FCC s RF exposure guidelines place the camera at least 20cm 7 87in from nearby persons IC Notice This device complies with Industry Canada licence exempt RSS standard s O...

Страница 151: ...e camera with a wireless network set up the camera s wireless connection before permanent installation Make sure that power adapter cable and ethernet cable if connecting the camera using ethernet are long enough to reach the installation location 11 2 INSTALLATION 1 Use the camera mounting stand to mark holes for the mounting screws If you are installing the camera in the ceiling the screw holes ...

Страница 152: ...le as necessary See below for suggested stand configurations 4 Secure the stand position by using a Philipshead screwdriver to tighten the screw connecting the camera to the stand 5 Connect the power adapter cable and ethernet cable if connecting the camera using ethernet to the camera Wall Mount Ceiling Mount Camera stand screw ...

Страница 153: ... router further away from any cordless telephones or other wireless devices Password required to change settings different than password created Changing settings requires the admin user name and password for the camera This is a different password than the one used to connect to the camera for video streaming By default the admin user name is admin and the password is left blank Cannot access Cam...

Страница 154: ...Search Camera may be on different network than computer Press next to camera list and enterthecameraIDandpasswordmanually Ifthisdoesnotwork checkthenetwork connection Cannot access Web Configure on PC Camera may be on different network than computer Connect the camera and computer to the same network i e the same router Bright spot in video when viewing camera at night Night vision reflects when p...

Страница 155: ...Copyright 2012 Lorex Technology Inc LNC104 www lorextechnology com Version 1 0 ...

Отзывы: