background image

26 


Enter information, as follows: 


Username

 – Enter the username of the new user. 


Password

 – Enter the password of the new user. 


Access level

 – Enter the access right level of the new user. 

4.


Select 

OK


Removing users 

Proceed, as follows: 

1.


Start UULA. 
 
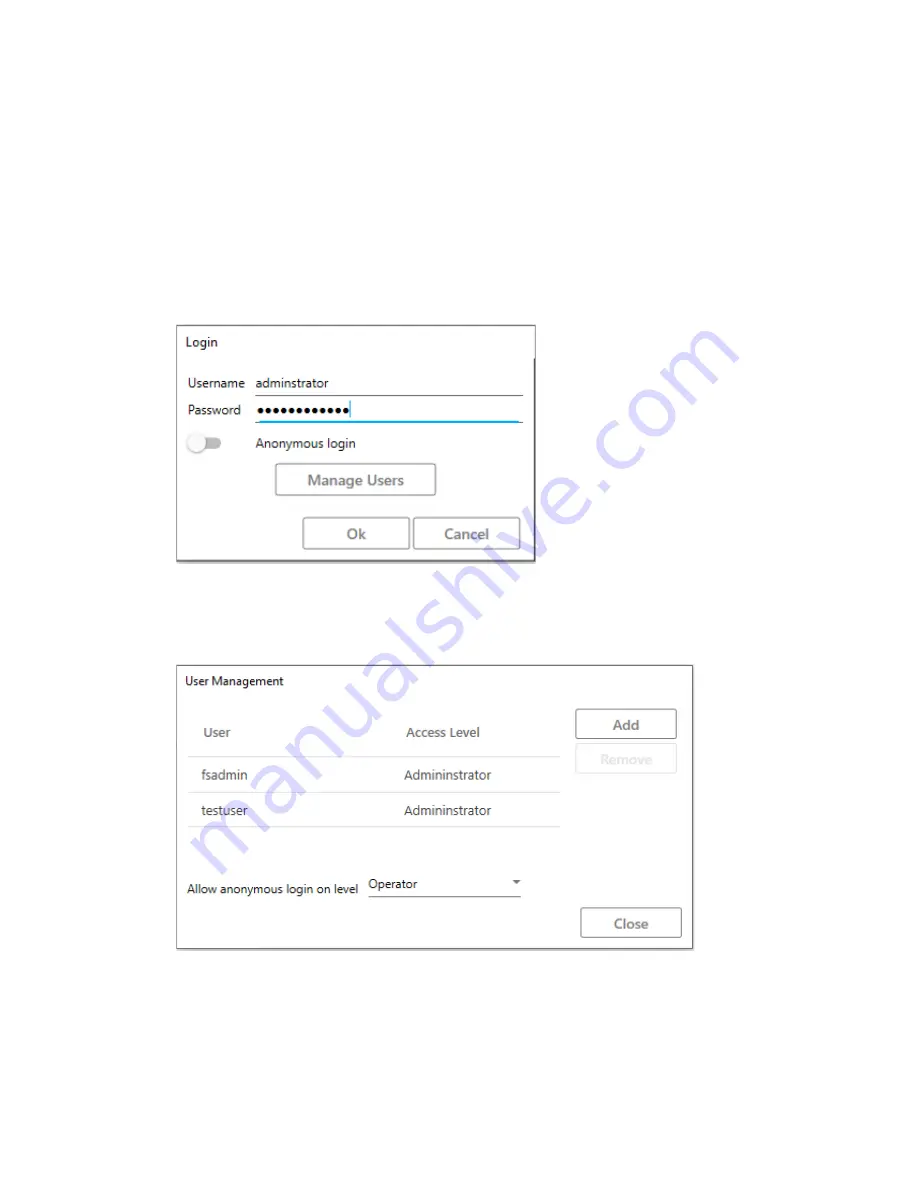
The screen below is opened: 


Figure 21. Login 

2.


Select 

Manage Users

 
The screen below is opened: 


Figure 22. User Management 

3.


Select the user you want to remove. 

4.


Select 

Remove


Содержание FocalSpec

Страница 1: ...FocalSpec 3D Line Confocal Scanner UULA...

Страница 2: ...n may be copied photocopied reproduced transmitted transcribed or reduced to any electronic medium or machine readable form without prior written consent of LMI Technologies Inc Trademarks and Restric...

Страница 3: ...nterface 23 2 2 1 Access Right Levels 23 2 2 2 Logging in 24 2 2 3 Managing users 24 2 2 4 Main Window 28 2 2 5 Measurement 29 2 2 6 Analysis 30 2 2 7 Recipes 31 2 3 Calibration 39 2 3 1 Instructions...

Страница 4: ...3 Maintenance and Service 83 3 1 Continuous Maintenance 83 3 2 Monthly Maintenance 83 3 3 Cleaning the Calibration Mirror 84 4 What Is New in the Latest SW Version 85 5 Technical Specifications 87 6...

Страница 5: ...ith the calibration mirror sample or fixture especially when starting new work and making any adjustments Table 2 Warnings Warning sign Warning Danger of crushing Keep your hands away from the measure...

Страница 6: ...rations must be done regularly and in due time Any changes to the safety circuit are strictly forbidden Changes may cause unexpected start up or shutdown or automatic repetition of cycles which may le...

Страница 7: ...the graphic card does not have HDMI Fastening strips and pins Plywood package and pallet Keep the package and pallet for future device transportation Printed UULA user manual and UULA installation ma...

Страница 8: ...rating system English Windows 10 Tested on build 10 0 15063 o For production and lab environments the recommended computer model is Advantech MIC 7500B U8A1E with NVIDIA GPU English Windows 10 For off...

Страница 9: ...ons are required to install the device Proceed as follows 1 Place the plywood package in such a way that you can walk around it 2 Unfasten the screws PH2 on the package lid 3 Remove the lid number 1 i...

Страница 10: ...or shackles and secure the device to the pallet 10 Ensure that the device is ready for lifting The device must only be lifted by using the two lifting eyebolts on top of the device Use the screw pin a...

Страница 11: ...measurement table 13 Remove the lifting eyebolts by unscrewing them Figure 6 Removing the Lifting Eyebolts Note It is extremely important that you remove the lifting eyebolts as they will collide with...

Страница 12: ...the package to its connector on the left side of the scannerframe Push the connector in place approximately 5 mm 0 2 and tighten the nut by turning it clockwise with Phoenix Contact tool TSD 04 SAC 12...

Страница 13: ...emove the sensor from its package Warning Danger of crushing The sensor weighs approximately 30 kg 66 lbs Two persons are required to handle the sensor Before you continue ensure that the lens cover i...

Страница 14: ...locked applies to the non motorized version U_XY Figure 11 Lifting the Sensor in Place 2 sensor fastening plate top at the level of device chassis 19 Ensure that the spherical guide pins in sensor ba...

Страница 15: ...n the case of the motorized Z version U_XYZ make sure that the Z axis locking handle remains loose 22 Connect Phoenix Contact NBC MSY 1407491 power trigger cable between the scanner and the connector...

Страница 16: ...lows 30 Copy setup exe from the USB memory stick or download it from LMI support site to the C drive 31 Double click setup exe to run it 32 Read and accept the license agreement 33 Select Next 34 Sele...

Страница 17: ...select Next 39 Select Install 40 Install CloudCompare only if not yet installed 41 In the FocalSpec VEVO Filter Driver setup window a Select Install b Select Yes to the network adapter parameters que...

Страница 18: ...rsion 4 TCP IPv4 Properties 7 Select Use the following IP address Enter the details below Figure 16 Network Adapter Settings 8 Select OK Reboot your computer if needed 1 6 Installing Focalspec Map Thi...

Страница 19: ...s how to install the Mountains Map software Proceed as follows 1 Before installing a new version of the software Uninstall all previous versions also Focalspec Map software in Add or Remove programs M...

Страница 20: ...I O requires its own dedicated Ethernet port Do not use a switch SF UTP double shielded cable CAT 5 recommended Note 2 In order to connect the PC to company LAN another Ethernet port card or USB is ne...

Страница 21: ...S version is enough Install first DSU device search utility https moxa com Moxa media PDIM S100000211 moxa device search utility v2 2 exe Open DSU Ethernet port TCP IPv4 setting can be on automatic Ru...

Страница 22: ...Excel compatible numerical results for compatibility with quality management and other systems This manual covers both machine versions an earlier model without the motorized Z stage referred to as U...

Страница 23: ...ter model is Advantech MIC 7500B U8A1E with NVIDIA GPU English Windows 10 For office environment also HP Z2 Mini G5 WKS I7 8700 32GB 512GB P600 2xLAN W10P 4YNBD can be used Ethernet cable to connect t...

Страница 24: ...r Administrators 2 Enter your username and password If the administrator has allowed anonymous logins for a particular user level you can login without writing a username and password by selecting Ano...

Страница 25: ...25 Figure 18 Login 2 Select Manage Users The screen below is opened Figure 19 User Management 3 Select Add The screen below is opened Figure 20 User window...

Страница 26: ...of the new user Access level Enter the access right level of the new user 4 Select OK Removing users Proceed as follows 1 Start UULA The screen below is opened Figure 21 Login 2 Select Manage Users Th...

Страница 27: ...ned Figure 23 Login 2 Select Manage Users The screen below is opened Figure 24 User Management 3 From the Allow anonymous login on level drop down menu select the anonymous access level which you want...

Страница 28: ...ng Status Indicator lights related to the physical machine status Camera The possible statuses are Green The camera has been found and the connection to it has been established Red No connection to th...

Страница 29: ...e Users User management is available on administrator level Note Restart the system to make the changes effective 2 2 5 Measurement On the Measurement tab you can define measurement related parameters...

Страница 30: ...ogram The height distribution of the current work which helps to see if height adjustment is needed Intensity Histogram The intensity distribution of the current work which helps to see if intensity a...

Страница 31: ...me of the selected job The buttons are Add Add a new job Remove Remove the selected job Note You cannot remove the Master job Start X Define the starting X coordinates The X axis scan line interval de...

Страница 32: ...ation path To enable more flexible X direction adjusting you can switch stitching off in which case the recipe can only be one sweep wide LCI1201 11 mm 0 43 Note After turning stitching ON or OFF chec...

Страница 33: ...numbers from 2 to 16 With thin transparent films lower FIR helps to detect the both surfaces of the film In these cases use a FIR value lower than the film thickness in micrometers divided by 6 With n...

Страница 34: ...LED Pulse width is required due to a high measurement frequency Increasing Gain also increases noise and the background signal level therefore the Gain increase may also require increasing the Thresho...

Страница 35: ...n calibration is saved in the Calibration View See chapter 2 7 7 for detailed parameter settings Output Settings related to the measurement output The Output parameters screen is depicted in the figur...

Страница 36: ...e Motor Control window is depicted in the figure below The buttons are Move to Start Move the table to the set start position X X Y Y Move the measurement table step by step so that the sensor moves t...

Страница 37: ...ttons in the Z Height area The buttons are 10 mm up 1 mm up 0 1 mm up 10 mm down 1 mm down 0 1 mm down Select Auto Z to automatically move the scanner down to the focus height Note Before you select A...

Страница 38: ...ent buttons are SAVE Save the recipe SAVE AS Save the recipe with another name and in another location DELETE Delete the current recipe At the top right hand corner of the preview camera signal window...

Страница 39: ...pter describes how to calibrate UULA and the contents of the calibration log file 2 3 1 Instructions for calibration Make sure that the mirror and all measured areas are clean usually compressed air i...

Страница 40: ...er such as a Post it Note to hide the left side of the groove specimen as seen in the picture below Figure 42 Paper on the groove specimen 2 Select Calibration in the header 3 If the calibration block...

Страница 41: ...two steps are typically only needed when the sensor is changed Use the Y arrows to move the beam to the center of the groove sample as depicted in the picture below Figure 44 Y Position for the beam U...

Страница 42: ...e Figure 45 Adjust Mirror Position 7 Verify the groove position Select Move Back to Groove The table moves to the small groove The Z value and X distance to the center should be as close to 0 as possi...

Страница 43: ...he Z Calibration If the new value is accepted Z Calibration is done again This step is usually needed at the first run when the specimen is not certified and the original estimate for the Groove Heigh...

Страница 44: ...hoose either the latest or the saved data so you can compare the results The calibration statistics show the numerical data from the last saved calibration and the current working data 11 Select Syste...

Страница 45: ...mooth settings to be used in calibration When calibration is started current calculated correction is displayed in Preview window Progress bar displays a percentual status of the correction When calib...

Страница 46: ...or height Figure 57 Z compensation target surface is on 0 level Make sure that the calibration block rotation is correct Lines on the edge of calibration block shall be like in Figure 50 When the surf...

Страница 47: ...bration if smaller z range is enough When the scanning is competed turn the sample 90 degrees to Y direction position like in the picture below Figure 51 The calibration block in Y Direction scan posi...

Страница 48: ...follows 1 Select Load Recipe from the footer 2 Select the recipe called Recipe 3 Save the recipe with a new name using the Save as button 4 Use the X and Y sliders or the Motor Control window to move...

Страница 49: ...a clear view of the gap between the sensor and the sample Ensure that the sensor does not collide with the sample or the fixture 10 Adjust X and Y if needed 11 Adjust Z to fine tune the sample surface...

Страница 50: ...lly after the measurement has been completed Open with Select the program with which the scan result will be opened once the scanning is completed The options are None PCD viewer CloudCompare FocalSpe...

Страница 51: ...ysis tab 2 Double click the desired scanning result or right click to open a context menu The results are opened in the Pcd viewer There are seven sliders in the top left corner of the pcd viewer Rota...

Страница 52: ...ration Calibration creates precise compensation data to the points on the calibration path Therefore the sample measuring must travel the same path that the calibration has created Sample measuring st...

Страница 53: ...reset the emergency stop and to switch the motor power back on P2 When there is a light on the yellow P2 button there is an error Pressing the button resets the error and the table will return to the...

Страница 54: ...Peak Threshold 0 255 The Peak Threshold should be as low as possible and as close to the Background signal level as possible to get the maximum sensitivity 2 7 4 FIR Length The FIR Length parameter is...

Страница 55: ...D Pulse Width so that Intensity values in the most important area of the profile is between 150 and 240 meaning the signal is not saturating This may cause signal saturation in other areas of the prof...

Страница 56: ...0 no compensation 1 0 default Threshold User has an option remove points where calculated Z Compensation is big This is useful feature if the material has a strong texture and compensation is suboptim...

Страница 57: ...s how to carry out multiple scans with a different rotation angle This feature requires an optional rotation table For this use case you need two or more recipes Proceed as follows 1 Select a recipe f...

Страница 58: ...58 Figure 58 Output Settings 1 Figure 590 Output Settings 2...

Страница 59: ...XYZ and to measurement start XY position Then press the green P1 button to start measuring Camera preview Z scale is not symmetrical and zero is not in the center It is difficult to see the surface le...

Страница 60: ...in scanning during which the scanner does not see the object It is possible that the data will not be saved The scanner does not see the object Decrease the length of the scan Separate short scans to...

Страница 61: ...and so on For a list of CloudCompare functionalities see the documentation page and the wiki http www cloudcompare org documentation html http www cloudcompare org doc wiki index php title Main_Page 2...

Страница 62: ...ins examples on how you can use CloudCompare to view measurement data Opening a File You can open a pcd file by selecting File Open Select the object in DB Tree window Editing Colors and the Height Ra...

Страница 63: ...ting Colors and the Height Ramp 1 Banding In Banding you can set the banding period in micrometers The color scale covers each defined banding period Figure 63 Editing Colors and the Height Ramp 2 Fig...

Страница 64: ...64 Figure 65 Banding 2 Zooming You can zoom in to view more details Figure 66 Banding Period 300 m...

Страница 65: ...65 Figure 80 Zooming Saving a File You can save the screen view as a BMP picture by selecting Display Render to file Figure 81 Saving a File...

Страница 66: ...es for beginners The actual use cases depend on the scanner customer s industry and LMI is happy to assist with possible questions It is recommended to keep the software up to date You can check the a...

Страница 67: ...67 Figure 68 Rotating a Picture To open the 3D view select Studies View group 3D View Figure 69 Rotated Picture...

Страница 68: ...68 Figure 70 3D View To level the measured result select Operators Adjust position group Level Figure 71 Levelling a Surface...

Страница 69: ...9 Figure 72 Levelled Surface To measure dimensions select Studies Geometry group Distance measurement To study the profile select Operators Extract group Extract profile Figure 73 Measuring Dimensions...

Страница 70: ...t hand corner you can select Average and the number of points When for example defining surface roughness Ra this may give a more reliable figure To study the surface in more detail select Operators E...

Страница 71: ...71 Figure 92 Studying the Surface To get a set of numeric roughness parameters select Studies Parameters group Parameter table Figure 74 Extracted Area...

Страница 72: ...Figure 75 Parameter Table 2 10 1 2 Sample 2 2 Coin Open the sur file by selecting Studiables Load a studiable To rotate the picture select Operators Adjust position group Rotate Figure 76 Opening a Fi...

Страница 73: ...73 Figure 77 Rotating a Picture To open the 3D view select Studies View group 3D View Figure 78 Rotated Picture...

Страница 74: ...select Operators Adjust position group Level To measure dimensions select Studies Geometry group Distance measurement Figure 100 Measuring Dimensions To study the profile select Operators Extract gro...

Страница 75: ...75 Figure 102 Extracted Profile To study the surface in more detail select Operators Extract group Extract area Figure 101 Studying the Profile Figure 81 Extracted Area...

Страница 76: ...76 To filter the roughness to study the sample form select Operators Filter group Standard filter Figure 83 Filtering the Picture Figure 82 Studying the Surface...

Страница 77: ...77 To set the step height select Studies Step height Figure 85 Setting the Step Height Figure 84 Filtered Picture Figure 86 Step Height...

Страница 78: ...line to Help with More on in the right hand bottom corner of the Operator window A reference guide has extensive contents including well visualized instructions The search function is handy to find mo...

Страница 79: ...Texture Everything that you need for advanced 2D surface texture analysis Advanced 2D filtering techniques remove form and apply roughness waviness filters from 2RC to ISO 16610 apply morphological f...

Страница 80: ...dimensioning tolerancing of profiles Calculate dimensions of profiles using interactive tools calculate dimensions including distances radii diameters and angles Define display pass fail criteria with...

Страница 81: ...e new data into account Control your process show control charts for an instant picture of whether or not a parameter is out of limits together with histograms box plots and scatter plots Evaluate man...

Страница 82: ...82 2 11 Declaration of Conformity Figure 92 Declaration of Conformity...

Страница 83: ...addressed immediately The machine and its surroundings should be kept clean For safe use the measurement table surroundings must be kept clear of anything that may block the table movement and the tab...

Страница 84: ...free otherwise oil may end up on the calibration mirror Caution Do not use air flow that is too high Important Use only oil free compressed air If you wipe the calibration mirror for example to remov...

Страница 85: ...Z compensation block is used and available from LMI as a new UULA accessory What s new in UULA version 2 2 0 With version 2 2 0 of the UULA software it is recommended to use version 290319020 of the m...

Страница 86: ...ss Intensity Type Height coloring with intensity in Pcd Viewer Known issues and problems Old recipes which are using Half Step Scan need to be saved with Uula 2 2 0 before they are used for scanning I...

Страница 87: ...t dialog in the UULA software header The technical specifications for the FocalSpec 3D Line Confocal Scanner UULA are presented in the table below Table 4 Technical Specifications UULA scanner XY moti...

Страница 88: ...Sensor High Precision Line Confocal Sensor Measurement method Optical Scanning method Line Number of points line 2048 Optical profile length 11 3 mm Pixel size X 5 50 m Pixel size Y 25 0 m Z repeatab...

Страница 89: ...tical profile length 16 6 mm Pixel size X 8 1 m Pixel size Y 36 0 m Z repeatability 0 24 m Stand off distance 64 0 mm Depth of field 5 50 mm LCI401 sensor Sensor High Precision Line Confocal Sensor Me...

Страница 90: ...90 Operational conditions Ambient temperature 22 C 2 C 68 75 F Humidity 30 50 Environment Minimum Class ISO 9 ISO 14644 1 Room air FED STD 209E...

Страница 91: ...t isLMI Technologies Inc Distributor The commercial entity that has provided the Product to the End User The Distributor may be a commercial distributor but also the Editor End User Individual user s...

Страница 92: ...nglish and User Interface and User Manual are available in English The Editor reserves the right to change the language availability at its discretion without prior notice Intellectual property rights...

Страница 93: ...limitations may not apply to you Limitation of liability To the extent not prohibited by applicable law under no circumstances shall the Editor or the Distributor be liable for personal injury or any...

Страница 94: ...LMI Technologies Inc This material including documentation and any other related items is protected by copyright controlled by LMI Technologies Inc All rights are reserved Copying including reproduci...

Отзывы: