Screen item
Description
1
Back
• Displays with a touchscreen — Select the
onscreen
Back
icon to go back to the
previous menu.
• Non–touchscreen or HybridTouch displays
— Use the
Back
button to go back to the
previous menu.
2
Function icons
— Some dialogs include
icons which can be selected to access
additional functions. For example, in the
Waypoint List dialog, the
Sort by
icon can
be used to change how the waypoints list is
sorted.
3
Menu / List item
• Displays with a touchscreen —
Momentarily touching an item automatically
selects the item and displays the item
options menu.
• Non–touchscreen or HybridTouch displays
— Use the
Rotary control
to highlight an
item, and the
Ok
button to select it and
display the item options menu.
4
Close
• Displays with a touchscreen — Select the
onscreen
Close
icon to close the dialog.
• Non–touchscreen or HybridTouch displays
— Use the
Back
button to close the dialog.
5
Scroll bar
• Displays with a touchscreen — To scroll
through the available items, press and
hold your finger on the scroll bar and drag
it up or down.
• Non–touchscreen or HybridTouch displays
— To scroll through the available menu
items, use the
Rotary control
.
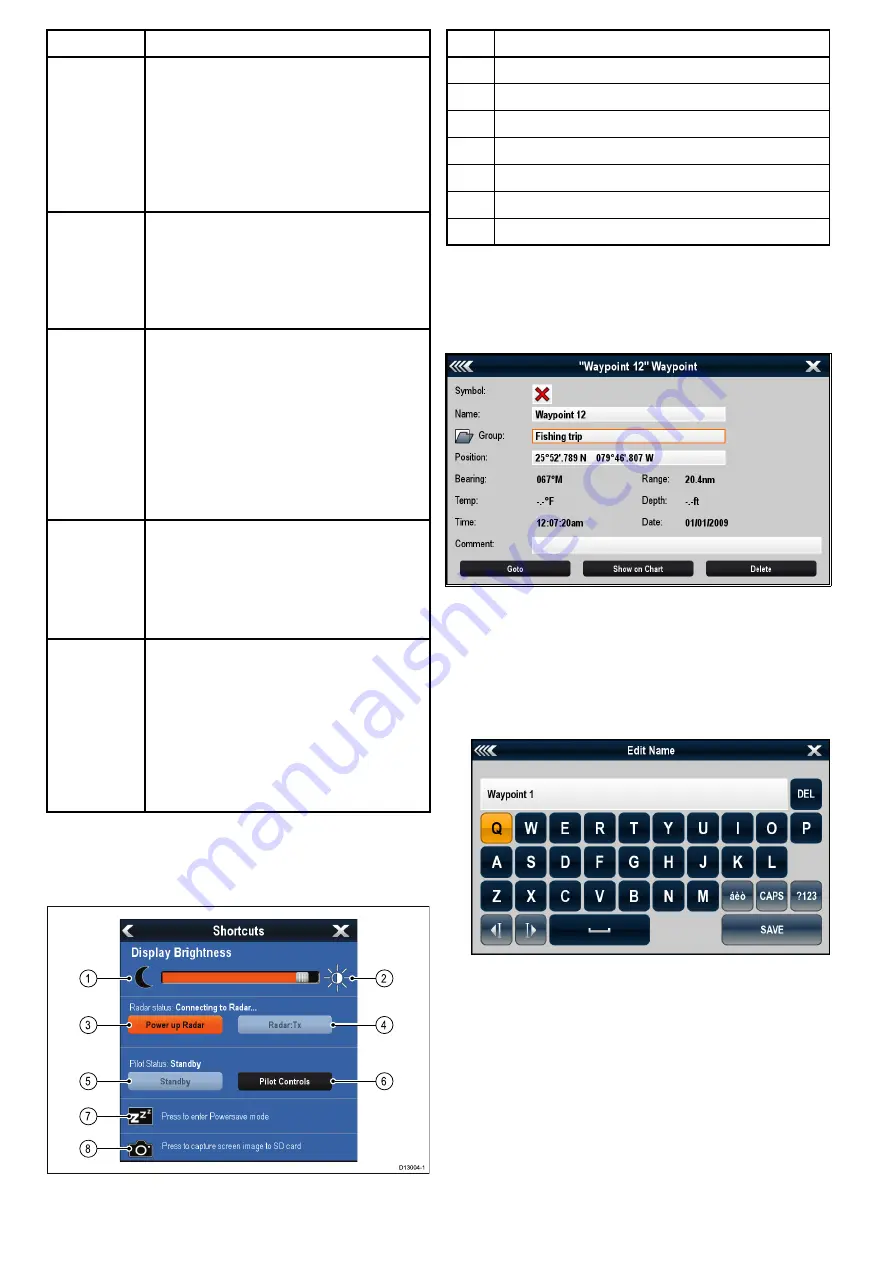
Shortcuts page
A number of useful functions can be accessed from
the Shortcuts page.
D13004-1
1
3
5
7
8
4
2
6
1
Decrease display brightness
2
Increase display brightness
3
Power up / Power down Radar
4
Radar standby / Radar transmit
5
Autopilot standby (during active navigation)
6
Display pilot control dialog
7
PowerSave mode
8
Screenshot / Screen capture
Edit dialogs
Edit dialogs enable you to edit the details of data
items stored on your multifunction display, such as
waypoints, routes, and tracks.
Selecting a text field displays the onscreen keyboard,
which can be used to edit the details.
Editing information in dialogs
With the dialog displayed:
1. Select the field you want to edit.
The onscreen keyboard is displayed:
2. Use the onscreen keyboard to make the changes.
3. Select
SAVE
to save the changes.
Entering special or accented characters
With the onscreen keyboard displayed:
1. Select the onscreen keyboard's
àèò
key.
2. Select the character you want to accent.
The available accented characters are displayed
above the text entry field.
3. For characters that have multiple available
accents, use the character key to toggle between
them.
4. Select the
àèò
key to enter the character.
100
a Series / c Series / e Series
Содержание a125
Страница 2: ......
Страница 6: ......
Страница 16: ...16 a Series c Series e Series ...
Страница 43: ...13 GPS receiver 14 Thermal camera 15 Wireless connection Planning the installation 43 ...
Страница 50: ...50 a Series c Series e Series ...
Страница 82: ...82 a Series c Series e Series ...
Страница 114: ...114 a Series c Series e Series ...
Страница 120: ...120 a Series c Series e Series ...
Страница 186: ...186 a Series c Series e Series ...
Страница 187: ...Chapter 13 Man Overboard MOB Chapter contents 13 1 Man overboard on page 188 Man Overboard MOB 187 ...
Страница 190: ...190 a Series c Series e Series ...
Страница 193: ...Chapter 15 Fuel manager Chapter contents 15 1 Fuel manager overview on page 194 Fuel manager 193 ...
Страница 208: ...208 a Series c Series e Series ...
Страница 230: ...230 a Series c Series e Series ...
Страница 320: ...320 a Series c Series e Series ...
Страница 340: ...340 a Series c Series e Series ...
Страница 364: ...364 a Series c Series e Series ...
Страница 420: ...420 a Series c Series e Series ...
Страница 424: ...424 a Series c Series e Series ...
Страница 434: ...434 a Series c Series e Series ...
Страница 459: ......
Страница 460: ...www raymarine com ...


