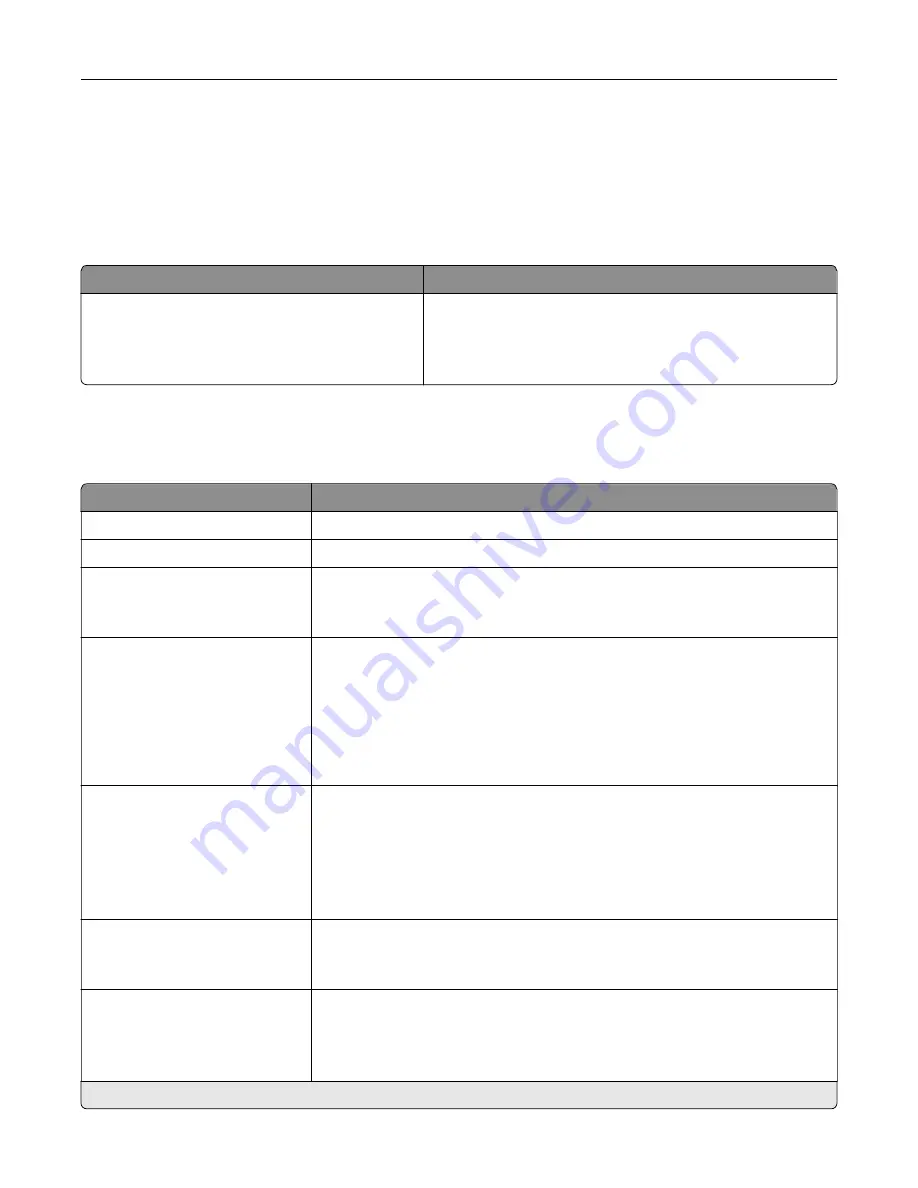
Fax
Fax Defaults
Fax Mode
Menu item
Description
Fax Mode
Fax
Fax Server
Disabled
Select a fax mode.
Note:
Depending on your printer model, the factory default
setting may vary.
Fax Setup
General Fax settings
Menu item
Description
Fax Name
Specify your fax ID.
Fax Number
Specify your fax number.
Fax ID
Fax Name
Fax Number*
Set the fax ID to use during fax negotiation.
Enable Manual Fax
Off*
On
Turn on the manual fax function in the printer.
Notes:
•
This menu item requires a line splitter and a telephone handset.
•
Use a regular telephone line to answer an incoming fax job and to dial a
fax number.
•
To go directly to the manual fax function, touch
#
and
0
on the keypad.
Memory Use
All receive
Mostly receive
Equal*
Mostly send
All send
Set the amount of internal printer memory allocated for faxing.
Note:
This menu item prevents memory buffer conditions and failed faxes.
Cancel Faxes
Allow*
Don't Allow
Cancel outgoing or incoming faxes.
Fax Number Masking
Off*
From Left
From Right
Specify the format for masking an outgoing fax number.
Note:
An asterisk (*) next to a value indicates the factory default setting.
Use printer menus
147
Содержание XC4342
Страница 58: ...4 Locate the ISD connector 5 Insert the card to the ISD connector Set up install and configure 58 ...
Страница 64: ...3 Remove the fax cover 4 Remove the fax bracket Set up install and configure 64 ...
Страница 65: ...5 Install the fax card to the bracket Set up install and configure 65 ...
Страница 66: ...6 Install the fax card and attach the connector to the controller board Set up install and configure 66 ...
Страница 70: ...4 Install the ISP into its housing Set up install and configure 70 ...
Страница 71: ...5 Attach the housing to the controller board shield Set up install and configure 71 ...
Страница 72: ...6 Connect the ISP extended cable to the ISP connector in the controller board Set up install and configure 72 ...
Страница 76: ...Set up install and configure 76 ...
Страница 79: ...4 Attach the cover of the power supply until it clicks into place Set up install and configure 79 ...
Страница 81: ...7 Insert the power supply through the printer 8 Install the convenience stapler Set up install and configure 81 ...
Страница 84: ...Set up install and configure 84 ...
Страница 85: ...3 Install the wireless module into its housing Set up install and configure 85 ...
Страница 86: ...4 Attach the wireless module to the controller board shield Set up install and configure 86 ...
Страница 87: ...5 Connect the wireless assembly to the ISP connector in the controller board Set up install and configure 87 ...
Страница 88: ...6 Attach the controller board shield Set up install and configure 88 ...
Страница 204: ...Replacing parts and supplies Replacing a toner cartridge 1 Open door B Maintain the printer 204 ...
Страница 205: ...2 Remove the used toner cartridge 3 Unpack the new toner cartridge Maintain the printer 205 ...
Страница 206: ...4 Insert the new toner cartridge 5 Close door B Maintain the printer 206 ...
Страница 207: ...Replacing the black imaging unit 1 Open door B Maintain the printer 207 ...
Страница 209: ...3 Remove the toner cartridges Maintain the printer 209 ...
Страница 210: ...4 Disconnect the imaging kit cable Maintain the printer 210 ...
Страница 214: ...9 Insert the imaging kit Maintain the printer 214 ...
Страница 216: ...Replacing the color imaging kit 1 Open door B Maintain the printer 216 ...
Страница 218: ...3 Remove the toner cartridges Maintain the printer 218 ...
Страница 219: ...4 Disconnect the imaging kit cable Maintain the printer 219 ...
Страница 220: ...5 Remove the used imaging kit Maintain the printer 220 ...
Страница 222: ...8 Insert the black imaging unit into the new imaging kit Maintain the printer 222 ...
Страница 223: ...9 Insert the new imaging kit Maintain the printer 223 ...
Страница 225: ...Replacing the waste toner bottle 1 Open door B Maintain the printer 225 ...
Страница 234: ...2 Remove the used separator bracket 3 Unpack the new separator bracket Maintain the printer 234 ...
Страница 238: ...2 Remove the used ADF pick roller Maintain the printer 238 ...
Страница 240: ...5 Insert the new ADF separator roller until it clicks into place Maintain the printer 240 ...
Страница 250: ...2 Remove the ADF pick roller Maintain the printer 250 ...
Страница 252: ...5 Insert the ADF separator roller until it clicks into place Maintain the printer 252 ...
Страница 253: ...6 Insert the ADF pick roller until it clicks into place 7 Close door C Maintain the printer 253 ...
Страница 294: ...Jam locations 1 ADF 2 Standard bin 3 Door A 4 Multipurpose feeder 5 Trays Troubleshoot a problem 294 ...
Страница 298: ...2 Remove the jammed paper Note Make sure that all paper fragments are removed 3 Open door A1 Troubleshoot a problem 298 ...


