


38
ENGLISH
t %POPUVTFIBSTIPSIBSNGVMEFUFSHFOUTTVDIBTBMDPIPMQFUSPMPSTPMWFOUTUPDMFBOUIF
DPGGFFNBDIJOFVTFXBUFSBOEOFVUSBMEFUFSHFOUT
/PUF
5IFEBJMZDMFBOJOHPQFSBUJPOTNVTUCFDBSSJFEPVUJOPSEFSUPNBJOUBJOUIFFGmDJFODZPGUIFNBDIJOFBOEUP
HVBSBOUFFUIFTBGFUZPGUIFVTFSBOEPGUIFQFSTPOTBSPVOEJU
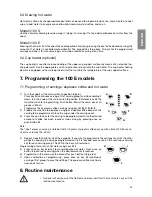
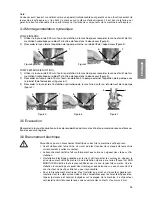
8.1 Cleaning the serving units and the filter holder
1) Detach the filter cup from the serving unit, remove the coffee grounds and replace the filter present with
the blind filter (without holes) provided with the machine.
/PUF
5IFmMUFSJTJOTFSUFEJOUPUIFDVQCZQSFTTVSFUPSFNPWFJUJUJTTVGmDJFOUUPGPSDFJUPOUIFTJEFTBOEUIFOFY
-
USBDUJU%POPUSFNPWFUIFFMBTUJDSJOHPOUIFJOTJEFPGUIFmMUFSIPMEFS
2) Using the brush, clean the seat in the unit in which the filter cup is inserted.
3) Insert the cup in the unit and, without latching it completely, press the continuous flow button.
4) Let water overflow from the filter holder. This will clean the serving group.
5IFDPOUJOVPVTnPXPGXBUFSGSPNUIFVOJUDBODBVTFCVSOTEVFUPBDDJEFOUBMTLJODPOUBDUT
5) Stop the water flow and insert the filter cup in the unit.
6) Start the continuous flow and then stop it after a couple of seconds; repeat this operation a few times
(this is to clean the drain duct and the solenoid of the unit).
7) Clean the perforated filter and place it back into the cup. Let the water flow for a couple of seconds to
clean the filter, the cup and the spouts.
8) Repeat these operations on all the serving units.
/PUF
4QFDJBMDPNNFSDJBMMZBWBJMBCMFEFUFSHFOUTDBOCFVTFEUPFGGFDUJWFMZDMFBOUIFTFSWJOHVOJUT
8.2 Cleaning the tray and the cup support grill
The lower cup support grill
5
must be kept clean at all times; during the normal use of the machine, it is suffi-
cient to clean it with a sponge or a moist cloth. At the end of the working day, clean the tray and the grill also
in the internal areas using warm water and neutral detergent.
8.3 Cleaning the steam spout
Clean the steam spout with a sponge or a moist cloth at the end of the working day to remove all traces of milk or other
substances that inevitably form during the normal operation of the machine. Open the steam tap, placing the spout in
the tub, to remove any residues which may have accumulated in the spout.
8.4 Substitution of boiler water
To change the water inside the boiler, proceed as follows:
1) Cut off the power supply to the machine by turning the main switch
1
to position
0
(zero).
2) Remove the tub and the cup support grille and open the boiler drain tap.
3) Open a steam drawing valve to facilitate the draining of the water until the end of the operation.
4) When water no longer comes out of the boiler, close the boiler drain and the steam drawing tap.
5) Charge the machine with water following the instructions of paragraph “Charging the water in the boi-
ler”.
Содержание 100 E/S PRACTICAL
Страница 1: ...Series 100 La San Marco New Hundred LIGHT YEARS AHEAD...
Страница 2: ...An Italian myth a pleasure without borders Series 100 La San Marco Made in Italy...
Страница 10: ...ITALIANO USO E MANUTENZIONE SERIE 100...
Страница 32: ...ENGLISH USE AND MAINTENANCE SERIES 100...
Страница 53: ...44 ENGLISH...
Страница 54: ...FRAN AIS EMPLOI ET ENTRETIEN S RIE 100...
Страница 76: ...DEUTSCH BEDIENUNG UND WARTUNG SERIE 100...
Страница 99: ...90 DEUTSCH...
Страница 100: ...ESPA OL USO Y MANTENIMIENTO SERIE 100...
Страница 122: ...PORTUG ES MANUAL DE USO E MANUTEN O S RIE 100...
Страница 143: ...134 PORTUG ES...
Страница 144: ...E HNIKA 100...
Страница 146: ...137 E HNIKA 1 1 1 1 2 LA SAN MARCO SPA 1 3 5 45 C 80 800 kPa 0 8 8 0 bar 5 fH...
Страница 151: ...142 E HNIKA 3 LA SAN MARCO SPA 3 1 3 8 3 2 3 8 3 8 3 3...
Страница 153: ...144 E HNIKA 3 mm 1 2 3 3 3 3 110V 230 230V 400V 3N 230V 3 230V 400V 3N 230V 3 100 PRACTICAL 100 SPRINT 2 3...
Страница 157: ...148 E HNIKA 1 0bar LASANMARCOSPA 15 16 17 6 6 1 1 2 100 S 100 E 6 2...
Страница 158: ...149 E HNIKA 6 3 100 S 100 E 6 4 7 100 E 7 1 1 0 2 G 2 G G A B C D E F 3 4 G A D B E C F G 7 8 25 35 25 30 cm3 5 3 4...
Страница 159: ...150 E HNIKA H I 6 H L 7 I 8 G H I L 8 8 1 1 2 3 4 5 6 7 8 8 2...
Страница 160: ...151 E HNIKA 8 3 8 4 1 0 2 3 4 5 9 1 0 2 3 5 C 4 5 10 10 1 100 E 100 E 5 45 10 2 150...
Страница 161: ...152 E HNIKA 10 3 11 11 1 LA SAN MARCO SPA LA SAN MARCO SPA 11 2 2 2 5 bar LA SAN MARCO SPA 12 2002 96 WEEE t t 2002 96...
Страница 163: ...154 E HNIKA 4 5 6 1 1 7 8 9 10 1 2...
Страница 164: ...155 E HNIKA 11 12 100 S 13 14 100 S 100 S 100 E 100 S 100 S 100 E 15 12 bar 9 bar 16 17 18 100 DTC 19 90 C 9 bar...
Страница 165: ...20 9 bar 21 9 bar 22 23 24 LA SAN MARCO SPA...


