77
Measur
ement Section
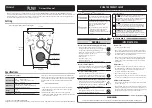
HOLD
OVER
CH01 NTSC Ad P1
E1 [ ]
CH01 NTSC Ad P1
E2 [ ]
HOLD key
HOLD LED
<Error Messages in LCD Display Section>
......... For other error messages, refer to page 107.
●
“OVER”
•
Measurement is not possible since the instrument’s measurement range
is exceeded by the measured value.
In the case of analyzer mode, the instrument’s measurement range or
display range (100,000%) is exceeded by the measured value.
●
“E1”
•
Cause : In the case of xyLv, T
∆
uvLv, u'v'Lv or XYZ measurement mode,
the currently used measuring probe is different from the one used
to perform user calibration and set the target color. In the case of
analyzer mode, the currently used measuring probe is different
from the one used to input RGB emission characteristic for ana-
lyzer mode and set the target color (W).
•
Action : Use the same probe as the one used to input the RGB emission
characteristic and set the target color. Alternatively, input the RGB
emission characteristic and set the target color using the currently
used measuring probe.
●
“E2”
•
Cause : An error has occurred due to shift of the zero point because the
ambient temperature has changed since zero calibration.
•
Action : Perform zero calibration.
* Measurement can still be performed even if “E2” is currently displayed.
* “E2” will not appear if “E1” is currently displayed.
When the optional 4-Probe Expansion Board CA-B04 is used
●
If two or more measuring probes are connected, measurement will be performed with all the probes simulta-
neously. However, the digital and analog display sections show only the measurement results taken by the one
selected probe (page 43).
2. Holding the Measured Values
●
To hold the measured values, press the HOLD key. The HOLD LED
will light up. (Hold mode)
Pressing the HOLD key again will cancel hold mode and resume mea-
surement. This will cause the HOLD LED to go out.
* If the conditions (e.g. measurement mode) set for hold mode are changed, the measured values
that are currently hold will be re-calculated according to the new conditions and then dis-
played. (This does not apply in the case of SYNC mode.)
<Notes on when Holding the Measured Values>
●
It is not possible to hold the measured values in the following cases.
1
Until the measured values appear after the POWER switch is set to ON and then 0-CAL key is pressed
2
Until the measured values appear after the 0-CAL key is pressed
3
When the error message “NO SYNC. SIGNAL” is currently displayed in the LCD display section
●
To cancel hold mode, press the 0-CAL key.
●
When measurement is implemented, the same Measuring Probe to be used for the User Calibration is necessary.
If measurement is carried out by connecting the different Measuring Probe, error message E1 will be displayed.
In this case, please replace it with the Measuring Probe that received User Calibration or execute User Calibra
Содержание CA-100PLUS
Страница 24: ...22...
Страница 46: ...44...
Страница 76: ...74...
Страница 100: ...98...
Страница 108: ...106 Dimension Diagram Main Body Measuring Probe 60 ISO 5mm screw depth 6mm...
Страница 123: ...121 Explanation Section...
Страница 124: ......
Страница 125: ...9222 1891 13 2002 KONICA MINOLTA SENSING INC AEIDPK 10 Printed in Japan...


