MONITOR SETTINGS
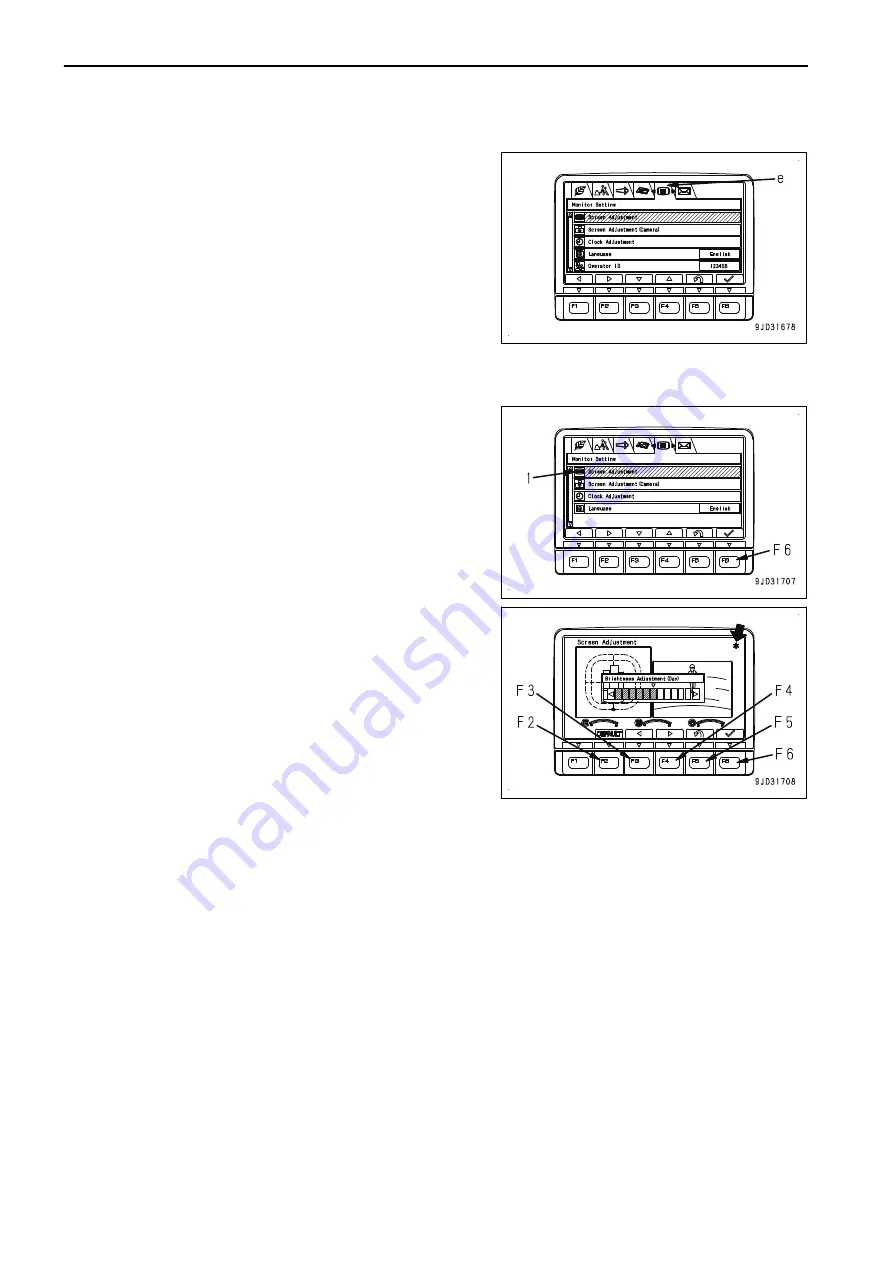
On each item of “Monitor Setting” menu (e), you can perform
the settings for the monitor.
SCREEN ADJUSTMENT
Use “Screen Adjustment” menu to adjust the brightness of the monitor screen.
1.
Select “Screen Adjustment” (1) on “Monitor Setting” menu
screen, then press the switch F6.
2.
Use the switches F2 to F6 to adjust the brightness of the
screen.
F2: Resets an adjusted value to default value.
F3: Moves the indicator to the left by one level.
F4: Moves the indicator to the right by one level.
F5: Cancels the change and returns the screen to “Monitor
Setting” screen.
F6: Accepts the change and returns the screen to the
Monitor Setting menu screen.
REMARK
• If the light switch is at night mode ON, and the screen
is adjusted, it is possible to adjust the brightness of
the monitor screen (night mode).
• If the light switch is at day mode ON, and the screen is
adjusted, it is possible to adjust the brightness of the
monitor screen (day mode).
• As long as “*” mark is displayed in the upper right cor-
ner of the screen, brightness is automatically restrict-
ed by the machine monitor to protect the liquid crystal.
Screen adjustment may not change the screen bright-
ness as long as “*” mark is displayed. However, it is
not an error.
• The state of the previous screen display is reflected
on the background of the screen adjustment screen.
Screen Adjustment (Camera)
Use “Screen Adjustment (Camera)” menu to adjust the brightness of the camera screen.
EXPLANATION OF COMPONENTS
OPERATION
3-78
Содержание PC1250-11
Страница 2: ......
Страница 11: ...Do not repeatedly handle and lift loads FOREWORD VIBRATION LEVELS 1 9...
Страница 24: ......
Страница 66: ......
Страница 67: ...OPERATION Please read and make sure that you understand the SAFETY section before reading this section 3 1...
Страница 73: ...REMARK The above figure does not show all of the caution lamp symbols OPERATION GENERAL VIEW 3 7...
Страница 317: ...MAINTENANCE Please read and make sure that you understand the SAFETY section before reading this section 4 1...
Страница 377: ...Boom d Left side e Right side f Head side g Foot side MAINTENANCE MAINTENANCE PROCEDURE 4 61...
Страница 378: ...Arm h Left side i Right side MAINTENANCE PROCEDURE MAINTENANCE 4 62...
Страница 400: ......
Страница 401: ...SPECIFICATIONS 5 1...
Страница 406: ......
Страница 435: ...REPLACEMENT PARTS 7 1...
Страница 444: ......
Страница 452: ...PC1250 11 PC1250SP 11 HYDRAULIC EXCAVATOR Form No EENAM03651 2018 KOMATSU All Rights Reserved Printed in Belgium 06 2018...


