background image

A-61916  August 2019

23

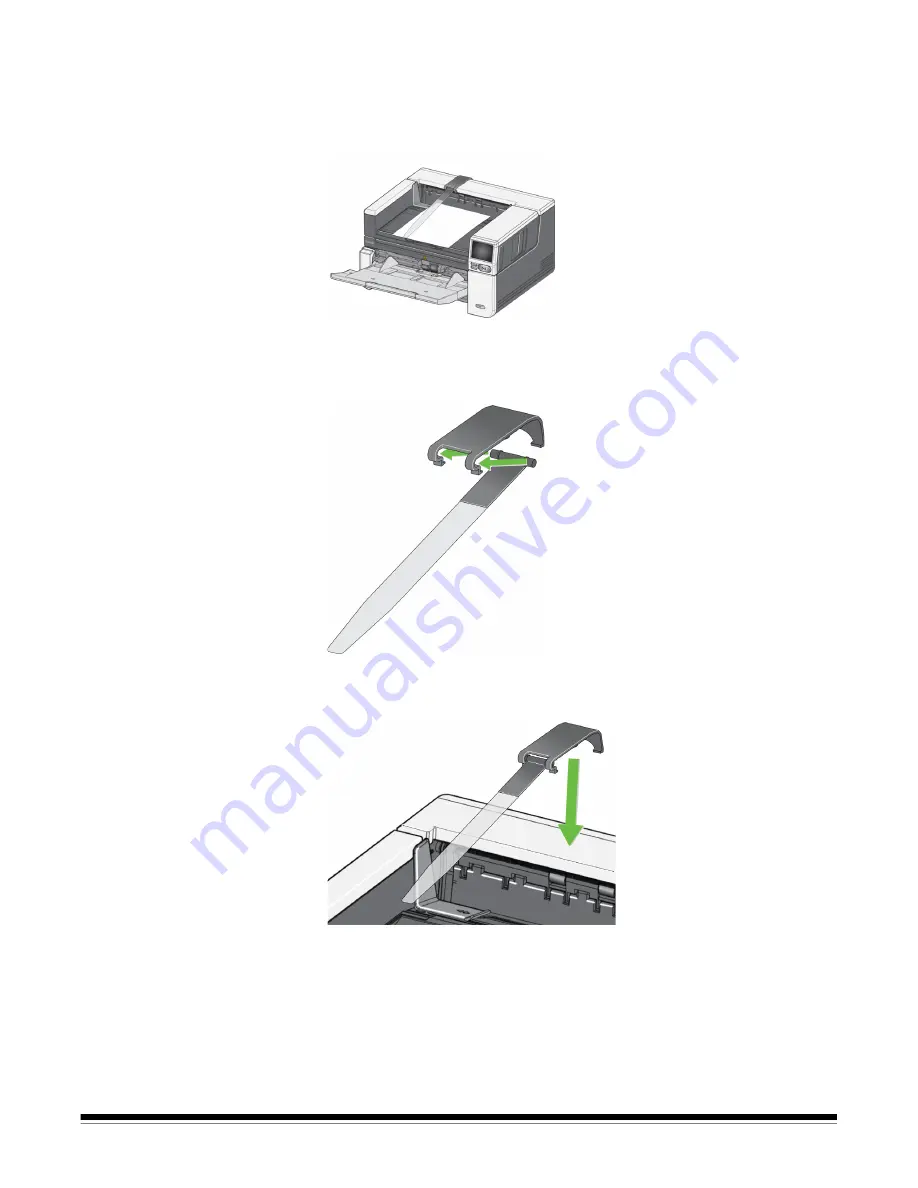
Attaching the exit 
deflectors

The scanner comes with custom exit deflectors and mounts. The deflectors 
help align the documents as they are deposited in the output tray. Multiple 
sizes of exit deflectors are included. Depending on the document set you are 
scanning, attach one of the size deflectors that meet your needs.

Attaching the exit deflector to the mount

Align the tabs on the exit deflector with the slots in the mount and snap into 
place.

Attaching the mount to the scanner

Hook the rear of the mount to the back of the scanner cover and push down on 
the front of the mount until it snaps into place, 

Содержание S2000f Series

Страница 1: ...A 61916 KODAK S2085f Scanner KODAK S3060 Scanner KODAK S3060f Scanner KODAK S3100 Scanner KODAK S3100f Scanner KODAK S3120 Scanner User s Guide...

Страница 2: ...ames of its contributors may be used to endorse or promote products derived from this software without specific prior written permission THIS SOFTWARE IS PROVIDED BY THE COPYRIGHT HOLDERS AND CONTRIBU...

Страница 3: ...te core 12 Install driver software 13 Verify scanner s firmware 14 Update scanner s firmware 15 Computer with driver software installed 15 Web Browser 15 Available Alaris Scanning Software 16 Smart To...

Страница 4: ...e output tray input elevator and transport area 51 52 Cleaning the rollers 52 Cleaning the separation roller tires 52 Cleaning the feed module tires 53 Cleaning the background strip s 53 Cleaning the...

Страница 5: ...A 61916 August 2019 iii Appendix A Regulatory Information 67 Environmental information 67 European Union 67 EMC statements 70 Appendix B Warranty US and Canada only 71...

Страница 6: ...iv A 61916 August 2019...

Страница 7: ...ust dirt and debris to other locations within the scanner which may cause the scanner to malfunction Material Safety Data Sheets MSDS for chemical products are available on the Kodak Alaris website at...

Страница 8: ...tic emission Maschinenl rminformationsverordnung 3 GSGV Der arbeitsplatzbezogene Emissionswert betr gt 70 dB A Machine Noise Information Ordinance 3 GSGV The operator position noise emission value is...

Страница 9: ...ation Kodak S3100f Scanner scans up to 100 pages per minute black and white lettersize documents at 300 dpi in landscape orientation The S3100f Scanner also includes a built in flatbed which allows yo...

Страница 10: ...ity for exception size documents up to A3 29 7 x 42 cm or 11 x 17 inch 27 94 x 43 2 cm to your Kodak S2085f S3060 S3060f S3100 S3100f S3120 Scanner CAT No 1894351 Document Extender allows you to scan...

Страница 11: ...hich allows you to scan exception documents books magazines file folders etc 4 Flatbed only on the Kodak S2085f S3060f and S3100f Scanners built in flatbed which allows you to scan exception size docu...

Страница 12: ...Power button press and release the power button to turn the scanner on If the scanner is already powered on hold the power button for several seconds and the scanner will turn off 11 Pause Resume butt...

Страница 13: ...document stacking 15 Input tray elevator side guides slide these guides in and out to accommodate the size of the documents that you are scanning 16 Scanner cover release latch pull the release latch...

Страница 14: ...nesses and textures of documents 3 CIS Imager 2 keep the imagers clean to obtain optimum image quality 4 Front Transport Roller Rollers provides smooth transport of documents through the scanner 5 Pap...

Страница 15: ...Accessory 7 Rear document exit allows you to exit exception documents from the rear of the scanner 8 Rear document exit toggle toggle this switch to enable the straight through paper path option of t...

Страница 16: ...h your Kodak Printer Accessory 1 Printer cable this cable connects directly to the scanner to allow communication to the printer 2 Print positions 11 print positions are available 3 Printer carrier ca...

Страница 17: ...efore updating the scanner s firmware If you have already performed all of the steps in the Installation Guide skip this section Unboxing the scanner Follow these steps to unbox your scanner and get i...

Страница 18: ...anner When you turn on the scanner the input tray will open if it is not already opened and the power button will flash for a few seconds 3 The language screen will be displayed unless the scanner was...

Страница 19: ...re Wired Network USB is also available USB Only Wired Network Access is turned off Scan EasySetup Document Allows you to scan a previously created EasySetup configuration document This is more suited...

Страница 20: ...re the scanner may cause interference to nearby wireless devices 1 Open the ferrite core that came with the scanner 2 Wrap the Ethernet cable around the ferrite core as shown Place it approximately 3...

Страница 21: ...om the scanner s product website Go to your scanner s product support website S2085f www AlarisWorld com go S2085finstall S3060 S3060f S3100 S3100f S3120 www AlarisWorld com go S3000install Scroll to...

Страница 22: ...rmware It will be a six digit number Press the button to exit the Information menu and return to the Settings screen 2 Determine the version of the firmware that is on the scanner s product website Go...

Страница 23: ...irmware section that matches your scanner s model name 3 Download the firmware installer that matches your computer s Operating System 4 Make sure your scanner is turned on is connected available to y...

Страница 24: ...h your scanner see descriptions below They can be downloaded from your scanner s product support website S2085f www AlarisWorld com go S2085fsupport S3060 www AlarisWorld com go S3060support S3060f ww...

Страница 25: ...your documents for scanning stack the documents so the lead edges are aligned and centered in the input tray This allows the feeder to introduce documents into the scanner one at a time Remove all sta...

Страница 26: ...roll up or down until Color PDF appears If you are using Capture Pro choose Scan to PDF 3 Using the touch screen press Color PDF The document will be scanned When you output it the PDF file with your...

Страница 27: ...the bottom of the side guides over the slots in the tray to slide the guides in and out Adjusting the input tray for document length the input tray extender has two positions When you are scanning le...

Страница 28: ...ches 43 2 cm Other scanner driver settings may limit the length of the document that you can scan It is recommended that you use a document extender if you are scanning documents longer than 17 inches...

Страница 29: ...tch the position of the side guides on the input tray Adjusting the document stop adjust the output tray document stop to slightly longer than the longest document being fed If you are scanning docume...

Страница 30: ...e the height adjustment tab This position will enable a more uniform stack of documents NOTE It is recommended that you use a document extender if you are scanning documents longer than 17 inches 43 2...

Страница 31: ...deflectors are included Depending on the document set you are scanning attach one of the size deflectors that meet your needs Attaching the exit deflector to the mount Align the tabs on the exit defle...

Страница 32: ...ore 1 Open the flatbed cover see Grasp here to open flatbed on page 3 2 Place the document face down on the glass platen 3 Align the document in the lower right hand corner at the corner arrows 4 Clos...

Страница 33: ...bed the document may extend all the way to the edge of the flatbed However the flatbed will only scan any information that is aligned with the line on the frame of the flatbed glass The background on...

Страница 34: ...the transport and are jamming documents are fragile and you do not want to bend them output stacking order is not important scanning directly into the recycle bin when documents are no longer needed a...

Страница 35: ...ies scanners include a touch screen with color graphic display of scanner information and controls To navigate the screen touch a selection or a button The menu button leads to the main menu The Next...

Страница 36: ...le than the screen can display a scroll bar is provided When the worn tire icon appears at the top of the scanner touch screen it is time to clean the scanner or replace consumables rollers tires etc...

Страница 37: ...ent power on cycle The following options are available in the Settings menu Information The Information option will display Pairing ID Network Name Network address info Firmware Serial number Total Pa...

Страница 38: ...There are meters for the following items Cleaning Feed Tires Feed Module Urging Tires Pre separation Pad Separation Tires Separation Module To adjust the maximum number of scans for any item 1 Select...

Страница 39: ...ork will assign an IP address to scanner To connect your scanner to a static IP address 1 Select Manual 2 Select Settings 3 Using the touch screen key pad enter the Static IP Address Subnet Mask and D...

Страница 40: ...tus area Count Only Multifeed this option allows you to count documents without scanning however when a multifeed is detected the scanner will stop Clear the multifed documents and press the Pause Res...

Страница 41: ...an EasySetup document and the network settings will be configured automatically Obtain an EasySetup document 1 From the Settings screen select EasySetup 2 Place the EasySetup document in the input tra...

Страница 42: ...Saver is set to 5 minutes Power Off is set to 240 minutes Balanced Power Saver is set to 15 minutes Power Off is set to 240 minutes High Performance Power Saver is set to 120 minutes Power Off is disa...

Страница 43: ...are engaged If short light weight thin or delicate documents are causing paper jams try changing this setting Select from 1 to 4 shortest time to find the optimum setting for the documents you are sc...

Страница 44: ...se a setting Highest Quality runs the scanner at a slower speed but produces the highest quality image Highest Speed default runs the scanner at a faster speed and produces a good quality image Sharin...

Страница 45: ...nner operator will be required to enter a password to access some settings The password can be changed from this screen at any time 1 Select Admin Access 2 Touch the Add Password button 3 Enter a pass...

Страница 46: ...display screen Select your name or user ID from the list You may be asked to enter a password If the scanner s Sharing Mode is set to Single PC this screen will not appear Ready with profiles Once act...

Страница 47: ...ea together It results in either one or more images not being captured or an image that combines content from more than one page If Multifeed or Intelligent Document Protection are enabled in the scan...

Страница 48: ...A 61916 August 2019 Scanning paused You can pause scanning at any time by pressing the button The scanner display will reflect that the scanning activity is paused Resume scanning by touching the butt...

Страница 49: ...up for your job using the driver To adjust Document Handling setting During scanning you can adjust document handling using the scanner screen 1 Pause the scanner 2 Touch the menu icon 3 Select Docume...

Страница 50: ...n Lower Elevator touch this option to lower the elevator input tray to the 300 sheet position Use this option when you need to make additional room in the input elevator tray for adding documents to t...

Страница 51: ...ates at full scanner speed The printer can add a date time document sequential counter and custom messages The print string can be configured to include information that stays the same for each docume...

Страница 52: ...t orientation 0 and 90 degrees Font size Normal Bold and Extra Bold NOTE Not all languages can support a Bold font based on the complexity of the characters such as half width Katakana Print side Rear...

Страница 53: ...nk cartridge when printed characters appear light or uneven missing characters or inconsistent character quality are evident cleaning has not improved the overall print quality IMPORTANT Dispose of th...

Страница 54: ...reen release tab and rotate the printer carrier to the printing position 6 Slide the printer carrier into the desired print position See Changing print positions on page 47 7 Close the printer door NO...

Страница 55: ...Slide the printer carrier to the desired printing position IMPORTANT When changing print positions it is important to verify that the printer carrier is securely in a printing detent position When you...

Страница 56: ...head see Printing problems when starting up due to dry print head below Printing problems when starting up due to dry print head Remove the ink cartridge from the printer carrier and using a lint free...

Страница 57: ...ration Scanner consumables tires pre separation pads etc and cleaning supplies are available for purchase from Kodak Alaris see Supplies and consumables on page 60 Consumables are sold in kits The kit...

Страница 58: ...ray output tray and transport 3 Pull the scanner cover release latch forward The scanner cover will open partially Grasp the center of the top cover to fully open the cover for access to the internal...

Страница 59: ...compressed air Use of compressed air may cause dust to be forced into the scanner s imaging system and lodge in an area that causes image quality issues and cannot be cleaned without Kodak Alaris Serv...

Страница 60: ...he rollers with a lint free cloth Cleaning the separation roller tires 4 Remove the pre separation pad by lifting the pad up and out of position 5 Remove the separation roller 6 Manually rotate and wi...

Страница 61: ...ed module to clean the tires 11 Inspect the tires If the tires show signs of wear or damage replace the feed module tires or the feed module See Replacement procedures on page 56 Cleaning the backgrou...

Страница 62: ...ng procedures turn on the scanner Cleaning the flatbed glass S2085f S3060f S3100f Scanners only The flatbed s glass platen can collect fingerprints and dust Use Staticide Wipes for Kodak Scanners or B...

Страница 63: ...t 5 Remove the transport cleaning sheet from the output tray and place it in the center of the input tray in landscape orientation with the adhesive side down and rescan 6 Steps 4 and 5 may need to be...

Страница 64: ...ed module or feed module tires 1 Open the scanner cover 2 Push the feed module release lever to the right and release the feed module 3 If you are just replacing the feed module go to Step 10 If you a...

Страница 65: ...t overstretch the tire it may tear 8 Replace each core assembly in the lower feed module housing and align the tabs on the upper housing with the slots on the lower housing 9 Press the upper and lower...

Страница 66: ...s 5 Close the scanner cover Replacing the separation roller tires 1 Open the scanner cover 2 Remove the pre separation pad by lifting the pad up and out of position then remove the separation roller 3...

Страница 67: ...he pre separation pad when the frequency of multi fed documents increases 1 Open the scanner cover 2 Remove the pre separation pad by lifting the pad up and out of position 3 Install the new pre separ...

Страница 68: ...flatbed cover 2 Using a Phillips head screwdriver loosen and remove the four screws which hold the flatbed background in place 3 Align the new flatbed and insert and tighten the screws until the flatb...

Страница 69: ...utton Problem solving If your scanner does not function as you expect this section may help you resolve the situation Scanner exception handling The following user correctable error conditions will be...

Страница 70: ...ression Bit depth may result in the image being larger than the scanner memory Adjust settings as needed The scanner will not scan feed documents Make sure that the power cord is plugged in and the po...

Страница 71: ...nts are being fed perpendicular to the feed module all staples and paper clips have been removed from the documents the feed module separation roller and drive rollers are clean the scanner cover is f...

Страница 72: ...an Decrease the sensitivity setting for the multifeed and Intelligent Document Protection in the scanning application NOTE If condition continues see Perform a Multifeed Calibration on page 65 A misfe...

Страница 73: ...gs menu Press the Diagnostics option Press the Multifeed Calibration option The scanner will prompt you to place a sheet of paper in the input tray Use an A4 size 75 80 g m2 or Letter size 20 lb bond...

Страница 74: ...fore contacting Service Go to www AlarisWorld com go IMsupport access S2000f S3000 Drivers software and download the most recent upgrade Contacting Service 1 Visit www AlarisWorld com go IMsupport to...

Страница 75: ...that are replaced during maintenance or service follow local regulations or contact Kodak Alaris locally for more information The product packaging is recyclable Kodak S2085f S3060 S3060f S3100 S3100...

Страница 76: ...SJ T 11363 2006 O indicates hazardous substance concentration lower than MCV X indicates hazardous substance concentration higher than MCV EPUP Environmental Protection Use Period EPUP In mainland Chi...

Страница 77: ...Kodak S3120 Scanner Unit Restricted substances and their chemical symbols Lead Pb Mercury Hg Cadmium Cd Hexavalent chromium Cr 6 Polybrominated biphenyls PBB Polybrominated diphenyl ethers PBDE AC AC...

Страница 78: ...ced radio TV technician for additional suggestions Any changes or modifications not expressly approved by the party responsible for compliance could void the user s authority to operate the equipment...

Страница 79: ...enance mistreatment operator error failure to provide proper supervision or maintenance including use of cleaning products or other accessories not approved by Kodak Alaris or use in contravention of...

Страница 80: ...overed under this Limited Warranty must obtain a Return Material Authorization Number RMA by calling 800 822 1414 and within ten 10 business days from the date of issuance of the RMA must return the A...

Страница 81: ...ons and accessories which include power cord documentation etc not covered by the Limited Warranty All products should be returned to Kodak Alaris in the original shipping container or in a recommende...

Страница 82: ...l Support by telephone Telephone technical support is available Monday Friday between the hours of 5 a m to 5 p m excluding Kodak Alaris holidays Phone 800 822 1414 For technical documentation and FAQ...

Страница 83: ......

Страница 84: ...l trademarks and trade names used are the property of their respective holders The Kodak trademark and trade dress are used under license from Eastman Kodak Company 2019 Kodak Alaris Inc TM MC MR Alar...

Отзывы: