background image

Printing
Guide

CONTENTS

INDEX

SEARCH

HELP

Overview

Installing the Driver

Using Color 
Management

Using the Printer 
Driver

Option Descriptions

Use the options on the tabs in the Printer Properties dialog box to select 
media for your print job, add a logo, or adjust the color of your document 
pages.

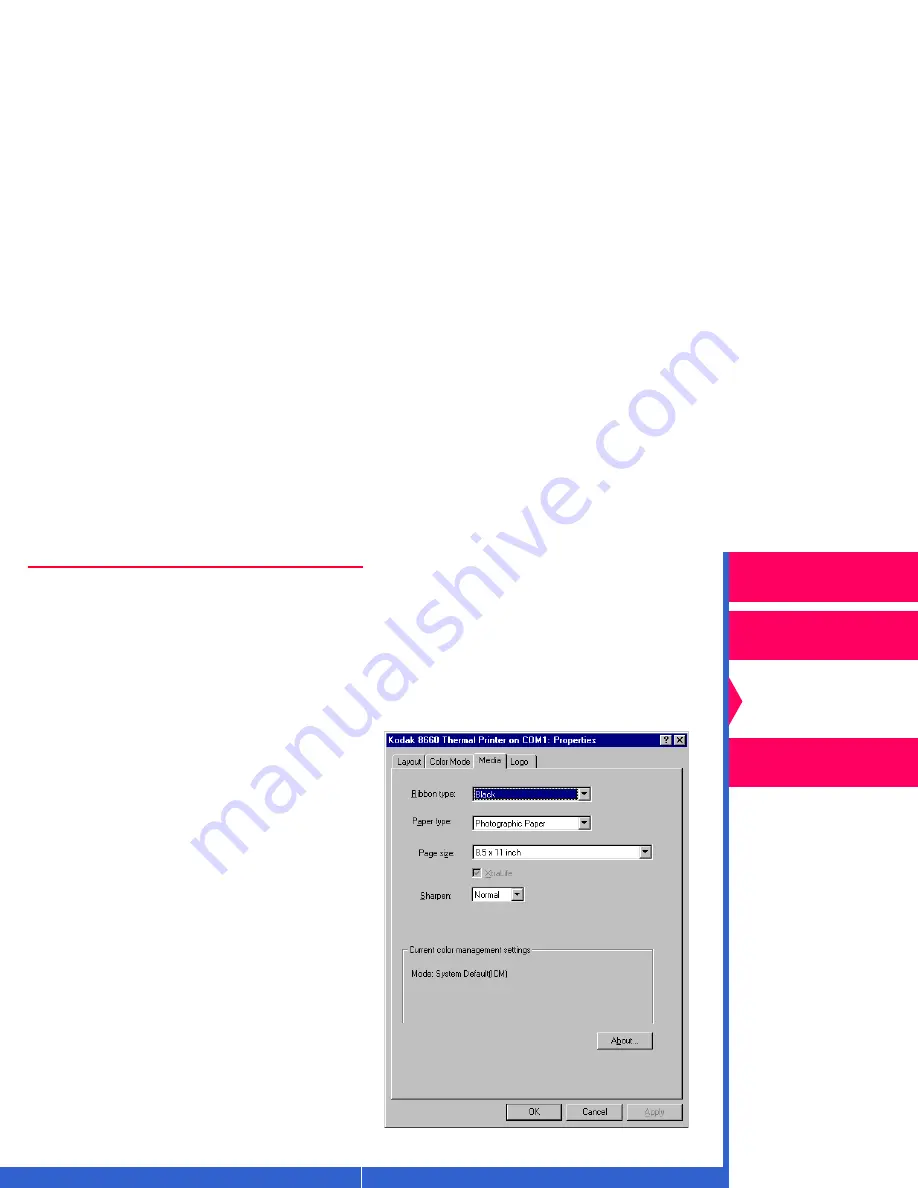
Options on the Media Tab

You can select the following options 
on the Media tab:

Ribbon type—allows you to select 
the ribbon to be used for the print 
job.

Paper type—allows you to select 
the paper type to be used for the 
print job.

NOTE:

Refer to “Working with Media” 
in the operator’s guides for 
the 8650 and 8660 printers for 
a complete listing of paper, 
ribbon, and image sizes. This 
information is also included 
on the Quicksetup card that 
came with your printer.

Page Size—allows you to select the 
page size for the print job.

Содержание DIGITAL SCIENCE 8650

Страница 1: ...ion Getting Help from Outside the United States and Canada Getting Information from the Kodak Home Page Installing the Driver Using the Printer Driver Hardware and Software Requirements Getting Started Using the Printer Driver Using the Print Options Accessing the Printer Properties Dialog Box Using Package Printing Using Preformatted Packages Adding a Logo Color Management Options Using the Color...

Страница 2: ...ox Color Management Options Color Connector Creating Color Connector Files Using Color Connector System Requirements Windows Systems ICC Profiles Steps to Create Color Connector Files Color Connector Window Getting Ready to Use Color Connector Creating a Color Connector File Matching Your Monitor to Your Printer s Output Color Managing Multiple Sources Simulating Another Output Device Using Gamut ...

Страница 3: ...ering Setting Automatic Rendering Setting Custom Rendering Sending a Color Connector to the Printer as a Default 8660 Printer only Color Connector Memory Locations in Printers Exporting a Color Connector File to be a Printer Default Selecting a Printer Deleting Color Connector Files 8660 printer only Exporting a Color Connector File as an ICC DeviceLink Profile ...

Страница 4: ...to the printers from most applications About the Printer Driver The printer driver is software that allows the software applications you use to access the printer s features For example your application determines the page breaks font selection and page setup for your print job The printer driver translates this information into a printer language such as Adobe PostScript or Kodak raster language ...

Страница 5: ...ents Adding a Logo You can add a logo of your choice to your document page and adjust its placement on the page Package Printing Package printing was previously available only through the export module for the 8660 printer and is now available to both printers through the printer driver With package printing you send a single document page to the printer and get multiple sizes on your print You ca...

Страница 6: ...plication System Level Support The printer driver includes system level support for Windows 95 OS release 2 and Windows 98 operating systems About the On Line Documentation This user s guide is comprised of the following sections Installing the Software gives you instructions on how to install and remove the printer driver on your PC Using the Printer Driver describes how to use the printer driver...

Страница 7: ...ter can help you with problems you may occasionally have with the printers For more information refer to the troubleshooting sections in these guides For technical support in the US call 1 800 23KODAK 1 800 235 6325 between 9 00 a m and 8 00 p m Eastern Standard Time on regular business days Call this number for help setting up or operating the printer to obtain supplies for service for warranty i...

Страница 8: ...ean regions are listed below Country Country code Helpline number Australia 61 3 9350 1222 Hong Kong 85 2 2564 9333 Indonesia 81 3 5488 2001 Korea 82 2 708 5400 Malaysia 60 3 757 2722 Philippines 63 2 815 8851 Singapore 65 473 6611 Thailand 66 2 271 3040 Taiwan 88 6 2 895 1580 Belgium 32 2 263 2211 Denmark 45 70 157000 Finland 358 9 584 071 France 33 1 400 13000 Germany 49 711 406 0000 Italy 39 2 ...

Страница 9: ...ecent printing software for the printers access the Kodak home page on the World Wide Web at http www kodak com and click on Service and Support Click on Drivers Software and Firmware and select your printer type from the drop down list Netherlands 31 3065 99911 Norway 47 66 81 81 81 Spain 34 1 626 7101 Sweden 46 8 580 23500 UK 44 2 845122 Country Country code Helpline number ...

Страница 10: ...familiar with Microsoft Windows operation and terminology To install the driver 1 Install the CD in the CD drive on your PC 2 Open the Windows Explorer 3 Browse to the drive containing the CD 4 Double click on Setup32 exe to launch the CD s browser 5 Click anywhere in the CD s splash screen to begin 6 Click on your language 7 Click on Printing Software in the Software Installations window 8 Follow...

Страница 11: ...ter Driver For a final cleanup after you remove the printer driver you can delete the Kodak SCSI port monitor 1 Click Start 2 Select Settings Control Panel 3 Double click the Add Remove Programs icon 4 Select Kodak SCSI Printer Port in the Add Remove Programs Properties dialog box that opens 5 Click Add Remove ...

Страница 12: ... printer 8660 printer from your host computer with Microsoft Windows 95 98 NOTE This section shows Windows 95 98 dialog boxes with the 8660 printer The dialog boxes for Windows 95 98 with the 8650 printer look similar and have identical functionality Hardware and Software Requirements We recommend that you have the following hardware and software to use the printer driver 266 MHz Pentium processor...

Страница 13: ...e printer driver you need to select the printer port that the driver will use To select the port 1 From the Start menu select Settings Printers 2 Double click on the icon for the printer 3 From the Printer menu select Properties 4 Select the Details tab in the Printer Properties dialog box that opens 5 Select the port to which the printer is connected the appropriate printer driver ...

Страница 14: ...ialog box For a description of the available options refer to Option Descriptions Accessing the Printer Properties Dialog Box 1 From your application select Print from the File menu 2 Click Properties in the Print dialog box NOTE In some applications click Setup to access the Printer Properties dialog box 3 Make your options selections from the tabs in the dialog box 4 Click Print in your applicat...

Страница 15: ... more 3 5x5 in prints and a number of wallet size prints depending upon the paper size selected on a single page NOTE The print sizes may not be exact because of the height to width ratio of the document page To fill the entire print area you may need to resize the document page to match the package s largest document page size in an application such as Adobe Photoshop You can select from several ...

Страница 16: ...st results make sure that the document page you wish to print in package format is the same size as the largest document page in the package For example if you select the package 5 x 7 in and 3 5 x 5 in and Wallets your original document page should be 5 x 7 in If necessary resize the document page in an application such as Adobe Photoshop before printing ...

Страница 17: ... orientation of your document page 3 Select the package you wish to use from the Package list The Layout Package window displays the number of document pages and the layout of the package on the printable area on the page If the package does not fit on the page a message appears indicating that you should select a larger page size NOTE When you use package printing the Paper size list in your appl...

Страница 18: ... preview of it on the Logo tab IMPORTANT The logo file must be either a TIFF or a bitmap To use the logo option 1 Click the Logo tab 2 Check the Use Logo checkbox 3 Click Browse and locate the file for the logo When you select the logo a thumbnail image of the logo appears next to the Preview window 4 Make your logo option selections For more information on the options on the Logo tab refer to Opt...

Страница 19: ...s you to match the colors in your input device such as your computer monitor with the colors in your output device the printer You create color connector files that store color management information specific to the input and output devices Select this file from the printer driver to apply it to your print job Refer to Using Color Management for instructions on how to use color connector Color Man...

Страница 20: ...nt options 1 Click the Color Mode tab 2 Select your color management option in the Color control mode group box Refer to Options on the Color Mode Tab for information on the options on the Color Mode tab NOTE If you are using the Windows ICM color management you can select a rendering intent that best matches your print job 3 Click Advanced to access the Advanced Color dialog box ...

Страница 21: ...s for the settings to fine tune the color in your document page If necessary refer to Options on the Advanced Color Dialog Box 5 If desired click Save to save your settings to a file NOTE To apply the settings you saved to a document page click Load Locate the file with the saved settings in the open file dialog box that opens 6 Click OK ...

Страница 22: ...the Media Tab You can select the following options on the Media tab Ribbon type allows you to select the ribbon to be used for the print job Paper type allows you to select the paper type to be used for the print job NOTE Refer to Working with Media in the operator s guides for the 8650 and 8660 printers for a complete listing of paper ribbon and image sizes This information is also included on th...

Страница 23: ...rom None Normal or High image enhancement to improve the sharpness of the document page Current Color Management Settings box lists the selection you made for color management on the Color Mode tab About lists the software version of the printer driver OK saves your selections and closes the dialog box Cancel cancels your selections and closes the dialog box Apply saves your selections without clo...

Страница 24: ...ows you to print multiple pages of a document on a single page Mirror reverses the document page producing a mirror image Portrait vertically orients the document page on the page Landscape horizontally orients the document page NOTE If you make a change to your orientation selection that change will not be visible in the Preview window until you make another print Rotate 180 rotates the document ...

Страница 25: ...sing Color Management Using the Printer Driver Preview window shows a proportional model of your printed page OK saves your selections and closes the dialog box Cancel cancels your selections and closes the dialog box Apply saves your selections without closing the dialog box ...

Страница 26: ...acity of the logo Scaling enter a value from 1 to 400 to increase or decrease the size of the logo Horizontal position enter a value from 25 to 25 to move the logo in from the left edge of the imageable area of the page Vertical position enter a value from 25 to 25 to move the logo from the bottom to the top of the imageable area Preview Window shows a proportional model of your printed page OK sa...

Страница 27: ...olor Mode tab allows you to select your color management option color control mode Choose from No color control Printer s Default Color Kodak Colorflow color connector Color management windows ICM Refer to Color Management Options for a description of these options When you select one of the color management options the options on the Color Mode tab change ...

Страница 28: ...lor Mode When you select Printer s Default Color the Color Mode tab changes to include Advanced allows you to access the Color Adjust tab where you can fine tune the color of your document pages OK saves your selections and closes the dialog box Cancel cancels your selections and closes the dialog box Apply saves your selections without closing the dialog box ...

Страница 29: ...locate a file that contains the color connector files Description contains the description text that you entered in the color connector file Connector file rendering settings lists any rendering intents that you selected for your color connector file Advanced allows you to access the Advanced Color dialog box where you can fine tune the color of your document pages OK saves your selections and clo...

Страница 30: ...ng intent select the rendering intent that best matches your job Select Saturation for presentation graphics Contrast for photographic images Colorimetric for matching a particular color Advanced allows you to access the Advanced Color dialog box where you can fine tune the color of your document pages OK saves your selections and closes the dialog box Cancel cancels your selections and closes the...

Страница 31: ...ment page before you adjust any of the advanced color options Preview Window shows a proportional model of your printed page Brightness adjusts the relative lightness or darkness of the color usually measured as a percentage from 0 black to 100 white Contrast adjusts the relationship between the document page s light areas mid tones and dark areas Saturation adjusts the strength or purity of the c...

Страница 32: ...nnel Blue adjusts the document page s blue channel Reset resets all the settings to 0 Load opens an open file dialog box that allows you to locate a document that contains saved settings you can apply to the current document page Save opens a save dialog box that allows you to save the settings to a file OK accepts your changes and closed the dialog box Cancel discards your changes and closes the ...

Страница 33: ...nector that you can install on your host computer Color Connector The colors you see on your computer monitor may appear differently from the colors in the output from your printer In addition the colors in your monitor and output from your printer may appear differently from your original image White clouds in a scanned photograph may look yellow on your monitor and change to a greenish tint on y...

Страница 34: ...r output device such as the 8650 or 8660 printers Creating Color Connector Files You create color connector files by extracting source transforms simulation transforms and destination transforms from ICC profiles These transforms are represented as puzzle pieces Drag each selected puzzle piece to an empty socket in the color connector template for your job Each type of transform is represented by ...

Страница 35: ...nal thermal printers that use different ribbon and media combinations The dialog boxes for color connector software used with the 8650 and 8660 printers look similar and have identical functionality System Requirements Listed below are the hardware and software necessary to run color connector Windows Systems 60 MHz Pentium processor with a minimum of 16 MB of memory A 100 MHz Pentium processor wi...

Страница 36: ...connector files is contained in the ICC profiles The profiles an industry standard format for color management are defined by the International Color Consortium They contain multiple pieces of color information for input output and display devices This information is individually extracted from the profiles and appears as puzzle pieces in the Transforms list box in the color connector window ...

Страница 37: ...river Using Color Management Using the Printer Driver Steps to Create Color Connector Files Run color connector application Select and drag transforms to template Select desired color connector options Save the color connector file Print using the color connector file ...

Страница 38: ...the Driver Using Color Management Using the Printer Driver Color Connector Window When you access the color connector application the color connector window appears From this window you can create your color connector files Options Transforms List Template Sockets ...

Страница 39: ... The following steps describe how to get started with color connector 1 Install the software for color connector and the printer driver The software is included on the CD that came with your printer NOTE Before you use color connector for the first time you may wish to complete the tutorial that is included on the CD 2 Start the color connector application ...

Страница 40: ...Driver Using Color Management Using the Printer Driver The color connector window appears 3 Pull down the File menu and select Preferences Set any of the desired preferences options Follow the procedures on the following screens to build your own color connector files ...

Страница 41: ...e ICC Profiles Drag the pieces to the appropriate Source Transforms sockets in the template on the right side of the color connector window The template has six sockets for source transforms You can apply independent color management to up to six different kinds of sources in one job RGB CMY and grayscale pixel images such as TIFF files or scanned photographs RGB CMY and grayscale graphic images s...

Страница 42: ...ppears in its socket indicating that the minimum requirement for source transforms is complete NOTE If you wish to change the transform you placed in the socket select a new transform and drag it to the socket It replaces the previously selected transform To delete a transform from a color connector socket select the transform pull down the Transforms menu and select Delete Transform on Windows sy...

Страница 43: ...st of transforms and select a destination transform that matches your output device Drag the green puzzle piece for the destination transform to the Destination Transform socket in the color connector template The destination puzzle piece then appears over its place holder indicating that the requirement for a destination transform is complete ...

Страница 44: ...rm from the Transforms list is optional For instructions on using the Simulation option refer to Simulating Another Output Device 4 You may enter a description of the color connector file you created in the Connector file description box Entering a description will help you to identify the file when printing 5 Pull down the File menu and select Save ...

Страница 45: ...our printer NOTE Monitors vary with model age and manufacturer For optimum results make sure that the ICC Profile for your specific monitor model is in the Transforms list Your monitor should be calibrated Refer to the documentation that came with your monitor for instructions on how to calibrate it 1 In the Connector file options box make your selection for Gamut alarm Refer to Using Gamut Alarm ...

Страница 46: ...g Color Management Using the Printer Driver 2 From the Transforms list select a pink triangle puzzle piece that matches the name of your monitor 3 Drag and drop the pink triangle puzzle piece to the appropriate Source Transforms socket The piece appears in the RGB or Gray socket ...

Страница 47: ...h to add a simulation transform to the template so that the job matches the output from another printing system refer to Simulating Another Output Device 4 From the Transforms list select a green puzzle piece that matches your output device and media combination 5 Drag and drop the green puzzle piece to the Destination Transform socket ...

Страница 48: ...ed a destination transform that was extracted from an ICC Profile other than one that came with the printer the Select Printer dialog box appears Use the Printer model pull down list to select the model of the printer you are using Click on OK A dialog box similar to the one below appears that allows you to select the media for the printer ...

Страница 49: ... Setup screen may appear differently depending on the printer you are using Make your media choices Click on OK 6 You may enter a description of the color connector file you created in the Connector file description box Entering a description will help you to identify the file when printing 7 Pull down the File menu and select Save ...

Страница 50: ... of source transforms RGB CMY and grayscale pixel images such as TIFF files or scanned photographs RGB CMY and grayscale graphic objects such as EPS files or text You cannot apply color management to multiple images from different sources in the same color space For example you cannot apply color management separately to two pixel RGB images 1 In the Connector file options box make your selection ...

Страница 51: ...Transforms list select the pink puzzle pieces that match the images or objects to which you wish to apply color management NOTE Make sure that the images or objects you select have not had any previous color management applied to them If your file contains a source that uses PANTONE Color leave the socket empty for that color space ...

Страница 52: ...he appropriate sockets in the Source Transforms section of the template NOTE If you wish to add a simulation transform to the template so that the job matches the output from another printing system refer to Simulating Another Output Device 4 From the Transforms list select a green arrowhead shaped puzzle piece that matches your output device and media combination ...

Страница 53: ...inting Guide CONTENTS INDEX SEARCH HELP Overview Installing the Driver Using Color Management Using the Printer Driver 5 Drag and drop the puzzle piece to the Destination Transform socket in the template ...

Страница 54: ...orm that was extracted from an ICC Profile other than one that came with the printer click on Select in the Printer setup portion of the color connector window The Select Printer Model dialog box appears Use the Printer model pull down list to select the printer model A dialog box similar to the one below appears allowing you to select the media for the printer ...

Страница 55: ...alog box may appear differently depending on the printer you are using 6 Select the correct media for the printer Click on OK 7 You may enter a description of the color connector file you created in the Connector file description box Entering a description will help you to identify the file when printing 8 Pull down the File menu and select Save ...

Страница 56: ...ing systems such as SWOP or Euroscale 1 In the Connector file options box select Use simulation 2 Create a color connector file by selecting and dragging the appropriate source and destination transform puzzle pieces to the template To create a color connector file that matches your monitor to the printer s output refer to Matching Your Monitor to Your Printer s Output To create a color connector ...

Страница 57: ... the Driver Using Color Management Using the Printer Driver 3 From the Transforms list select a yellow puzzle piece that matches the name of the output device you wish to simulate 4 Drag and drop the puzzle piece in the Simulation Transform socket of the template ...

Страница 58: ...alarm is a feature that allows you to determine if the simulation or destination devices you selected for your connector file are capable of accurately reproducing the colors of the previous device When you select one of the gamut alarm modes any areas of your image that are out of gamut are printed in black All other areas are printed in white ...

Страница 59: ...select either Simulation to determine if the colors of the source transform are out of the gamut of the simulation device or Destination to determine if the colors of the simulation or source device are out of the gamut of the destination device NOTE To use gamut alarm in the Simulation mode be sure to select the Use simulation check box 2 Create your color connector file Refer to Color Managing M...

Страница 60: ...duce that color The color must be represented by another color that is close to the desired color Rendering intents determine how out of gamut colors are substituted Automatic Rendering You can let color connector set Rendering for you by selecting one of the automatic settings from the Rendering drop down list box The automatic settings set rendering intents for the individual transforms by compa...

Страница 61: ...ll down the Rendering drop down list and select either Auto Photographic for scanned photographs Color connector attempts to maintain the correct hue by adjusting the color saturation for the out of gamut colors or Auto Presentation for computer generated graphics charts graphics Color connector tries to maintain saturation at the expense of the correct hue for the out of gamut colors ...

Страница 62: ...set custom rendering for more than one puzzle piece in the template you need to repeat this procedure for each piece 1 Pull down the Rendering drop down list box and select Custom 2 Build the connector file you need for your job Refer to Color Managing Multiple Sources 3 Double click on the source or simulation puzzle piece in the color connector socket in the template for which you wish to set cu...

Страница 63: ...he Printer Driver The Transform Information dialog box appears A Recommendation box gives you two recommended settings based on a comparison of gamuts If you select a different rendering intent the Effect box changes to describe the expected results 4 Select a rendering intent from the following options ...

Страница 64: ...esses the gamut of the image while maximizing the color saturation Use this rendering intent for presentation graphics Relative Colorimetric compresses the gamut of the image for brightness and clips the gamut for color Use this rendering intent when you wish to match a particular color Absolute Colorimetric Clips the gamut of the image Use this rendering intent when you wish to match a particular...

Страница 65: ...nnector file as a DeviceLink profile so that it can be used with other color management applications NOTE The color connector file that you export as a DeviceLink profile can contain only one source transform 1 From the File menu select Export As ICC DeviceLink Profile 2 In the dialog box that appears enter a name for the color connector file Select the folder where you want the file to reside 3 C...

Страница 66: ...about automatic rendering gamut alarm rendering intents About option on Media property page absolute colorimetric rendering adding simulation transforms to the template adjusting color representation in out of gamut areas Advanced option on the Kodak Color property page applying color management to source transforms automatic rendering about setting intents B brightness option on Advanced Color pr...

Страница 67: ... color connector about color management options connecting files creating files deleting files exporting to the printer as a default getting ready to use memory locations in printers system requirements using window color inconsistencies color management color connector options features color management options using color managing multiple source images on a single page multiple sources color ren...

Страница 68: ... default connector file rendering settings option on Kodak Color tab contrast option on Advanced Color property page creating color connector files about color connector files prcoedure current color management settings box option on Media property page custom rendering about setting D default color deleting color connector files transforms in sockets destination gamut alarm transforms E exporting...

Страница 69: ...INDEX exporting color connector to the printer as a default extracting transforms F FAX back number features color management G gamut alarm about destination setting simulation using in the simulation mode getting ready to use color connector H help getting from Kodak dealer from Kodak home page from outside of the US horizontal position option on Logo property page ...

Страница 70: ... profile exporting a color connector file ICC profiles image color management inconsistencies color information about Kodak products K Kodak raster language L logo adding M Macintosh systems selecting a printer matching monitor to printer s output memory location in printer mirror Layout property page option monitor calibrating matching to printer s output multiple sources color managing ...

Страница 71: ...al option on Advanced Color property page out of gamut areas adjusting color representation output device simulating P package printing preformatted packages using package option on Layout property page paper size option on Media property page paper type option on Media property page perceptual rendering port selecting preparing to use color connector preview window print layout option on Layout p...

Страница 72: ...s 95 print preview printer default exporting a color connector file printer driver features hardware and software requirements for installing printer selection Macintosh printer setup screen product literature R raster path relative colorimetric rendering rendering absolute colorimetric automatic custom perceptual relative colorimetric saturation rendering intents about setting ...

Страница 73: ...ion S saturation rendering scaling option on Layout property page scaling option on Logo property page selecting Macintosh printer sending connector files to the printer to save as default service calling for setting automatic rendering intents custom rendering gamut alarm rendering intents sharpen option on Media property page simulating another output device simulation gamut alarm transforms soc...

Страница 74: ...pplying color management steps to create color connector files supplies obtaining system requirements for color connector T technical support templates adding simulation transforms transform information window transforms deleting from sockets extracting sockets types U use logo option on Logo property page using color connector gamut alarm in the simulation mode print options for Windows 95 ...

Страница 75: ...ng the Printer Driver A B C D E F G H I J K L M N O P Q R S T U V W X Y Z INDEX V vertical position option on Logo property page W warranty information windows Color Connector Transform Information Windows systems system requirements for color connector X XtraLife option on Media property page ...

Отзывы: