


4.2.7 Configuration
The ‘Configuration’ tab allows you to change the logging location. Select a location that has sufficient space. The default location
is: C:\SOLYS\Logging, but can be changed by clicking on the map icon on the right.
Default logging is on, but can be switched off with the check box. In case multiple SOLYS’s are connected a logging file is created
for each SOLYS. For Ethernet connection the file name shows the SOLYS name plus date (e.g.: LogInfo_Solys-
GD140003.26-02-2015.log). For COM port connection the file name shows the COM port plus date (e.g.: LogIn-
fo_COM10.26-02-2015.log).
For both connections this file contains the following information for every second:
2015-02-26 11:29:42,429
computer logging date and time:
- .status=1;
Message type:
SolysGD140003;
SOLYS (network) name:
2015/02/26;
SOLYS,
date
10:32:17;
SOLYS, time
156.896621;
Solar Azimuth angle
63.285995;
Solar Zenith angle
156.896652;
SOLYS axis azimuth angle
63.285976;
SOLYS axis zenith angle
51.996799;
Lattitude (degrees, North positive)
4.386190;
Longitude (degrees, East positive)
999.40;
Estimated air pressure in millibar, based on altitude
0x012;
Status
code
0x0001BA34;
Instrument status
0x210B;
Azimuth motor status
0x210B;
Zenith motor status
0x4F69;
Checksum
See Appendix E.2.3. for detailed explanation of the status codes.
Tracking Status
Instrument Status
Configuration
Browser
Serial Setting
Logging
File location
Logging
C:\Solys\Logging
COM10
69
Содержание SOLYS Gear Drive
Страница 1: ...SOLYS2 Sun Tracker SOLYS Gear Drive Sun Tracker Instruction Manual...
Страница 2: ...2...
Страница 4: ...4...
Страница 6: ...6...
Страница 10: ...10...
Страница 38: ...Figure 3 12 Mounting the sun sensor M5 locking nut 3x Shoulder washer 6x Compression spring 3x Sun Sensor 38...
Страница 39: ...Figure 3 13 Adjustment of the sun sensor 21 0 5 mm 3x 39...
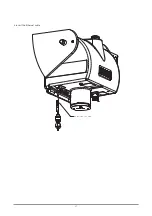
Страница 61: ...6 Insert the Ethernet cable Contacts on this side 61...
Страница 78: ...78...
Страница 80: ...80...
Страница 86: ...86...
Страница 88: ...88...
Страница 112: ......


